Page is loading ...

Model:P16LCDD
4:3 DIGITAL LCD-TV-Monitor
15” LCD TELEVISION BUILT-IN DVD PLAYER
OPERATING MANUAL
www.pyleaudio.com

- 1 -
CONTENTS
1. PREFACE...............................................................…....................…...............…………….
2. SAFETY PRECAUTIONS....................................................................................…………
3. FRONT, BACK, CONNECTIONS OF LCD......................………………………………..
4. TV INSTALLATION GUIDE................................................................…………………...
4.1 CONNECTION ANTENNAS....................................………………………………...…..
4.2 AV VIDEO INPUT DRAWING............…....…….....…….....….....….….…….….....
4.3 S-VIDEO INPUT DRAWING...............................................................…..……….….
4.4 PC (VGA) CONNEXION DRAWING …………………………………………….……….
5. CONFIGURATION OF THE LCD...........................……………………………………..
5.1 PICTURE SETTING.....................…………………………………………………...…...
5.2 AUDIO SETTING……………………………………………………………………………………
5.3 SOURCE SETTING………………………………………………………………………………….
5.4 TV PROGRAMMER SEARCH...............................................……………..…..…...…..….
6. TV / DVD COMBO REMOTE CONTROL...........………………………………………
A.Remote control instructions in TV mode…………………………………..
B. Remote control instructions in DVD mode…………………………………
7. REMOTE CONTROLS SETUP...................................…………………………………..
7.1 Battery Usage Caution:............................................................…..……………..….…..
8. ACCESSORIES......................................................................................……….…….……
9.. THE DVD SETUP MENU SYSTEM...............…………………………………………….
9.1 General Steps of Setup Menu.................………………………………………...…….
9.2 Setup Items Introduction...............………………………………………………..……
9.2.1 SYSTEM SETUP..............………………………………………….....……………
9.2.2 AUDIO SETUP............................…………………………………………………....
3
4
5
7
7
7
7
8
9
9
9
10
10
11
12
12
13
13
13
14
14
15
15
19

- 2 -
9.2.3 VIDEO SETUP....................…………………………………………………………..
9.2.4 SPEAKER SETUP..............................………………………………………………
9.2.5 DIGITAL SETUP …………………………………………………………………….
10 PLAYING MP3 AND JPEG DISCS……………………………………………………….
11 TROUBLESHOOTING AND ADVICE .................................…......…...………………...
12 SPECIFICATIONS......................................................……………………………………..
20
21
22
23
25
26

- 3 -
1 PREFACE
Thank you for buying this TV ! Please read this manual thoroughly before operating the
monitor. Make sure the monitor was not damaged in transit. Should the monitor is
damaged, do no install it and contact your dealer. Check that you have all the accessories
according to the model.
2 SAFETY PRECAUTIONS
Preparation
Put the monitor on a stable surface.
Do not use the monitor with others fixations than those provided or
suggested by the manufacturer.
Do not place any material on the monitor.
Do not block or cover the ventilation openings on the monitor
If you have a wall mount, check that it is steady
Power source
The monitor must be plugged with a tension source of 110 volts and
60 Hz.
Connexion cables
Power cord and cables must be properly routed and protected to
prevent people from stepping on them and causing the monitor to
fall.

- 4 -
Heating sources and humidity
Keep the monitor dry and away from humidity.
Keep the monitor away from heat sources
Cleaning and maintenance
Unplug the monitor before cleaning it. Do not use solvents or liquids
to clean the monitor.
Only clean the monitor with a soft and dry cloth.
In case of troubleshooting, do not use spare parts other than those
suggested by the manufacturer. Using inadequate spare parts can lead
to electric shocks, short-circuits fire or other incidents.
Departure in holidays
Unplug the LCD during lighting storms or when unused for long
periods of time.

- 5 -
3 Front , Back , Connexions of LCD
Front View
Back View and Control Connections

- 6 -
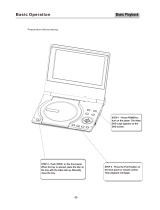
Side View
DVD Player Control
DVD Function Keys
: PLAY / PAUSE
: STOP
: NEXT TRACK
: PREVIOUS TRACK
: EJECT DISK BUTTON
Disc Slot inside
(Label side toward user)

- 7 -
4. TV INSTALLTION DRAWINGS
4.1 CONNECTION ANTENNAS
To ensure good picture and sound, TV antenna system needs to be installed. The antenna
system as shown can be sourced from TV equipment shops, which will provide service
for correct installation and connection. After installation, insert the 75-ohm antenna plug
into the antenna jack as shown.In case of signal of closed circuit TV,
4.2 .VIDEO connection
4.3 S-Video connection

- 8 -
4.4 PC INPUT connection
VG A PC Audio

- 9 -
5 CONFIGURATION OF THE LCD
5.1 PICTURE SETTING
Press <SYS MENU> key until the screen displays as below.
a) Press ► key to access image adjusting programmer. Press ▲ or ▼ key to select
Picture Mode, Brightness, Contrast, Saturation ,Sharpness and Hue for required
adjusting option.
b) Press ◄ or ► key to adjust the setting selected.
5.2 AUDIO SETTING
Press <SYS MENU> KEY until the screen displays as below.
a) Press ► key enter into audio menu press ▲ or ▼ key to select Sound Mode, Volume,
Bass, Treble and Balance for required adjusting option.
b) Press ◄ or ► key to adjust the setting selected.

- 10 -
5.3 SOURCE SETTING
Press <SYS MENU> key until the screen displays as below.
a) Press ► key to access Language –Blue Screen –C.capion—Parent CTRL—Color
temp—ONR—Reset menu setting.
b) Press ▲ or ▼ key to select exact menu setting.
RGB for input source
a) Press ▲ or ▼ key to access OSD <Language>, select suitable language as you like.
b) Press ▲ or ▼ key to access <Reset >, it will come back to original factory setting.
If you have problems for the TV, pls use <Reset> menu help you to back to factory
setting.
5.4 TV CHANNEL SEARCH
. Press <SYS MENU> key until the screen displays as below.
a) Press ► key to access Auto Tune – Fine Tune – Add/Erase –Source setting.
b) Press ▲ or ▼ key to select exact menu setting.
c) Press ▲ or ▼ key to select <Auto Scan> or <Fine Tune > menu to adjust the TV.
d) Press ▲ or ▼ key to access <add/Erase> to add or Erase the channel.
For the first time use the TV, please choose the correct color system and sound
system of country. After that, choose the auto scan to start searching the TV channel.

- 11 -
6 TV / DVD COMBO REMOTE CONTROL

- 12 -
A. Remote control instructions in TV mode
1 Automatic Switch off
2 Sound switch off
3 Standby button
4 TV- CVBS -SVIDEO- DVD- PC
5 Number Buttons
7 CCD
9 Access to one / two-Digit channel selection
10 System setting menu button
11 Previous CHANNEL
12 Picture mode selection
13 Audio mode selection
14 Channel control and menu adjustment button
15 Volume decrease button
16 Volume Increase button
20 Display control menu
B. Remote control instructions in DVD mode
6 To eject the disc
7 Pause/Play
8 To stop the disc
17 Access to menu in DVD Disc
18 Access to settings in DVD mode
19 Return to the previous screen
20 Display control menu
21 Locating a title
22 Access to subtitles
23 Search disc chapter and time
24 Zoom the picture in DVD Disc
25 Access to menu list, select chapter
26 PBC control for VCD 2.0 format disc
27 Preview the multi-pictures for VCD format disc
28 Selecting language
29 Slow key
30 Repeat the chapter or all chapter that we select
31 Select movie vision angle
32 Replaying point A to point B when selected
33 Fast forward key
34 Jump to previous track
35 Fast backward key
36 Jump to next track

- 13 -
7 REMOTE CONTROLS SETUP
a) Open the cover
b) AA size batteries, When inserting the batteries, make sure correct polarities as
per”+“and ”-“marks on the batteries and within the battery compartment
c) Replace the battery cover
7.1 Battery Usage Caution:
To prevent battery leakage which may result in bodily injury or damage to the remote:
1. Install all batteries correctly, and as marked on the remote control.
2. Do not mix batteries:(OLD and NEW or CARBON and ALKALINE, etc)
3. Remove batteries when the remote is not used for a long time.
8 ACCESSORIES
1. Adapter Plug
2. One Remote Control
3. 2 Batteries 1.5V
4. One User Manual
5. AV Cable

- 14 -
9. THE DVD SETUP MENU SYSTEM
9.1 General Steps of Setup Menu
a) Press the Setup button, the main setup menu appears.
z When the main menu displayed, the DVD system will auto pause.
b) Press the Left and Right arrow buttons to highlight the icon of the desired page, then press
the Down or Right arrow button to activate that page; For example, if you want to setup the
video page, press Right to highlight the video icon, the video page will be displayed on the
screen.
c) Press the Down arrow button to highlight the desired option. Press Enter or press Right to
select, the choices of that option appear on the right; For example, press the Down arrow
button to highlight the BRIGHTNESS option, then press Enter to select, the brightness
choices appear on the rig

- 15 -
d) Press the Arrow buttons to highlight the Exit Setup option, then press Enter or Setup again
to exit Setup Menu.
Notes:
z When setup, the pressing of the following buttons will turn off the setup menu, while the
choices that have been changed will be saved: P / N, Subtitle, F.F, F.R, Vol +/-, PBC, Title,
Return, Play, Stop, Resume, Pause / Step, Next, Prev, S.F, S.R, Zoom, Preview, Goto,
Program, Repeat, A-B, Angle, language, Soundtrack, 3D, Record, Display, Mute, Setup.
9.2 Setup Items Introduction
9.2.1 SYSTEM SETUP
The system setup options are illustrated below:
TV SYSTEM
According to the Color System of the TV, you can choose the TV System.
z AUTO: Choose this settings if your DVD player is connected to a multi-system TV.
z NTSC: Choose this settings if your DVD player is connected to a NTSC TV.
z PAL: Choose this settings if your DVD player is connected to a PAL TV.
The default setting is NTSC.

- 16 -
SCREEN SAVER
If the screen saver is on, when your DVD player is in Stop, Open, or No Disc state, or there
is a frame frozen for more than 60sec, the screen saver will be displayed. This feature can protect
the screen from damage.
z ON: Choose this setting to activate the screen saver.
z OFF: Choose this setting to cancel the screen saver
The default setting is ON.
TV TYPE
z 16 : 9 (Wide Screen): Choose this setting if your DVD player is connected to a wide
screen TV. If you choose this setting and you don’t have a wide screen TV, the images
on the screen may appear distorted due to vertical compression.
z 4 : 3 LB (Letter Box): Choosing this setting if your DVD player is connected to a
normal ratio TV. connector You’ll see the movies in their original aspect ratio
(height-to-width ratio). You’ll see the entire frame of the movie, but it will take up a
smaller portion of the screen vertically. The movie might appear with black bars at the
top and bottom of the screen.
z 4 : 3 PS (Pan & Scan): Choosing this setting if your DVD player is connected to a
normal ratio TV. You can fill the movie to the entire screen of your TV. This might
mean that parts of the picture (the left and right edges) won’t be seen.
Notes:
z The image display ratio is related to the recorded disc format. Some disc can not
display images in the aspect ratio you choose.

- 17 -
z If you play a disc recorded in 4:3 format on a wide screen TV, black bars will appear
on the left and right side of the screen.
z You must adjust the screen setting depending on the type of the television you have.
PASSWORD
The password option is initialized locked, and you cannot set the ratings limit or change
the password. In order for the Ratings feature work, the password mode must be turned on.
If you want to set the ratings limit, you will need to enter the default password, which is
0000, then press Enter to confirm. To change the password, you will be prompted for the old
password, then be prompted for a new. Enter a 4-digit number (this is your password).
RATING
The Rating feature is a rating limit system, like movie ratings. It works with DVD discs
that have been assigned a rating. This helps you control the types of DVDs that your family
watches.
z There are multi- rating options: 1.KID SAFE. 2. G. 3. PG. 4.PGB. 5.PG-R.
6.R..7.NG-17. 8.ADULT
z Select the VIEW ALL option to cancel the rating limit.
Notes:
z If the password option is locked, you cannot set the ratings limit; the rating limit doe
not work when the password option unlocked.

- 18 -
Highlight the AUDIO LANG option, and press the Arrow buttons to choose the audio
language you prefer. Press Enter to confirm. If the disc you are playing has that language
available, it will output audio in that language; There are multi- optional audio languages:
Chinese, English, Japan, French, Spanish, Portuguese, German and Latin.
Highlight the SUBTITLE LANG option, and press the Arrow buttons to choose the subtitle
language you prefer. Press Enter to confirm. If the disc you are playing has that language
available, it will displays subtitles in that language; There are multi- optional audio
languages: Chinese, English, Japan, French, Spanish, Portuguese, German, and Off.

- 19 -
Highlight the MENU LANG option, and press the Arrow buttons to choose the menu
language you prefer. Press Enter to confirm. If the disc you are playing has that language
available, it will displays menu in that language; There are multi- optional menu languages:
Chinese, English, Japan, French, Spanish, Portuguese, German, and Latin.
Notes:
z If your preferred language isn’t available, the disc’s default language will be played.
z The default language of your DVD player is Chinese.
NOTE:
AUDIO OUT ONLY USE FOR THE MACHINE WITH Coaxial & Optical output.
9.2.2 AUDIO SETUP
The audio setup options are illustrated below:
Highlight the AUDIO OUT option, and press the Arrow buttons to choose the audio output
mode you prefer. Press Enter to confirm; There are 3 optional audio output modes: ANALOG,
SPDIF / RAW, and SPDIF/ PCM.
z ANALOG: From the Coaxial Output jack and the Optical Output jack, no signal is
output.
z SPDIF/ RAW: Choose this setting if your DVD player is connected to a power
amplifier with a coaxial cable or an optical cable; When playing a disc recorded with
Dolby Digital, DTS and MPEG audio formats, the corresponding digital signals will be
output from the Coaxial Output jack or Optical Output jack. This player’s digital output
jacks are designed for a connection to a Dolby Digital, DTS , or MPEG receiver or
decoder.
z SPDIF / PCM: Choose this setting if your DVD player is connected to a 2-channel
digital stereo amplifier; When playing a disc recorded with Dolby Digital and MPEG
audio formats, audio signals will be modulated into a 2-channel PCM signal, and it will
be output from the Coaxial Output jack or Optical Output jack.
Notes:
AUDIO OUT function be same with coaxial/optical model only..
/