
49-40786-3 01-19 GEA
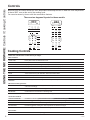
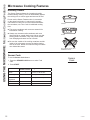
Write the model and serial numbers here:
Model # _______________________________
Serial # _______________________________
You can find them on a label under the cooktop.
English • Español
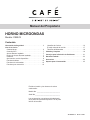
Owner's Manual
MICROWAVE OVEN
Model: CEB515
Contents
Safety Information ...............................3
Using the Microwave
Features ......................................6
Wifi Connect ...................................7
Remote Enable ................................7
Remote Enabled Equipment ......................7
Controls ......................................8
Available Cooking Options ........................9
Basic Features ................................10
Microwave Features ...........................12
Convection Features ...........................14
Cookware tips ................................16
Best Method of Cooking .........................17
Microwave Terms ..............................18
Care And Cleaning .............................19
Toubleshooting ................................21
Limited Warranty ...............................23
Acessories ....................................24
Consumer Support .............................25
TM

2 49-40786-3
THANK YOU FOR MAKING CAFÉ A PART OF YOUR HOME.
We take pride in the craftsmanship, innovation and design that goes into every Café product, and
we think you will too. Among other things, registration of your appliance ensures that we can deliver
important product information and warranty details when you need them.
Register your Café appliance now online. Helpful websites are available in the Consumer Support
section of this Owner’s Manual. You may also mail in the pre-printed registration card included in the
packing material.

49-40786-3 3
READ AND SAVE THESE INSTRUCTIONS
IMPORTANT SAFETY INFORMATION
READ ALL INSTRUCTIONS BEFORE USING THE APPLIANCE
SAFETY INFORMATION
WARNING
To reduce the risk of burns, electric shock, fire, injury to persons, or exposure to
excessive microwave energy:
When using electrical appliances, basic safety precautions should be followed, including the following:
Ŷ 5HDGDOOLQVWUXFWLRQVEHIRUHXVLQJWKHDSSOLDQFH
Ŷ 5HDGDQGIROORZWKHVSHFLILFSUHFDXWLRQVLQWKH
PRECAUTIONS TO AVOID POSSIBLE EXPOSURE
TO EXCESSIVE MICROWAVE ENERGY section on
page 5.
Ŷ 8VHWKLVDSSOLDQFHRQO\IRULWVLQWHQGHGXVHDVGHVFULEHG
in this manual. Do not use corrosive chemicals or
vapors in this appliance. This microwave oven is
specifically designed to heat, dry or cook food, and is
not intended for laboratory or industrial use.
Ŷ This microwave should be serviced only by qualified
service personnel. Contact nearest authorized service
facility for examination, repair, or adjustment.
INSTALLATION
Ŷ This product is to be used 3 feet above floor level.
Ŷ This appliance must be grounded. Connect only to
a properly grounded outlet. See the GROUNDING
INSTRUCTIONS section on page 5.
Ŷ Do not operate this appliance if it has a damaged power
cord or plug, if it is not working properly, or if it has been
damaged or dropped.
Ŷ Keep power cord away from heated surfaces.
Ŷ Do not let power cord hang over edge of table or
counter.
Ŷ Do not immerse power cord or plug in water.
Ŷ Do not block or cover any openings on the appliance.
Ŷ Be certain to place the front surface of the door 3” or
more back from the countertop edge to avoid accidental
tipping of the appliance in normal usage.
Ŷ Recommended clearances: 3 inches on each side, 3
inches on top and 1 inch in the rear.
Ŷ Do not store this appliance outdoors. Do not use this
product near water—for example, in a wet basement,
near a swimming pool, near a sink or in similar location.
FOR BUILT-IN INSTALLATION WITH AN APPROVED
KIT:
Ŷ Install or locate this appliance only in accordance with
the provided kit installation instructions.
Ŷ Do not mount this appliance over a sink.
Ŷ The kit and microwave are approved for installation
alone or above any single electric wall oven. Do not
mount adjacent (within 2 feet) to any range, cooktop,
gas oven, or other microwave.
TO REDUCE THE RISK OF FIRE IN THE OVEN CAVITY
Ŷ Do not overcook food. Carefully attend appliance when
paper, plastic or other combustible materials are placed
inside the oven while cooking.
ŶRemove wire twist-ties and metal handles from paper or
plastic containers before placing them in the oven.
ŶDo not store any materials, other than our
recommended accessories, in this oven when not in
use. Do not leave paper products, cooking utensils or
food in the cavity when not in use. Microwave rack
should be removed from oven when not in use.
ŶIf materials inside the oven ignite, keep the oven door
closed, turn the oven off and disconnect the power cord,
or shut off power at the fuse or circuit breaker panel.
ŶDo not operate the microwave without food in the oven.
TO REDUCE THE RISK OF BURNS
Ŷ Be careful when opening containers of hot food. Use
pot holders and direct steam away from face and hands.
Ŷ Vent, pierce, or slit containers, pouches, or plastic bags
to prevent build-up of pressure.
Ŷ Be careful when touching the turntable, door, or walls of
the oven which may become hot during use.
Ŷ Liquids and certain foods heated in the microwave oven
can present a risk of burn when removing them from the
microwave. The potential for a burn is greater in young
children, who should not be allowed to remove hot items
from the microwave.
OPERATING AND CLEANING
Ŷ As with any appliance, close supervision is
necessary when used by children.
Ŷ Do not store anything directly on top of the
microwave surface when the microwave oven is in
operation.
Ŷ Oversized food or oversized metal cookware
should not be used in a microwave/convection oven
because they increase the risk of electric shock and
could cause a fire.
Ŷ Do not clean with metal scouring pads. Pieces can
burn off the pad and touch electrical parts involving
risk of electric shock.
Ŷ Do not use paper products in oven when appliance
is operated in any cooking mode except microwave
only.
Ŷ Some products such as whole eggs and sealed
containers—for example, closed jars—are able to
explode and should not be heated in this microwave
oven.

4 49-40786-3
SAFETY INFORMATION
READ AND SAVE THESE INSTRUCTIONS
IMPORTANT SAFETY INFORMATION
READ ALL INSTRUCTIONS BEFORE USING THE APPLIANCE
WARNING
Continued
OPERATING AND CLEANING (continues)
Ŷ Do not cover the microwave rack or any part of the
oven with metal foil. This will cause overheating of
the microwave/convection oven.
Ŷ Cook meat and poultry thoroughly—meat to at least
an INTERNAL temperature of 160°F and poultry to at
least an INTERNAL temperature of 180°F. Cooking
to these temperatures usually protects against
foodborne illness.
Ŷ Make sure all cookware used in your microwave
oven is suitable for microwaving. Most glass
casseroles, cooking dishes, measuring cups, custard
cups, pottery or china dinnerware which does not
have metallic trim or glaze with a metallic sheen can
be used.in compliance with cookware manufacturers’
recommendations.
Ŷ It is important to keep the area clean where the
door seals against the microwave. Use only mild,
nonabrasive detergents applied with a clean sponge
or soft cloth. Rinse well.
SUPERHEATED WATER
Ŷ Liquids, such as water, coffee, or tea, are able to
be overheated beyond the boiling point without
appearing to be boiling. Visible bubbling or boiling
when the container is removed from the microwave
oven is not always present. THIS COULD RESULT
IN VERY HOT LIQUIDS SUDDENLY BOILING
OVER WHEN THE CONTAINER IS DISTURBED
OR A SPOON OR OTHER UTENSIL IS INSERTED
INTO THE LIQUID.
To reduce the risk of injury to persons:
Ŷ Do not overheat the liquid.
Ŷ Stir the liquid both before and halfway through
heating it.
Ŷ Do not use straight-sided containers with narrow
necks.
Ŷ After heating, allow the container to stand in the
microwave oven for a short time before removing the
container.
Ŷ Use extreme care when inserting a spoon or other
utensil into the container.
USE OF THE MICROWAVE RACK ACCESSORY
Ŷ Remove the microwave rack from the oven when not
in use.
Ŷ Use pot holders when handling the microwave rack
and cookware. They may be hot.
Ŷ Be sure that the microwave rack is positioned
properly inside the oven to prevent product damage.
Ŷ Do not use the rack in any microwave only model.
NOTICE: PACEMAKERS
Most pacemakers are shielded from interference from electronic products, including microwaves. However,
patients with pacemakers may wish to consult their physicians if they have concerns.

49-40786-3 5
READ AND SAVE THESE INSTRUCTIONS
SAFETY INFORMATION
IMPORTANT SAFETY INFORMATION
READ ALL INSTRUCTIONS BEFORE USING THE APPLIANCE
GROUNDING INSTRUCTIONS
WARNING
Improper use of the grounding plug can result in a risk of electric shock.
Ŷ
To prevent risk of electric shock, follow these
instructions.
Ŷ
Plug microwave into a grounded 3-prong outlet.
Ŷ
Do not remove the ground prong or use an
adapter.
Ŷ
Do not use an extension cord.
This appliance must be grounded. In the event of an
electrical short circuit, grounding reduces the risk of
electric shock by providing an escape wire for the
electric current.
This appliance is equipped with a power cord having
a grounding wire with a grounding plug. The plug
must be plugged into an outlet that is properly
installed and grounded.
Consult a qualified electrician or service technician
if the grounding instructions are not completely
understood, or if doubt exists as to whether the
appliance is properly grounded.
A short power-supply is provided to reduce the risks
resulting from becoming entangled or tripping over
a longer cord. Do not use an extension cord with
this appliance. If the power cord is too short, have
a qualified electrician or service technician install an
outlet near the appliance.
READ AND SAVE THESE INSTRUCTIONS
PRECAUTIONS TO AVOID POSSIBLE EXPOSURE
TO EXCESSIVE MICROWAVE ENERGY
(a) Do Not Attempt to operate this oven with the
door open since open-door operation can result
in harmful exposure to microwave energy. It is
important not to defeat or tamper with the safety
interlocks.
(b) Do Not Place any object between the oven front
face and the door or allow soil or cleaner residue to
accumulate on sealing surfaces.
(c) Do Not Operate the oven if it is damaged.
It is particularly important that the oven door close
properly and that there is no damage to the:
(1) door (bent),
(2) hinges and latches (broken or loosened),
(3) door seals and sealing surfaces.
(d) The Oven Should Not be adjusted or repaired by
anyone except properly qualified service personnel.
ELECTRICAL REQUIREMENTS
Product rating is 120 volts AC, 60 Hertz, 14 amps and 1.60 kilowatts. This product must be connected to a supply
circuit of the proper voltage and frequency. Wire size must conform to the requirements of the National Electrical
Code or the prevailing local code for this kilowatt rating. The power supply cord and plug should be brought to a
separate and dedicated 15 to 20 ampere branch circuit single grounded outlet. The outlet box should be located
in the cabinet above the oven. The outlet box and supply circuit should be installed by a qualified electrician and
conform to the National Electrical Code or the prevailing local code.

6 49-40786-3
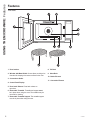
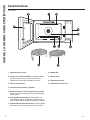
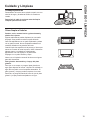
Features
USING THE MICROWAVE: Features
1000 Watts
1. Door Latches.
2. Window with Metal Shield. Screen allows cooking to be
viewed while keeping microwaves confined in the oven.
3. Convenience Guide.
4. Control Panel Display.
5. Door Latch Release. Press latch release to
open door.
6. Removable Turntable. Turntable and support must
be in place when using the oven. The turntable may be
removed for cleaning.
7. Removable Turntable Support. The turntable support
must be in place when using the oven.
8. Tall Rack
9. Short Rack
10. Broiler Element
11. Convection Element

49-40786-3 7
Wifi Connect
Remote Enabled Equipment
Remote Enable
USING THE MICROWAVE: Wifi Connect / Remote Enable and Equipment
Empowers you to remotely monitor and control your
microwave oven using your smart phone or tablet.
For example, you could view the current status of the
microwave or turn it on and off. To get started, download
and open the Café Appliances Kitchen App using
your smart device. To enable this feature, follow the
instructions provided in the app. To disable this feature
and remove the microwave from the WiFi network, press
and hold the WiFi Connect button for 3 seconds. You
have successfully disabled this feature when the WiFi
icon in the display is no longer illuminated.
For further instructions, visit our website at
cafeappliances.com/connect.
WiFi
Connect
Hold 3 Sec
This device complies with part 15 of the FCC Rules. Operation is subject to the following two conditions: (1) This device
may not cause harmful interference, and (2) this device must accept any interference received, including interference
that may cause undesired operation.
The wireless communication equipment installed on this microwave has been tested and found to comply with the
limits for a Class B digital device, pursuant to part 15 of the FCC Rules. These limits are designed to:
(a) provide reasonable protection against harmful
interference in a residential installation. This equipment
generates, uses, and can radiate radio frequency energy
and, if not installed and used in accordance with the
instructions, may cause harmful interference to radio
communications. However, there is no guarantee that
interference will not occur in a particular installation. If
this equipment does cause harmful interference to radio
or television reception, which can be determined by
turning the equipment off and on, the user is encouraged
to try to correct the interference by one or more of the
following measures:
Ŷ5HRULHQWRUUHORFDWHWKHUHFHLYLQJDQWHQQD
Ŷ,QFUHDVHWKHVHSDUDWLRQEHWZHHQWKHHTXLSPHQWDQG
receiver.
Ŷ&RQQHFWWKHHTXLSPHQWLQWRDQRXWOHWRQDFLUFXLW
different from that to which the receiver is connected.
Ŷ&RQVXOWWKHGHDOHURUDQH[SHULHQFHGUDGLR79
technician for help.
(b) accept any interference received, including interference
that may cause undesired operation of the device.
Note that any changes or modifications to the wireless
communication device installed on this oven that are not
expressly approved by the manufacturer could void the
user’s authority to operate the equipment.
You can use Remote Enable to start the microwave from a
remote source such as the GE Appliances Kitchen App or
Voice Commands from Amazon Alexa or Google Assistant.
When the Remote Enable feature is off, you will still
receive messages from your microwave, you can turn off
the microwave, or you can use the timer and clock from
your smart device.
There are two cooking modes that you can control when
remote enable is turned on: Convection Cooking and
Microwave Only. The Remote Enable feature allows you to
use any Convection Cooking mode from your smart device.
When using Microwave Only through Remote Enable,
you need to have opened the microwave door within the
last 5 minutes. The 5 minute restriction is to help ensure
food is in the microwave before starting the cooking
cycle.
Remote
Enable

8 49-40786-3
USING THE MICROWAVE: Controls / Cooking Controls
Controls
Be aware that the control senses the oven temperature and keeps the fan on when the oven temperature
is above 200F, even at the end of the cooking cycle.
You can microwave by time or with the convenience features.
Cooking Controls
Check the Convenience Guide before you begin.
There are two keypanel layouts for these models
Basic Features
COOK TIME Press pad to enter the desired time cook.
ADD 30 SEC Starts the microwave in increments of 30 seconds.
POWER LEVEL Display the power level setting for each cycle. Can be manually adjusted.
SET CLOCK Press pad to set clock: factory setting is a 12 hour clock display.
START/PAUSE Starts every function.
CANCEL/OFF Cancels current selection or turns off the selection.
MUTE Turns off the end of cycle notification and all microwave alerts.
TIMER/ON/OFF Can be set for up to 99 minutes and 99 seconds.
EXPRESS COOK Starts the microwave oven with preset amount of time.
TEMPERATURE
PRESETS
Automatically sets the cook temperature to the preset temperature labelled on the pad.
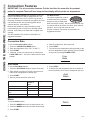
Microwave Cooking Features
SENSOR COOK A sensor in the microwave cavity detects humidity released from the food as it heats and adjusts the
cook time accordingly.
POPCORN Cooks based on user selection of bag size.
BEVERAGE Cooks based on user selection of beverage size.
AUTO DEFROST Defrosts based on user selection of food and weight.
Convection Features
CONVECTION BAKE Circulates hot air through the microwave oven cavity with a fan for baking performance.
AUTO BAKE Provides suggested cooking times and temperatures for selected food type.
CONVECTION ROAST Circulates hot air and microwaves through the microwave oven cavity with a fan for roasting performance.
AUTO ROAST Provides suggested cooking time and temperature for selected food type.
WARM Maintain a temperature between 170-190 degrees for a maximum time of 90 minutes.
Broil Feature
BROIL Uses a thermal element to quickly grill/broil foods.
0
1
4
2
5
3
789
6
Sensor
Cook
Power
Level
Cancel
Off
Start
Pause
Time
Cook
Timer
On/Off
Warm
Conv
Roast
Auto
Roast
Broil
Beverage Popcorn
Auto
Defrost
Clock
Set
170° F
250° F 275° F
325° F300° F 350° F
400° F375° F 425° F
Control Lock
Hold 3 Sec
To M u te
Hold 3 Sec
WiFi
Connect
Remote
Enable
Conv
BakeBake
Auto
Add 30
Seconds
Convect Bake Roast Broil Auto
Timer Sensor Warm Mute
Cook Time
Hold 3 Sec
0
Sensor
Cook
Power
Level
Time
CookTimer
On/Off
Warm
Conv
Roast
Auto
Roast
Broil
Beverage
Popcorn
Auto
Defrost
Clock
Set
To M u te
Hold 3 Sec
Conv
BakeBake
Auto
Remote
Enable
Cancel
Off
Start
Pause
Control Lock
Hold 3 Sec
Add 30
Seconds
Convect Bake Roast Broil Auto
Timer Sensor Warm Mute
Cook Time
WiFi
Connect
Hold 3 Sec
1
4
2
5
3
7
8
9
6
170° F
250° F
275° F
325° F
300° F
350° F
400° F
375° F
425° F
Express Cook

49-40786-3 9
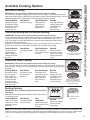
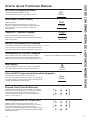
Available Cooking Options
Microwave Cooking
IMPORTANT: The tray and tray support must be used during all cooking.
Your oven uses microwave energy to cook by a set time or weight, or automatically by sensor.
Sensor microwave works by detecting the increasing humidity released during cooking. The oven
automatically adjusts the cooking time to various types and amounts of food.
USING THE MICROWAVE: Available Cooking Options
Do not use the racks when
microwave cooking.
Always use the racks when
convection cooking.
Cooking Method
Microwave energy
is distributed evenly
throughout the oven
for thorough, fast
cooking of food.
Heat Source
Microwave energy.
Heat Conduction
Heat produced
within food by
instant energy
penetration.
Benefits
Fast, high efficiency
cooking. Oven and
surroundings do
not get hot.
Easy clean-up.
Cooking Method
Hot air circulates
around food to
produce browned
exteriors and seal
in juices.
Heat Source
Circulating heated
air.
Heat Conduction
Heat conducted
from outside of food
to inside.
Benefits
Aids in browning
and seals in flavor.
Cooks some foods
faster than regular
ovens.
Cooking Method
Warm air circulates
around food to keep
previously cooked
food warm.
Heat Source
Circulating heated
air (Convection).
Heat
Conduction
Warmth conducted
from outside of food
to inside.
Benefits
Keeps hot, cooked
foods at serving
temperature.
Cooking Method
Microwave energy
and convection
heat combine to
cook foods in up to
one-half the time
of regular ovens,
while browning and
sealing in juices.
Heat Source
Microwave energy
and circulating
heated air.
Heat Conduction
Food heats from
instant energy from
penetration and
heat conducted
from outside of
food.
Benefits
Shortened
cooking time from
microwave energy,
plus browning
and crisping from
convection heat.
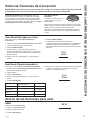
Convection Baking and Convection Roasting
IMPORTANT: The tray and tray support must be used during all cooking.
During convection cooking, a heating element raises the air temperature inside the oven.
You can set Convection Bake from 170F to 425F, and Convection Roast from 170F to
375F. A fan gently circulates the heated air around the food and produces golden brown
exteriors and rich moist interiors.
Because the heated air is kept constantly moving, not permitting a layer of cooler air to
develop around the food; some foods cook faster than in regular oven cooking.
Convection Roast Cooking
IMPORTANT: The tray and tray support must be used during all cooking.
Your oven also offers the option of combination cooking, using microwave energy along
with convection cooking. You cook with speed and accuracy, while browning and crisping to
perfection.
Always use the provided
racks when combination
cooking. Do not use any other
metal while cooking.
Broiling Cooking
IMPORTANT: The tray and tray support must be used during
all cooking.
Broil and uses the upper heater elements to broil food similar to
a conventional oven.
NOTE: Do not use regular cooking or oven thermometers when cooking by microwave or convection roast (combination). The
metal and mercury in these thermometers could cause arcing and possible damage to the oven. Do not use a thermometer
in food you are microwaving unless the thermometer is designed or recommended for use in the microwave oven.
Always use the tall rack
when broiling.

10 49-40786-3
USING THE MICROWAVE: Basic Features
Cook Time
Allows you to microwave for any time up to 99 minutes
and 99 seconds.
Power level 10 (High) is automatically set, but you may
change it for more flexibility.
1. Press the COOK TIME button.
2. Enter cooking time.
3. Change Power Level if you don’t want full power.
(Press POWER LEVEL. Enter power level 1-10.)
4. Press the COOK TIME button again to set a second
cook time (if desired) that will be excuted after the first
cook time expires.
5. Change Power Level for second cook time if you
don’t want full power. (Press POWER LEVEL. Enter
power level 1-10.)
6. Press the START/PAUSE button to start cooking.
You may open the door during Cook Time to check
the food. Close the door and press START/PAUSE to
resume cooking.
Basic Features
Changing the Power Level
The power level may be entered or changed before
entering the time for Cook Time.
1. Press COOK TIME.
2. Enter cooking time.
3. Press POWER LEVEL to select power level.
4. Press START.
Variable power levels add flexibility to microwave
cooking. The power levels on the microwave oven can
be compared to the surface units on a range. Each
power level gives you microwave energy a certain
percent of the time. Power level 7 is microwave energy
70% of the time. Power level 3 is energy 30% of the
time. Most cooking will be done on HI which gives you
100% power. HI power level will cook faster but food
may need more frequent stirring, rotating or turning
over. A lower setting will cook more evenly and need
less stirring or rotating of the food. Some foods may
have better flavor, texture or appearance if one of the
lower settings is used. Use a lower power level when
cooking foods that have a tendency to boil over, such as
scalloped potatoes.
Rest periods (when the microwave energy cycles off)
give time for the food to “equalize” or transfer heat to
the inside of the food. An example of this is shown with
power level 3—the defrost cycle. If microwave energy did
not cycle off, the outside of the food would cook before
the inside was defrosted.
Here are some examples of uses for various power
levels:
HI: Fish, bacon, vegetables, boiling liquids.
Med-High 7: Gentle cooking of meat and poultry;
baking casseroles and reheating.
Medium 5: Slow cooking and tenderizing for stews and
less tender cuts of meat.
Low 2 or 3: Defrosting; simmering; delicate sauces.
Warm 1: Keeping food warm; softening butter.
Add 30 Sec
It will add 30 seconds to the time counting down each
time the pad is pressed. Each touch will add 30
seconds, up to 99 minutes and 99 seconds.
The oven will start immediately when pressed.
Add
30 Sec
Time
Cook
Power
Level

49-40786-3 11
Basic Features (Cont.)
Set Clock
Press pad to set clock.
Factory setting is a 12 hour clock display.
USING THE MICROWAVE: Basic Features
Start/Pause
Starts every function.
This pad will also resume the function if cycle is stopped
in the middle of operation. Will also stop function if
selected in the middle of an operation.
Cancel/Off
Cancels current selection or turns off the selection
To lock the controls, press and hold this button for
3 seconds.
Insert Food Reminder
A reminder will show on the display if the user tries to
start the cooking cycle without placing food inside the
microwave oven within 5 minutes prior to starting the
cooking cycle.
Cooking Complete Reminder
To remind you that you have food in the oven, the oven
will display “Food is ready” and beep once a minute until
you either open the oven door or press the CANCEL/
OFF button.
Mute
Turn off the end of cycle notification and all microwave
alerts. Hold for 3 seconds to mute.”
Timer On/Off
The timer does not start or stop the microwave.
Can be set for up to 99 min and 99 seconds.
Microwave/cooking cycles can be in operation while
timer is on.
Express Cook
Pressing number pad buttons 1 through 6 will activate
Express Cook, and food will be cooked on microwave
mode for a time of 1-6 minutes, depending on what
number was pressed (1 = 1 minutes, 2 = 2 minutes,
etc.).
Temperature Presets
Pressing and holding number pad buttons 1 through 9
during a Convection Bake or Convection Roast mode will
activate the Temperature Presets and the temperature
will be set to the temperature displayed below the button
pushed.
Start
Pause
Clock
Set
Cancel
Off
Control Lock
Hold 3 Sec
1
4
2
5
3
6
170° F
250° F 275° F
325° F300°
F 350° F
1
4
2
5
3
789
6
170° F
250° F 275° F
325° F300° F 350° F
400° F375° F 425° F
Timer
On/Off
0
To M u t e
Hold 3 Sec

12 49-40786-3
Sensor Cook
To use the Sensor Cook feature:
1. Press the SENSOR COOK button to select Food
code.
2. Press START.
USING THE MICROWAVE: Microwave Cooking Features
Microwave Cooking Features
Humidity Sensor
The Sensor Features detect the increasing humidity
released during cooking. The oven automatically adjusts
the cooking time to various types and amounts of food.
Do not use the Sensor Features twice in succession
on the same food portion—it may result in severely
overcooked or burnt food. If food is undercooked after
the countdown, use Time Cook for additional cooking
time.
Ŷ The proper containers and covers are essential for
best sensor cooking.
Ŷ Always use microwave-safe containers and cover
them with lids or vented plastic wrap. Never use tight
sealing plastic containers—they can prevent steam
from escaping and cause food to overcook.
Ŷ Be sure the outside of the cooking containers and the
inside of the microwave oven are dry before placing
food in the oven. Beads of moisture turning into steam
can mislead the sensor.
Dry off dishes so they don’t
mislead the sensor.
Vented
Covered
Sensor
Cook
Food Press pad this
number of times
Weight/Portion
Potato 1 1-4 Pcs, 8-10 Oz./Pcs
Fresh Vegetables 2 1-4 Cup, 250 ml/Cup
Frozen
Vegetables
3 1-4 Cup, 240 ml/Cup
Ground Meat 4 4-32 Oz
Fish 5 4-24 Oz.

49-40786-3 13
Microwave Cooking Features (Cont.)
USING THE MICROWAVE: Microwave Cooking Features
Popcorn
To use the Popcorn feature:
1. Press the POPCORN button until bag size appears.
Press pad this number
of times
Popcorn Weight
1 1.75 Oz
2 3.0 Oz
3 3.5 Oz
2. Press START.
Beverage
To use the Beverage feature:
1. Press BEVERAGE button until size appears.
Press pad this
number of times
Size of Beverage
1 4 Oz.
2 8 Oz.
3 12 Oz.
Press START.
Auto Defrost
To use the Auto Defrost feature:
1. Press the AUTO DEFROST button to select Food
code.
2. Enter weight.
3. Press START.
Auto
Defrost
Food Press pad this
number of times
Weight/Portion
Meat 1 0.1 - 6.0 lbs.
Poultry 2 0.1 - 6.0 lbs.
Fish 3 0.1 - 6.0 lbs.
Beverage
Popcorn
Use only with prepackaged
microwave popcorn weighing
1.75, 3.0 to 3.5 ounces.

14 49-40786-3
Convection Features
IMPORTANT: For all convection features, Put the food into the oven after the preheat
period is complete .There will be a beep and the display will show the set temperature.
Convection Bake cooking uses a heating element to
raise the temperature of the air inside the oven. Any
oven temperature from 170°F to 425°F may be set. A
fan gently circulates this heated air throughout the oven,
over and around the food, producing golden brown
exteriors and rich, moist interiors.
Because the heated air is kept constantly moving,
not permitting a layer of cooler air to develop around
the food, some foods cook faster than in regular oven
cooking.
See the Cookware Tips section for information on
suggested cookware.
For Best Results…
The rack is required for good air
circulation and even browning.
Always use the provided racks
when convection cooking. We recommend the tall rack
for cookies and the short rack for cakes, pizza, biscuits
and pies. Do not use both racks at once.
See the Cookware Tips section for information on
suggested cookware.
USING THE MICROWAVE: Convection Features
Convection Bake
To use the Convection Bake feature:
1. Press the CONVECTION BAKE button.
2. Enter the temperature (from 170°F to 425°F.)
3. Press START.
4. If desired, a cook time may be set by pressing the
COOK TIME button. This can be done before or after
preheat.
5. Wait for preheat tone, then insert food.
6. Press START.
7. The current oven temperature (during preheat) or the
set oven tempearature (after preheat) can be recalled
at any time by pressing POWER LEVEL.
Conv
Bake
Auto Bake
To use the Auto Bake feature:
1. Press the AUTO BAKE button to select Food code.
2. Enter weight or portion for French Fries menu only
(other menu’s weight/portion already set).
3. Press START.
4. Wait for preheat tone then insert food.
5. Press START.
6. A default time and temperature will be set based on
the food selection, but it can be changed at any time.
Food Press pad this
number of
times
Weight/Portion
Frozen Pizza 1 10 Oz.
Muffins 2 6 Pcs, 85g/Pcs
Biscuit/Dinner Roll/Bread
Stick
3 7 Oz.
Frozen French Fries 4 4-16 Oz.
Warm
To use the Warm feature:
1. Press the WARM button once to warm food on low.
2. Press the WARM button twice to warm food on high.
3. Press START.
Auto
Bake
Warm

49-40786-3 15
Convection Features
IMPORTANT: For all convection features, Put the food into the oven after the preheat
period is complete .There will be a beep and the display will show the set temperature.
USING THE MICROWAVE: Convection Features / Broil Features
Convection Roast Cooking offers the best features of
microwave energy and convection cooking. Microwaves
cook food fast and convection circulation of heated air
browns foods beautifully. Any oven temperature from
170°F to 375°F may be set.
For Best Results…
The rack is required for
good air circulation and even
browning.
Always use the provided rack when combination cooking.
Do not use any other metal. We recommend placing the
meat inside of a glass dish on top of the short rack.
See the Cookware Tips section for information on
suggested cookware.
Convection Roast
To use the Convection Roast feature:
1. Press the CONVECTION ROAST button.
2. Enter the temperature (from 170F to 375F.)
3. Press START.
4. If desired, a cook time may be set by pressing the
COOK TIME button. This can be done before or after
preheat.
5. Wait for preheat tone, then insert food.
6. Press START.
7. The current oven temperature (during preheat) or the
set oven tempearature (after preheat) can be recalled
at any time by pressing POWER LEVEL.
Auto Roast
To use the Auto Roast feature:
1. Press the AUTO ROAST button to select Food code.
2. Enter weight.
3. Press START.
4. Wait for preheat tone then insert food.
5. Press START.
6. A default time and temperature will be set based on
the food selection, but it can be changed at any time.
Conv
Roast
Auto
Roast
Food Press pad this
number of
times
Weight/Portion
Beef 1 2.0 - 4.0 lbs.
Whole Chicken 2 2.5 - 6.0 lbs.
Turkey Breast 3 3.0 - 6.0 lbs.
Pork 4 2.0 - 4.0 lbs.
Broil Features
Broil
To use the Broil feature:
1. Press the Broil button.
2. Enter the cooking time.
3. Press START.
Broil

16 49-40786-3
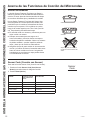
USING THE MICROWAVE: Cookware Tips
Cookware Tips
Cookware Microwave Convection Convection
Bake or Warm Roast
Heat-Resistant Glass, Glass-Ceramic Yes Yes Yes
(Pyrex
®
, Fire King
®
, Corning Ware
®
, etc.)
Metal No Yes No
Non Heat-Resistant Glass No No No
Microwave-Safe Plastics Yes No Yes
*
Plastic Films and Wraps Yes No No
Paper Products Yes No No
Straw, Wicker and Wood Yes No No
*
Use only microwave cookware that is safe to 450°F.
Convection Bake Cooking or Warming
Metal Pans are recommended for all types of baked products, but especially where browning or crusting is
important.
Dark or dull finish metal pans are best for breads and pies because they absorb heat and produce crisper crust.
Shiny aluminum pans are better for cakes, cookies or muffins because these pans reflect heat and help produce a
light tender crust.
Glass or Glass-Ceramic casserole or baking dishes are best suited for egg and cheese recipes due to the
cleanability of glass.
Convection Roast Cooking
Glass or Glass-Ceramic baking containers are recommended. Be sure not to use
items with metal trim as it may cause arcing (sparking) with oven wall or oven shelf, damaging the cookware, the
shelf or the oven.
Heat-Resistant Plastic microwave cookware (safe to 450°F) may be used, but it is not recommended for foods
requiring crusting or all-around browning, because the plastic is a poor conductor of heat.

49-40786-3 17
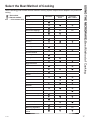
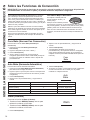
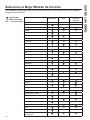
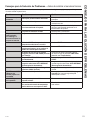
Select the Best Method of Cooking
USING THE MICROWAVE: Best Method of Cooking
Use the following guide to select the best method of cooking. Specific recipes can be adapted to any method of
cooking.
1
— Best method
2
— Alternate method
N/R — Not recommended
Foods Microwave Convection
Roast
Convection
Bake or Warm
Appetizers
Dips and Spreads
1
N/R N/R
Pastry Snacks
2
1
2
Beverages
1
N/R N/R
Sauces and Toppings
1
N/R N/R
Soups and Stews
1
2
N/R
Meats
Defrosting
1
N/R N/R
Roasting
2
1
2
Poultry
Defrosting
1
N/R N/R
Roasting
2
1
2
Fish and Seafood
Defrosting
1
N/R N/R
Cooking
1
2
N/R
Casseroles
2
1
2
Eggs and Cheese
Scrambled, Omelets
1
N/R
2
Quiche, Souffle
2 2
1
Vegetables, (fresh)
1
N/R N/R
Breads
Quick
2
1
2
Yeast N/R
2
1
Muffins, Coffee Cake
2
1
2
Desserts
Cakes, Layer and Bundt
2
1
2
Angel Food and Chiffon N/R N/R
1
Custard and Pudding
1
N/R N/R
Bar Cookies
2
1
2
Fruit
1
N/R N/R
Pies and Pastry N/R
2
1
Candy
1
N/R N/R
Blanching Vegetables
1
N/R N/R
Frozen Convenience
Foods
1
2 2

18 49-40786-3
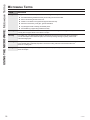
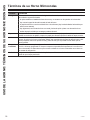
USING THE MICROWAVE: Microwave Terms
Microwave Terms
Arcing Arcing is the microwave term for sparks in the oven. Arcing is caused by:
Ŷ the metal shelf being installed incorrectly and touching the microwave walls.
Ŷ metal or foil touching the side of the oven.
Ŷ foil that is not molded to food (upturned edges act like antennas).
Ŷ metal such as twist-ties, poultry pins, gold-rimmed dishes.
Ŷ recycled paper towels containing small metal pieces.
Ŷ the turntable ring support being installed incorrectly.
Covering Covers hold in moisture, allow for more even heating and reduce cooking time. Venting plastic wrap or
covering with wax paper allows excess steam to escape.
Shielding In a regular oven, you shield chicken breasts or baked foods to prevent over-browning. When microwaving,
you use small strips of foil to shield thin parts, such as the tips of wings and legs on poultry, which would
cook before larger parts.
Standing Time When you cook with regular ovens, foods such as roasts or cakes are allowed to stand to finish cooking or
to set. Standing time is especially important in microwave cooking. Note that a microwaved cake is not
placed on a cooling rack.
Venting After covering a dish with plastic wrap, you vent the plastic wrap by turning back one corner so excess
steam can escape.
Term Definition

49-40786-3 19
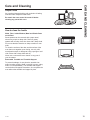
Care and Cleaning
Helpful Hints
An occasional thorough wiping with a solution of baking
soda and water keeps the inside fresh.
Be certain the oven control is turned off before
cleaning any part of this oven.
How to clean the Inside
Walls, Floor, Inside Window, Metal and Plastic Parts
on the Door
Some spatters can be removed with a paper towel,
others may require a damp cloth. Remove greasy
spatters with a sudsy cloth, then rinse with a damp cloth.
Do not use abrasive cleaners or sharp utensils on oven
walls.
To clean the surface of the door and the surface of the
oven that come together upon closing, use only mild,
non-abrasive soaps or detergents using a sponge or soft
cloth. Rinse with a damp cloth and dry.
Never use a commercial oven cleaner on any part of
your microwave.
Removable Turntable and Turntable Support
To prevent breakage, do not place the turntable into
water just after cooking. Wash it carefully in warm, sudsy
water or in the dishwasher. The turntable and support
can be broken if dropped. Remember, do not operate the
oven without the turntable and support in place.
CARE AND CLEANING

20 49-40786-3
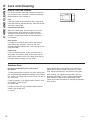
CARE AND CLEANING
Care and Cleaning
How to clean the Outside
Do not use cleaners containing ammonia or alcohol on
the microwave oven. Ammonia or alcohol can damage
the appearance of the microwave.
Case
Clean the outside of the microwave with a sudsy cloth.
Rinse with a damp cloth and then dry. Wipe the window
clean with a damp cloth.
Control Panel and Door
Wipe with a damp cloth. Dry thoroughly. Do not use
cleaning sprays, large amounts of soap and water,
abrasives or sharp objects on the panel—they can
damage it. Some paper towels can also scratch the
control panel.
Door Surface
It is important to keep the area clean where the door
seals against the microwave. Use only mild, non-
abrasive detergents applied with a clean sponge or soft
cloth. Rinse well.
Power Cord
If the cord becomes soiled, unplug and wash with a
damp cloth. For stubborn spots, sudsy water may be
used, but be certain to rinse with a damp cloth and dry
thoroughly before plugging cord into outlet.
Stainless Steel
Do not use a steel-wool pad; it will scratch
the surface.
To clean stainless steel surfaces, use a hot, damp cloth
with a mild detergent suitable for stainless steel surfaces.
Use a clean, hot, damp cloth to remove soap. Dry with a
dry, clean cloth.
If food soil remains, try a general kitchen cleaner, such
as Fantastik
®
, Simple Green
®
or Formula 409
®
.
For hard-to-clean soil, use a standard stainless-steel
cleaner, such as Bon-Ami
®
or Cameo
®
.
Apply cleaner with a damp sponge. Use a clean, hot,
damp cloth to remove cleaner. Dry with a dry, clean
cloth. Always scrub lightly in the direction of the grain.
After cleaning, use a stainless-steel polish, such as
Stainless Steel Magic
®
, Revere Copper and Stainless
Steel Cleaner
®
or Wenol All Purpose Metal Polish
®
.
Follow the product instructions for cleaning the stainless-
steel surface.
Page is loading ...
Page is loading ...
Page is loading ...
Page is loading ...
Page is loading ...
Page is loading ...
Page is loading ...
Page is loading ...
Page is loading ...
Page is loading ...
Page is loading ...
Page is loading ...
Page is loading ...
Page is loading ...
Page is loading ...
Page is loading ...
Page is loading ...
Page is loading ...
Page is loading ...
Page is loading ...
Page is loading ...
Page is loading ...
Page is loading ...
Page is loading ...
Page is loading ...
Page is loading ...
Page is loading ...
Page is loading ...
Page is loading ...
Page is loading ...
Page is loading ...
Page is loading ...
-
 1
1
-
 2
2
-
 3
3
-
 4
4
-
 5
5
-
 6
6
-
 7
7
-
 8
8
-
 9
9
-
 10
10
-
 11
11
-
 12
12
-
 13
13
-
 14
14
-
 15
15
-
 16
16
-
 17
17
-
 18
18
-
 19
19
-
 20
20
-
 21
21
-
 22
22
-
 23
23
-
 24
24
-
 25
25
-
 26
26
-
 27
27
-
 28
28
-
 29
29
-
 30
30
-
 31
31
-
 32
32
-
 33
33
-
 34
34
-
 35
35
-
 36
36
-
 37
37
-
 38
38
-
 39
39
-
 40
40
-
 41
41
-
 42
42
-
 43
43
-
 44
44
-
 45
45
-
 46
46
-
 47
47
-
 48
48
-
 49
49
-
 50
50
-
 51
51
-
 52
52


Ask a question and I''ll find the answer in the document
Finding information in a document is now easier with AI
in other languages
Related papers
Other documents
-
GE Profile PEB9159SJSS Owner's manual
-
Haier HMC1685SESS User manual
-
Thermador MC30WP User guide
-
LG LMVH1711ST Owner's manual
-
Bosch HMV8050 User manual
-
 Cafe CTS70D Operating instructions
-
Maytag ACM1580A Owner's manual
-
Beko MCF28310 Owner's manual
-
Panasonic NN-T888S Owner's manual
-
Haier HMC1085SESS User manual
