hrvatski
8
English
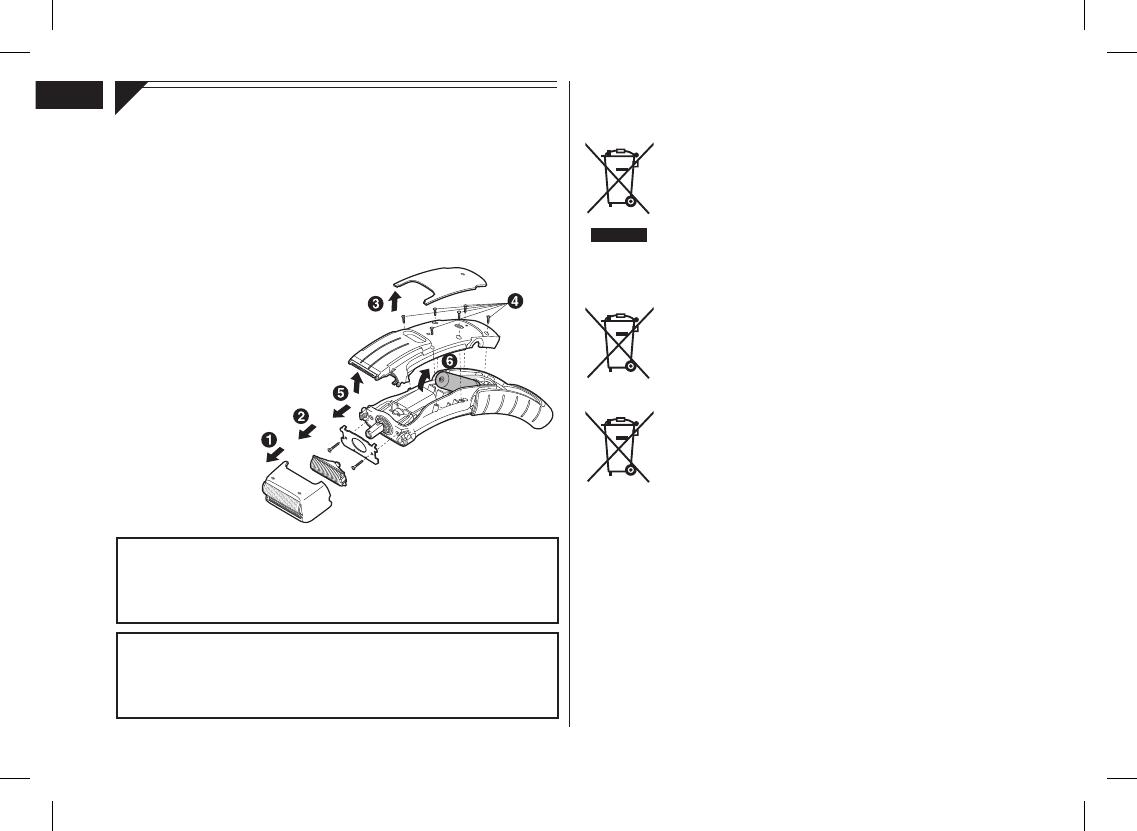
Removing the built‑in rechargeable battery
Remove the built‑in rechargeable battery before disposing of the
shaver. Do not dismantle or replace the battery. Otherwise you
can’t use the shaver again. This could cause fire or an electric
shock. Replace them at an authorized service center.
Remove the battery as illustrated.
Discharge the battery completely before removing it.
Please take care not to short‑circuit the battery.
Important notice regarding environmental protection
The built‑in rechargeable Nickel‑Metal Hydride battery contains
substances that may be environmentally harmful. Please remove
the battery before discarding your shaver.
For environmental protection and recycling materials
This shaver contains Nickel‑Metal Hydride battery.
Please make sure that the battery is disposed of at an officially
designated location if there is one in your area.
•
•
Information for Users on Collection and Disposal of Old
Equipment and used Batteries
These symbols on the products, packaging, and/or
accompanying documents mean that used electrical
and electronic products and batteries should not be
mixed with general household waste.
For proper treatment, recovery and recycling of old
products and used batteries, please take them to
applicable collection points, in accordance with your
national legislation and the Directives 2002/96/EC and
2006/66/EC.
By disposing of these products and batteries correctly,
you will help to save valuable resources and prevent
any potential negative effects on human health and the
environment which could otherwise arise from
inappropriate waste handling.
For more information about collection and recycling of
old products and batteries, please contact your local
municipality, your waste disposal service or the point of
sale where you purchased the items.
Penalties may be applicable for incorrect disposal of
this waste, in accordance with national legislation.
For business users in the European Union
If you wish to discard electrical and electronic
equipment, please contact your dealer or supplier for
further information.
[Information on Disposal in other Countries outside the
European Union]
These symbols are only valid in the European Union. If you wish to
discard these items, please contact your local authorities or dealer
and ask for the correct method of disposal.
Note for the battery symbol (bottom two symbol examples):
This symbol might be used in combination with a chemical symbol. In
this case it complies with the requirement set by the Directive for the
chemical involved.
ER-GY50 EU.indb 8 2010/01/15 19:19:53
8
English
Removing the built‑in rechargeable battery
Remove the built‑in rechargeable battery before disposing of the
shaver. Do not dismantle or replace the battery. Otherwise you
can’t use the shaver again. This could cause fire or an electric
shock. Replace them at an authorized service center.
Remove the battery as illustrated.
Discharge the battery completely before removing it.
Please take care not to short‑circuit the battery.
Important notice regarding environmental protection
The built‑in rechargeable Nickel‑Metal Hydride battery contains
substances that may be environmentally harmful. Please remove
the battery before discarding your shaver.
For environmental protection and recycling materials
This shaver contains Nickel‑Metal Hydride battery.
Please make sure that the battery is disposed of at an officially
designated location if there is one in your area.
•
•
Information for Users on Collection and Disposal of Old
Equipment and used Batteries
Cd
These symbols on the products, packaging, and/or
accompanying documents mean that used electrical
and electronic products and batteries should not be
mixed with general household waste.
For proper treatment, recovery and recycling of old
products and used batteries, please take them to
applicable collection points, in accordance with your
national legislation and the Directives 2002/96/EC and
2006/66/EC.
By disposing of these products and batteries correctly,
you will help to save valuable resources and prevent
any potential negative effects on human health and the
environment which could otherwise arise from
inappropriate waste handling.
For more information about collection and recycling of
old products and batteries, please contact your local
municipality, your waste disposal service or the point of
sale where you purchased the items.
Penalties may be applicable for incorrect disposal of
this waste, in accordance with national legislation.
For business users in the European Union
If you wish to discard electrical and electronic
equipment, please contact your dealer or supplier for
further information.
[Information on Disposal in other Countries outside the
European Union]
These symbols are only valid in the European Union. If you wish to
discard these items, please contact your local authorities or dealer
and ask for the correct method of disposal.
Note for the battery symbol (bottom two symbol examples):
This symbol might be used in combination with a chemical symbol. In
this case it complies with the requirement set by the Directive for the
chemical involved.
ER-GY50 EU.indb 8 2010/01/15 19:19:53
8
Uklanjanje ugrađene punjive baterije
Prije odlaganja aparata za brijanje uklonite ugrađenu
punjivu bateriju. Nemojte rastavljati ili zamjenjivati bateriju.
U suprotnom nećete moći ponovno koristiti aparat za
brijanje. To može izazvati požar ili strujni udar. Zamijenite
ih u ovlaštenom servisnom centru. Uklonite bateriju kako je
prikazano na slici.
• Potpuno ispraznite bateriju prije nego što ju izvadite.
• Nemojte izazvati kratki spoj na bateriji.
Važna napomena glede zaštite okoliša
Ugrađena punjiva nikal-metal hidridna baterija sadrži
sastojke koji mogu biti štetni za okoliš. Molimo izvadite
bateriju prije odlaganja aparata za brijanje.
Zaštita okoliša i recikliranje materijala
Ovaj aparat za brijanje sadrži nikal-metal hidridnu bateriju.
Bateriju obavezno odložite na mjesto službeno određeno
za tu namjenu, ako ono postoji u vašoj zemlji.
Obavijesti za korisnike o prikupljanju i odlaganju dotrajale
opreme i iskorištenih baterija
Ovim se oznakama na proizvodu, pakiranju i/ili
pratećim dokumentima označava da se korišteni
električni i elektronički uređaji te baterije ne smiju
odlagati s otpadom iz domaćinstava. Radi pravilne
obrade, sanacije i recikliranja dotrajalih proizvoda i
baterija, odnesite ih u odgovarajuća prikupljališta,
u skladu s lokalnim zakonodavstvom i Direktivama
2002/96/EZ i 2006/66/EZ.
Pravilnim odlaganjem navedenih proizvoda i baterija
pomoći ćete očuvanju vrijednih resursa i spriječiti
negativne učinke na ljudsko zdravlje i okoliš koji
bi mogli nastati zbog neprimjerenog rukovanja
otpadom. Detaljne informacije o prikupljanju i
recikliranju dotrajalih proizvoda i baterija potražite u
lokalnom poglavarstvu, službi za odlaganje otpada ili
na prodajnome mjestu na kojem ste kupili proizvod.
Za nepropisno odlaganje ovog otpada mogli biste biti
kažnjeni sukladno lokalnom zakonodavstvu.
Za poslovne korisnike u Europskoj uniji
Ako želite odložiti električnu i elektroničku opremu,
detaljne obavijesti zatražite od svojeg prodavača ili
dobavljača.
[Informacije o odlaganju u zemljama izvan
Europske unije]
Ovi su simboli važeći samo u Europskoj uniji. Ako želite
odložiti ove uređaje, obratite se nadležnim lokalnim tijelima ili
dobavljačima i raspitajte se o pravilnoj metodi odlaganja.
Napomene o simbolima na bateriji (donja dva primjera simbola):
Ovaj se simbol može koristiti u kombinaciji s kemijskim simbolom.
U tom je slučaju usklađen sa zahtjevom navedenim u Direktivi za
korištene kemikalije.


