Delta Children Adele Dress Kit Assembly Instructions

Category
Car kits
Type
Assembly Instructions

This manual is also suitable for

Note: The style of your item may vary from what is pictured in the instruction sheet.
Remarque : Le modèle de votre article peut être différent de celui qui est illustré dans le feuillet d’instructions.
Note: El estilo de su artículo puede variar de la ilustración en la hoja de instrucciones.
©2012 Simmons Juvenile Furniture, A Division of Children's Products, LLC
Simmons Juvenile Furniture
A Division Of Children's Products, LLC
114 West 26th Street
New York, NY 10001
1-800-218-2741
23292, May 29,2012
Lea todas las instrucciones antes de
ensamblar y usar. MANTENGA LAS
INSTRUCCIONES PARA SU USO FUTURO.
Read all instructions before assembly
and use. KEEP INSTRUCTIONS
FOR FUTURE USE.
Instrucciones de Ensamble
Vestido Kit
Directives de Montage pour votre
Kit robe
Assembly Instructions for your
Dress Kit
ADULT ASSEMBLY
REQUIRED
Due to the presence of small parts during assembly,
keep out of reach of children until assembly is complete.
DEBE SER ENSAMBLADO
POR UN ADULTO
Debido a la presencia de piezas pequeñas durante el ensamblaje,
mantenga fuera del alcance de los niños hasta que complete el
ensamblaje.
Style #:
Lot:
Date:
___________
___________
___________
Distributed in Canada by
Little Folks
A Division of Children’s Products, LLC
Care of:
501 Franklin Boulevard
Cambridge, Ontario N1R8G9
1-800-218-2741
When contacting simmons consumer care you will need to reference the numbers
below. They can also be found on the label on the back rail
En communiquant avec le centre de service à la clientèle delta, vous devrez faire
référence aux numéros ci-dessus. Ils peuvent également être retrouvés sur l'étiquette
sur l' traverse arrière
En caso de ponerse en contacto con la atención al consumidor de simmons, tendrá que
especificar como referencia los números de arriba. También los encontrará en la
etiqueta de baranda de atras
Lisez toutes les instructions avant l’assemblage et
l’utilisation. CONSERVEZ LES INSTRUCTIONS
POUR RÉFÉRENCE ULTÉRIEURE.
L’ASSEMBLAGE DOIT ETRE FAIT
PAR UN ADULTE
A cause de la présence de petites piéces, pendant l’assemblage gardez
hors de portée des enfants jusqu'à ce que celui-ci soit terminé.
Conforms to
ASTM F2388
Safety Standards
PG#2
WARNING
FALL HAZARD - To prevent death or serious injury, always keep child within arm’s reach.
Read all instructions before use of the changing table.
KEEP THESE INSTRUCTIONS IN A SAFE PLACE FOR FUTURE USE.
Inspect the changing table periodically. Do not use the changing table if it is damaged or
broken. Contact Simmons Kids Furniture with any questions.
Tighten all loose screws and bolts before each use.
The maximum recommended weight of the child is 30lbs for the changing table.
Always secure the dress kit to the changing surface using the screws provided. See
Instructions. Secure the Dress Kit only to Simmons Juvenile Furniture item 302030.
THE CHANGING PAD USED SHOULD BE 32" X 16" WITH A MAXIMUM THICKNESS OF 1".
RISQUE DE CHUTE – Afin de prévenir tout risque de décès ou de blessure grave, toujours demeurer à
portée de bras de l’enfant placé sur la table à langer.
Bien lire toutes les instructions avant d’utiliser la table à langer
Conserver ces instructions dans un endroit sûr pour référence ultérieure.
Inspecter régulièrement la table à langer. Ne pas l’utiliser si elle est endommagée ou brisée.
Serrer tous les boulons et vis desserrés avant chaque usage.
Le poids maximum recommandé est de 30 livres (13,6kg).
Toujours fixer la table à langer à la surface de la table à langer en utilisant les vis fournies. Consulter les
directives. La table à langer doit être fixé à seulement Simmons Juvenile Furniture produit 302030.
LE COUSSIN À LANGER DOIT MESURER 32 po X 16 po ET AVOIR UNE ÉPAISSEUR
MAXIMALE DE 1 po
AVERTISSEMENT
PELIGRO DE CAIDAS - Para prevenir la muerte o lesiones graves, mantenga al niño al alcance de sus
manos. Lea todas las instrucciones antes de usar el cambiador.
Coloque estas instrucciones en un lugar seguro para su uso futuro.
Inspeccione este cambiador periodicamente. No use el cambiador si esta dañado o roto.
Apriete los tornillos y pernos flojos antes de cada uso.
El paso maximo recomendado 30 libras (13.6 kg).
Coloque siempre el kit de vestir a la superficie cambiando con los tornillos suministrados. Vea las
Instrucciones. Asegure el kit de vestido sólo Simmons 302030 elemento juvenil Muebles.
LA ALMOHADILLA USADA DEBE SER 32 X 16 PULGADAS CON UN GROSOR
MÁXIMO DE 1 PULGADA.
ADVERTENCIA
#4 - (2) M3 x 32mm DOWEL
(2) GOUJONS M6 x 32mm
(2) PASADOR M6 x 32mm
#3 - (2) CAM LOCK
(2) VIS D’ASSEMBLAGE RAPIDE
(2) CERRADURA DE LEVA
#2 - (2) CAM BOLT
(2) GOUJON D’ASSEMBLAGERAPIDE
(2) CERROJO DE LEVA
#7 - (1) RIGHT SIDE
(1) CÔTÉ DROIT
(1) LADO DERECHO
Part #23289
#8 - (1) LEFT SIDE
(1) CÔTÉ GAUCHE
(1) LADO ISQUIERDO
Part #23288
#9 - (1) FRONT RAIL
(1) TRAVERSE AVANT
(1) BARANDA DELANTERA
Part #23287
#10 - (1) BACK RAIL
(1) TRAVERSE ARRIÈRE
(1) BARANDA DE ATRAS
Part #23286
#5 - (4) M6 x 35mm Bolt
(4) Boulons M6 x 35mm
(4) Pernos M6 x 35mm
#6 - (1) CENTER RAIL
(1) CENTRE FERROVIAIRE
(1) CENTRO DE FERROCARRIL
Part #23290
NOTE: FASTENERS ARE SHOWN FULL SIZE
REMARQUE: LES DISPOSITIFS DE FIXATION SONT
MONTRÉS EN TAILLE RÉELLE
NOTA: LOS PERNOS SE MUESTRAN EN TAMAÑO REAL
CAUTION: DO NOT USE A POWER SCREWDRIVER THEY CAN CAUSE
SCREWS TO BREAK OR STRIP.
ATTENTION: NE PAS UTILISER UN TOURNEVIS ÉLECTRIQUE CARLE
VIS PEUVENT CASSER OU PERDRE LEURS FILETS.
PRECAUCIÓN: NO USE UN DESTORNILLADOR ELÉCTRICO PORQUE
PUEDEN HACER QUE LOS TORNILLOS SE ROMPAN O RUEDEN.
THE FOLLOWING TOOLS AND PARTS ARE REQUIRED:
OUTILS ET PIÈCES NÉCESSAIRES
SE NECESITAN LAS SIGUIENTES HERRAMIENTAS Y PIEZAS:
M4 Hex Wrench (Provided)
M4 Clé À Six Pans (Fournie)
M4 Llave Hexagonal (se Incluye)
Phillips Screwdriver (Not Provided)
Tournevis ‘Phillips’(Non prévu)
Destornillador ‘Phillips’ (No siempre)
#11 - (4) M4 x 38mm SCREW
(4) VIS M4 x 38mm
(4) TORNILLO M4 x 38mm
PG#4
Hardware kit Part # 23291 for color 247.
Ensemble de quincaillerie Élément #23291 pour couleur247
Pieza número # 23291 para el color 247
STEP #2
ÉTAPE N°2
PASO #2
A
ÉTAPE NO 2
PASO #2
STEP #2
1.Refer to page 5 for instructions on how to use
the cam lock system.
2. Insert (1) cam locks (part #3) into the holes on
the side of the center rail (part #6). Insert Cam
Bolt (Part #2) into Front Rail (Part #9).
3. Line up the cam bolt (part #2) and dowel (part
#4) at the back of the front rail; from step #1 with
the holes in the end of the center rail (part #6).
Insert and turn the cam lock clockwise to tighten
using a phillips screwdriver.
1.Voir à la page 5 pour obtenir des instructions sur la
façon d'utiliser le système de verrouillage à came.
2. Insert (1) serrures (pièce n ° 3) dans les trous sur le
côté de la glissière médiane (pièce n ° 6). Insert le
boulon à came (pièce n ° 2) en rail avant (pièce n ° 9).
3. Alignez le boulon à came (pièce n ° 2) et la broche
(pièce n ° 4) à l'arrière du rail avant; de l'étape n ° 1
avec les trous dans la fin de la glissière médiane (pièce
n ° 6). Insérer et tourner la came de verrouillage dans le
sens horaire pour serrer l'aide d'un tournevis cruciforme.
1.See en la página 5 para obtener instrucciones sobre cómo
utilizar la leva de bloqueo.
2. Inserte (1) cerraduras (Pieza 3) en los orificios en el lado
del carril del centro (Pieza 6). Inserte (1) perno de leva (Pieza
2) barra de carga (Pieza 9).
3. Alinear el perno de leva (Pieza 2) y la pasador (Pieza 4) en
la parte posterior del riel frontal, el paso # 1 con los agujeros
en el extremo del carril centro (punto 6). Inserte y gire la leva
de la derecha para apretar con un destornillador.
PART #3
PIÈCE NO3
PIEZA #3
PART #2
PIÈCE NO2
PIEZA #2
PART #4
PIÈCE NO4
PIEZA #4
PART #6
PIÈCE NO6
PIEZA #6
PG#7
#2 - (1) CAM BOLT
(1) GOUJON D’ASSEMBLAGERAPIDE
(1) CERROJO DE LEVA
#4 - (1) M3 x 32mm DOWEL
(1) GOUJONS DE M6 x 25mm
(1) PASADOR M6 x 25mm
#3 - (1) CAM LOCK
(1) VIS D’ASSEMBLAGE RAPIDE
(1) CERRADURA DE LEVA
FINAL ASSEMBLY
ASSEMBLAGE FINAL
ESEMBLAJE FINAL
ASSEMBLED DRESS KIT
LA TABLE À LANGER MAINTENANT ASSEMBLÉE
EQUIPÓ DE ENSEMBLAJE
DRESSER UNIT
LA COMMODE
LA COMMODA
FINAL ASSEMBLY
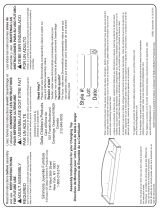
1. Set the Assembled Dress Kit on the top of the Dresser as
shown.
2. Insert (4) M4 x 38mm screws (Part #11) through the back of
the Dress Kit, into the pre drilled holes the dresser.
3. Tighten with a Phillips Screwdriver.
PART#11
PIÈCENO11
PIEZA #11
PG#8
ASSEMBLAGE FINAL
1. Placer la Table à Langer maintenant assemblée sur ledessus de la
commode.
2. Insérer (4) vis m4 x 38mm (pièce no11) à partir del’arrière de la
table à langer, jusque dans les trous deguidage que l’on vient de
percer dans la commode.
3. Serrer au moyen d’un tournevis phillips.
ESEMBLAJE FINAL
1. Poner el equipó de ensemblaje ensima del cambiador.
2.Inserta (4) tornillos m4 x 38 mm (pieza #11) en laparte de atras
en los wecos pilót.
3.Apriete con destornillador phillips.
ASSEMBLY FROM STEP #2
ASSEMBLÉE DE L’ÉTAPE N
O
2
ENSEMBLAJE DEL PASO #2
STEP #3
ÉTAPE N°3
PASO #3
1. Insert Cam Bolt (Part #2) into Back Rail (Part #10).
2. Line up the dowels (part #1) at the back of the assembly from step #2 with the holes in the face of
the back rail (part #10).
3. Insert (1) m6 x 35mm bolt (part #5) through each hole in the back of the back rail and into the
holes in the sides from step #2.
4.Refer to page 5 for instructions on how to use the cam lock system.
5.Tighten with a phillips screwdriver.
Part #5
Pièce No5
Pieza #5
Part#4
Pièce No4
Pieza #4
Part#2
Pièce No2
Pieza #2
Part#3
Pièce No3
Pieza #3
1. Insert le boulon à came (pièce n ° 2) en rail arrière (pièce n °10).
2. Alignez les chevilles (pièce n ° 1) à l'arrière de l'assemblage de l'étape n ° 2 trous with the dans
le visage de la traverse arrière (pièce n ° 10).
3. Insert (1) M6 x 35mm boulon (pièce n ° 5) dans chaque trou à l'arrière de the back ferroviaire et
dans les petits trous pré-percés sur les côtés de l'étape n ° 2.
4.Refer à la page 5 pour obtenir des instructions sur la façon d'utiliser le système de verrouillage à
came.
5.Serrez avec un tournevis cruciforme.
1. Inserte (1) perno de leva (Pieza 2) barra trasero (Pieza 10).
2. Alinee las clavijas (Pieza 1) en la parte posterior de la asamblea desde el paso # 2 agujeros
conel en la cara del travesaño trasero (Pieza 10).
3. Insertar (1) M6 x 35mm perno (Pieza # 5) en cada agujero en la parte posterior de theback
ferrocarril y pequeños agujeros piloto en los lados de la etapa 2.
4.Referirse en la página 5 para obtener instrucciones sobre cómo utilizar la leva de bloqueo.
5.Apriete con un destornillador Phillips
#3 - (1) CAM LOCK
(1) VIS D’ASSEMBLAGE RAPIDE
(1) CERRADURA DE LEVA
#2 - (1) CAM BOLT
(1) GOUJON D’ASSEMBLAGERAPIDE
(1) CERROJO DE LEVA
#4 - (1) M3 x 32mm DOWEL
(1) GOUJONS
M6
x
25mm
(1) PASADOR M6 x 25mm
#5 - (2) M6 x 35mm Bolt
(2) Boulons M6 x 35mm
(2) Pernos M6 x 35mm
Part #5
Pièce No5
Pieza #5
#11 - (4) M4 x 38mm SCREW
(4) VIS M4 x 38mm
(4) TORNILLO M4 x 38mm
  • Page 1 1
  • Page 2 2
  • Page 3 3
  • Page 4 4
  • Page 5 5
  • Page 6 6
  • Page 7 7
  • Page 8 8

Delta Children Adele Dress Kit Assembly Instructions

Category
Car kits
Type
Assembly Instructions
This manual is also suitable for

Ask a question and I''ll find the answer in the document

Finding information in a document is now easier with AI