Page is loading ...
Page is loading ...

3
TABLE OF CONTENTS EN
1/ NOTICES TO THE USER ................................................................................ 4
WARNING ..................................................................................................... 5
CAUTION ...................................................................................................... 6
WARNING FOR INSTALLING THE HOOD ................................................... 6
2/ INSTALLING YOUR APPLIANCE .................................................................... 7
INSTALL THE DUCTWORK .......................................................................... 7
INSTALL MOUNTING BRACKETS ............................................................... 7
INSTALL DUCT FIXING SUPPORT .............................................................. 7
NONE-DUCTED RECIRCULATION FILTER INSTALLATION ....................... 7
PREPARE THE HOOD ................................................................................. 8
INSTALL THE HOOD .................................................................................... 9
3/ USING YOUR APPLIANCE ............................................................................ 10
OPERATION ............................................................................................... 10
4/ CARING FOR AND CLEANING YOUR APPLIANCE ...................................... 11
MAINTENANCE ........................................................................................... 11
5/ TROUBLESHOOTING ................................................................................... 12
6/ AFTER-SALES SERVICE .............................................................................. 13

4
1/ NOTICES TO THE USER
EN

5
1/ NOTICES TO THE USER
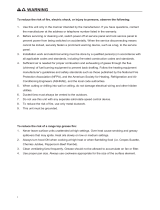
WARNING
TO REDUCE THE RISK OF FIRE, ELECTRIC SHOCK, OR INJURY TO PERSONS,
OBSERVE THE FOLLOWING:
1. Use this unit only in the manner intended by the manufacturer. If you have questions,
contact the manufacturer at the address or telephone number listed in the warranty.
2. Before servicing or cleaning unit, switch power off at service panel and lock service
panel to prevent power from being switched on accidentally. When the service
disconnecting means cannot be locked, securely fasten a prominent warning device,
such as a tag, to the service panel.
3. Installation work and electrical wiring must be done by a qualified person(s) in accor-
dance with all applicable codes and standards, including fire-rated construction codes
and standards.
4. Sufficient air is needed for proper combustion and exhausting of gases through the
flue (chimney) of fuel burning equipment to prevent back drafting. Follow the heating
equipment manufacturer’s guidelines and safety standards such as those published
by the National Fire Protection Association (NFPA), and the American Society for
Heating, Refrigeration and Air Conditioning Engineers (ASHRAE), and the local code
authorities.
5. When cutting or drilling into wall or ceiling, do not damage electrical wiring and other
hidden utilities.
6. Ducted fans must always be vented to the outdoors.
7. Do not use this unit with any separate solid-state speed control device.
8. To reduce the risk of fire, use only metal ductwork.
9. This unit must be grounded.
TO REDUCE THE RISK OF A RANGE TOP GREASE FIRE:
A. Never leave surface units unattended at high settings. Boil over cause smoking and
greasy spillovers that may ignite. Heat oils slowly on low or medium settings.
B. Always turn hood ON when cooking at high heat or when flam being food (i.e. Crepes
Suzette, Cherries Jubilee, Peppercorn Beef Flam be’).
C. Clean ventilating fans frequently. Grease should not be allowed to accumulate on fan
or filter.
D. Use proper pan size. Always use cookware appropriate for the size of the surface
element.
WARNING
TO REDUCE THE RISK OF INJURY TO PERSONS IN THE EVENT OF A RANGE
TOP GREASE FIRE, OBSERVE THE FOLLOWING:*
1. SMOTHER FLAMES with a close-fitting lid, cookie sheet, or metal tray, then turn off
the burner. BE CAREFUL TO PREVENT BURNS. If the flames do not go out
immediately, EVACUATE AND CALL THE FIRE DEPARTMENT.
2. NEVER PICK UP A FLAMING PAN - You may be burned.
3. DO NOT USE WATER, including wet dishcloths or towels - violent steam explosion will
result.
4. Use an extinguisher ONLY if:
A. You know you have a Class ABC extinguisher and you already know how to operate it.
B. The fire is small and contained in the area where it started.
C. The fire department is being called.
D. You can fight the fire with your back to an exit.
EN

6
1/ NOTICES TO THE USER
CAUTION
1. To reduce risk of fire and to properly exhaust air, be sure to duct air outside. Do not
vent exhaust air into spaces within walls or ceilings or into attics, crawl spaces, or
garages.
2. Take care when using cleaning agents or detergents.
3. Avoid using food products that produce flames under the Range Hood.
4. For general ventilating use only. Do not use to exhaust hazardous or explosive mate-
rials and vapors.
5. To avoid motor bearing damage and noisy and/or unbalanced impellers, keep drywall
spray, construction dust, etc. off power unit.
6. Your hood motor has a thermal overload which will automatically shut off the motor if it
becomes overheated. The motor will restart when it cools down. If the motor continues
to shut off and restart, have the hood serviced.
7. For best capture of cooking impurities, the bottom of the hood should be a minimum of
26" (66CM) and a maximum of 31" (78CM) above the cooking surface.
8. Two installers are recommended because of the large size and weight of this hood.
9. This product is equipped with a thermostat which may start blower automatically. To
reduce the risk of injury and to prevent power from being switched on accidentally,
switch power off at service panel and lock or tag service panel.
10. Use with approved cord-connection kit only.
11. Please read specification label on product for further information and requirements.
WARNING FOR INSTALLING THE HOOD
Note: This range hood must be properly
grounded. The unit should be installed by a
qualified electrician in accordance with all
applicable national and local electrical codes.
The minimum hood distance above cook top must
not be less than 26” (66CM). A maximum of 31”
(78CM) above cook top is highly recommended for
best capture of cooking impurities. Distances over
31” (78CM) are at the installer and users discretion.
EN
MIN 26” (66cm)
MAX 31” (78cm)

7
2/ INSTALLING YOUR APPLIANCE
INSTALL THE DUCTWORK
1. Where the ductwork will run between the hood and the outside.
2. A straight, short duct run will allow the hood to perform most efficiently.
3. Install the Aluminum Flex duct on the vent towards
hood location.
INSTALL MOUNTING BRACKETS
1. After evaluating the height of the hood, place the
hook center over installation location. Drill 3 holes of
Ø8mm on a suitable place to fix the mounting
brackets.
2. Put the drywall anchors into the holes and fix the
mounting screws (4x40mm) into the anchors, and
install the hook on the wall as shown.
INSTALL DUCT FIXING SUPPORT
1. Calculate the final height of the U-shaped section, drill 2 holes of Ø8mm on a suitable
place in line with the slidery duct fixing support.
2. Put the drywall anchors into the holes and fix the mounting screws (4x40mm) into the
anchors, and install the hook on the wall as shown.
NON-DUCTED RECIRCULATION FILTER INSTALLATION
1 Purchase a non-ducted recirculation filter from your dealer.(The non-duct
recirculation filter is optional, and bought separately)
2 Install the filter by rotating
it onto the brackets which
are on both sides of the
motor.
EN

8
Screw: 4x8mm
2/ INSTALLING YOUR APPLIANCE
PREPARE THE HOOD
Note: On stainless steel hoods, carefully
remove the plastic protective film from all
exterior surfaces of the hood and
decorative flues, prior to final
installation.
1. Pick out the hood from the carton.
2. Install the vent into the duct connector of the
cooker hood.
3. Fix the extensive pipe onto the vent.
EN

9
2/ INSTALLING YOUR APPLIANCE
INSTALL THE HOOD
Note: at least two people will be required to mount the hood.
1. Raise the hood into its mounting position.
2. Align the rectangular opening on the back of the
hood with the wall-mounting bracket. Gently lower
the hood until it securely engages the bracket.
3. Open the Al. filter and find the two Ø8 mm holes on
the back of the hood. Level the hood with 2 mounting
screws (4*30mm) with washer. Use drywall anchors
provided.
4. Measure the height of the slide duct fixing support.
Adjust the height of the chimney according to the
height. Then use the duct fixing support with two
screws (4x8mm) to fix the chimneys. Shown as in the
pic.
5. Put the chimney on the hood, use two screws (4x8mm)to
fix the chimney to the duct fixing support.
6. Use the other two screws (4x8mm) to fix the bottom of
chimney.
7. After adjusting the position, open the filter and fix the
body inside with safety screws(4X30MM).
EN
4x8mm

10
3/ USING YOUR APPLIANCE
OPERATION
Controls
Electronic Button
Control Panel Layout and Buttons Configurations:
Electronic Controls with Time Delay
• Lights:
o Press the light button to turn halogen lights on and off.
• Power settings:
o Press the button once and the motor starts to operate at Low speed
o Press the button again and the motor will reach Medium speed.
o Press the button once more and the motor wilI reach High speed.
o Press the button to lower speeds in succession until the motor stops
working (power off).
• Timer function:
o The control system provides the option to run the motor for a predetermined
time period in order to evacuate remaining vapors from me kitchen,
o Press the timer button while the motor is running. The motor will shut off
automatically after 10 minutes
EN

11
4/ CARING FOR AND CLEANING YOUR APPLIANCE
MAINTENANCE
Proper maintenance of the Range Hood will assure
proper performance of the unit.
Filters
The filters must be cleaned approximately once every 30
hours of operation.
Use a warm detergent solution. Grease filters are
dishwasher safe.
Remove filter by pushing filter towards the back of hood
and rotating filter downward.
Duct free (Carbon) Filters
The duct free filters should be changed every 6 months.
Rotate the filters to remove and replace
.
Hood Cleaning
Stainless steel is one of the easiest materials
to keep clean. Occasional care will help preserve its fine
appearance.
Cleaning tips:
Hot water with soap or detergent is all that is usually needed.
Follow all cleaning by rinsing with clear water. Wipe dry with a clean, soft cloth to
avoid water marks.
For discolorations or deposits that persist, use a non-scratching household cleanser
or stainless steel polishing powder with a little water and a soft cloth.
For stubborn cases, use a plastic scouring pad or soft bristle brush together with
cleaner and water. Rub lightly in direction of polishing lines or "grain" of the stainless
finish. Avoid using too much pressure which may mar the surface.
DO NOT allow deposits to remain for long periods of time.
DO NOT use ordinary steel wool or steel brushes. Small bits of steel may adhere to
the surface causing rust.
DO NOT allow salt solutions, disinfectants, bleaches, or cleaning compounds to
remain in contact with stainless steel for extended periods. Many of these com-
pounds contain chemicals which may be harmful. Rinse with water after exposure
and wipe dry with a clean cloth.
Painted surfaces should be cleaned with warm water and mild detergent only.
HALOGEN BULBS
To change bulbs:
1 Use a screwdriver to pull out the lampshade and get off
the glass. CAUTION: BULB MAY BE HOT,PLEASE
ROTATE WHEN THE BULB IS COOL!
2 Replace with a Type JC, 12Volt, 20Watt Max, G-4 Base
bulb. Do not touch replacement bulb with bare hands!
3 Fix the glass and lampshade back the light after
replacing the bulb.
EN

12
5/ TROUBLESHOOTING
Fault Cause Solution
Lights on, but motor
does not work
The vent is blocked Remove the blockage
The capacitor is damaged Replace capacitor
The motor jammed causing
bearing damaged
Replace motor
A bad smell from the motor
which suddenly stops working
Replace motor
Light does not work,
motor does not work
Beside the above mentioned, check the following:
Light damaged Replace lights
Power cord is loose
Connect the wires as per
the electric diagram
Oil leakage
Damper and the air ventilation
entrance are not tightly sealed
Take down the Damper and
seal with glue
Leakage from the connection of
U-shaped section and cover
Take U-shaped section
down and seal
The hood is shaking
The vent is damaged and
causes shaking
Replace the vent
The motor is not tightly attached Lock the motor tightly
The chimney is not tightly
hanged
Attach the chimney tightly
Insufficient suction
The distance between the hood
and the gas top is too much
Readjust the distance
Too much ventilation from open
doors or windows
Choose a new place and re
assemble the machine
The machine inclines to
one side
The fixing screw not tight enough
Tighten the fixing screw
and make it horizontal
The mounting screw is not tight
enough
Tighten the mounting screw
and make it horizontal
EN

13
6/ AFTER-SALES SERVICE
Any maintenance on your equipment should be undertaken by:
— either your dealer,
— or another qualified mechanic who is an authorized agent for the brand appliances.
When making an appointment, state the full reference of your equipment (model, type and
serial number). This information appears on the manufacturer's nameplate attached to
your equipment.
EN
Page is loading ...

15
TABLE DES MATIÈRES FR
1/ AVIS AUX UTILISATEURS ............................................................................. 16
AVERTISSEMENT ...................................................................................... 17
ATTENTION ................................................................................................ 18
AVERTISSEMENT POUR L'INSTALLATION DE LA HOTTE ...................... 18
2/ INSTALLATION DE VOTRE APPAREIL ......................................................... 19
INSTALLATION DES CONDUITS ............................................................... 19
INSTALLATION DES SUPPORTS DE MONTAGE ..................................... 19
INSTALLATION DU SUPPORT DE FIXATION DU CONDUIT .................... 19
INSTALLATION DU FILTRE DE RECIRCULATION SANS CONDUIT ........ 19
PRÉPARATION DE LA HOTTE ................................................................... 20
INSTALLATION DE LA HOTTE ................................................................... 21
3/ UTILISATION DE VOTRE APPAREIL ............................................................ 22
FONCTIONNEMENT .................................................................................. 22
4/ ENTRETIEN ET NETTOYAGE DE VOTRE APPAREIL ................................. 23
ENTRETIEN ................................................................................................ 23
5/ DÉPANNAGE ................................................................................................. 24
6/ SERVICE APRÈS-VENTE ............................................................................. 25
Page is loading ...
Page is loading ...
Page is loading ...
Page is loading ...
Page is loading ...
Page is loading ...
Page is loading ...
Page is loading ...
Page is loading ...
Page is loading ...
Page is loading ...

27
CONTENIDO ES
1/ AVISO A LOS USUARIOS .............................................................................. 28
ADVERTENCIA ........................................................................................... 29
PRECAUCIÓN ............................................................................................ 30
ADVERTENCIA SOBRE LA INSTALACIÓN DE LA CAMPANA .................. 30
2/ INSTALACION DE SU APARATO .................................................................. 31
INSTALACIÓN DEL DUCTO ....................................................................... 31
INSTALACIÓN DE LOS SOPORTES DE MONTAJE .................................. 31
INSTALACIÓN DEL SOPORTE DE FIJACIÓN DEL DUCTO ...................... 31
INSTALACIÓN DEL FILTRO DE RECIRCULACIÓN SIN DUCTO .............. 31
PREPARE LA CAMPANA ............................................................................ 32
INSTALACIÓN DE CAMPANA .................................................................... 33
3/ USO DE SU APARATO .................................................................................. 34
OPERACIÓN .............................................................................................. 34
4/ MANTENIMIENTO Y LIMPIEZA DE SU APARATO ........................................ 35
MANTENIMIENTO ...................................................................................... 35
5/ TROUBLESHOOTING ................................................................................... 36
6/ SERVICIO POSTVENTA ................................................................................ 37
Page is loading ...
Page is loading ...
Page is loading ...
Page is loading ...
Page is loading ...
Page is loading ...
Page is loading ...
Page is loading ...
Page is loading ...
Page is loading ...
Page is loading ...
Page is loading ...
Page is loading ...
Page is loading ...
Page is loading ...
Page is loading ...
Page is loading ...
Page is loading ...
Page is loading ...
Page is loading ...
Page is loading ...
Page is loading ...
/