Page is loading ...

ENGLISH
CAL. NX04
DUO-DISPLAY QUARTZ
● Time/calendar display
● Demonstration function
● World time
● Stopwatch
● Regular alarm
● Single-time alarm
● Illuminating light
(Electroluminescent panel)

2
English
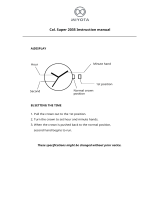
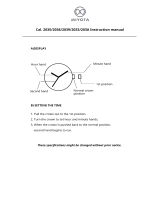
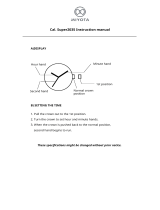
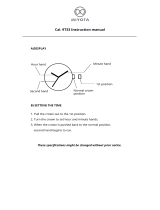
CROWN/BUTTONS AND DISPLAYS
A
CB
D
Date Day
Minute hand
SecondsMinutesHour
Second hand
Hour hand
CROWN
a: Normal position b: Extended position
a b

3
English
REGULAR
ALARM
With each press, the mode in the digital display changes in the following
order:
TIME/
CALENDAR
WORLD TIME
STOPWATCH
➡➡
➡
➡
A
Press in TIME/CALENDAR mode to show SINGLE-TIME ALARM
mode.
TIME/CALENDAR SINGLE-TIME ALARM
➡
C
With each press in the TIME/CALENDAR mode, the display changes
in the following order:
D
Time/Calendar Calendar
➡
Blank
➡
➡

4
English
SCREW DOWN CROWN
[for models with screw down crown]
Locking the crown
1 Turn Crown counterclockwise until you no
longer feel the threads turning.
2 Crown can be pulled out.
1 Push Crown back in to normal position.
2 Turn Crown clockwise while pressing it lightly
until tight.
Unlocking the crown

5
English
TIME/CALENDAR MODE
● Before setting the analogue time, be sure to set the digital time.
DIGITAL TIME/CALENDAR SETTING
Press to show TIME/CALENDAR
mode.
▲
Press for 2 to 3 seconds to show
TIME/CALENDAR SETTING
display.
Date
Day
C
● Once the time/calendar of your area is set in the TIME/CALENDAR mode, the
times of the 27 cities covered in the WORLD TIME mode will be set automatically.
A D
SecondsMinutesHour
* The world map and
a city mark appear,
and the part of the
map representing
the city flashes.
City mark
A
A

6
English
City ➾ Seconds ➾ Minutes ➾ Hour ➾ Year ➾ Month ➾ Date
➾
12-/24-hour indication
➾
▲
Press to select the digits/segments to be adjusted (flashing).
Press to set the flashing digits/segments.
Press to return to TIME/CALENDAR mode.
▲
C
D
A
▲

7
English
1 Pull out when the second hand is
at the 12 o’clock position.
2 Turn to set the hour and minute
hands to the time shown in the
digital display.
3 Push back in to the normal
position when the second digits
count “00” in the digital display.
ANALOGUE TIME SETTING
CROWN
Hour hand
➠
➠
Minute hand
Second hand
1
3
2
A convenient way of using the TIME/CALENDAR mode
When you travel around different time zones, the time and calendar of the place
you visit can easily be shown in the TIME/CALENDAR mode.

8
English
1 Press button A for 2 to 3 seconds in the TIME/CALENDAR mode to show
the TIME/CALENDAR SETTING display.
2 Press button D repeatedly to select the city representing the place you are
visiting.
3 Press button A to return to the TIME/CALENDAR mode, and then, adjust
the hands to the digital time.
● The watch shows the modes and displays in order.
D
Press for 2 to 3 seconds in TIME/CALENDAR mode to start the
demonstration.
* The modes and displays are shown for 2 seconds in the following order:
DEMONSTRATION FUNCTION
Time/calendar
display
Calendar
display
WORLD TIME
mode
REGULAR
ALARM mode
➾
➾
➾
➾➾
➾
* To stop the demonstration, press any of the buttons. The watch will
return to the TIME/CALENDAR mode.
Blank display
STOPWATCH
mode

9
English
WORLD TIME MODE
●
The times of 27 cities in different time zones throughout the world can be displayed
together with the time difference between the selected city and your area.
● Daylight saving time can be set for each city.
A
C
D
Time difference
Daylight saving time mark
City mark
Selected
area
(flashing)
Time of the selected area
Press to show
WORLD TIME mode.
▲
A
C D
or
Press to select the
desired city.
* With each press of button C and D,
the flashing segments of the map
move rightward and leftward,
respectively.
*
If a selected time zone has no city
mark set for the watch, “– – – – – –”
will be displayed in place of a city mark.

10
English
1 Press button C or D to select the desired city.
2 Press button A for 2 to 3 seconds to show the DAYLIGHT SAVING TIME
SETTING display.
* A flashing “DST” mark appears.
3 With each press of button D, the standard time and daylight saving time of
the selected city are alternately shown.
4 Press button A to return to the WORLD TIME mode.
DISPLAYING THE DAYLIGHT SAVING TIME

11
English
Time differences
UTC = coordinated universal time
City mark
City name
UTC ± (hours)
[standard time]
UTC ± (hours)
daylight
saving time
[]
(–11)*
HNL
ANC
LAX
DEN
CHI
NYC
CCS
RIO
(–2)*
(–1)*
UTC
LON
PAR
CAI
–
Honolulu
Anchorage
Los Angeles
Denver
Chicago
New York
Caracas
Rio de Janeiro
–
–
–
London
Paris
Cairo
–11:00
–10:00
–09:00
–08:00
–07:00
–06:00
–05:00
–04:00
–03:00
–02:00
–01:00
+00:00
+00:00
+01:00
+02:00
–10:00
–09:00
–08:00
–07:00
–06:00
–05:00
–04:00
–03:00
–02:00
–01:00
+00:00
–
+01:00
+02:00
+03:00

12
English
City mark City name
UTC ± (hours)
[standard time]
UTC ± (hours)
daylight
saving time
[]
JRS
JED
THR
DXB
KBL
KHI
DEL
DAC
RGN
BKK
HKG
TYO
ADL
SYD
NOU
WLG
Jerusalem
Jeddah
Tehran
Dubai
Kabul
Karachi
Delhi
Dhaka
Yangon
Bangkok
Hong Kong
Tokyo
Adelaide
Sydney
Nouméa
Wellington
+02:00
+03:00
+03:30
+04:00
+04:30
+05:00
+05:30
+06:00
+06:30
+07:00
+08:00
+09:00
+09:30
+10:00
+11:00
+12:00
+03:00
+04:00
+04:30
+05:00
+05:30
+06:00
+06:30
+07:00
+07:30
+08:00
+09:00
+10:00
+10:30
+11:00
+12:00
+13:00
* For the time zones with “*” mark in the table above, “– – – – – –” will be displayed in
place of a city mark.

13
English
STOPWATCH MODE
● The stopwatch can measure up to 23 hours, 59 minutes and 59 seconds in 1/100
second increments for the first hour and in 1 second increments thereafter.
A
C
D
SecondsMinutes 1/100 seconds
STOPWATCH
mode mark
Start/Stop/Restart
Reset

14
English
Press button A to show the STOPWATCH mode.
Accumulated elapsed time measurement
Start Stop Restart Stop Reset
➡
➡➡
➡
C DC C C
STOPWATCH OPERATION

15
English
REGULAR ALARM MODE
Press to show REGULAR ALARM
mode.
▲
Press for 2 to 3 seconds to show
REGULAR ALARM SETTING
display.
REGULAR ALARM
mode mark
C
A D
Alarm mark
MinutesHour
* The hour digits start flashing.
A
A
Press to select the digits to be
adjusted (flashing).
C
▲
Hour ➾ Minutes
➾
Press to set the digits.
D
▲

16
English
Press to return to REGULAR ALARM mode.
▲
A
* The alarm mark appears and the regular alarm is automatically engaged.
Engagement/disengagement of the regular alarm
● With each press of button C in the REGULAR ALARM mode, the regular alarm
is engaged and disengaged alternately.
* At the designated time, the alarm rings for 20 seconds and stops. To stop it
manually, press any of the buttons.

17
English
SINGLE-TIME ALARM MODE
Press in TIME/CALENDAR
mode to show SINGLE-TIME
ALARM mode.
Press to set the desired alarm
time.
Designated alarm time
C
A D
Single-time
alarm mark
C
● The single-time alarm can be set to ring only once at the designated time. As it
rings, it is automatically disengaged.
● The alarm time can be set in 1 minute increments starting from the current time.
Current time
C D
or
▲
▲
A
Press to
return to TIME/
CALENDAR mode

18
English
* The alarm rings at the designated time for 20 seconds. To stop it manually, press any
of the buttons.
● To cancel the alarm time you have set, press buttons C and D at the same time
or press button C or D to set the alarm time to the current time in the SINGLE-TIME
ALARM mode.
ILLUMINATING LIGHT (Electroluminescent panel)
B
Press in any mode.
* The digital display is evenly
illuminated for 3 seconds.
B

19
English
NOTES ON USING THE WATCH
TIME/CALENDAR MODE
[DIGITAL TIME/CALENDAR SETTING]
● The calendar automatically adjusts for odd and even months including February of leap
years from 2000 to 2050.
● Once the year, month and date have been set, the day of the week is automatically set.
● Before setting the time/calendar, be sure to select the city representing your area. (For
the city marks and cities they represent, see “Time differences”.)
● Setting the seconds:
• With the second digits flashing, press button D in accordance with a time signal. The
second digits are reset to “00” and start immediately.
CROWN/BUTTONS AND DISPLAYS
● If the watch is left untouched in the WORLD TIME mode, it will automatically return to
the TIME/CALENDAR mode in 1 to 2 minutes.
• When the seconds count any number from “30” to “59” and button D is pressed, one
minute is added and the seconds are reset to “00”.
● 12-/24-hour indication setting:
• Changeover between 12- and 24-hour indications is made alternately with each press
of button D.
● The flashing digits except the seconds and 12-/24-hour indication move quickly if button
D is kept pressed.

20
English
[DISPLAYING THE DAYLIGHT SAVING TIME]
● When the daylight saving time is set for the city selected in the TIME/CALENDAR mode,
the current time is advanced by one hour.
● If the watch is left untouched in the DAYLIGHT SAVING TIME SETTING display with the
daylight saving time mark flashing, it will automatically return to the WORLD TIME
mode in 1 to 2 minutes.
● When setting the hour digits in the 12-hour indication, check that AM/PM is properly set.
Only the “PM” mark is displayed. For the AM setting, there is no indication. In the 24-
hour indication, “24” is displayed.
● If the watch is left untouched in the TIME/CALENDAR SETTING display with the digits/
segments flashing, it will automatically return to the TIME/CALENDAR mode in 1 to 2
minutes.
● Note on unusual display:
While in the TIME/CALENDAR SETTING display with the digits flashing, all the
segments of the display will light up if both buttons C and D are pressed at the same
time. This is not a malfunction. Press button A, C or D to return to the TIME/CALENDAR
mode, and then set the time/calendar again.
[ANALOGUE TIME SETTING]
● When setting the minute hand, first advance it 4 to 5 minutes ahead of the desired time
and then turn it back to the exact minute.
WORLD TIME MODE
● To display the times of the cities covered in the WORLD TIME mode properly, it is
necessary to select the city representing your area and set the correct time in the TIME/
CALENDAR mode. (See “TIME/CALENDAR MODE”.)
/