Page is loading ...

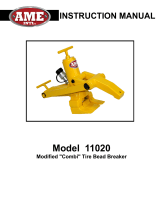
INSTRUCTION MANUAL
Model 11010
"Combi" Tire Bead Breaker

To avoid serious personal in-
jury, always wear proper pro-
tective gear, such as hard
hats, safety glasses, gloves,
and steel toe shoes when us-
ing hydraulic equipment.
Failure to chock the wheels
and crib the vehicle can re-
sult in Serious injury or
death. Always deflate tires
before removing a wheel, a
rim, or part of a rim clamp or
nut. If you do not deflate the
tire, the tire could explode,
causing serious injury of
death. Always stand to one
side of the rim when using
the bead breaker. Standing to
one side of the bead breaker
allows you to maintain con-
trol of the bead breaker. If it
is not seated properly and
flies off the rim, the bead
breaker could cause serious
injury or death.
AME INTERNATIONAL
! WARNING !
- 2 -
IMPORTANT RECEIVING INFORMATION
Visually inspect all parts for shipping damage. If you find shipping dam-
age, notify the carrier at once. Shipping damage is not covered by your
warranty. The carrier is responsible for all costs of replacement or
repair caused by shipping damage.
Warranty of this unit will be void on any part if the unit subjected to
misuse due to overloading, abuse, lack of maintenance and
unauthorized modifications. No warranty – verbal, written or implied –
other than the official, published AME new machinery and equipment
warranty will be valid with this unit. In addition, it is your responsibility to
be aware of existing Federal, State and Local codes and regulations
governing the safe use and maintenance of this unit.
DESCRIPTION
The 11010 Bead Breaker is used on all types of rims except 5-piece
earthmover rims. It is ideal for use with truck, farm tractor, grader, com-
bine, and skidder tires. The 11010 can be used with a hydraulic pump
model (15000), (15020),(15040), or equivalent 10,000 psi [700 bar]
pump.
SAFETY INFORMATION
To avoid personal injury or property damage while using this product,
read and follow all DANGERS, WARNINGS, CAUTIONS, and IN-
STRUCTIONS that are attached to, or included with, this product.
1. Follow the instructions of the tire manufacturer and the vehicle manufacturer
when deflating, demounting, mounting, and inflating tires.
2. These operating instructions do not apply to any specific rim. There-fore,
contact the rim manufacturer for the correct procedure for your rim.
3. For the publication, “Multipiece Rim Matching Chart” contact the United
States Department of Labor.
4. AME Intl cannot be held responsible for damage or injury resulting from
unsafe use of this product; lack of maintenance; or incorrect product and
system application.
5. Contact AME Intl. when in doubt about safety precautions or applica-tions.
The bead breaker, and all tire tools, should be used only by per-
sons properly trained according to OSHA Regulation
#29CFR1910.177, “Servicing Single-Piece & Multi-Piece Wheels.”
Free copies of this regulation are available upon request from AME
Intl.
WARNING
INSTRUCTION MANUAL
To avoid serious personal injury, always wear proper protective gear,
such as hard hats, safety glasses, gloves, and steel toe shoes when using
hydraulic equipment.
CAUTION

AME INTERNATIONAL
- 3 -
OPERATING INSTRUCTIONS
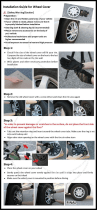
REMOVING THE WHEEL
1.Chock the wheels opposite the jack
2.Jack up the vehicle.
3.Crib the vehicle with safety stands or blocking devices after jacking it up. Do not work under an un-
blocked load
DANGER
Failure to chock the wheels and crib the vehicle can result in serious injury or death.
4.Remove the valve core; deflate tires completely. (See Fig. 1.)
5.Insert a thin piece of wire through the valve stem to make sure air is flowing freely and the valve stem is
not blocked.
NOTE: Deflate both tires if you have a dual mounting.
DANGER
Figure 1
Always deflate tires before removing a wheel a rim, or part of a rim,
such as a rim clamp or nut. If you do not deflate the tire, the tire
could explode, causing serious injury or death.
6a. If you are breaking the tire bead with the wheel on the vehicle: Pro-
ceed to “Positioning the Bead Breaker” below
6b. If you are breaking the tire bead with the wheel of the vehicle: Rmove the tire/ rim assembly from The
vehicle and place it flat on the ground with the gutter side up. Then proceed to “Positioning the Bead
Breaker” below.
USING THE 11010 BEAD BREAKER
Positioning the Bead Breaker
Position the bead breaker, so that the wedge- shaped teeth
will grad evenly under the rim flange when the clamping jaw tightens.
(See Fig. 2)
NOTE: Make sure the bead breaker is about 30
0
, or at least 12 inches [0,3 m], to one side of the flange butt weld.
INSTRUCTION MANUAL

AME INTERNATIONAL
- 4 -
Activating the Bead Breaker
CAUTION
The bead breaker uses a long stroke and high force. Be Careful not to dam-
age or bend rim parts, such as flange But weld, when using the bead
breaker.
1. Run the air hydraulic pump so that the clamping jaw begins to tighten against
the rim. (See Fig. 3) Make sure the wedge –
shaped teeth are placed well into the tire bead and against the rim flange.
NOTE: To grab the rim flange evenly, you may have to try Several times.
Do not force the bead breaker when grabbing the flange.
2. Continue to apply hydraulic pressure until the bead breaking ram ex-
tends about ¼ inch [6,35 mm] from the bead breaker. (See Fig 4.)
3. Maintain the bead breaker, so that it is nearly perpendicular (90°) to
the rim.(See Fig. 5.) If necessary, adjust the position of the bead
breaker.
4. Step away from the bead breaker. (See Fig. 6.)
INSTRUCTION MANUAL

AME INTERNATIONAL
- 5 -
DANGER
Always stand to one side of the rim when using the bead
breaker. Standing to one side of the bead breaker allows
you to maintain control of the bead breaker.
Do not hold the bead breaker when breaking the tire bead.
If it is not seated properly and flies off the rim, the bead
breaker could cause serious injury or death.
5. Continue to apply hydraulic pressure until the bead breaking ram ex-
tends about 1/2 - 3/4 inch [13-19 mm] from the bead breaker. (See Fig.
7.)
NOTE: Never try to break the tire bead with only one push. Instead, pro-
ceed to “Continuing to Break the Tire Bead” below.
Continuing to Break the Tire Bead
1. Move the bead breaker 8-12 inches [0,2-0,3 m] from its current posi-
tion.
2. Repeat steps, starting with “Positioning the Bead Breaker”, until the rim is completely separated
from the tire bead.
Breaking the Bead on the Other Side
1. Turn the tire over on the other side.
2. Repeat all steps, starting with “Positioning the Tire Bead” on page 2.
DANGER
Failure to chock the wheels and crib the vehicle can result in serious injury or death.
MOUNTING AND INFLATION
Jacking Up the Vehicle
1. Chock the wheels opposite the jack.
2. Jack up the vehicle.
3. Crib the vehicle with safety stands or blocking devices after jacking it up. Do not work under an un-
blocked load.
INSTRUCTION MANUAL

AME INTERNATIONAL
- 6 -
INSTRUCTION MANUAL
Inspecting the Tire and Rim
DANGER
Always replace damaged or badly worn tires. When replacing tires, always use a replacement of
exactly the same diameter. Destroy old tires, so that they cannot be used. Using badly worn or
damaged tires can result in serious injury or death.
1. Inspect all rim parts for damage.
DANGER
Always replace rim parts that are bent, badly rusted, pitted from corrosion, cracked, worn, or
damaged. Destroy old rim parts, so they cannot be used. Using damaged rim parts can result in
serious injury or death.
Do not mix parts from one rim with parts from another rim. Always use replacement parts that
you can positively identify as the CORRECT replacement parts. All replacement rim parts MUST
match the replacement part numbers stamped on the rim parts. Rims with different part numbers
cannot be interchanged. If in doubt about sizing, DO NOT reassemble the rim. Contact the rim
manufacturer for more information.
2. Replace damaged parts.
DANGER
Never weld on an inflated or partially inflated tire/rim assembly. Welding on an inflated tire/rim
assembly can cause an explosion and serious injury or death.
Do not rework, weld, heat, or braze any rim parts for any reason. Reworking and welding dam-
aged parts can result in serious injury or death.
3. Clean and repaint rim parts as necessary.
NOTE: Remove rust, dirt, and foreign material from rim parts. Repainting the rim parts and bare metal
areas will make them last longer. Be careful to keep paint out of the lock ring groove in the gutter when
repainting rim parts.
4. Visually inspect all tire and rim parts to make sure they are positioned properly.
Starting to Inflate the Tire
1. To comply with OSHA Regulation #29CFR1910.177, place the tire in a safety cage or other restrain-
ing device before inflating the tire. Use a clip-on air chuck and hose that is long enough to allow you
to stand outside the wheel trajectory. The air line must be equipped with an in-line valve with pres-
sure gauge or regulator that can be preset. Use AME INTL. Truck Tire Inflator Model 11365.

AME INTERNATIONAL
- 7 -
DANGER
Always use a safety cage or restraining device when inflating a tire. Not using a safety cage or
restraining device can result in serious injury or death.
Always use a clip-on air chuck and a hose that is long enough to allow you to stand outside the
wheel trajectory. The air line must be equipped with an in-line valve with a pressure gauge or a
regulator that can be preset.
Never use starting fluid, ether, gasoline, or any other flammable material to lubricate, seal, or
seat the bead of a tubeless tire. Doing so can cause an explosion and serious injury or death.
2. Inflate the tire to 5 psi [0,345 bar].
3. Check all tire and rim parts again for proper positioning.
4. If tire/rim parts are not seated properly, deflate the tire and correct the problem before proceeding.
WARNING
Never hammer, strike, or pry an inflated or partly inflated tire/rim assembly. If you must seat a
part or correct a problem, always deflate the tire first.
CAUTION
Do not use a steel hammer on rim or rim parts. This can damage the rim. If you must reposition
tire or rim parts, use a rubber, plastic, or brass-faced hammer.
If a tire/rim assembly does not slide over a cast spoke wheel: Do not force the assembly by
hammering. Instead, deflate the tire and inspect for warped or incorrectly seated parts, such as
lock rings.
5. If tire and rim parts are seated properly proceed to “Finishing the Tire Inflation” below.
Finishing the Tire Inflation
1. Inflate the tire to 20 psi [1,38 bar].
2. Check the tire bead for proper seating.
3. Continue inflating the tire to 40 psi [2,76 bar]. If the tire bead is not fully seated, see the Warning
below. If the tire bead is fully seated, continue with Step 4 below.
INSTRUCTION MANUAL

WARNING
Never inflate a tire beyond 40 psi [2,76 bar] to seat a tire bead. If the tire bead is not fully seated at 40 psi
[2,76 bar]: Stop! Deflate the tire and correct the problem.
4. Once you see that the tire bead is fully seated at 40 psi [2,76 bar], deflate the tire completely.
5. Reinflate the tire slowly to the manufacturer’s recommended pressure.
DANGER
Inflate and load tires only to manufacturer’s specifications. Over-inflating and overloading tires can result
in serious injury or death.
Never run a vehicle with only one tire of a dual assembly. Doing so can result in a collapse of the vehicle,
leading to possible serious injury or death.
INSTRUCTION MANUAL
Feel the difference with AME International. Learn more about automotive tools we have.
/