Bissell 6591 Owner's manual

Type
Owner's manual

This manual is also suitable for

6591/3595/3596 SERIES
3
5=6
We'regladyou purchaseda BISSELLVacuum.Everythingwe know aboutfloor
carewent into the designand construction of this complete,high-tech home
vacuumingsystem.
YourBISSELLVacuumis well made,and we back it with a limited
comprehensiveone-yearwarranty.Wealsostand behind it with a
knowledgeable,dedicatedConsumerServicesDepartment,so,shouldyou ever
havea problem,you'll receivefast,considerateassistance.
My great-grandfather inventedthe floor sweeper in 1876.Today,BISSELLisa
global leader in the design, manufacture,and service of highquality homecare
products likeyour BISSELLVacuum.
Thanksagain,from all of usat BISSELL.
Mark J. Bissell
Presidentand ChiefExecutiveOfficer
0
j S_etchHose
Carrying
Hanale,\
\
CreviceTool-
Twbt
Dusti
ur}nolsTey Too
HandleRelease
Pedal
QuickRelease
j_ Cord'@lae
Sowe
withScreen,<
@
(SelectModelsOnly)
CarpetSensor
(SelectModelsOnly)
CleanFilterIndicator
(SelectModelsOnly)
FrameandFilter
(InsideLouvers)
Filter
Wide Cleaning
Path Foot
O
selgrl_
Adj
',,nob
Drotecti
Guarc
Pre-Moro
Heaolgnr
/
CAUTION:
Do not plugin yourvacuum
cleaneruntil youare familiar
with all instructionsand
operating procedures,
Lever
Foot
•FurnitureProtection
Guard
ThisUser'sGuidehasbeendesignedtohelpyou
getthemostsatisfactionfromyourBISSELLvacuum.
You'llfindassemblyandoperatingingructions,
safetyprecaddons,aswellasmaintenanceand
troubleshootinginslructions.PleasereadthisGuide
_horoughlybeforeassemblingyourvacuumcleaner.
Payparticularattentionto theproductdiagram,
assemblyinstructions,andpartnames.Locateand
organizeaJlpartsbeforeassembly.Familiarize
yourselfwiththe partsandwheretheyfit.Following
this User'sGuidewill greatlyenhanceyourability
togetthemostperformancefromyourBISSELL
vacuumfor manyyears.
Theonlytoolyou'llneedto assembleyourvacuum
cleanerisa screwdriver.
Locate the vacuum Handle andremove me scre_
packet taped to the base of the Handle.
Stand the vacuum upright and slide the base of
the Handlefirmly into the grooves at the top of the
vacuum body,
Check to be sure the Handle is fitted to tne vacuum
body. If there is a gap in front, continue to push firmly
until the Handle is flush.
O Insert the screw provided from the screw packet into
the existing hole.Tighten securely with a screwdriver.
k
0
Joe UDrne rapson the base of theTwist 'n Snap
dose Wltll tne corresponding no[cnes onrne hose
collar as shown,
I_ Turn theTwist 'n Snap Hoseto me nght to lockthe
hose imo place.
Grasping the Quick Reach Handle,slidethe end of
the Hose Wand ontothe HoseWand Base.Snap the
Hose into the Hose Clip.
NOTE',The Powerfoot will not operate
effectively unless the HoseWand is
firmly attached.
O Slide the ExtensionWand and the CreviceTool
together into the storage clip as snown
SlidetheDustingBrush/UpholsteryToolintothestorageclip
asshown.
O AttachtheTurboBrushbyaligningthesmallholesnear
thebrushrollwith thetabsatthebottomofTurboBrush
housing.SnapTurboBrushintoplaceasshown.
SelectModelsOnly
= =
| floor cleaning. To prevent carpet |
|damage, do not lean on the vacuum or|
let the Powerfoot tilt forward.
CAUTION:
Before using your vacuum,
make sure that the Dirt
Containerand Upper Tank are
in locked position and that all
filters (UpperTank, Pre-Motor
and Post-Motor) are in place.
Do not operate yourvacuum
without these filters.
@
PresstheHandleReleasePedalwithyourfoottoplace
yourvacuumintooneofthreedeaningpurl'done.
Upright- Forstorageand abovefloor cleaningw_[n[oo_s.
Normal Cleaning- PressHandle ReleasePedalonce. Use
for most household floor cleaning tasks.
OLow Cleaning- With the vacuum innormal cleaning
position, press Handle ReleasePedalagain. Usefor
reaching under low furniture such as tables, chairs
or beds.
ThePowerfoot/RotatingFloorBrushonyourvacuum
canbeadjustedtocleanseveralfloorsurfaces.
NOTE:For optimal cleaning performance,
adjust to the lowest practical setting, if your
cleaner is difficult to push, adjust to the next
higher setting.
Place Handle inUpright Position.
O Turn Height Adjustment knob to desired setting.
Lowest Setting For bare floors.
Medium Settings For short and medium
pile carpets.
Nighest Setting For plush pile carpet.
Place the Handle in the normal cleaning position andthe
Powerfoot will adjust to the setting chosen.
NOTE:Youmay also adjust the setting while
in the normal cleaning position.
OTo move your cleaner from room to room, pu[ rne
Handle in the upright position, tilt the cleaner bacKon
its rear wheels and push forward.
OThe cleanercanalsobemovedbyusingthe
CarryingHandle.
O
Select ModelsO.ly
TheCleanCarpetSensordetectsdirtbeingpickedup
whilethevacuumisinuse.Whenthevacuumispicking
updirt.theredlightwillcomeon.Occasionally,1helights
mayalternatequicklybackandforthiftheareaisonly
lightlysoiledorthedirtisspreadout.Forthebest
cleaning,continuetovacuumuntilthegreenlight
remainsconstantlyilluminated.
Select ModelsOnly
TheCleanFilterIndicatortellsyouwhenairflowin
thevacuumisreduceddueto dirtyfiltersor a clog
in thehose.TheCleanFilterIndicatorwillremain
greenuntiltheairflowisreduced.Atthattime,it
beginsto changetored.Whenit isfullyred the
airflowis significantlyreducedor blocked.Follow
thestepson page11to cleanyourfilters.Allfilters
in thevacuumshouldbecleanedor replacedwhen
theCleanFilterIndicatorturnsred.
If theindicatorremainsredafterallfiltershavebeen
cleaned,followthestenson page13to checkfor
andclearclogs.
NOTICE:
Whilevacuuming,certaincarpets
andlawhumidity conditionsmay
generatesmallstaticdischarges.
The dischargesare entirely
harmlessandarenotassociated
inanywaywiththemain
powersupply.
O
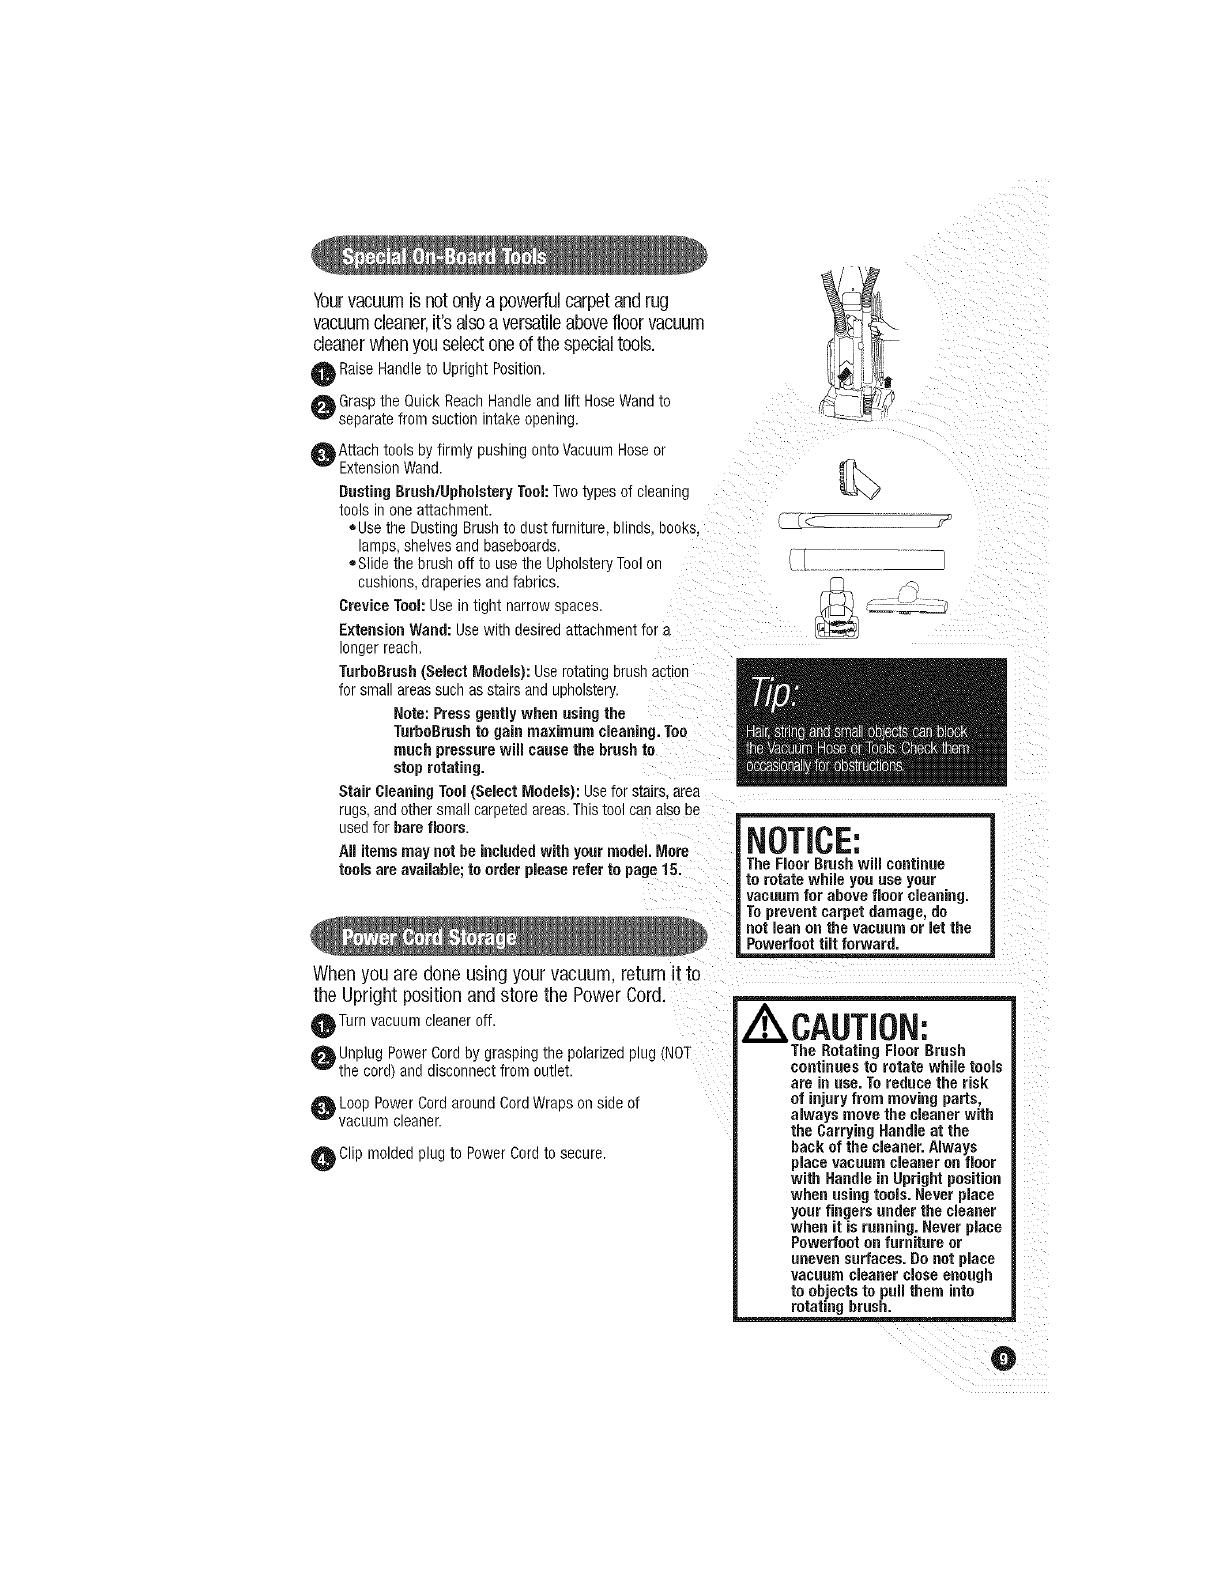
Yourvacuumisnotonlya powerfulcarpetandrug
vacuumcleaner,it'salsoa versatileabovefloorvacuum
cleanerwhenyouselectoneofthespecialtools.
Raise Handleto Upright Position.
OGrasp the Quick Reach Handle and ft HoseWand to
separate from suction intake opening.
OAttach tools by firmly pushing onto Vacuum Hoseor
ExtensionWand.
Dusting Brush/Upholstery Tool:Twotypes of cleaning
tools inone attachment.
=Usethe Dusting Brush to dust furniture, mines. DOCKS.
lamps,shelves and baseboards.
=Slide the brush off to use the Upholstery Toolor
cushions,draperies and fabrics.
Crevice Tool:Use in tight narrow spaces.
Extension Wand: Usewith desired attachment for a
longer reach.
TurboBrush(Select Models): Userotating urusn acrton
for small areas such as stairs and upholstery.
Note: Press gently when using the
TurboBrushto gain maximum cleaning. Too
much pressurewill cause the brush to
stop rotating.
Stair Cleaning Tool (Select Models): Usefor stairs area
rugs,and other small carpeted areas.This tool can also be
used for bare floors.
All items may not be includedwith your model More
tools are available; to order pleaserefer to page 15.
Whenyouare done usingyourvacuum,returnit to
the Uprightpositionand storethe PowerCord.
OTurn vacuum cleaner off.
Unplug PowerCord by grasping the polarized plug (NOT
the cord) and disconnect from outlet.
O Loop Power Cordaround Cord Wraps on side of
vacuum cleaner.
OClip molded plug to Power Cordto secure.
_F
NOTICE:
The Floor Brush will continue
to rotate while you use your
vacuum for above floor cleaning.
To prevent carpet damage, do
not lean on the vacuum or let the
Powerfeot tin forward.
A\CAUTION:
The Rotating Floor Brush
continues to rotate while tools
are in use.Toreduce the risk
of injury from moving parts,
always move the cleaner with
the Carrying Handle at the
back of the cleaner.Always
place vacuum cleaner on floor
with Handle in Upright position
when using tools. Never piece
your fingers underthe cleaner
when it isrunning. Never place
Powerfoot on furniture or
uneven surfaces. Do not place
vacuum cleaner close enough
to objects to pull them into
rotating brush.
O
Tomaximizeyourdenning performanceandextendthe
lifeofyourvacuum,itisveryimportantthatyouempty
yourdirtcontainerandcheckandcleanyourfilters
frequently.Performthefollowingmaintenancesteps:
OEmpty the Dirt Container when me air[ reaclles the
"Full" line.
Check the UpperTankand Pre-Motor Filters at least once a
month and clean or replace as needed.
O CleanorreplacethePost-MotorFiltereverytnree[osixmonths.
Note:Morefrequentfilter cleaningmaybe
necessaryif youarevacuumingnewcarpet,
fine dust,orhaveallergy concerns.Followthe
instructionsonthefollowing pagesto perform
thesesimplemaintenancesteps.
/ WARNING:
To reduce the risk of
electric shock, turn
Power Switch OFFand
disconnect polarized
plug from electrical outlet
before performing
maintenance or
troubleshooting checks.
TheDirtContainerneedsto beemptiedwhenthe dirt
reachesthe Full lineontheContainer.
Unplug cleaner from electrical outlet.
OSlide the LOCK'n Seal Leverto the "Unlock position.
Grasp handle and pull the Dirt Container straight out to
remove from vacuum
Empty dirt into garbage container.The Screensmay also be
removed from the side DustChambers when you empty or
clean the Dirt Container.The Screensare made to fit each
Dust Chamber.Ifthey do not slide down completely, try in
the opposite Dust Chamber.The Screenswill also notfit if
there is debris in the track.
O Put the Dirt Container back in the vacuum and slide the
lever to the "Lock" position.
Note: The DirtContainer and Screensmay he
washed inwarm water with a mild detergent.
Make sure it iscompletely dry before using again.
Screc
To maintainthe effectivenessof the CleanCarpet
Sensor.aquarterly cleaningof the internalsensor
ensis recommended.Tocleanthe sensorlens,
detachtheTwist qSnapHoseand gently wipe the
clearlensarea usinga lightly dampenedseft cloth.
Allow enoughtime for the lensto dry thoroughly
beforereattachingthe Twistn Snap Hoseand using
the vacuum.
@
Unplug the cleaner from electrical outlet.
OThe UpperTank Filter can be reached by removing the Dirt
Container,reaching underneath the UpperTank and turning
the rim of the Filter Frameto unlock. Pull straigh[ down [o
remove. Brush the dirt off the Louversand UpperTankFilter.
OThe foam UpperTank Filter may be removed ann nana
washed incold water with mild detergent. Rinse wenrner
air dry thoroughly before replacing.
OThe UpperTankandLouversmayalsobewipedcleanw_tr
adampcloth.
Note:Foreasieraccess,the entire UpperTank
maybe removedbyturningthe knobon the
backofthe cleanerto unlockandpullingthe
entiretank straightout.
Unplug the cleaner from electrical outlet.
O The Pre-Motor Filterprotects the motor from dirt particles.
It is located in the slide out tray underneath the Dirt
Container.If the filter becomes dirty, pull outthe tray, lift
out the filter and clean.
O The Post-MotorFilter assists inthe filtration process to
return clean airto the room.It is located behindthe door on
the sideof the cleaner.Ifthe filter becomes dirty, open the Pro-Motor
door,removethe filter and clean. Filte,r------_
Note: Select Models come with a white, pleated
NEPAMedia Filter.This filter is not washable (
/
and must be replaced. _
O The standard filters may be hand washed incold wate_
with mild detergent. Rinse well andair dry thoroughly
before replacing.
Youshouldcheck yourvacuumcleaner'sRotating
FloorBrushand DriveBelt regularlyfor wearor
damage.Youshouldalso cleanthe brushand brush
endsof strings,hair,and carpetfibers.Thesecan
wraparoundthe brushand hamperits abilityto
effectivelycleanyourcarpet.Alsoremoveanydebris
that hasaccumulatedunderthe brushcover.
O Unplug cleaner from electrical outlet.
Place handle in Low position and turn vacuum cleaner over
so bottom side is up.
O Lift Tab 1 and release the three latches in order 2-4
marked. Lift the Brush Coveroff.
Q
O Grasp Rotating Floor Brush at both ends and lift.
Cleanstnngs, hair and other debris from Rotating Floor
3rush, paying [)articular aEentlon ro orusn ends.
O Cleanstrings, hair and other debris from Motor Pulleyand
Drive Belt areas.
O Check Drive Belt carefu y for wear. cuts or stressea areas.
_ CheckAir Passagewayfor obstructions. Removedebris
from this area.
\
Unplug cleaner from electrical ouue[.
AWJth Rotating Floor Brush removed from vacuum cleaner
v
(Steps 1-4 of check Rotating Floor Brush and Drive Belt),
grasp old Drive Belt and remove from Motor Pulley.
3iscard old Drive Belt.
@ ;lace new Drive BeltoverMotorPulleyaoas[re[cn otnerend
overRotatingFloorBrushin the spacebetweenthe bristles.
Place ends of Rotating Floor Brush do_ n into slots on
sides as shown.
OTurn Rotating Floor Brush by hand severa times in the
direction of Motor Pulley.If properly installed Drive Belt
will center itself on Rotating Brush crown.
ReposJtionBrush Coverandscrew or snap backinto place.
Checkto be sure allscrews or latchesare secure.
g
AirPassageway
Unplug cleaner from electrical outlet.
Usinga screwdriver, remove the two screws as shown
and lift off the lens.
Removethe bulb from the socket by grasping bulb and
pulling straight out. Install the new bulb by pushing it
gently into the socket until the bulb snaos into place.
ReposJtionlens and secure with the two screws.
\\
_Lz .... eJ
0
SelectModelsOnly
TheTurboBrushshouldbecheckedregularlyforclogs
or debriswrappingaroundthebrushroll.
Unplug vacuum from electrical OUtlet.
If a clog ispresent or debris is visible, unscrew [ne two
screws onthe back of the TurboBrushto remove tne
faceplate and clear any obstructions.
O Toclean debris from the brush rol, remove me screw
located by the brush roll with a Phil os head screwdriver.
_ift the belt cover. Removethe brush ro from the drive
belt and clean debris.
O Repositionthedrivebeltonthebrushroll.Placeends
ofbrushrollinslotsonsidesasshown.Reposmonbelt
coverandsecurewithonescrew.ReoositionfaceEale
andsecurewithtwoscrews.
Lowsuctionorpoorpickupmaybe dueto a clogin //_ _X
thevacuumcleaner.Ifyounoticea changeinthe _/_
soundofthemotororareductioninthespinning -'q y/T/ ¢,_',)T_
action,checkfor clogs. 1.____
0 Unplug cleanerfrom electrical outlet. _,,/_v'v'v'v'v'v'v'v'_/,___/ ,- ,
Empty Dirt Container. _ \_! _/--_
"_" _J Suction Ii'
0 Check UpperTank for build up or clogs. _/_
Inlet
O Removethe UpperTankandcheck thesuctioninletfor a clog. _[_
0 Graspthe QuickReachHandleandlift HoseWandtoseparate _z:_,i
from thesuction opening.Checkfor a clogin the Base,the I I I/\j II I1_, _
Wandor the Hose. It 1 ]II1/11t
ReeasetheTwst 'n Snap Hosefrom the vacuum by turn ng U _j'
@ to the left.Straightenthe hoseandunclogwith along, _,_._L__ Hose Wand
narrow object, f_ I_/! Base
_ Ifthe clog persists, follow the instructions for Checking /_ (_//' _._,j,_,
the Rotating Floor Brush on pages 11-12 and nspect the '_ 4 - -_--_!\
Air Passagewayfor obstructions. _-_/__
AirPassageway_
For informationabout repairsor replacement parts,or auestions aboutyour
warranty,call:
BISSELLConsumerServices
1-800-237-7691
Monday - Friday 8 a.m. 10 o.m. ET
Saturday 9 a.m. 8 o.m. ET
Or write:
BISSELLHomecare,Inc.
POBox3606
GrandRapids, MI49501
ATTN:ConsumerServices
Or visit the BISSELLwebsite- www.bissell.com
WhencontactingBISSELL,havemodelnumberof unitavailable,
PleaserecordyourModelNumber:
PleaserecordyourPurchaseDate:
NOTE:Pleasekeepyouroriginalsales receipt.It is yourwarranty.
@
Vacuum cleaner won't run
Possible Causes
O Powercordnotpluggedin
Blownfuse/trippedbreaker
WARNING:
To reducethe risk of injuryfrom moving
partsand/or electrical shock, turn Power
Switch OFFand disconnectpolarizedplug
from electrical outletbeforeperforming
troubleshooting checks.
Remedies
O Checkelectricalplug
O Check!Replacefuseor resetbreaker
Vacuumcleaner orToolswon't pickup dirt
PossibleCauses
O ncorrectHeightAdjustment
0 Hosenotattachedto suctionopening
Twist'n SnapHosenotsecurelyattached
O Crackor holeinHose
Q Brokenor wornDriveBelt
Q Rotating;Igor Brushbristlesworn
O RotatingFloorBrushjammed
0 Clog nvacuum
O DirtContainerfull
@bDirtContainerorUpperTanknotinstalledproperly
Filtersaredirty
_b TurboBrushiscloggedor debrisis wrapped
aroundtheBrushRoll
Vacuumcleanerisdifficult to push
PossibleCauses
O IncorrectHeightAdjustment
Visibledirt escapingfrom cleaner
PossibleCauses
O DirtContainerfull
0 Filtersmissingorinstalledincorrectly
0 DirtContainerinstalledincorrectly
Remedies
OAdjust Powertootto correctheight
Q FirmlypushHoseWandintothesuc'donopening
0 MakesureTwist'n SnapHoseissnappedinto
lockedposition
Q CheckHoseandreplaceifneeded
Q ReplaceDriveBelt,seepage12
O Replacebrush
0 Removebrushandcleandebrisfrombrushends
Q Clearclog,seepage13
Q EmptyDirt Container
@ Positioncorrectlyandlockin place
CheckandcleanUpperTank,
Pre-MotorandPost-MotorFilters
@bMaintainingTurboBrush,seepages12-13
Remedies
O AdjustPowertoottocorrectheightsetting
Remedies
0 EmptyDirtContainer
Q CheckUpperTank,Pre-MotorandPost-Motor
Filtersfor correct installation
0 Pulloutandre-insertDirtContainercorrectly
CleanCarpetSensornotfunctioningproperly
PossibleCauses Remedies
O CleanCarpetSensorLensis Dirty O CleanInternalSensorLens,seepage10
_) _ CloginSuctionIntakeArea 0 Clearclog,seepage13
Youmaypurchasereplacementpartsfromyourretailer,bycallingBISSELLConsumerServices
orbyvisitingourwebsite.Tolocatearetailernearyou,ortoplaceanorderusingVISA.
MasterCard,DiscoverorAmericanExpress,call:
BISSELLConsumerServices
1-800-237-7691
Orvisit our Website- www.bissell.com
item Part No.
1 32074
2 203-1297
3 203-1063
4 203-1228
5 203-6732
6 203-6730
7 203-6624
8 203-1084
9 203-2035
10 203-6726
11 203-6729
12 203-6756
13 203-1195
14 3093
15 3099
16 32076
Part Name
Style7/9/10 DriveBelt !2-Pack
StandardHeadlightBulb
CreviceTool
DustingBrush/UpholsteryToo
TurboBrush(SelectModelsOny)- me
TurboBrush(SelectModelsOnly)-SonicYello_
StairCleaningTool(SelectModelsOnly;
ExtensionWand
WireReinforcedTwist'n SnapVacuumHoseCear
WideWindowFootBrusnRoll- Lime
WideWindowFootBrusnRoll- SonicYeow
WideWindowFootBrushRoll- Taupe
WideCleaninaPathFootBrusnRo
Style7/8 uDDerTankFilterand Pre-MotorFilterSet
Style7 WashablePost-Motor:ilter Sett2 pack)
Style7 HEPAMediaPost-MotorFilter
@
This warranty gives youspecific legal gnrs,anu you Ylavalso haveother rights which may vary from state to
state. It ;ou neeuaaumona_ns[rucuon regarum_ [n_swarranty or have questions regardingwhat it may cover,
eleasecontact BISSELLConst ner Servicesb\ E-ma releonone or regular mailas described below.
Limited OneYearWarranty
Subject to the *EX}EPTIONSALD EXCLUSIONSidentified below, upon receipt of the product BISSELLHomecare,
_c.wlu repair or replace wire new ol remanuracturea cart ponents or products), at BISSELL'soption, free of
cnarae from the date of EJrcnaseoy me anginal )urchaser. for oneyear any defective or malfunctioning part.
See nformatlon uelow on "If your BISSELLoroaucr snoula requireservice".
Thiswarranty applies T( sroauc[ useafor sersona ana norcommercial or rentalservice.This warranty does not
applyto fans or routine _nalmenancecor_oonemssuch as filters, belts, or brushes. Damageor malfunctioncaused
oy negugence,aDuse qeglecLunautnonzearepair,or an} )mer use not in accordancewith the User's Guide is
no[coverea.
if yourBISSELLproductshouldrequireservice:
ContactBISSELLConsumerServicestolocatea BISSELLAuthorizedServiceCenterin yourarea.
Ifyouneedinformationaboutrepairsorreplacementparts,orif youhavequestionsaboutyour
warranty,contactBISSELLConsumerServices.
Websiteor E-mail:
www.bissell.co_
Usethe "CustomerServices"tab.
OrCarl:
BISSELLConsumerServices
1-800-237-7691
Monday- Friday8 a.m.- 10 p.m.ET
Saturday9a.m.- 8 p.m.ET
Orwrite:
BISSELLHomecare,Inc.
POBox3606
6randRapids.M149501
AS-rN:ConsumerServices
RiSSELL ROMECARE, iNC. IS NOTLIABLE FOR INCIDENTAL OR CONSEQUENTIALDAMAGESOF ANY
NATUREASSOCIATEDWITH THE USE OF THIS PRODUCT.RISSELL S LIABILITY WILL NOTEXCEED THE
PURCHASE PRICEOFTHE PRODUCT.
Some states do not allow the exclusion or limitation of incidental or consequential damages, so
the above limitation or exclusion may not apply to you.
*EXCEPTIONSAHD EXCLUSIONSFROM THETERMS OFTHELIMITED WARRANTY
@
THISWARRAHTYIS EXCLUSIVEAND iN LiEUOFANYOTHERWARRANTIESEITHER
ORALOR WRITTEH.AHY IMPLIED WARRANTIESWHICHMAY ARISEBY OPERATION
OFLAW.INCLUDINGTHE IMPLIED WARRANTIESOFMERCHANTABILITYAHD
FITNESSFORA PARTICULARPURPOSE.ARELiMiTED TOTHE ONEYEARDURATION
FROM THEDATEOFPURCHASEASDESCRIBEDABOVE.
Somestatesuono[alowuml[auonson NOWdnganImpuedwarrantylasts,sotheaboveliraitation
ma!norapply[o you.
©2005 BISSELLHomecar_,Inc
GrandRapids,Michigan
All rights r_served Pril/tedin Korea
PartNumber603 6720
Rev02/05
Visit ourwebsiteat:
www bissellcom
  • Page 1 1
  • Page 2 2
  • Page 3 3
  • Page 4 4
  • Page 5 5
  • Page 6 6
  • Page 7 7
  • Page 8 8
  • Page 9 9
  • Page 10 10
  • Page 11 11
  • Page 12 12
  • Page 13 13
  • Page 14 14
  • Page 15 15
  • Page 16 16

Bissell 6591 Owner's manual

Type
Owner's manual
This manual is also suitable for

Ask a question and I''ll find the answer in the document

Finding information in a document is now easier with AI