Page is loading ...

Issue - /06/14
Dimensions
Width - 245cm
Depth - 245cm
Height - 250cm
Bar Gazebo & Table
Assembly Instructions
- Please keep for future reference
872/9314
Important
–
Please
read
these
instructions
fully
before
starting
assembly
For further assistance please visit http://www.argos-support.co.uk
If you need help or have damaged or missing parts, call the
Customer Helpline: Argos = 0345 6400800
Address: 489-499 Avebury Boulevard Saxon Gate West, Central Milton Keynes Bucks,MK9, 2NW

1
IMPORTANT SAFETY INSTRUCTIONS
Read all instruction before using and keep for future reference
CAUTION
Read these instructions
carefully and familiarise
yourself with the procedure
before assembling the unit.
Check that you have all the
component parts following the
list on the page 3 and
familiarise yourself with each
part before proceeding.
Take all the fittings out of the
plastic bag and separate them
into their groups.
Ensure you have enough
space to lay out all the parts
before assembly.
To avoid scratching it is
recommended that you
assemble the unit on a soft
level surface.
The unit
weight approximately
Warning:
Please lift with care.
when assembly. Please keep
children under direct supervision
of adult when using.
under windy condition.
the gazebo when using.
structure and should be
disassembled and stored away
after using.
until completely dry.
four persons under light or no
wind conditions.
erect in windy conditions.
from screws, nails, staples,
hooks, etc to avoid damage to
the fabric and frame.
Safety
suffocation to animals or
children dispose of the
Cleaning
with a damp cloth and mild
detergent, do not use bleach
plastic bags immediately.
or abrasive products.
61 kgs.
To prolong the life of
the fabric/canopy, we
recommend to dismantle
it and store it indoors over
the winter months.
This gazebo should be
secured to the ground at
all times. If positioned on
grass then tent pegs can
be used. If positioned on
concrete, then bolts should
be used.
Always use the pegs to secure
Recommend Caution
Each shelve can bear 45kg
maximumly. Please do not
put more than this weight
on the shelve.
This product contains toughened
safety glass.In the unlikely event
that the glass fails it will break
into a large number of small
fragments that may be spread
over a wide area.
Do not strike the glass with
hand or pointed items.
Do not sit or stand on the
glass surface,as this would be
hazardous.

2
1
2 3
4
5
6 7
8
9
10 11
12
13
14 15
16
17
18 19
20
Gazebo Leg Pole x 2 Gazebo Leg Pole x 1 Gazebo Leg Pole x 1 Support Pole x 4
Top Pole x 4 Top Pole x 4 Metal Connector x 8 Center Connector x 1
Table Leg x 1 Table Leg x 1 Table Top Frame x 1 Table Leg x 1
Shelve x 4 Table Sling tube x 6 Table Sling tube x 4 Panel x 2
Panel x 2 Panel x 2 Table Glass Top x 2 Upper Gazebo Cover x 1
Components - Parts
Please check you have all the parts listed below
If you have damaged or missing components, call the
Customer Helpline: Argos = 0345 6400800

Main Gazebo Cover x 1 Wine Glass Rack x 1
21
22
Components - Parts
Please check you have all the parts listed below
If you have damaged or missing components, call the
Customer Helpline: Argos = 0345 6400800
Spanner x 1
The quantities below are the correct amount to complete the assembly. In some cases more fittings
Note:
may be supplied than are required.
A
B
D
C
Screw x 40 Screw x 4
Screw caps x 38
E
F G H
Peg x 8(Φ 4.5x200mm)
Spanner x 1
Components - Fittings
Please check you have all the fittings listed below
If you have damaged or missing components, call the
Customer Helpline: Argos = 0345 6400800
Screw x 36 Screw x 8
M6X15
M6X28
M6X40 M6X60
3

4
Assembly Instructions
Step 1
a:
pole
Assembling Gazebo Leg
and Support Poles
A
A
A
with screws
1
1
Note:
connect the support
4
to leg pole
suggest to complete
this product assembly
by 2 persons
x2
x4
1
1
3
1
2
4
2
3
4
a:
A
x2
b:
c:
b:
A
repeat this step for
leg pole and leg pole
.
2
4
c:
use support pole
to connect two assembled
units by screws .
4
4
Important note:
Because of the
size of this unit we
recommend that it
is built in the place
intended for using.
Ensure to locate
the unite on the
flat ground free
from obstruction,
in a sheltered area
away from wind
and heavy rain as
this will damage
the unit.
3

1
1
3
2
4
A
A
7
5
8
6
5
5
6
7
x4
x4
Step 3
Assembly Instructions
Step 2
5
Assembling Metal
Connector onto the
gazebo frame
a:
b:
At this step please
keep metal connector
45 degrees with the line
of support poles
a: After fixing leg poles
assemble metal connector
4
7
7
21
3
with srews .
A
onto leg poles
b: Fix metal connectors
onto the support poles
with screws
A
7
4
Assembling top poles
8
6
insert top poles
into center connector
5
&

Step 5
Assembly Instructions
Step 4
Carefully place the upper
gazebo cover and the
main cover
assembled top poles.
Then fix the upper gazebo
gazebo cover tightly over
the assembled roof frame.
Note:
It would be useful
to ask someone to
help you at this
step.
Assembling gazebo
covers
over the
20
21
20
21
7
5
E
B
6
But at this step please do
not fix the main gazebo
cover tightly.
Assembling top poles
onto the leg
the connected
top poles
Assemble
and
the frame by connecting
them and metal connector
onto
with screws
E
B
and
and screw
caps
.
5
6
7
Note:
a ladder is suggested
to be used in this step
Then fix the main gazebo
gazebo cover tightly over
the assembled roof frame.

Step 7
Assembly Instructions
Step 6
Assembling panels
Fix table legs
with screws
Assembling bar table
Fix table legs
B
11
129 10
B
14
15
17
16
10
9 12
and
onto table top frame
11
Insert sling tube into
panels .
14
17
Insert sling tube into
panels .
15
16
Important:
Do not fully
tighten all screws
until assembly is
complete.
7

x8
x2
x4
Assembly Instructions
Step 8
15
16
16
17 17
14
A
E
B
B
E
a:
b:
Assembling table sling
tubes into the table frame
a:
to table legs
9 and 10
with screws
A
a:
connect the panels
1516
9 and 10
with screws .
A
b:
to table legs and
9 10
with screws .
A
connect the panels
1517
1512
9 10
B
10
9
9
12
10
8

b:
x4
x2
x4
Step 10
Assembly Instructions
Step 9
a:
Assembling shelves onto
the table legs
a:
connect the shelves
15
9 and 10
with screws
A
a:
13
9 10
C
D
E
D
E
E
C
13
10
12
9
3
2
B
onto the table legs
and screw caps
AE
b:
connect the shelves
15
:
connect the
13
12 with screws
onto the table legs
and screw caps
AE
AD
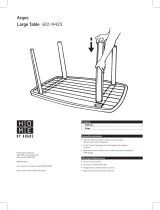
Connect the table and
the gazebo leg poles
Fix the table legs
9
and
10
9
10 onto the gazebo poles
9 and 10 with screws 2 3
AB
9

Step 12
Assembly Instructions
Step 11
Fixing the sling tubes
to the table legs(the
side w/o panels)
15
with screws and
A
14
B
screw caps .
AE
104
Fix the sling tube
to the table legs and
9 9
1012
15
with screws and
A
14
B
screw caps .
AE
Fix the sling tube
to the table legs and
9 12
1010
19
18
18
22
4
19
H
a:
b:
c:
d:
a:
put the table glass
on the table top frame
1019
1011
b:
hang the panels
on the table frame
1018
c:
hang the wine glass
rack on the support
pole
1022
if the product is
positioned on grass,
please fix it using pegs
d:
AH
Important note: always use this product with caution
and read the important safety instructions.
For further assistance please visit http://www.argos-support.co.uk
If you need help or have damaged or missing parts, call the
Customer Helpline: Argos = 0345 6400800
Address: 489-499 Avebury Boulevard Saxon Gate West, Central Milton Keynes Bucks,MK9, 2NW
Assembly is complete.
10
9
14
14
10
14
14
12
E
E
B
B
14
/