Whirlpool WDF330PAHS User guide
- Category
- Dishwashers
- Type
- User guide
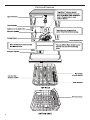
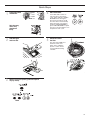
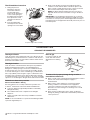
Whirlpool WDF330PAHS is a high-quality dishwasher with features designed for energy efficiency, optimal cleaning performance, and ease of use. Its water and energy-saving capabilities make it an environmentally friendly choice. The dishwasher uses a triple filtration system for minimizing sound, optimizing water and energy consumption, and maintaining peak cleaning performance. It also has an optical water sensor that determines the optimum water and energy consumption for excellent cleaning results.
Whirlpool WDF330PAHS is a high-quality dishwasher with features designed for energy efficiency, optimal cleaning performance, and ease of use. Its water and energy-saving capabilities make it an environmentally friendly choice. The dishwasher uses a triple filtration system for minimizing sound, optimizing water and energy consumption, and maintaining peak cleaning performance. It also has an optical water sensor that determines the optimum water and energy consumption for excellent cleaning results.


-
 1
1
-
 2
2
-
 3
3
-
 4
4
-
 5
5
-
 6
6
-
 7
7
-
 8
8
-
 9
9
-
 10
10
-
 11
11
-
 12
12
-
 13
13
-
 14
14
-
 15
15
-
 16
16


Whirlpool WDF330PAHS User guide
- Category
- Dishwashers
- Type
- User guide
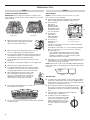
Whirlpool WDF330PAHS is a high-quality dishwasher with features designed for energy efficiency, optimal cleaning performance, and ease of use. Its water and energy-saving capabilities make it an environmentally friendly choice. The dishwasher uses a triple filtration system for minimizing sound, optimizing water and energy consumption, and maintaining peak cleaning performance. It also has an optical water sensor that determines the optimum water and energy consumption for excellent cleaning results.
Ask a question and I''ll find the answer in the document
Finding information in a document is now easier with AI
Related papers
-
Whirlpool Dishwasher User manual
-
-
-
-
Whirlpool WDF120PAFB User manual
-
-
-
-
-
Other documents
-
IKEA IUD8555DX3 Owner's manual
-
-
KitchenAid KUDE70FXBL6 Owner's manual
-
Kenmore 13542 Owner's manual
-
KitchenAid KUDE40FXWH4 Owner's manual
-
Jenn-Air JDB9200CWX3 Owner's manual
-
Jenn-Air JDB8700AWP0 User manual
-
Jenn-Air JDB8700AWP0 Owner's manual
-
 Kenmore Elite 14712 Owner's manual
-
 Kenmore Elite 72214307910 Owner's manual

