
1.
Dr
ill a
3
/4" hole in the center of top and bottom boards where rope
will be attached.
2. Tie five knots, equally spaced, for climbing grips.
3. Insert rope through top hole and tie a knot with 4" remaining.
4. Insert opposite end through bottom hole, pull tight and tie a knot
while keeping rope snug.
5. Secure with staples provided (2 each end).
30" Wide Climbing Rock
Incline
60" Wide Climbing Rock
Incline
30" Wide
Climbing
Rock
Vertical Wall
1
3
/
4
"
STAKE
1
3
/
4
"
18"
2" x 4"
Tools Required: Drill, ¹⁄₈" & ¹⁄₄" Drill Bit, Tape Measure, Saw, Hammer, Phillips Screwdriver, Socket
W
rench,
⁹
⁄₁₆
"
Socket, Chalk, Pencil, Square, Safety Glasses, Tape,
³
⁄₄
"
Spade Bit
Hardware Included: (8) #14 x 1¹⁄₄" Pan Head Screws
30"
WIDE INCLINE
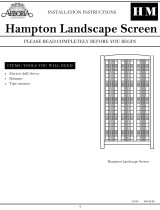
INSTALLATION INSTRUCTIONS FOR ALL 3 STYLES
IMPORTANT: B
efore starting to build your Climbing Rock Wall, make sure all boards are cut and identified
by size and name. (To avoid marks on lumber, use masking tape or chalk.) This will improve your building time
greatly because you will know the size and name of each board as the instructions call for them.
1
. Using a scrap of wood between the end of the stake and the hammer will reduce the likelihood
of the end of the stake splitting.
2
. If soil conditions permit stakes to be pulled out easily, such as in sandy soil conditions,
cementing is required. If your ground is too hard to pound in the stakes, you can remove the
earth with a shovel. Install the stakes and compact the earth as you replace it. Stakes must be
placed belo
w the level of the shock-absorbing surfacing material to prevent tripping or injury
resulting from a fall.
3.
For stake angle cut, measure 1³⁄₄" from straight cut. Draw a
line from measurement to center of straight cut.
3/4"
3/4"
MOUNTING OPTIONAL ROPE (PS 7828)
60" 18"
2" x 4" x 8' – two (2) boards required
Boards 1 - 2
5/4" x 6" x 10' – one (1) board required
5/4" x 6" x 8' – two (2) boards required
W
all Support Stake
Wall Decking Wall Decking Wall Decking
Boards 1 - 2
30" 30" 30"
Wall Decking Wall Decking Wall Decking Wall Decking
Board 1
30" 30" 30" 30"
4. For Detail of Screw Placement
Predrill –
1
/
8
" Dia. for #8 x 2
1
/
2
" deck screws
1
/
4
" Dia. for
3
/
8
" x 3" lag screws
F GE H
A
Fig. 1
F
F
G
G
2"
x 4"
x 60"
2"
x 4"
x 60"
2" x 4" x 18"
23"
3
. Install ten 5/4" x 6" x 30" wall decking.
H
old wall supports at dimension shown.
(Fig. 2)
4. Place first board tight against the bottom
o
f the deck side board with equal
o
verhang on both sides of wall supports,
a
pproximately 3
¹
⁄₂
"
. Secure with four
#8 x 2
¹⁄₂" deck screws. (Fig. 2)
5. Install next board tight against
first, keeping 23" measurement.
Secure with four #8 x 2¹⁄₂" deck
s
crews. (
Fig. 2)
6. Repeat for remaining boards. (Fig. 2)
7
. Install Rocks.
Fig. 2
E
5/4" x 6" x 30"
23"
E
E
E
E
E
E
E
E
E
5. To install rocks:
A. Position rocks at desired location.
B.
Mark pilot holes with pencil.
C. Predrill
¹⁄₈" dia. holes 1" deep.
D. Secure each rock with two #14 x 1¹⁄₄" pan head screws provided.
1.
Install tw
o 2" x 4" x 60" w
all suppor
ts to 4" x 4" to
w
er posts
.
P
osition the w
all supports
under the deck side board so the ends are flush with the rear edge of the 4" x 4"s
(opposite ends resting on the ground as shown). Secure with two #8 x 2
¹⁄₂" deck
scre
ws and one ³⁄₈" x 3" lag scre
w with w
asher each side
.
(Fig.1)
2. Install two 2" x 4" x 18" ground stakes at the bottom of wall supports as shown (outside
dimension of w
all supports will be 23"). Drive them into the ground as shown. Secure
with four #8 x 2¹⁄₂" deck screws each. (Fig.1)
60" WIDE INCLINE
60" 18" 8"
2" x 4" x 8' – two (2) boards required
Boards 1 - 2
5/4" x 6" x 10' – five (5) boards required
2" x 4" x 10' – one (1) board required
Wall Support Stake Block
W
all Decking Wall Decking
Board 1
60" 60"
Wall Decking Wall Decking
Boards 1 - 5
60" 60"
19"
16"
15"
19"
1. Install two 2" x 4" x 8" blocks 19" from inside of 4" x 4" posts as shown. Secure with four
#8 x 2
¹⁄₂" deck screws each. (Fig.1)
2. Install two 2" x 4" x 60" wall supports to 4" x 4" tower posts. Position the wall
supports under the deck side board so the ends are flush with the rear edge of
the 4" x 4"s (opposite ends resting on the ground). Secure with two #8 x 2¹⁄₂" deck
screws and one ³⁄₈" x 3" lag screw with washer each side. (Fig.1)
3. Install two 2" x 4" x 18" ground stakes to wall supports as shown (outside
dimension must be 53"). Drive them into the ground as shown. Secure with
four #8 x 2¹⁄₂" deck screws each. (Fig.1)
4. Install two 2" x 4" x 60" wall supports to the 2" x 4" x 8" blocks. Position
the wall supports under the deck side board so the end is in line with
the two outer wall supports. Secure with two #8 x 2¹⁄₂" deck screws
per board. (Fig.1)
Fig. 1
5. Install ten 5/4" x 6" x 60" wall
decking. Hold wall supports at
dimensions shown in Figure 1.
6. Place first board tight against the bottom
of the deck side board with equal o
v
erhang on
both sides of w
all support, approximately 3
¹⁄₂".
Secure with eight #8 x 2¹⁄₂" dec
k screws
.
(Fig.
2)
7. Install next board tight against first, keeping measurements shown
in Fig.
1.
Secure with eight #8 x 2
¹⁄₂" dec
k scre
ws.
(Fig.
2)
8. Repeat for remaining boards. (Fig. 2)
9. Install Rocks.
Fig. 2
53"
16"
G
G
F
F
H
H
A
A
E
E
E
E
E
E
E
E
E
E
5/4" x 6" x 60"
2"
x 4"
x 60"
2"
x 4"
x 60"
2"
x 4"
x 60"
2"
x 4"
x 60"
2" x 4" x 18"
1. Install two 2" x 4" x 48" vertical rails at dimensions shown. Secure to base and deck support using eight #8 x 2¹⁄₂" deck
screws per board.
(Fig.1)
2. Install eight 5/4" x 6" x 30"
w
all panels. (Fig.
2)
3.
Place first board flush with top
of decking. Secure with eight
#8 x 2
¹⁄₂" deck screws.
(Fig. 2)
4.
Install ne
xt board tight
against first.
Secure with
eight #8 x 2
¹⁄₂" deck screws.
(Fig. 2)
5. Repeat for the remaining boards. (Fig. 2)
6.
Install Roc
ks.
Fig. 2
A
A
A
A
A
A
A
A
A
30"
A
A
A
2" x 4" x 48"
2" x 4" x 48"
5/4"x6"x30"
Fig. 1
30" WIDE VERTICAL WALL
5/4" x 6" x 10' – two (2) boards required
2" x 4" x 8' – one (1) board required
V
ertical Rail V
ertical Rail
Board 1
48" 48"
W
all P
anel
W
all P
anel Wall Panel Wall Panel
Boards 1 - 2
30" 30" 30" 30"
Hardware Required:
(52) #8 x 2¹⁄₂" deck
screws
(2)
³⁄₈" x 3" lag screws
(
2)
³
⁄₈
"
flat washers
Hardware Required:
(104) #8 x 2¹⁄₂" deck
screws
(2)
³⁄₈" x 3" lag screws
(
2)
³
⁄₈
"
flat washers
H
ardware Required:
(80) #8 x 2¹⁄₂" deck
screws
PlayStar
,
Incorporated
Janesville, WI 53547
Patent Nos. US 6,540,645 & 6,709,365
© 2004, 1999 PlayStar, Inc.
Climbing Roc
k Kit PS
7830
LT 6415
PS 7830
-
 1
1

Ask a question and I''ll find the answer in the document
Finding information in a document is now easier with AI
Related papers
-
PlayStar KT 74752 Operating instructions
-
-
-
-
-
-
PlayStar PS 7534 Operating instructions
-
-
-
Other documents
-
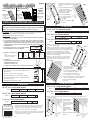
 Arboria Hampton Landscape Screen User manual
-
 Backyard Discovery Grand Escape Setup Manual
-
Gorilla Playsets 4431 Installation guide
-
-
-
Gorilla Playsets 01-0066-TS Operating instructions
-
-
-
Swing-N-Slide Playsets 6352 User manual
-
 Signature Development 810901500000000 Operating instructions


