Page is loading ...

EUPHONIA
Manual
www.dali.dk
EUPHONIA Series

2
3
anish udiophile oudspeaker ndustries
The black boxes
contain head-
words for the
subjects discus-
sed on each
page.
The aim of this
manual is to
ensure that you
have the infor-
mation you
need for setting
up, connecting
and positioning
your Euphonia
speakers.
DALI® is renowned among music lovers throughout the world for its
unique speakers and cables, all constructed and build for uncompro-
mising design and sound requirements. Our ultra-modern factory in
Denmark is fully equipped with facilities for development and produc-
tion of quality speakers.
DALI's principal competence is development and optimisation of known
and new technology in the eld of audio and acoustics. The result is con-
tinuous development and optimisation of new and existing models.
We always keep our goal rmly in view for each and every DALI® speaker:
To recreate sound experiences in your home that will carry you away,
making you forget time and place...
It is important to us that your new DALI® speakers be set up and con-
nected optimally. This manual contains our recommendations for setup,
connection and maintenance.
Enjoy!

2
3
Euphonia
Euphonia
Euphonia
Euphonia
Euphonia
Unpacking
Running-in
Running-in
Like any other mechanical system, a speaker needs to be "run in", so you can look
forward to a gradual improvement in sound quality over the initial period. Unlike
other mechanical systems, regular use will in fact extend your loudspeakers life-
time.
Unpacking
After unpacking and setting up the equipment in the most suitable way, the
enclosed spikes should be mounted (MS5, MS4 and AS2). The thread bushings are
embedded in the base. After mounting, tighten the lock nuts to ensure the best
possible mechanical stability.
DALI® recommends the use of spikes for oor-standing speakers to ensure the
best possible acoustic connection between oor and speaker.


6
7
D
D
D
5
4
9
0
24,0
2
1
,
6
4
,
0
°
°
1
2
0
1
1
1
2
,
0
81,2
12,4
2
0
,
0
5
4
9
,
0
4
6
1
,
1
How the room affects the sound
Every room has its own distinctive acoustics, which in uence the way we
experience the sound from a speaker. In actual fact, it's a matter of how
the room accommodates the sound and then dampens it. You can in u-
ence the acoustics of your listening room in various ways.
Some of the sound you hear does not come directly from the actual
speakers but are re ections from oor, ceiling and walls. These re ec-
tions can be dampened by objects such as furniture, plants and carpets.
If the sound is bright, adding soft items such as curtains and carpets can
help. If the room has large window panes, drawing the curtains will pre-
vent re ections from the glass surfaces.
Both the amount and quality of the deep bass depend on the size and
shape of the room, and the position of the speakers. If positioned near
a side or back wall, this will accentuate the bass. A corner location will
accentuate it even more, but will also increase the re ections. The deci-
sion is yours, so experiment with different positions to nd which pro-
vides the ideal sound for you.
As a general guide, avoid large, hard re ective surfaces immediately
around the speakers, as these will act like an eccho effect and weaken
the spatial perspective of the sound image. Try placing a tapestry behind
the speakers, laying a rug in front or placing a large plant at the side - it's
surprising how much this can affect the precision of the sound image.
How the room
affects the sound
When you are satis ed with the location
of the speaker, it is important to ensure
that the speaker does not tilt or is unstable
in any other way. For the oor-standing
models, it is very important that they are
mounted with the enclosed spikes. The
rear speaker, RS3, must be hung carefully
using the enclosed tting, which should
be mounted with materials suitable for
the wall.

6
7
Connection
The connection to your ampli er is extremely important for your sound experi-
ence. Before you connect cables or make any changes to the connections, you
must disconnect your ampli er from AC-power.
Always use the same type and length of cable for the left and right speakers. This
class of speaker should be connected with very high quality cables such as DALI®
Wave or Wasatch. Using inferior cables is like putting low cost tyres on a full-
blooded sports car. As an alternative to direct installation in the terminal screws,
the cables can also be connected to the terminals with special plugs such as DALI®
connect to ensure a stable connection and loss-free transfer of the signal.
A detail often overlooked is connection to the correct polarity, i.e. the red termi-
nal (+) on the ampli er must be connected to the red terminal (+) on the speaker,
and the black terminal (-) on the ampli er must be connected to the black termi-
nal (-) on the speaker.
DALI® recommends connection with DALI® connect plugs or spade plugs to ensure
a perfect electrical connection and mechanical stability.
In the following pages, we will describe the special conditions that occur when
connecting with tri-wiring or bi-wiring, and connecting the AS2 subwoofer.
Connection &
Cables

8
9
Tri-wiring
Bi-wiring
Tri-wiring / Bi-wiring
Tri-wiring means that the bass, midrange and treble tone ranges are each
fed through their own separate speaker cable. In the ultimate set-up,
there is an ampli er to handle each range (tri-amping). Tri-amping is the
sophisticated consequence of multi-wiring in a multipath speaker, which
allows the maximum bene t of the EUPHONIA MS5. All other EUPHONIA
models are connected by bi-wiring.
Bi-wiring or bi-amping improves the acoustic quality markedly and can be
highly recommended. Bi-wiring provides greater openness in the acous-
tic image and reduces distortion. Bi-amping - when separate ampli ers
are used for the bass/midrange tone and treble ranges - provides even
greater openness in the acoustic image and adds increased dynamics.
For bi-wiring on the MS5, we recommend that the treble and midrange
terminals are combined and the bass terminals are supplied separately.
DALI® EUPHONIA speakers can, of course, be used with single-wiring. In
this case, the enclosed cables should be used with three stripped parts
that are fed down through the terminals, thus connecting the bass, mid-
range and tweeter terminals.
DALI® recommends that EUPHONIA speakers
are connected with bi-wiring as a minimum to
ensure the best possible conditions for acoustic
imaging.
We recommend DALI® Silver Wave
Four speaker cables for bi-wiring.
For tri-wiring, we recommend DALI®
Silver Wave Four for the treble and
midrange tone range, and DALI®
Silver Wave for the bass. This keeps
powerful currents from the bass sig-
nals away from the cables that carry
the treble/midrange tone signals.
Treble
Midrange
Bass

8
9
Connecting
EUPHONIA
AS2
Stereo signal
with full
frequency
content
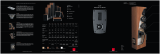
Connecting the AS2 subwoofer
Thanks to its active crossover network and numerous connection options, the
AS2 provides further advantages such as stepless variable phase. The AS2 is con-
nected to a line signal either via 'Left/Right Input', 'Mono Input' or 'LFE Input'. It
is important that the level of the connected line signal is controlled together with
the equipment’s volume control.
Connection to stereo signal with full frequency content
If the subwoofer is connected to a pre-ampli er without a built-in crossover net-
work of the same high quality as the AS2, we recommend that the subwoofer’s
'Left/Right Inputs' are connected to a signal with full frequency content from a
normal pre-ampli er output. The subwoofer’s built-in crossover network takes
care of the necessary ltering.
Once the subwoofer’s 'Left/Right Inputs'
are connected to a stereo signal with full
frequency content, there is access to a high-
pass ltered signal (without the deep tones)
on the 'Left/Right Output' sockets. This
signal is connected to the power ampli er
for the main speakers, which thus does not
need to handle the demanding deep tones.
This will always result in the main speakers
playing more cleanly and un-stressed.

10
11

10
11
Functions
EUPHONIA
AS2
Output terminals
The output terminals (Left & Right) provide a ltered output signal with a crosso-
ver frequency of 70 Hz and cut off with a 2nd order high-pass lter. This set of ter-
minals can be used if the subwoofer is used together with the speaker driven by a
separate ampli er, if you want only the frequency range over 70 Hz to be handled
here, e.g. to protect the speaker system against very low frequency content - low
frequencies which the AS 2 has been selected to deal with.
Other functions
The 'Power' button is the main switch for the system. You should switch off the
system completely when it will not be in use for long periods. When making or
changing connections, you must always switch off the system completely.
The 'Auto Shut Off' function places the AS2 in stand-by mode after 15 minutes
without a signal on the input. When the AS2 receives a signal again, the system
comes on automatically.
Overloading
If you often play very loud, you should be careful of any dissonance or distor-
tions. The AS2 is protected against short-term overloading, but if you oftentend to
overdrive the system, you should use a permanently lower setting on the volume
level control on the AS2. Repeat any phase adjustment to improve the connection
between the front speaker and subwoofer. It may be this ne adjustment which
provides the desired deep bass level.

12
13
Adjustement
EUPHONIA
AS2
Level
Level
Adjust the volume on the AS2 - or on the connected equipment
when using the LFE input - so that the low frequency level match
the level from the front speakers. You must make adjustments
so that you can notice the contribution to the sound from the
AS2 - but without the bass becoming too dominant. The bass
must act steadily and precisely. If you set the volume too high,
you risk over-modulating the subwoofer, which will adversely
affect the all-important reproduction of the midrange tones
from the front speakers. Using the same setting for both sur-
round and 2-channel stereo is not always optimal. So it is useful
to make a note of your preferred settings for each type.
Begin by setting the 'Level' and 'Low-pass Crossover Fre-
quency' to the middle position (’12 o’clock’). Turn the 'Phase'
control in the '0' position, and then set 'Power' to the 'ON'
position.
If the subwoofer is connected via the LFE Input, both the
'Level' and 'Low-Pass Crossover Frequency' controls will not be
functioning, and should be set to the minimum position. How-
ever, adjustment to the correct level and crossover frequency is
still of great importance, and these adjustments must be made
when setting up the connected equipment. Please refer to the
manuals of the connected equipment.
We recommend the use of the procedure below to achieve the
best results. Use a piece of music you know well and preferably
containing rhythmic base tones such as bass drum, electric bass
or similar.
Adjustment of the AS2 subwoofer

12

14
15
Clean the cabinets with a soft, dry cloth. If the cabinets are dirty, wipe with a soft
cloth dipped in all-purpose cleaner and then well wrung out. Be very careful if
wiping the speaker membranes, as they are very fragile. Fabric frameworks can
be vacuumed and wiped with a well-wrung, lint-free cloth and mild all-purpose
cleaner.
Maintenance
The Euphonia series has been developed and produced without compromise of any
kind. To achieve the optimum sound from your Euphonia speakers it is important
that all links in your stereo/surround system are premium selection. We therefore
repeat our suggestion that you use cables of very high quality throughout the
equipment - preferably DALI® Wave cables, which fully meet the standards of
Euphonia speakers.
We wish to congratulate you once again on your investment, and to inform you
that your authorised Euphonia agent will be happy to provide you with advice on
both connection and adjustment of your stereo/surround equipment. Finally we
would like to invite you to visit our website - www.dali.dk - where you can read
more about the Euphonia range, including the implemented technology behind
the series, other aspects of quality and the stunning story of DALI®.
DALI® - quality in all aspects
Maintenance
Quality in all
aspects

14
15
E
2
5
9
4
Technical speci cations
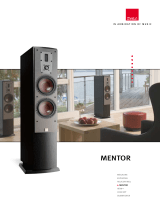
MS 5
Main Speaker
MS 4
Main Speaker
CS 4
Centre Speaker
RS 3
Rear Speaker
AS 2
Active Subwoofer
Frequency range +/- 3dB
Cross over frequencys
Sensitivity(2.83 V/1m)
Nominial impedance
Minimum impedance
Maximum SPL
Rec. amp. power (8 ohm)
Ampli er
High frequency drivers
Midrange drivers
Low frequency drivers
Bass re ex system resonance
Dimensions (HxWxD)
Weight
31 - 28.000 Hz
685/3.300 Hz(17.000)
89 dB
4.0 Ω
3.3 Ω
115 dB
50 - 500 Watt
-
1 x 29 mm soft dome
1 x 10 x 55 mm Ribbon
1 x 6"
2 x 8"
24.0 Hz
124.5x28x55.2 cm
49.5x11.25x22.0 inch.
60 kg/132 lb
33 - 28.000 Hz
3.000 Hz(17.000)
88 dB
4.0 Ω
3.6 Ω
111 dB
50 - 350 Watt
-
1 x 29 mm soft dome
1 x 10 x 55 mm Ribbon
-
2 x 6"
31.5 Hz
101.8x21.9x42.3 cm
40.75x8.75x17.0 inch.
35 kg/77 lb
45 - 28.000 Hz
2.400 Hz(17.000)
88.5 dB
4.0 Ω
3.4 Ω
111 dB
50 - 350 Watt
-
1 x 29 mm soft dome
1 x 10 x 55 mm Ribbon
-
2 x 6"
30.0 Hz
23.9x67.3x51.7 cm
9.5x27.0x20.75 inch.
20 kg/44 lb
64 - 28.000 Hz
2.600 Hz(17.000)
87 dB
4.0 Ω
4.2 Ω
108 dB
50 - 250 Watt
-
1 x 29 mm soft dome
1 x 10 x 55 mm Ribbon
-
1 x 6"
72.5 Hz (sealed)
47x20x20.3 cm
18.75x8.0x8.0 inch.
10 kg/22 lb
25 - 200 Hz
40 - 100 Hz
-
22 kΩ
22 kΩ
120 dB
-
650 W RMS/
1.300 W peak
-
-
2 x 12" long throw
-
40.5x57.3x61.3 cm
16.25x23.0x25.50 inch.
55 kg/121 lb
Technical
speci cations

16
CAUTION
RISK OF ELECTRIC SHOCK
DO NOT OPEN
Concept Interest
CAUTION:
TO REDUCE THE RISK OF ELRCTRIC SHOCK, DO NOT REMOVE THE BACK PANEL. NO USER-SERV-
ICEABLE PARTS INSIDE. REFER SERVICING TO QUALIFIED PERSONNEL.
1. Read Instructions - All the safety and operating instructions should be read before the appliance is operated.
2. Retain Instructions - The safety and operating instructions should be retained for future reference.
3. Heed Warnings - All warnings on the appliance and in the operating instructions should be adhered to.
4. Follow Instructions - All operating and use instructions should be followed.
5. Water and Moisture - The appliance should not be used near water - for example, near a bathtub, washbowl, kitchen sink,
laundry tub, in a wet basement, or near a swimming pool and the like.
6. Carts and Stands - The appliance should be used only with a cart or stand if recommended by the manufacturer.
7. Wall or Ceiling Mounting - The appliance should be mounted to a wall or ceiling only as recommended by the manufacturer.
8. Ventilation - The appliance should be situated so that its location or position does not interfere with proper ventilation. For
example, the appliance should not be situated on a bed, sofa, rug, or similar surface that may block the ventilation openings;
or placed in a built-in installation, such as a bookcase or cabinet, that mayimpede the ow of air through the ventilation
openings.
9. Heat - The appliance should be situated away from heat sources such as radiators, heat registers, stoves, or other
appliances that produce heat.
10. Power Sources - The appliance should be connected to a power supply only of the type described in the operating instructions
or as marked on the appliance.
11. Power Cord Protection - Power-supply cords should be routed so that they are not likely to be walked on or pinched by
items placed on or against them, paying particular attention to cords at plugs, convenience receptacles and the point
where they exit from appliance.
12. Cleaning - Do not use any liquid cleaners. Use only a dry cloth to wipe off dust and grease.
13. Non-use Periods - The power cord of the appliance should be unplugged from the outlet when left unused for a long
period of time.
14. Object and Liguid Entry - Care should be taken so that objects do not fall and liquids are not spilled into the enclosure
through openings.
15. Damage Requiring Service - The appliance should be serviced by quali ed personnel when:
a. The power-supply cord or the plug has been damaged; or
b. Objects have fallen, or liquid has been spilled into the appliance; or
c. The appliance has been exposed to rain; or
d. The appliance does not appear to operate normally, or exhibits a marked change in performance; or
e. The appliance has been dropped, or the enclosure damaged.
16. Servicing - The user should not attempt to service the appliance beyond that described in the operating instructions. All
other servicing should be referred to quali ed service personnel.
The lightning ash within an equilateral
triangle is intended to alert you to the pres-
ence of uninsulated „dangerous voltage“
within the product’s enclosure that may
be of suf cient magnitude to constitute
an electric shock to persons.
The exclamation point within an equila-
teral triangle is intended to alert you to
the presence of important operating and
maintenance (servicing) instructions in the
literature accompanying the appliance.
SAFETY
/