GE JE1590SH02 Owner's manual
- Category
- Microwaves
- Type
- Owner's manual
This manual is also suitable for

vvvvw.GEAppliances.com
©
©
©
Safely Information
Adapter Plugs ............... 7
Arcing ..................... 3
Exmnsion Cords ............. 6
Foods ...................... 4
Grounding Instructions ....... 6
Important Safety
Instructions ............... 9-7
Microwme4afe Cookware ..... 5
P_ecautions m Avoid Possible
Exposure m Excessixe
Microwm> Energy . .......... 9
Operating Instruaions
Best Method of
Cooking Chart .............. 90
Changing Power i,ex>l ....... 13
Combination Features . .l 0, 18, 19
Convection Features... ]0, ] 7, ] 9
Oooking Options ............ 10
Cookware Tips .............. 19
Features of Yo/lr Oven ..... 8, 9
Microwme Terms ........... 93
Other Features ........... 91,92
Beeper Vohune ............ 92
Child i,ock-Out ............ 91
Clock .................... 91
Cooking Complem
Reminder . ............... 91
Display ON/OFF . ......... 22
Display Speed ............. 22
OH?/CI,EAR .............. 21
START/PAUSE ............ 21
Timer ................... 21
Sensor Microwm_
Features ................ 14-16
Time and Auto
Microwm> Features .... 9, 11,12
Write the model and serial
numbers here:
#
#
You can find them on a label
when the door is open.
Care and Cleaning
Inside ..................... 24
Outside .................... 24
Stainless Steel ............... 25
Troubleshooting Tips
Before You (',all For Service . . . 96
Things That Are Nomml
With Yo/li Microwme O_en . . . 97
Consumer Support
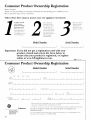
Product Registration ..... 99, 30
Consumer Support .. Back Co_er
_atTantv .................. 31
Jb21590
3828W5A3768 164D3370P333 49-40406 10-03JR

IMPORTANTSAFETYINSTRUCTIONS.
READALLINSTRUCTIONSBEFOREUSING.
a, WARNING!
For your safe_ the information in this manual must be followed to minimize the risk of fire, explosion, electric shock,
exposure to excessive microwave energy, or to prevent property damage, personal injury, or loss of life.
PRECAUTIONSTOAVOIDPOSSIBLEEXPOSURE
TOEXCESSIVEMICROWAVEENERGY
(a) Do NotAttempt to operate this oven with the door
open since open<loot operation can result in hmmflfl
eN)osm'e m microwave energy': It is impommt not to
defeat or tamper with tile satiety interlocks.
(b) DoNotPlace any object between tile oven fl'ont lace
and the door or allow soil or cleaner residue to
accumulate on sealing sm_i_ces.
(c) Do Not Operate tile oven if it is damaged. It is
particularly important that tile oven door close
properly and that there is no damage to tile:
(1) door (bent)
(2) hinges and latches (broken or loosened)
(3) door seals and sealing sudi_ces.
(d) The Oven Should Not be a(!j usted or repaired by
anyone except properl._ qualified service personnel.
IMPORTANTSAFETYINSTRUCTIONS.
When using electrical appliances basic safety precautions should be followed, including the following:
Use this appliance only for its intended purpose as described in this Owner's Manual.
Read and follow tile specific precautions in tile
PRECAUTIONSTOAVOIDPOSSIBLEEXPOSURETO
EXCESSIVEMICROWAVEENERGY section above.
This appliance must be grounded. Connect only
to a i)ropelly grounded outlet. See tile GROUNDING
INSTRUCTIONS secdon on page 6.
Install or locate this appliance only in accordance with
tile provided Installation Instructions.
This product is to be used 3' above floor level.
Be certain to place tile fl'ont surtilce of tile door 3" or
more back ti'om tile counmrtop edge to avoid accidental
tipping of tile appliance in nomml usage.
Do not operam this appliance if it has a damaged power
cord or plug, if it is not working properly, or if it has
been damaged or dropped.
Do not cover or block any openings on tile appliance.
Use this appliance only fin" its intended use as described
in this I//antlal. Do not rise corrosive chemicals or vapo_
in this appliance. This microwave oven is specifically
designed to heat, dry or cook food, and is not inmnded
fin" laboratory or industrial rise.
This microwave oven is not approxed or tested fiw
I/1}l IJne rise.
To reduce tile risk of fire in tile oven cavity:
-- Do not overcook fix)& Carefully attend appliance
when paper; plastic or other combustible materials are
placed inside the oven while cooking,
-- Remove wire twist-ties and metal handles fl'om paper or
plastic containe_ before placing them in tile oven.
-- Do not rise tile oven fi)r storage puq)oses. Do not leave
paper products, cooking utensils or food in tile oven
when not in use.
-- Do not pop popcorn in w)ur microwave oven unless in
a special illiCi'Owave i)oi)coi'n accessoQ' or tlnless VO/I rise
popcorn labeled fin" rise ill microwave ovens.
-- If materials inside the oven ignite, keep the oven door
closed, ttlrn tile oven off and disconnect tile power
cord, or shut off power at tile fllse or drcuit breaker
panel. If tile door is opened, tile fire may spread.
-- Do not use tile Sensor Features twice in succession
on tile same fi)od portion. If food is tmdercooked after
tile fix_t countdown, use TIMECOOKfi)radditional
cooking time.
SAVETHESEINSTRUCTIONS

www.GEAppliances.com
IMPORTANTSAFETYINSTRUCTIONS.
X'_]/eI1 using tile convection or conlbinafion cooking
fllncfions, both tile outside and inside of tile oven will
beconle hot. _Mways use hot pads to reinove containei_
ot fl)od and accessories such as tile oven shell
_ermometerIDo not use i'egular cooking or oven
thelilloi/letei's when cooking bv illici'owave or
conlbinadon. Tile metal and nlercurv in these
theimoinetei3 could cause arcing and possible dan/age
to the oven. Do not rise _1 thei3ilOli/etei" ill _()()d _'O/l _li'e
inicrowaving unless tile theimoinetei" is designed or
recoi/llllended fi)r tlse in tile ii/icrowa\'e ()veil.
Do not clean with n/etal scouting pads. Pieces can burn
off tile pad and touch electrical parts invoMng risk ol
electric shock.
Do not store }llIV IllatelJals_ other than o/II" i'ecoi//illended
accessolJes, ii1 this ()veil when not ii1 rise.
Do not store this appliance out(looi_. Do not use this
product near watei_fi)r exainple, in a wet basenlent,
near a swinlnling pool, near a sink or in sinlilar h)cafions.
Kee I) power cord away fl'oin heated surti_ces.
Do not iinn/ei_e power cord or phig in watei:
Do not let power cord hang over edge of table or
COtlnteI:
Do not inount this al)pliance over a sink.
Do not I//Otlnt the i//ici'o_;lve ()veil over or near any
portion of a heating or cooking al)pliance.
Do not store anything directly on top (ff tile inicrowa\'e
()veil stlrtilce when tile I//icI'o_;Ive ()veil is iI1 opei'ation.
Do not operate any heating or cooking al)pliance
beneath this n/icrowave oven.
See door surti_ce cleaning instructions in tile Care and
cleaning of the microwave oven section of this nlanual.
This al)pliance illtlSt only be sei_'iced by qllalified service
pei_onnel. (_ontact nearest authoiized seiMce fi_cilitv fi)r
exanlination, repair or a(!iusnnent.
_&swith any ai)pliance, close supeia'ision is necessary
when used by children.
Sonle products such as whole eggs and sealed containei_--
fi)r exainple, closedjai_--ai'e able to explode and should
not be heated in this n/icrowave oven. Such use (ff tile
inici'o_we oven (_)tIlcl Iesult in iqjuI v
SAVETHESEINSTRUCTIONS
WARNING!
ARCING
If you see arcing press the OFF/CLEAR button and correct the problem.
Arcing is tile inicrowa\'e teml fi)r sparks in tile (wen. Foil not n/olded to fi)od (Ul)turned edges act
Arcing is caused by: like anmnnas).
The n/etal shelf not installed correctly so it Metal, such as twist-ties, i)oultiT pins, or gold-
touches tile nlicrowave wall. i_inn/ed dishes, in tile microwave.
Metal or fl)il touching tile side of tile (weI1. Recycled paper towels containing sn/all n/etal
pieces being used in the nlicrowa\'e.
3

IMPORTANTSAFETYINSTRUCTIONS.
READALLINSTRUCTIONSBEFOREUSING.
WARNING!
FOODS
Do not i)op i)oi)coi'n in y()/lI" i//ici'owave oven
unless in a special microwave popcorn accessory
or unless you use I)op('orn labeled fi)r use in
illici'owave ovens.
Do not boil eggs in a microwave oven. Pressure
will build up inside egg yolk and will cause it to
bm_t, possibly resulting in iqim>
Operating the microwave with no food inside for
I/lOI'e than a II/intlte or two ii/_lV Catlse (laI/lage to
the oven and could start a fire. It increases the
heat arotmd the magnetron and can shorten the
life (ff the oven.
Foods with unbroken outer "skin" such as
potatoes, hot clogs, sausages, tomatoes, apples,
chicken livex_ and other giblets, and egg yolks
should be pierced to allow steam to escape
dtllJng cooking.
SUPERHEATEDWATER
Liquids, such as water, coffee ortea, are able to
be overheated beyond the boiling point without
appearing to be boiling. Visible bubbling or boiling
when the container is removed from the microwave
oven is not always present. THIS COULD RESULT
IN VERYHOT LIQUIDS SUDDENLYBOILING OVER
WHEN THECONTAINER IS DISTURBED ORA SPOON
OROTHERUTENSIL IS INSERTED INTO THELIQUID.
To reduce the risk of iqjm y to pe_ons:
-- Do not overheat the liquid.
-- Stir the liquid both beli)re and halfway through
heating it.
-- Do not use straight-sided containe_ with
narrow necks.
Foods cooked in liquids (such as pasta) may
tend to boil more rapidly than fi)ods containing
less moistm'e. Should this occm; reter to the
Care and cleaning of the microwave oven section
ti)r instructions on how to clean the inside ot
the oven.
Avoid heating baby tood in glassja_s, even with
the lid ott_ Make sm'e all infimt toad is thoroughly
cooked. Stir toad to distribute the heat evenly:
Be careflfl to prevent scalding when wamfing
ti)mmla. The container may feel cooler than the
ti)mmla really is. _Mwavs test the tommla befi)re
feeding the baby.
Don't defl'ost fl'ozen beverages in narro_mecked
bottles (espedally carbonated beverages). Even if
the container is opened, pressm'e can build up.
This can cause the container to built, possibly
resulting in iqjm T
Hot fi)ods and steam can cause burns. Be careflfl
when opening any containe_ (ff hot food,
including popcorn bags, cooking pouches and
boxes. To prevent possible iqjtu N direct steam
away fl'om hands and ti_ce.
Do not overcook potatoes. They could dehydrate
and catch fire, causing damage to u:,tu" oven.
Cook meat and poult_?' thoroughl}_meat to at
least an INTERNAl, mmperatm'e of 160°F and
poultry to at least an INTERNAl, temperature
of 180°E Cooking to these temperatm'es usually
protects against toodborne illness.
--_Mter heating, allow the container to stand in
the microwave oven fin" a short time before
removing the containe_:
-- Use extreme care when inserting a spoon or
other utensil into the containe_:
4

www.GEAppliances.com
MICROWAVE-SAFECOOKWARE
Do not operate the oven without the turntable and the turntable support seated and in place. The turntable
must be unrestricted so it can rotate.
Make sure all cookware used in your microwave oven is suitable for microwaving. Most glass casseroles,
cooking dishes, measuring cups, custard cups, pottery or china dinnerware which does not have metallic
trim or glaze with a metallic sheen can be used. Some cookware is labeled "suitable for microwaving."
If you are not sure if a dish is microwave-sate,
use this test: Place in the ()veil both the dish vou
are testing and a glass measuring cup filled with
1 cup of watei_set tile ineasulJng cup either in
or next to the dish. Microwave 30-45 seconds at
high. If the dish heats, it should not be used fi)r
micr()waving.
If the dish remains cool and only the water in
tile cup heats, then tile dish is microwave-sale.
Oversized food or o\'eL_ized metal cookwme
should not be used in a micro_\'e/convecfion
oven because they increase the risk of electric
shock and could cause a fire,
Sometimes tile oven floor, turntable and _lls
can become too hot to touch. Be careful touching
tile flora, turntable and _dls during and after
cooking,
If vou use a meat themlometer while cooking,
iilake Stli'e it is sate tot rise in illicrowave ()veils.
Do not use recycled paper products. Recycled
paper towels, napkins and waxed paper can
contain metal flecLs which may cause arcing
or ignite. Paper products containing nylon
or nylon filalnents should be avoided, as they
Inay also ignite.
Solne stvrolban/trays (like those that ineat is
packaged on) have a thin stri I) of inetal elnbedded
in the bottom. X_]len inicrowaved, the metal can
burn tile floor of tile oven or ignite a paper towel.
Use of the shelf accessmw:
-- Remove tile shelf fl'om tile oven when
not in use.
-- Use pot holde_ when handling tile shelf and
cookware. They Ill}IV be hot.
-- Be sure that tile shelf is positioned properly
inside tile oven to prevent product damage.
-- Do not cover the shelf or any part of the oven
with metal tbil. This will cause overheating ot
tile illiCi'O_;ive/convection oven.
Do not rise yotlr IlliCI'()wave/convection ()ven to
(hT newsl)ape_.
Not all l)lasfic wral) is suitable fin" use in micrm_:_ve
ovens. Check tile package tot proper use.
Paper rowels, waxed paper and l)lasfic wrap can
be used to cover dishes in order to retain moisture
and prevent spattering. Be sure to vent plastic
WI'}l l) SO steaIll can escape.
Do not use i/aper i/roducts when tile microwave/
convection ()veil is ol)erated ill tile convection oi"
COillbination ill ode.
Cookware may become hot because (ff heat
transli_rred fl'om the heated food. Pot holde_
may be needed to handle the cookware.
"Boilable" cooking pouches and tightly closed
plastic bags should be slit, pierced or vented as
directed by package. If they are not, plastic could
btlI_t dtlring or ilnlnediately after cooking,
possibly resulting in injury: A]so, plastic storage
containe_ should be at least partially uncovered
because they fimn a tight seal. When cooking with
containers tightly covered with plastic wrap,
remove covering carefully and direct steam away
fl'om hands and ti_ce.
Use fl)il only as directed in this inanual.
TV dinnei_ inav be inicrowaved ill toil trays less
than 3/4" high; relnove tile top foil cover and
return the tray to the box. X._]/en using foil in the
microwave oven, kee I) tile ti)il at least 1" away
fl'om the sides of the oven.
Plastic cookware>--Plasfic cookware designed for
microwave cooking is ve_y useflll, but should be
used cmefllll> Even microwave-sate plastic may
not be as tolerant of overcooking conditions as
are glass or cei'alilic illatelJals and IIlaV solten or
char if subjected to short periods of overcooking.
In longer exposures to overcooking, tile fi)od
and cookware could ignite.
Follow these guidelines:
_Use illi(Towa_,e-saJ[e plastics Olll_ and rise
them in strict compliance with the cookware
Ill a n t/[;I ct tlI'eI"S i'e COil/illen datio ns.
_Do not illici'owa_e ei/ll)t}, cont_linei3.
_Do not peru/it children to use plastic
cookware without complete supervision.

IMPORTANTSAFETYINFORMATION.
READALLINSTRUCTIONSBEFOREUSING.
A WARNING!
GROUNDINGINSTRUCTIONS
WARNING:Im_ro_or,sooft_ogro,n_i,g_l,gco,ros,ltinoriskofelectrics_ock.
This appliance must be grounded. In tile event oI an
electrical short circuit, grotmding reduces tile risk of
electric shock by providing an escape wire for tile
electric current.
This appliance is equipped Mth a power cord ha\ing
a grounding wire Mth a grounding plug. Tile plug
must be plugged into an outlet that is properly
installed and grounded.
Consult a qualNed electridan or service technician
if tile grounding instructions are not completely
tmde_tood, or if doubt exists as to whether tile
appliance is properly gro/mded.
If tile outlet is a standard 2-prong wall outlet, it is
yore" personal responsibili F and obligation to
have it replaced with a properly gro/mded %prong
wall outlet.
Do not tinder [lnv cii'C/llllStnnces cut or i'elllOVe tile
third (gro/md) prong from tile power cord.
X_'edo not recommend using an extension cord
with this appliance. If tile power cord is too short,
have a qualNed electrician or service technician
inst;fll an outlet near tile appliance, (See EXTENSION
CORDSsection.)
For best operation, plug this appliance into its
own electrical outlet to prexent flickering of lights,
blowing, of fllse or trili) )ing, of circuit breaker:
EXTENSIONCORDS
A short power supply cord is provided to reduce tile risks resulting fl'om becoming entangled in or
tripping over a hmger cord.
Extension cords may be used if you are careful in using them.
If an extension cord is used--
B The marked electrical rating of tile extension cord should be at least as great as tile electrical rating
of tile appliance;
_'_ The extension cord illtlSt be a gm/mding-t}])e 3-wi_e cord and it i/it/st be plugged into a 3-slot outlet;
_The extension cord should be arranged so that it will not drape oxer tile co/mtertop or tabletop
where it can be pulled on by children or tripped oxer unintentionally:
If you use an extension cord, the interior light may flicker and the blower so/md may w_T when the
microwave oven is on. Cooking times may be longe_; too.

www.GEAppliances.com
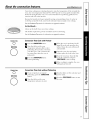
ADAPTERPLUGS
Usage situations where appliance's power cord will be disconnected infrequently.
Because of potential saf'elw ha/_u'(ls under certnin conditions, (Adapterplugsnot
we strengly recemmend against the use elan adapter plug. However; permittedinCanada}
if you still elect to use an a(laptex; where local codes pemfit, a Alignlarge
TEMPORARYCONNECTIONma_be made to a )re )erl_ grounded
[ [ ,,
2-prong wall receptncle by the use ot a UI, listed adapter which
is a\;filable at most local hardware stores.
The larger slot in the adapter must be aligned with the larger slot TEMPORARY
in the wall receptncle to provide proper polarity in the connection METHOD
of the power cord.
CAUTlON: A achingthe adapter ground terminal to the wall receptacle cover screw does not
ground the appliance unless the cover screw is metal, and not insulated, and the wall receptacle is
grounded through the house wiring.
You should have the circuit checked by a qualified electrician to make sure the receptncle is l)roperly
grotmded,
When discom_e(ting the power cord fl'om the adal)te_; always hold the adapter with one hand, If this
is not done, the adapter grotmd temfinal is ve_w likely to break with repeated rise. Should this hal)pen,
DONOTUSEthe appliance tmtil a proper groined has again been established.
Usage situations where appliance's power cord will be disconnected frequently.
Do not use an adapter plug in these situations beta use fl'equent disconnection of the power cord places
undue strain on the adapter and leads to eventual tifilure of the adapter grotmd temfinal. You should have
the 2-prong wall receptacle replaced with a 3-prong (grotmding) receptacle by a qualified electrician before
using the appliance.
Ensure proper ground
and firm connection
before use.
READANDFOLLOWTHISSAFETYINFORMATIONCAREFULLY.
SAVETHESEINSTRUCTIONS

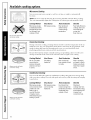
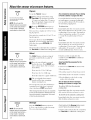
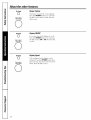
Aboutthe featuresofyouroven.
Throughout this manual, features and appearance may vary from your model.
1000Watts
Featuresof theOven
Door Latch Release Handle.
Door Latches.
Window with Metal Shield. Screen alh)ws
cooking to be viewed while keeping
0
0
@
O
0
0
0
OptionalAccessories:
Availableatextracostfrom}/ourGEsupplier
Choose tile appropriate ]nstalladon Fdt below to
convert this oven to a built-in wall oven.
For27" installations:
microwaxes confined in tile oven.
ControlPanel and Selector Dial
Removable Turntable.Turntable and support
Model Kit
JE1590BH ,lX1597CBH
,]E1590CH ,]X1527CCH
,lE1590SH JX1527CSH
,lE1590WH ,lX1527CWH
must be in I)lace when using, the oven. Tile
turntable may be removed fi)r cleaning.
Removable Turntable Support.Tile ttm_table
support must be in place when using
tile oven.
Shelf. Use when convection or combination
cooking (Do not use when microwaxe
cooking.)
For30" installations:
Model Kit
JE1590BH ,lX1530CBH
JE1590CH JX1530CCH
JE1590SH JX1530CSH
JE 159(}X,VH JX1530CWH
NOTE:Ovenvent(s)andovenl/)ht arelocatedontheinside
waftsofthemicrowaveoven.Theratingplateislocatedon
thefaceof theoven(visiblewhenthedoorisopen).

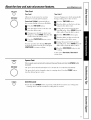
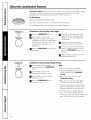
Aboutthe cookingfeaturesofyour
microwave/convectionoven. vvww.OEAppliances.com
Youcan cook by microwave, convection or combination.
-------_COMBINA_0N
©
CONVECTION
©
TIME COOK
START OFF
©©
PAUSE CLEAR
EXPRESS POWER
© ©
-q[.--
SENSOR
POPCORN REHEAT BEVERAGE C001{
© ©©
Selector Dial
CookingControls
o Microwave Cooking Timeand Auto Features
Press Turnandpushdialtoenter
0
@
TIMECOOK
Pressonceortwice
EXPRESScook/Add30see.
DEFROST
Pressonce(]]me)
Presstwice(Auto)
POWERlevel
Sensor Features
Press
POPCORN
Pressonceortwice
REHEAT
BEVERAGE
COOK
Convection Cooking
Press
CONVECTIONcook
Combination Cooking
Press
COMBINATIONcook
Amountofcookingtime
Startsimmediately!
Amountofdefrostingtime
Foodweight
Powerlevel1-10
Turnandpushdialtoenter Option
Startsimmediately! more/lesstime
Startsimmediately! more/lesstime
Startsimmediately!
Foodtype1-7 more/lesstime
Turnandpushdialtoenter
Oventemperatureandcooktime
Turnandpushdialtoenter
Oventemperatureandcooktime

Available cooking options.
Do not use the shelf when
microwave cooking.
Microwave Cooking
_)tlI" oven rises IIIi(TOW;IVe enei'_,' 1o (-ook bv _l set [iIlle oi" weight, or atltOillati(-allv
by sensoi:
Sensor micr_m'ave works by detecting the increasing h umidil_, released dm_ing cooking.
Tile oven automatically at!justs tile cooking tiIne to various types and ainounts of tood.
Cooking Method
Microwave energy
is distributed evenly
throughout the oven
for thorough, fast
cooking of food.
Heat Source
Microwave energy.
Heat Conduction
Heat produced
within food by
instant energy
penetration.
Benefits
Fast,high efficiency
cooking. Ovenand
surroundings do
not get hot.
Easyclean-up.
Always use the shelf when
convection cooking.
Convection Cooking
During convection cooking, a heating element is used to raise tile temperatm'e ot tile air
inside tile oven. Any oven temperatm'e from 225°F to 450°F may be programmed. A tim
gently circulates this heated air throughout tile oven, over and _li'otlnd tile rood,
producing golden brown exterioi_ and rich moist interioi_.
Because tile heamd air is kept constnnfly moving, not pemfitting a laver of cooler air to
develop aro/md tile ti)o(l; some ti)o(ls cook ti_smr than in regular oven cooking.
Cooking Method Heat Source
Hot air circulates Circulating
around food to heated air.
produce browned
exteriors and seal
in juices.
Heat Conduction
Heat conducted
from outside offood
to inside.
Benefits
Aids in browning
and seals in flavor.
Cookssomefoods
faster than regular
ovens.
Always use the shelf when
combhTafion cooking.
Combination Cooking
Ymr o_en also ofle_ tile oi)tion of combination cooking,, using mi(rowa_e energ_ alom,
with comection cooking., Ym cook with speed and accm'ac_, while browning, and cfiS,l)im,
to perfection.
Cooking Method Heat Source Heat Conduction Benefits
Microwave energy
and convection heat
combine to cook
foods in upto
one-half the time
of regular ovens,
while browning and
sealing in juices.
Microwave energy
and circulating
heated air.
Foodheats from
instant energy from
penetration and heat
conducted from
outside of food.
Shortened
cooking time from
microwave energy,
plus browning and
crisping from
convection heat.
10

Aboutthe timeandautomicrowave features, www.GEAppliances.com
TIMECOOK
(3
TURN TO SELECT
PUSH TO ENTER
Time Cook
Time CookI
_dlt)ws VOll to iilici'ow_lve ]_()i" anv tilIle
between 15 seconds and 95 mintltes,
Power level 10(High) is autonmficallx set,
bElt you may change it fin" more flexibility.
_r_ Press the 77MECOOKbtLtton.
_'_ TtLrn the dial to set the cook time and
press the dial to entex:
_€'] ClEange power lexel ifyotL don't want
fiLll powex: (Press POWER. Turn the dial
to select, Press the dial to entex:)
L_ Press the START/PAUSEbELtton to start
c_)_king
You may open the door dtLrJng Time cook
to check the food. (:lose the door and press
START/PAUSE to restLm e c_)_king
Time Cookfl
I,ets you change po_r levels automatically
dtLring cooking, Here's how to do it:
_ Press the TIME COOKbtLtton.
_'_ TtLrn the dial to set the fi_t cook time
and press the dial to enter;
B (_lEanoe the power level ff)OtL don't
want flLllpower: (Press POWER. TtLrn the
dial to select, Press the dial to enter:)
D Press the TIME COOKbtLtton again.
_'_ Turn the dial to set the second cook
time and press the dial to entex:
_ Change the power level if _OtLdon't
want flLll powex: (Press POWER.TtLrn the
dial to select. Press the dial to entex:)
_"_ Press the START/PAUSEbELtton to start
cooking
At the end ol Time CookI, Time Cook II
(-OllntS down,
EXPRESS
©
TURN TO SELECT
PUSH TO ENTER
Express Cook
This is a quick way to set and start cooking in 30 second blocks each time the EXPRESSbutton
is pressed.
The power level will atLtomaficalh, be set at 10 and the oven will start immediately,
The power level can be changed as time is counting down. Press the POWER button,
tm'n the dial and press to enter;
EXPRESS
(3
Add 30 Seconds
Each time the EXPRESSbutton is pressed, it will add :40 seconds to any cooking time
COtLnting down, tLntil the maximtLn cooking time is reached.
11

Aboutthe timeandautomicrowave features.
DEFROST
©
TURN TOSELECT
PUSH TO ENTER
time Defrost
Use Time Defrost to defrost fin" a selected
length of time.
D'_ Press the DEFROSTbEKton.
_Turn the dial to select the time )ou
want. Press the dial to enter:
1_] Press the START/PAUSEbEKton to start
defl'osting.
D Turn the tood oxer if the oxen signals
TURN FOODOVER.
Power level is automatically set at 3, but can
be changed. You can defl'ost small items
Eluickly by raising the power level after
entering the time. Power level 7 cuts the
total defl'osfing time in about haiti power
level 10 cuts the total time to al)proximately
1/3. Howevex; toed will need more
fl'eEluent attention than usual.
A dull tlEumI)ing noise may be heard
dewing defrosting. This is nomml when
oven is not operating at Highpowe_:
Defrosting Tips
Foods fl'ozen in paper or plastic can be
defrosted in the package. Closed packages
shotfld be slit, pierced or vented AFTER
fi)od has partially defrosted. Plastic storage
containers shotfld be i)artially tmcovered.
Family-size, prepackaged fl'ozen (limm_
can be defl'osted and microwaved. If the
fl)od is in a fi)il containe_; transti_r it to a
microwave-sate (lislE.
Foods that spoil easily shotfld not be
allowed to sit ()tit fin" more than one hour
alter defl'osting. Room temperature
promotes the gr(m_h of hamEfifl bacteria.
For more even defrosting of linger toods,
such as roasts, use Auto Defrost. Be sure
lmge meats are completely defl'osted
befl)re cooking.
When defl'osted, fi)od shotfld be cool
but softened in all areas./t still slightly icy,
return to the microwave very b_iefl 5 or
let it stand a tew minutes.
DEFROST
O
TURN TO SELECT
PUSH TO ENTER
0
Auto Defrost
Use Auto Defrost fi>r meat, potfltr)and fish.
Use Time Defrost fi)r most other fl'ozen fi)ods.
Auto Defrost automatically sets the
defl'osting times and power levels to give
even defl'osting restdts fin" meats, potdtry
and fish.
Remove meat fl'om package and place
on microwaxe-satb (lislE.
_r_ Press the DEFROSTbutton twice.
_'_ Turn the dial to the toed weight,
using the (_on;e_ion (;tilde at right
For exaEnple, dial 1.2 f )r 1.2 potmds
(1 p(mnd, 3 oz.) Press the dial t() enter:
B Press the START/PAUSEbutton t() start
deli'osting.
D Turn the fi)od oxer if the oxen signals
TURN FOODOVER.
Remove defl'osted meat or shield wam_
areas with small pieces (ff fl)il.
_Mter defl'osting, most meats need t()
stand 5 minutes t() complete defrosting.
I,mge roasts shotfld stand fin" about
30 minutes.
ConversionGuide
If thewel)htoffoodisstatedinpoundsand
ounces,theouncesmustbeconvertedtotenths
1)ofa pound
WeightofFeed EnterFoodWeight
in Ounces (tenthsofa pound)
1-2 .1
3 .2
4-5 .3
6-7 .4
8 .5
9-10 .6
11 .7
12-13 .8
14-15 .9
12

Aboutchangingthepower level www.GEAppliances.com
POWER
©
TURN TO SELECT
PUSH TO ENTER
The power level may be entered or
changed immediately after entering the
time tor Time Cook, Time Defrost or Express
Cook. The power level may also be changed
during time COEmtdown.
_r_ Filet, tollow directions tor Time Cook,
Time Defrost or Express Cook.
_'_ Press the POWERbEKton.
W]Tm'n the dial clockwise to increase and
coEmterch)ckwise to decrease the power
level. Press the dial to entei:
D Press the START/PAUSEbutton to start
cooking
Variable power levels add fle_bili U to
micro_z_\'e cooking. The power levels
on tile IllicI'O_lve oven C[lIl be coill[)ared
to the surfi_ce units on a range. Each power
level gives yOt! InicI'o_lve energy a certain
percent of the time. Power level 7is
inicro_lve energy 70% ot the time.
Power level 3 is energy 30% ot tile time.
Most cooking will be done on High (power
level 10) which gives you 100% powei:
Power level 10 will cook fiaster bElt filed may
need more fl'eEluent stirring, rotnfing or
turning ovei: A lower setting will cook more
evenly and need less stirring or rotating _ff
the tood. Some foods may have better fla\'m;
texture or appearance if one _ff the lower
settings is used. Use a lower power level
when cooking toods that have a tendency
to boil o\'ei; such as scalloped potatoes.
Rest periods (when the microwave energy/
cycles off) give time fill" the tood to
"eElualize" or transfer heat to the inside
of the fi)od. An example of this is shown
with powerlevel3_tlEe defl'ost cycle.
If microwave energy' did not cycle off;
the outside of the food would cook before
the inside was deti'osted.
Hero am some examples of uses for various
power levels:
High 10: Fish, bacon, vegetables, boiling
liEluids.
Med-High 7."Gentle cooking of meat and
poultry; baking casseroles and reheating.
Medium5: Slow cooking and tenderizing
fi)r stews and less tender CEltS of nleat.
Low2 or3: Defl'osfing; simmering; delicate
S_IIICeS.
Warm I: Keeping fl_od warn/; softening
buttei:
13

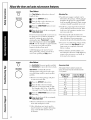
About the sensor microwave features.
Covered
HumiditySensor
Tile SensorFeatures detect the increasing hmniditv released during cooking. Tile oven
automatically a(!justs tile cooking time to w_rious t}l)es and amounts ot fi)od.
Do not use tile Sensor Features twice in succession on tile same fi_od portion--it may
result in severely overcooked or burnt food. If fi)od is tmdercooked after tile cotmtdown,
use Time Cook fin" additional cooking time.
_, Tile proper contnine_s and covei_ are essential fin" best sensor cooking.
Always use microwa_e-saie contninet_ and co',er them with lids or ",ented plastic wrap.
Ne_er rise tight sealing plastic containe_--the_ can pre_ent steam fl'om escai_ing, and
C_ltlSe _()od to o_ercook.
Vented
{{ Be sure tile outside of tile cooking contninet5 and tile inside of tile microwaxe oxen are
drx before I)lacim"_ food in tile oxen. Beads of moisture tm'ning, into steam can mislead
tile sensoi i
Dryoff dishesso theydon'tmislead
the selTsor,
COOK
O
Cook
Because most cooking containei_ must be covered during Cook,this teatm'e is best with
fi)ods that you want to steam or retnin moisture.
NOTE: Useof the metalshelf with Cook is notrecommended
Recommended Foods
A wide varie b' oI fi)ods including meats, fish and vegetables can be cooked using
this teatm'e.
Foodsnotrecommended
Foods that must be cooked un('_were(1, fi)ods that require ('onstnnt attention, fi)ods that
reqtfire addition of ingredients dtwing cooking and foods calling fin" a (hy look or crisp
surfilce after cooking should not be cooked using this ligature. It is best to time Cook them.
14

www.GEAppliances.com
COOK
©
TURN TOSELECT
PUSH TO ENTER
@
NOTE: Do not use this
feature twice in succession
on the same food portion--
it may result in severely
overcooked or burnt food.
Cook
B Place co_ered fi)od in the o_en and
close the dora; Press the COOKbEKton.
SELECTFOODTYPEappea_ in the
display;
_'_ Turn flEe dial to the desired fi_od t},l)e.
Press to entei;
See the Sensor Food Type Guide below fi)r
specific fi_ods and instructions.
The oven starts immediately:
NOTE."If the door was open while the
control was being set, close the door and
press the START/PAUSEbEmon to begin
cooking.
Do not open the oven door before the countdown
time is displayed--steam escaping from the oven
can affect cookingperformance.If the door Is
opened, dose the door and press START/PAUSE
immediately
If grotmd meat was selected, the oven may
signal you to drain and stir the meat. Open
the dora; drain the meat and close tile dora:
Press the START/PAUSEbEmon if necessm T
1o I'eSllIlle cooking
If food is tmdercooked alter the countdown
ElSe TimeCooktor additional cooking time.
CookingTips
_]len oven signals and cotmtdown time
is displayed, the door may be opened
for stin-ing, turning or rotating food.
To i'eStlll/e cooking, close the door and
press START/PAUSE
Match the amotmt of fix)d to the size of
container Fill containe_ at least 1/2 fifll,
Be sure outside of container and inside
of oven ai'e drv.
_dter completion of Cook cycle, if food
needs additional cooking, remm food to
oven and ElSe TimeCookto finish cooking.
How to Adjust the Oven's Automatic
Settings for a Shorter or Longer Cook Time
(Not available for all food types)
To subtract 10% from the automatic
cooking time:
Immediately after the oven starts, turn tile
dial counterclockwise and press to enter:
Toadd 10% to the automatic cooking time:
Immediately after the oven starts, mrn the
dial clockwise and press to enter:
Sensor Food Type Guide
Servings Serving Size
1 to 4 2 to 8
pieces
4 to 16 oz.
Chicken Pieces
Fish 1 to 4
GroundMeat 1/2 to 2 lbs.
,Bee£ PoE'k. Turkex
Potatoes 1 to 4 1/2 to 2 lbs,
Canned Vegetables 1 to 4 4 to 16 oz.
Fresh Vegetables 1 to 4 4 to 16 oz.
Frozen Vegetables 1 to 4 4 to 16 oz.
Comments
Use oblong, square or rotmd (lislE.
Cover with wax paper.
Use oblong, square or I'Ollnd (lislE.
Cover with vented plastic wrap.
Use rotmd casserole (lislE. C_mnble ineat
into (lislE. (:over with wax paper or vented
plastic wrap,
Pierce skin with fi_rk,
Ch]ster potatoes in center of oven floor.
Use microwave-sail _ casserole or bowl.
Cover with lid or vented plastic wrap.
Use nlicrowave-safe casserole or bowl.
Add 9 tablespoons water fi_r each serving,
Cover with lid or vented plastic wrap,
Use microwave-sate casserole or bowl,
Follow package inst_ uctions for adding
water, Cover with lid or vented plastic wrap,
/5

About the sensor microwave features.
POPCORN
©
Use only with prepackaged
microwave popcorn weighing
1.5to 3.5ounces.
NOTE:Donot use this
feature twice in succession
on the same food portion--
it mayresult in severely
overcooked or burnt food.
Popcorn
To use tile Popcorn teature:
_r_ Follow )ackaoe instructions, using
Time Cook if the package is less than
1.5 ounces or laiger than 3.5 ounces.
Place tile package ot popcorn in tile
center of tile microwave.
_'_ Press tile POPCORNbutton once or
twice. Tile oxen starts immediatelx.
Press once for a regular size (3.0 to 3.5 oz.)
bag of popcorn.
Press twice fi)r a snack size (1.5 to 1.75 oz.
bag of popcorn.
If you open the door while POPCORN is
displayed, an error message will appeai:
Close the (looi; press O/f/CLEAR and
begin again.
If toed is undercooked after tile countdown
tlse Time Cook tor additional cooking time.
How to Adjust the Automatic Popcorn Setting
to Provide a Shorter or Longer Cook Time
It vet1 find that tile brand el popcorn you
use undeq)ops oi"oveq)ops consistenfl>
vou can add or subtract 90-30 seconds to
tile automatic l)Ol)ping time.
Tosubtract time:
Immediately after tile oven starts, ttlYn the
dial counmrclockwise tot 20 seconds (-) less
cooking time. Press to entei: Turn again to
reduce cooking time another 10 seconds
(- -) total 30 seconds less time. Press to
enter.
Toadd time:
]lllll/ediatelv atter tile oven stnrts, ttlI'll tile
dial clockwise for an extra 90 seconds (+)
cooking time. Press menmi: Turn again to
add another 10 seconds (++) total 30
seconds additional time. Press to enter
REHEAT
O
NOTE:Donot use this
feature twice in succession
on the same food portion--
it mayresult in severely
overcooked or burnt food.
Reheat
Tile Reheat feature reheats serxings of
prexiousl) cooked fi)ods or a plate of
leflox ei_.
m
Place tile cup of liquid or coxered
fi)od in the oven, Press REHEATonce,
twice or three times, The oxen starts
immediately,
Press once for 1/2 to 1 fllll cup.
Press twice fi)r 1 to 2 fllll cups.
Press three times tot a plate of lefloveis.
_'_ The oxen signals when steam is
sensed and the time remaining
begins counting down.
Do not open tile oven door until finle is
counting down. If tile door is opened,
close it and press STARTimmediatel):
After removingfoodfrom the oven,stir,if possible,
to evenout the temperature.Reheatedfoodsmay
have wide vanationsin temperature.Someareas
of foodmaybe extreme/yhot.
If fi)od is not hot enough after tile
countdown use Time Cook fl)r additional
reheating time.
SomeFoodsNotRecommendedforUse
With Reheat
]t is best to use Time Cook tot these toods:
Bread products.
Foods that must be reheated uncovered.
Foods that need to be stirred or rotated.
Foods calling for a (hy look or crisp
StlIb_ilce alter reheating.
How to Adjust the Oven's Automatic
Settings for a Shorter or Longer Time
Tosubtract 10%from the automatic
cooking time:
]illillediatelv alter tile oven starts, ttlrn tile
dial counmrch)ckwise and press to entei;
Toadd 10% to the automatic cooking time:
Immediately after tile oven starts, turn tile
dial clockwise and press to entei:
BEVERAGE
O
NOTE: Do not use this
feature twice in succession
on the same food portion--
it may result in severely
overcooked or burnt food.
16
Beverage
Press the BEVERAGEbutton to heat an
8-10 oz. cup of coffee 11I"other beverage.
The o_en starts immediately.
Dr/)_ksheated with the Beverage featuremay be
veryhot. Removethecontal))erwith care.
If food is undercooked after tile countdown
11se Time Cook fl)r additional cooking tim e.

About the convection features, www.GEAppliances.com
Convection cooking uses a heating element to raise the teml)eratm'e of the air inside the
oven. Any oven temperature fl'om 225°F to 450°F may be set. A tim gently circulates this
heated air tlErotlglEotK the oven, over and arotmd the tood, producing golden brown
exterio_ and rich, moist interio_.
Because the heated air is kept constantly moving, not pemfitting a layer ot cooler air
to develop arotmd the fi)od, some fi)ods cook fi_ster than in regtflar oven cooking.
See the Cookware Tipssection for information on suggested cookware.
ForBest Results...
Mwavs use the shelf when comecdon cooking
The shelf is required fin" good air circulation and exert browning.
See the Cookware Tips section for information on suggested cookware.
CONVECTION
©
TURN TO SELECT
PUSH TO ENTER
Convection Time Cook with Preheat
B Press the CONVECTlONbutton.
[]Turn the dial to set the oxen
temperatm'e and press dial to enter
preheating. Do not enter convection
cook dine no_a: (Tile cook finle will
be entered later; after the oven is
preheated.)
_ Press the START/PAUSEbutton
to start preheating.
[]
X'_lEen the oven is preheated, it will
._lMlal. If v m do not open the door
within 1 IEOEU,the oxen will ttu'n off
automatically.
_'_ Oi)en the oven door and, using
caution, place the fi_od in the oxen.
_ Close the oven doo_; Tm'n the dial
to set the cook time and press
START/PAUSEto start cooking.
_"_ _ hen cooking is complete, the oxen
will signal and turn off.
CONVECTION
©
TURN TO SELECT
PUSH TO ENTER
Convection Time Cook without Preheating
_lf )OEU"recipe does not reEluire
I)reheating,, press the CONVECTION
button.
_'_ Tm'n tile dial to set the oxen
telllpei'attli'e and press to enteE
_Turn the dial to set the cook time and
press to entei:
D Press the START/PAUSEbutton to start
tile 0_, en,
17

About the combination features.
Combination Cooking oflex_ the best featm'es of microwave energy' and convection cooking.
Microwaves cook tood tilst and convection dreulafion of heated air browns fl)ods
beautifldlv. Any oven temperatm'e ti'om 225°F to 450°F may be set.
For Best Results...
Always use theshelf whencombination cook/bg.
The shelf is reEluired fin" good air circEflation and even browning.
See the Cookware Tips section for information on suggested cookware.
COMBINATION
0
TURN TO SELECT
PUSH TO ENTER
C)
Combination TimeCooking with Preheat
[] Press the COMBINATIONbutton. []
_'_ Turn tile dial to set the oven
temperature and press dial to enter
preheating. Do not enter combination
cook time now. (The cook time will []
be entered later, after the oxen is
preheated.)
[]
[]Press the START/PAUSEbutton to start
preheating.
[]
X4qEen the oven is preheated, it will
N'_" " " (
,_l_nal. If v m do not open the door
within 1 lEotm the oxen will mrn off
automatically.
Open the oven door and, usim,..,
caution, place the food in the oven.
Close the men doo_: Turn the dial to
set the cook time and press to enter:
Press the START/PAUSEbutton to start
cookillg.
_,_qlen cooking is complete, the oxen
xfill signal and turn off.
COMBINATION
0
TURN TO SELECT
PUSH TO ENTER
(3
Combination TimeCooking without Preheat
B If yore" recipe does not reEluire
preheating, press the COMBINATION
button.
_'_ Turn the dial to set the oven
telilperatt/re _llld press to eilter
_Turn tile dial to set the cook time
_111(1 press to eiltei i
]Press tile START/PAUSEbt/tton
to start tile o_,eIl.
NOTE:
Sonle recipes call fin" preheating.
Check the Cookwaro 7/ps section fin.
correct cookware when Combination
Cooking.
Do Ilot Else Illetal (ookwaYe wheIl
Combination Cooking.
Place meat on a trivet in a glass (lislE to
collect juices and prevent spattering.
For best roasting and browning restflts,
whole roasts shotdd be cooked in a glass
(lislE placed directly on the oven shelfi
For fi)ods that are too tall to fit in tile
oven, you can leave out the trivet. If
necessary, you may take out the shelf and
place the (lislE directly on the tm'ntable.
/8

Cookware tips. www.GEAppliances.com
Convection Cooking
Metal Pans are recmmnended for all types of baked products, but especially where
browning or crusting is important.
Dark or (11111finish metal pans are best t0r breads and pies because they absorb heat
and produce crisper crest.
Shiny ahnninuln pans are better t0r cakes, cookies or muffins because these pans
reflect heat and help produce a light tender crust.
Glass or Glass-Ceramic casserole or baking dishes are best suited for egg and cheese
recipes due to the cleanability of glass.
CombinationCooking
Glass or Glass-Ceramic baking containers are recommended. Be sure not to use
items with metal trim as it mav cause arcing (sparking) with oven wall or oven shelf,
damaging the cookware, the shelf or the oven.
Heat-Resistmlt Plastic microwave cookware (sale to 450°F) may be used, but it is not
recommended for t0ods requiring c_usting or all-arotmd browning, because the
plastic is a poor con(hlctor of heat.
Heat-Resistant Glass, Glass,Ceramic
(Pyrex®, Fire King®, Corning Ware®, etc.)
Microwave Convection Combination
'_s '_s _s
No "_s No
Non Heat-Resistant Glass No No No
"_s No "_s _
Plastic Films and Wraps "_s No No
Paper Products "_s No No
Straw, Wicker and Wood '_s No No
+Use only mkrowaxe (ookwaFe that is sat_ to 450°F.
19

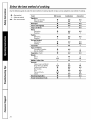
Select the best method of cooking.
Use the following guide to select the best method of cooking. Specific recipes can be adapted to any method of cooking.
0 -- Bestmethod
®--Alternate method
N/R-- Not recommended
Foods Microwave Combination Convection
Appetizers
Dips and Spreads 0 N/R N/R
Pastry Snacks ® 0 ®
Beverages 0 N/R N/R
SaucesandToppings 0 N/R N/R
Soupsand Stews 0 _ N/R
Meats
Defrosting 0 N/R N/R
Roasting ® 0 ®
Poultry
Defrosting 0 N/R N/R
Roasting ® 0 ®
Fishand Seafood
Defrosting 0 N/R N/R
Cooking 0 _ N/R
Casseroles ® 0 ®
EggsandCheese
Scrambled, Omelets 0 N/R
Quiche, Souffle ® ® 0
Vegetables,(fresh) 0 N/R N/R
Breads
Quick ® 0 ®
Yeast N/R ® 0
Muffins,CoffeeCake ® 0 ®
Desserts
Cakes,Layerand Bundt ® 0 ®
Angel Foodand Chiffon N/R N/R 0
Custard and Pudding 0 N/R N/R
Bar Cookies ® 0 ®
Fruit 0 N/R N/R
Pies and Pastry N/R ® 0
Candy 0 N/R N/R
BlanchingVegetables 0 N/R N/R
FrozenConvenienceFoods 0 _ ®
20
Page is loading ...
Page is loading ...
Page is loading ...
Page is loading ...
Page is loading ...
Page is loading ...
Page is loading ...
Page is loading ...
Page is loading ...
Page is loading ...
Page is loading ...
Page is loading ...
-
 1
1
-
 2
2
-
 3
3
-
 4
4
-
 5
5
-
 6
6
-
 7
7
-
 8
8
-
 9
9
-
 10
10
-
 11
11
-
 12
12
-
 13
13
-
 14
14
-
 15
15
-
 16
16
-
 17
17
-
 18
18
-
 19
19
-
 20
20
-
 21
21
-
 22
22
-
 23
23
-
 24
24
-
 25
25
-
 26
26
-
 27
27
-
 28
28
-
 29
29
-
 30
30
-
 31
31
-
 32
32


GE JE1590SH02 Owner's manual
- Category
- Microwaves
- Type
- Owner's manual
- This manual is also suitable for
Ask a question and I''ll find the answer in the document
Finding information in a document is now easier with AI
Related papers
Other documents
-
Oatey DLS4280R2 Specification
-
LG MC-1043ACS Owner's manual
-
Samsung SMH9187W/XAA Owner's manual
-
daltile CC071818HD1PV Operating instructions
-
AMERICANA ABS300K1BB Owner's Manual & Installation Instructions
-
Hotpoint RA620F1CT Owner's manual
-
Hotpoint RVM1635SK01 Owner's manual
-
-
-