Frigidaire FAQG7072LR0 Owner's manual
- Category
- Tumble dryers
- Type
- Owner's manual

.................19-2
Operating Instructions ................... 6-14 ...................... 2
Dryer Settings Chart ..................................... 15-17 Fran_ais ......................................... 2i
Care and Cleaning ............................................... 18 Espa_ol ........................................................... _
oo
www,frigidaire,com USA 1-800-944-9044 www,frigidaJre.ca Canada 1-800-265-8352

Please read all instructions before using this dryer,
Recognize safety symbols, words and
labels
Safety items throughout this manual are labeled with
a WARNING or CAUTION based on the risk type as
described below:
Definitions
This is the safety alert symbol. It is used to alert
you to potential personal injury hazards. Obey al! safety
messages that follow this symbol to avoid possible injury
or death.
DANGER indicates an imminently hazardous situation
which, if not avoided, will result in death or serious
WARNING indicates a potentially hazardous situation
which, if not avoided, could result in death or serious
CAUTION indicates a potentially hazardous situation
which, if not avoided, may result in minor or moderate
For your safety the following information in this manual
must be followed to minimize the risk of fire or explosion
or to prevent property damage, personal injury or death.
Do not store or use gasoline or other flam-
mable vapors and liquids in the vicinity of
this or any other appliance.
WHAT TO DO IF YOU SMELL GAS:
• Do not try to light any appliance.
• Do not touch any electrical switch; do not
use any phone in your building.
• Clear the room, building or area of all occu-
pants.
• Immediately call your gas supplier from a
neighbor's phone. Follow the gas supplier's
instructions.
• If you cannot reach your gas supplier, call
the fire department.
Installation and service must be performed
by a qualified installer, service agency or the
gas supplier,
Read all instructions before using this appliance. This
book contains valuable information about:
- Operation
- Care
- Service
Keep it in a safe place.
IMPORTANT indicates installation, operation or
maintenance information which is important but not
hazard-related,
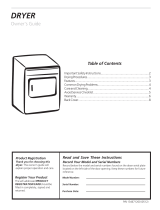
This Use and Care Guide provides general operating
instructions for your dryer. It also contains information
about features for several other models. Your dryer may
not have every feature included.
Use the dryer only as instructed in this Use & Care
Guide.
Save these instructions for future reference,
Product Record
Record Your Model and Serial Numbers
The model and serial numbers of your dryer are found on
the dryer serial plate located at the top of the door open-
ing. Record and retain these numbers.
Model Number
Serial Number
Purchase Date

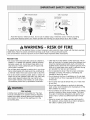
240 v Electric Dryer
120 v GasDryer
Grounding type
wall receptacle
10-30R
3-wire UL-approved service Do not. under
cord must be installed any circumstances
'fused 30 amp) on electric dryers Inot cut. remove,
provided with unit or bypass the
except those grounding prong.
manufactured for sale
in Canada).
14-30R _
4-wire _
J
(fused 30 ampj
Power cord with
3-prong grounded plug
Avoid fire hazard or electrical shock. Do not use an adaptor plug or extension cord or remove grounding
prong from electrical power cord. Failure to follow this warning can cause serious injury, fire or death.
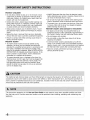
& WARNING - RISK OF FIRE
To reduce the risk of fire, electrical shock, or injury to persons when using this dryer, comply with the basic warnings
listed below. Failure to comply with these warnings could result in serious personal injuries.
You can be killed or seriously injured if you don't follow these Important Safety Instructions:
PREVENT FIRE
* Do not dry items that have been previously cleaned in,
soaked in, or spotted with gasoline, cleaning solvents,
kerosene, waxes, etc. Do not store these items on or
near the dryer. These substances give off vapors that
could ignite or explode.
, Do not place items exposed to cooking oils in your dryer.
Items contaminated with cooking oils may contribute to
a chemical reaction that could cause a load to catch fire.
Do not dry articles containing rubber, plastic or similar ma-
terials such as bras, galoshes, bath mats, rugs, bibs, baby
pants, plastic bags and pillows that may melt or burn.
Some rubber materials, when heated, can under certain
circumstances produce fire by spontaneous combustion.
FIRE HAZARD
A clothes dryer produces combustible lint, The dryer
must be connected to an outdoors exhaust. Regularly
inspect the outdoor exhaust opening and remove any
accumulation of lint around the opening and in the
* Clean the lint screen before or after each load. The in-
terior of the dryer, lint screen housing and exhaust duct
should be cleaned approximately every 18 months by
qualified service personnel. An excessive amount of lint
build-up in these areas could result in inefficient drying
and possible fire. See Care and Cleaning.
Do not operate the dryer if the lint screen is blocked,
damaged or missing. Fire hazard, overheating and
damage to fabrics can occur.
Do not obstruct the flow of ventilating air. Do not stack
or place laundry or throw rugs against the front or back
of the dryer.
Do not spray any type of aerosol into, on or near dryer
at any time.
Do not use fabric softeners or products to eliminate
static unless recommended by the manufacturer of the
fabric softener or product.
Do not continue to use the dryer is you hear squeaking,
grinding, rubbing or other unusual noises. This could
be a sign of mechanical breakdown and lead to fire or
serious injury. Contact a qualified technician immedi-
ately.
Failure to comply with these warnings could result in
fire, explosion, serious bodily injury and/or damage to
the rubber or plastic parts of the dryer.

PROTECT CHILDREN
- Do not allow children to play on or in the dryer. Close
supervision of children is necessary when the dryer is
used near children. As children grow, teach them the
proper, safe use of all appliances.
o Destroy the carton, plastic bag and other packing ma-
terials after the dryer is unpacked. Children might use
them for play. Cartons covered with rugs, bedspreads
or plastic sheets can become airtight chambers.
Keep laundry products out of children's reach. To pre-
vent personal injury, observe all warnings on product
labels.
• Before the dryer is removed from service or discarded,
remove the dryer door to prevent accidental entrapment.
Failure to comply with these warnings could result in
serious personal injuries.
PREVENT INJURY
• To prevent shock hazard and assure stability during
operation, the dryer must be installed and electrically
grounded by a qualified service person in accordance with
local codes, Installation instructions are packed in the
dryer for the installer's reference. Referto INSTALLATION
INSTRUCTIONSfor detailed grounding procedures. If the
dryer is moved to a new location, have it checked and
reinstalled by a qualified service person.
• To prevent personal injury or damage to the dryer, the
electrical power cord of a gas dryer must be plugged into
a properly grounded and polarized 3-prong outlet. The
third grounding prong must never be removed. Never
ground the dryer to a gas pipe. Do not use an extension
cord or an adaptor plug.
ALWAYSdisconnect the dryer from the electrical supply
before attempting any service or cleaning. Failureto do so
can result in electrical shock or injury.
• Do not use any type spray cleanser when cleaning dryer
interior. Hazardous fumes or electrical shock could occur.
• To prevent injury, do not reach into the dryer if the drum
is moving. Wait until the dryer has stopped completely
before reaching into the drum.
PREVENT IN3URY AND DAHAGE TO THE DRYER
- All repairs and servicing must be performed by an
authorized servicer unless specifically recommended in
this Owner's Guide. Useonly authorized factory parts.
Do not tamper with controls.
Do not install or store the dryer where it will be ex-
posed to the weather.
A thermal limiter switch automatically turns off the
motor in the unlikely event of an overheated situation
(electric dryers only). A service technician must replace
the thermal limiter switch after correcting the fault.
Failure to comply with these warnings could result in
serious personal injuries.
The California Safe Drinking Water and Toxic Enforcement Act requires the Governor of California to publish a list of
substances known to the state to cause cancer, birth defects or other reproductive harm, and requires businesses to
warn customer of potential exposure to such substances. Included in this list are soot and carbon monoxide, both of
which may be produced by the use of this product.
The instructions appearing in this Use and Care Guide are not meant to cover every possible condition and situa-
tion that may occur. Common sense and caution must be practiced when installing, operating and maintaining any

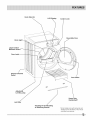
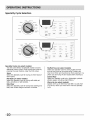
Cycle Selector
LCD Display
Control Lock
Drum Light
Large Surface
Moisture Sensor
Reversible Door
Door Latch
Adjustable
Leveling Legs
Lint Filter
Door Strike
L_ ................... _
Stacking Kit for Mounting
on Matching Washer*
*Not all models come with drying rack and
stacking kit from the factory. They may be
purchased as accessories.

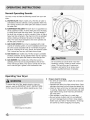
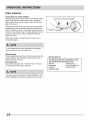
Normal Operating Sounds
You may or may not hear the following sounds from your new
dryer:
A. WATER VALVE (Steam models only.) The flow of water is
controlled by electric solenoids. During operation there may
be a clicking sound as the valve opens and closes to control
the water flow.
B. SUSPENSION ROLLERS The dryer drum is supported by a
set of suspension rollers. At times there may be a thumping
or rolling sound when the dryer starts. This may happen if
the dryer has not been in use for a period of time, or after a
heavy load has remained in the dryer drum for an extended
period, creating a temporary fiat spot on the edge of the
roller. The noise should dissipate as the dryer operates and
the fiat spots smooth out.
C. AIR FLOW SYSTEM Your dryer is equipped with a high
volume air handling system. In some installations there may
be some sounds associated with air movement throughout
the dryer, including the air duct, blower, and exhaust system.
This is normal and can vary with load size and type.
D. GAS VALVE (Gas models only.) The flow of gas is controlled
by electric solenoids. During operation there may be a clicking
sound as the valve opens and closes to control the gas flow.
E. GAS BURNER (Gas models only.) When the burner is
operating, there may be sounds generated as the air flow
mixes with the gas flame. This noise is normal and will only
occur when the gas is ignited in the combustion tube.
O
@
i!i!i!i;i;i!ii!ili!i!i!i!i!i!i!i!i!i!i!i!i!ii!¸iiii!!!!!!!!!!!!!ii!ii!i!!_iil¸_i_i_i_i_i_i_i_i_i_i_i_i;:!:_:!!!!!!!!!!i!_ii!i!i!i!i!i!i!i!i!i!i!i!i!i!i!i!i!i!i!i!i!i!i!i!i!i!i!i!i!i!i!i!i!i!i!i!i!i!i!i!i!i!i!i!i!i!i!i!i!i!i!i!i!i!i!i!i!i!i!i!i!i!i!i!i!i!i!i!! .... ;;;;;;;;;;;;;;;;;;;;;;;;;;;;;;;;;;;;;;;;;;;;;;;;;;;;;;;;;;;;;,
Do not continue to use the dryer if you hear
squeaking, grinding, rubbing or other unusual
noises. This could be a sign of mechanical
breakdown and lead to fire or serious injury.
Contact a qualified technician immediately.
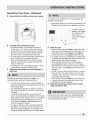
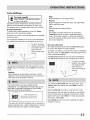
Operating Your Dryer
To reduce the risk of fire, electric shock or injury to
persons, read the IMPORTANT SAFETY INSTRUCTIONS
in this Use and Care Guide before operating your dryer.
(Mesh bag not included.)
1
Prepare load for drying,
- Dry items of similar fabric, weight and construction
in the same load.
- Separate dark items from light=colored items. Sepa=
rate items that shed lint from those that attract lint.
- Check for stains which may not have been removed
in washing. Repeat stain removal process and wash
again before drying. Dryer heat may permanently
set some stains.
- Place delicate or small items in a mesh bag.
- Be sure buckles, buttons and trim are heatproof
and won't damage the drum finish. Close zippers;
fasten hooks and Velcro<_>-likefasteners. Tie strings
and sashes to prevent snagging and tangling.

Operating Your Dryer, continued
2 Check that the lint filter is dean and in place.
©
3 Load the dryer and close the door.
- Load items loosely. The average wet load wiii
fillthe drum 1/3 to 1/2 full. Items need room to
tumble freely for even drying and less wrinkling.
- If desired, place a dryer fabric softener sheet on
top of the load at the beginning of the cycle.
- To save energy and time and avoid uneven drying
and wrinkling, do not overload the dryer.
• When drying large items, dry only two or three
items at a time. Fill out the load with small and
medium sized items.
o For delicate or very small loads, add two or three
similar items to improve tumbling action.
4 Select the appropriate cycle and settings for
each load.
Over-drying can cause wrinkles, shrinkage, lint,
harshness and a build up of static electricity.
Turn the cycle selector knob in either direction to
select the cycle desired. The indicator for that cycle
will be illuminated.
The estimated drying time for Auto Dry cycles or
the actual drying time for Timed Dry cycles will be
displayed.
• A suitable drying temperature, dryness level and
options will automatically be indicated for the cycle se-
lected. See the "Dryer Settings Chart" for more details.
To change the drying temperature and dryness
level, press the Temp or Dry Level buttons to
scroll to the desired settings.
To select or delete an option, press the button for
that option. The indicator will be illuminated when
the option has been selected. The indicator will no
longer be lighted when the option has been deleted.
If a setting is not available for the cycle selected, the
indicator will not light.
Adjustments made to a cycle wi be remembered and
recalled each time that cycle is selected in the future.
oouons
To return to factory
settings, press these
two buttons at the
same time and
hold until the signal
...... sounds.
5 Start the cycle.
* Close the door and press Start to begin the cycle.
The dryer will not operate with the door open. To
interrupt the cycle, press Pause; press Start to
resume the cycle. Press cancel to stop the cycle.
If changes to the cycle, temperature, dryness level
or options are attempted after the cycle starts, the
lights will blink and a signal will beep.
To change the cycle once the cycle has begun,
press cancel and select a new cycle. To change
the temperature, dryness level or options once the
cycle has begun, press Pause and make the new
selections.
To add or remove items when the dryer is running,
open the door. The dryer will stop when the door
is opened. Allow the drum to come to a complete
stop before reaching inside.
Close the door and press Start to resume the cycle.
A signal will sound at the end of the cycle if the
chime option has been selected.
6 When the cycle ends, remove items immedi=
ately and hang or fold.
Clean the lint filter after every load. CLERFI FILTER
will be displayed at the end of the cycle to remind you
to remove lint from the filter. ....

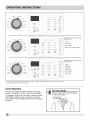
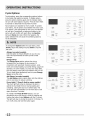
normal
towels
bulky
heavy
allergy
mixed load
casual
casual quickdry
allergy delicates
mixed
load
casual
refresh
time
dry
specialty
cycles
Specialty Cycles may include, but
not limited to:
,.leans
• Kids Wear
•Active Wear
• Warm Up (on select models)
quickdry
delicates
steam
refresh
time
dry
specialty
cycles
Specialty Cycles may include, but
not limited to:
,Jeans
• Pet Beds
• Kids Wear
• Stuffed Toys
•Active Wear
• Warm Up
This manual covers many models and not all cycles, options, or features listed are available on every model. Consoles shown
above for reference only. Your model may differ.
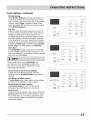
Cycle Selection
Turn the cycle selector in either direction to the cycle
desired. The indicator for that cycle will be illuminated.
To change the cycle once it has begun, press the cancel
button before selecting a new cycle, lust turning the
cycle selector knob to another selection will not change
the cycle.
For best results
Follow the fabric care label instructions
on items to be dried.

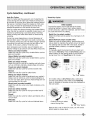
Cycle Selection, continued
Auto Dry Cycles
Auto Dry cycles take the guesswork out of selecting the
correct drying time for each load. Moisture sensing bars
at the back of the dryer drum sense the moisture level of
the load as it tumbles through the heated air. With Auto
Dry cycles, the load will automatically be dried at the
selected temperature to the desired dryness level.
Auto Dry cycles save time and energy and protect fabrics.
When the load has reached the selected dryness level, it will
continue to tumble during a cool down period. This helps
reduce wrinkling and makes items easier to handle during
unloading.
Drying time varies depending on size and dampness of
load and fabric type. If the load is too small or almost dry,
the moisture sensing bars may not detect enough moisture
to continue the cycle and the cycle may end after a few
minutes. If this occurs, select a Timed Dry cycle.
Room temperature and humidity, type of installation and
electrical voltage or gas pressure can also affect drying time.
Heavy (on select models)
Select this Auto Dry cycle to dry durable fabrics such as
jeans and overalls.
Heavy/Bulky (on select models)
Select this Auto Dry cycle to dry durable fabrics such as
jeans and overalls.
Bulky (on select models)
Select this Auto Dry cycle to dry bedding and bulky items
such as comforters, blankets, sleeping bags and parkas.
Towels (on select models)
Select this Auto Dry cycle for towels and bath mats.
Normal
Select this Auto Dry cycle for cotton items.
Allergy (on select models)
Select this Auto Dry cycle to compliment your washer's
Allergy cycle or where you wish to reduce allergens as
you dry your load. Items prone to heat damage are not
recommended for this cycle.
Mixed Load (on select models)
Select this Auto Dry cycle to dry loads containing a mix
of fabrics.
Jeans (on select models)
Select this Auto Dry cycle for drying an entire load of
denim jeans.
Casual
Select this Auto Dry cycle for cottons and blends with a
no-iron finish.
Delicates
Select this Auto Dry cycle for knits and delicate items.
Timed Dry Cycles
FIRE HAZARD
To avoid fire hazard, do not use heat to dry items
containing feathers or down, foam rubber, plastics
similarly textured, rubber-like materials. Use the Timed
Dry cycle and the Air Dry setting.
Quick Dry (on select models)
Select this timed cycle to quickly dry small loads in 25
minutes.
Steam Refresh (steam models only)
Select this cycle to refresh fabrics, remove odors and
reduce static by injecting the perfect amount of steam
into clothing that has been left in the dryer, stored in
crowded closets, drawers, or unpacked luggage.
Time Dry
To manually select the drying time for any load, turn
the knob to Time Dry. Press the Dry Time button (on
select models) on the setting panel to scroll through
drying times from 15 (Touch Up) to 90 minutes.
"Dry Time" button
On models without a Dry Time button, continue to
turn the cycle Selector knob while on the Time Dry
cycle, to increase or decrease drying time displayed on
the LCD screen.
allergy mExed]oad
quickdry .gn _nEgn ,:j_
_aJrarv oaam_,
K
Continue turning to select
manual drying time
No "Dry Time" button
Because this is not an Auto Dry cycle, you will not be
able to select a dryness level.

Specialty Cyde Selection
allergy
normal
towels
heavy/
bulky
casual quick dry
delicates
steam
START
pause
o_tions
release
90
Ein_
75 _ dry
60 _ cl_ay
_tart
" OW e lOW _ 30
aug
air dry _ damp -touch steam
up
arm
_amceL temp dr_ d_y _tk
{eve[ t_me
lock
mixed
load
normal
towels
heavy/
bulky
casual
quickdry
delicates
steam
optloris
Specialty Cycles (on select models)
Turn the cycle selector to Specialty Cycles to access
additional custom cycles. Scroll through the cycles by
pressing the outer buttons under the LCD screen.
Jeans
Select this Specialty cycle for drying an entire load of
denim jeans.
Pet Beds (on select models)
Select this Specialty cycle for drying soft-sided pet
beds, pet pillows or pet blankets.
Kids Wear
Select this Specialty cycle for drying kids clothing and
baby wear where allergen-reduction is desired.
Stuffed Toys (on select models)
Select this Specialty cycle for drying stuffed animals
and soft toys that can be tumble dried. Protect your
dryer drum finish and maximize toy life by placing it in a
pillow case and tying the end closed before washing it.
Active Wear
Select this Specialty cycle to dry lightweight synthetic
athletic apparel including stretch fabrics.
Warm=Up (on select models)
Quickly warm up an entire dry load left in a cold dryer
or a few dry items you want warm with this Specialty
cycle.

Cycle Settings
For best results
Follow the fabric care label instructions
on items to be dried.
Appropriate drying Temperature, Dryness Level and
Options will automatically be displayed for each cycle.
The settings can be changed before the cycle is started.
Drying Temperature
To change the preset temperature, press the Temp
button to scroll to the desired setting.
To protect your fabrics, not all temperatures are available
with every cycle.
The temperature selected for the cycle will be remembered
and recalled each time that cycle is selected in the future.
SfAR;
To return to factory
)_lons
settings, press these
two buttons at the
same time and
. . hold until the signal
...... sounds.
To change the Temperature after the cycle starts, press
Pause, adjust the setting and press Start to resume the
cycle.
Sanitize
Recommended for durable fabrics and towels. Use this
selection to remove harmful bacteria from your clothingor
other items where sanitization is desired.
The Sanitize option has been certified by NSF
InternationaP, an independent third=party testing and
certification organization dedicated to public health,
safety and environmental protection.
NSF Protolcol P154
Sanitization Performance of
Residential Clothes Dryers
This option will kill 99.9% of bacteria with no carryover of
bacteria between loads. A higher temperatures is required.
Pleasecheck fabric care labels to prevent damage.
High
Recommended for most cotton fabrics.
Normal
Recommended for wrinkle free, easy care, lightweight
fabrics and bulky loads.
Low
Recommended for delicate fabrics.
Air Dry
This setting (no heat) should only be used with a
Timed Dry cycle to dry items containing feathers,
down, foam rubber, plastics or rubber-like materials;
to refresh clothing, stuffed animal, pillows or blankets;
and to dust draperies.
Dry Level (Auto Dry)
To change the preset level, press the Dry Level button
to scroll to the degree of dryness desired.
To protect your fabrics, not all dryness levels are available
with every cycle. :If a Dry Level is not appropriate for the
cycle, it cannot be selected.
The Dry Level selected for the cyclewill be remembered
and recalled each time that cycleis selected in the future.
To return to factory
settings, press these
two buttons at the
same time and
hold until the signal
To change the Dry Level after the cycle starts, press
Pause, adjust the setting and press Start to resume
the cycle.
Select the Normal dry level for most Auto Dry cycles.
Occasionally a load may seem too damp or over=dried at
the end of the cycle. To increase drying time for similar
loads in the future, select More. For loads requiring less
drying time, select Less.
Select Damp for items you wish to partially dry before
hanging or ironing.

Cycle Options
To add options, press the corresponding options buttons
to illuminate the selections desired. To delete options,
press the options buttons again and the indicator lights
will turn off. Some Options require a "Press & Hold" effort
to activate or deactivate the secondary function.
Not all options are available on every model. To protect
your fabrics, not all options are available with every cycle.
If an option is not appropriate for the cycle, the indicator
will not light. Occasionally, a setting and option in the
same cycle will conflict with each other, like Sanitize
temp and Damp dry level. When this happens, the
option selected first will cause the conflicting option to
not be selectable.
To change the Options after the cycle starts, press
Pause, adjust the setting and press Stag to resume
the cycle.
Allergy (on select models)
Use this option to reduce allergens as you dry your
load. Not recommended for items prone to heat
damage.
Energy Saver
The Energy Saver option reduces the drying
temperature a few degrees to save energy. In
conjunction with automatic moisture sensors, cycle
times will increase slightly, but overall energy usage will
decrease. On some models, you may also notice after
the cycle begins most lights and indicators will turn off.
To turn those lights temporarily back on press Energy
Saver during the cycle.
Add Steam (on select models)
The Add Steam option injects steam into the clothing
prior to cool down to reduce wrinkling.
Drum Light (==0Press & Hold on some models)
The drum light will come on whenever the door is
opened to illuminate the drum during loading and
unloading. Closing the door turns off the light. The
drum light will automatically turn off if the door is left
open more than 3 minutes.
On models with Press & Hold features, you can
activate the drum light during a cycle by pressing and
holding the button under Options with the _ symbol.
The light will stay on during the cycle for 3 minutes. To
turn it off, press and hold the button again.

Cycle Options, continued
Wrinkle Release
Select Wrinkle Release if the dried load might not
be removed promptly at the end of the cycle. The dry
load will continue tumbling without heat to help reduce
wrinkling. When Chime is selected, a beep will be
heard periodically. The load may be removed any time
during Wrinkle Release.
Line Dry
Select this option to simulate hanging your laundry in
a summer breeze combined with the wrinkle-releasing
benefits of tumble action, Since drying times are
calculated with the dryer's automatic moisture sensors
and heat is radically reduced or eliminated, cycle time
will be lengthened, As a result, depending on moisture
content of load, overall energy consumption decreases,
Available on Mixed Load (on select models), Normal,
Casual, leans (on select models), and Delicates,
Delay Start
Press Delay Start to select a drying time convenient
to your schedule or during off peak energy hours. The
delay time selected will be displayed and begin counting
down when you select Start.
Options
_ v_nkl_9
_ _ release
SaB_t!ze max 90 .......................
hgh _ hgh _75 dry
While counting down during Delay Start, you
will notice your dryer periodically tumbling for a
few minutes without heat to redistribute the load,
maximizing load freshness,
ii
Chime (Press & Hold on some models)
A signal will sound at the end of the cycle (and
periodically during Wrinkle Release) if this option is
selected.
Anti Static (on select models)
The Anti Static option injects steam into the clothing
just before cycle completion to reduce static.
Shrink Guard (on select models)
Select Shrink Guard to lower the initial drying
temperature to protect fabrics from overdrying,
Control Lock
To lock the controls between cycles, press and hold the
Control Lock button for 5 seconds, Repeat to unlock
the controls when you are ready to operate the dryer.
Use this feature to reduce the likelihood of accidental
operation by children.

Other Features
Drying Rack (on select models)
Use the drying rack for items which should not be tumble
dried. Insert the rack into the dryer drum, resting the
back support on the moisture sensor bars and the front
legs on the air grill.
Place items to be dried on top of the rack, leaving space
between items and not allowing them to hang over the
sides or through the holes. The weight should not exceed
10 Ibs (4.5 kg). Select the air (no heat) setting for items
containing plastic, foam rubber, rubber-like materials,
feathers or down.
When items are dry, remove the rack and store it in a
convenient location.
If your model did not come supplied from the factory
with a drying rack you may order one.
ii
moisture sens-
ing bars
Status Display
The estimated total cycle time will be displayed when the
cycle is selected. The estimated remaining cycle time is
displayed during the cycle.
Reversible Door
Your dryer is equipped with a reversible door. The door
can be hinged on the right or left side.
Forstep-by-step instructions on DOOR REVERSAL,refer
to the Installation Instructions supplied with this dryer.
ii
STATUS DISPLAY
The following will also be displayed at the
appropriate times during the cycle:
DRMIFIG LURIFIHLE REL.
5RTIITI21FIG EMELE EOITIPLETE
COOUT1G CLERTI FILTER
RDDIFIG STERITI

f
allergy mixed load
y
bulky
heavy
osam_Eze ......
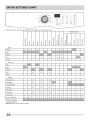
These Temperatures, Dryness levels and Options are available with the following cycles:
Temp
Sanitize _f _ _
High _
Normal _
Low _ _ _
Air Dry _
Dry Level
High d d d d d d d
Normal ¢ ¢
Low d d d d d
Damp ¢ ¢
Options
Energy Saver _ _ _
Wrinkle Release _ _ _ _ _ _ _ _ _
Line Dry _ _ _ _
Delay Start _ _ _ _ _ _ _ _ _ _ _
Chime
Shrink Guard _// _// _// _// _//
Control Lock _ _ _ _ _ _ _ _ _ _ _
,/Available selections
Shaded areas represent factory presets.

casual quickdry
towek
J
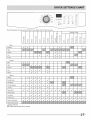
These Temperatures, Dryness levels and Options are available with the following cycles:
tO
(D
-r-
Specialty Cycles
(D
u_
da
E
0
z
E_
(D
<
m
u_
LD
C_
.u
CY
(D
da
U
OJ
C3
4::
u_
(D
(D
E
da
(D
u_
u_
P_
I
_2
C3 c:
0
v
C3
(D
.E
F-
0
to o]
-_I _ _ _ o_
_I _ "-
4-a
u
v cl_
Temp
Sanitize v/ v/ v/ v/
High
Normal _f _f
Low
Air Dry _
Dry Level
Max
High _ _ _ _
Normal _f
LOW V'_ V'_ V'_
Damp _/_ _/_
Options
Energy Saver _/_ _/_ _/_
Add Steam v/ v/ v/ ....
Wrinkle Release _/_ _/_ _/_ _/_ _/_ _/_ _/_ _/_
Line Dry d d d
Delay Start _/_ _/_ _/_ _/_ _/_ _/_ _/_ _/_ _/_ _/_ _/_ _/_ _/_ _/_ _/_
Anti Static _/_ _/_ _/_
Control Lock _/_ _/_ _/_ _/_ _/_ _/_ _/_ _/_ _/_ _/_ _/_ _/_ _/_ _/_ _/_
Press & Hold Light _/_ _/_ _f _f _/_ _/_ _/_ _/_ _f _/_ _/_ _/_ _/_ _f _/_
Press & Hold Chime
,/Available selections
Shaded areas represent factory presets.

casual quickdry
towels
f
These Temperatures, Dryness levels and Options are available with the following cycles:
nJgr
no ,o,
Low
........... eQ_ t_ _ !_i _
Specialty Cycles
Lr_
P_
-c J
Temp
Sanitize _/ _/ _/
High
Normal _/ _/
_ow _ _ _ _ _/:
Air Dry _/ _/
Dryness
High _/ _/ _/ _/
Normal _/
LOW _/ _/ _/ _/
Damp _/ _/ _/
Options
Allergy _/ _/ _/ _/ i:_,
Energy Saver _/ _/ _/ _/
_dd_o_m _ _ _ _ ,,,_:_
Wrinkle Release _/ _/ _/ _/ _/ _/ _/ _/
Line Dry _ _ _
Delay Start _/ _/ _/ _/ _/ _/ _/ _/ _/ _/ _/ _/ _/ _/ _/ _/
Shrink Guard _/ _/ _/ _/
Anti Static _/ _/ _/ _/
Control Lock _/ _/ _/ _/ _/ _/ _/ _/ _/ _/ _/ _/ _/ _/ _/ _/
Press & Hold Light _/ _/ _/ _/ _/ _/ _/ _/ _/ _/ _/ _/ _/ _/ _/ _/
Press & Hold Chime
¢Available selections
Shaded areas represent factory presets.

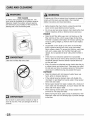
FIRE HAZARD
A clothes dryer produces combustible lint. The
dryer must be connected to an outdoors exhaust.
Regularly inspect the outdoor exhaust opening
and remove any accumulation of lint around the
open !ng a hes urround! ng area:..........................................................................................
Clean the lint filter after every load.
Do not store or place laundry products on top of
dryer at any time. They can damage the finish or
controls.
To reduce risk of fire or serious injury to persons or property,
comply with the basic warnings listed in the Important
Sa fety Instruct !Onsand those l!stedbel ow:.........................................................................................................................
o Before cleaning the dryer interior, unplug the electrical
power cord to avoid electrical shock hazards.
Do not use any type spray cleanser when cleaning the dryer
interior, Hazardous fumes or electrical shock could occur,
INSIDE
Clean the lint filter after every load. Lint build-up on the
filter restricts air flow, which causes longer drying times.
The filter is located at the bottom of the door opening. Re-
move by pulling straight up. Remove the lint and replace
the filter.
Occasionally a waxy build-up may form on the lint filter
and/or moisture sensing bars from using dryer-added
fabric softener sheets. To remove this build-up, wash them
with warm, soapy water. Dry the filter thoroughly and
replace. Do not operate the dryer without the lint filter in
place.
If the dryer drum becomes stained from noncolorfast
fabrics, clean the drum with a damp cloth and a mild liquid
household cleanser. Remove cleanser residue before dry-
ing the next load.
Every 18 months an authorized servicer should clean the dry-
er cabinet interior and exhaust duct. These areas can collect
lint and dust over time. An excessive amount of lint build-up
could result in inefficient drying and possible fire hazard.
OUTSIDE
o Clean the cabinet with mild soap and water. Never use
harsh, gritty or abrasive cleansers.
If the cabinet becomes stained, clean with diluted chlo-
rine bleach (1 part bleach to 8 parts water). Rinse several
times with clear water.
Remove glue residue from tape or labels with a mixture of
warm water and mild detergent. Or, touch residue with the
sticky side of the tape or label.
When cleaning chrome parts use a window cleaner with
ammonia or mild soap and water.
Before moving the dryer, place a strip of cardboard or thin
fiberboard under the front leveling legs to prevent damage
to the floor.

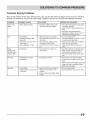
Common Drying Problems
Many drying problems involve poor cleaning results, poor soil and stain removal, residues of lint and scum, and fabric
damage. For satisfactory drying results, follow these suggestions provided by The Soap and Detergent Association.
PROBLEM
Greasy, oily
stains
Lint
Pilling
(Fibers break
off, ball up and
cling to fabric.)
Shrinking
Wri nkling
POSSIBLE CAUSES PREVENTIVE MEASURES
• Fabricsoftener sheet,
• Overloading.
• Overdrying causes static
electricity.
• Lint screen not clean when
cycle began.
• Lint is attached to "pills."
• Overdrying.
• Temperature too high.
SOLUTIONS
• Rub fabric softener stains with
bar soap, Rinse and rewash,
e
e
• Overloading.
• Leaving items in dryer after
cycle ends.
Reduce load size and rewash
using liquid fabric softener in the •
final rinse.
• Or, add a fabric softener sheet •
and tumble without heat.
• Use lint brush or roller to remove •
lint.
• Use a lint brush or shaver to
remove pills.
e
• Irreversible condition.
• Overdrying.
e
e
• Reduce load size and tumble at •
medium or low heat for 5-10
minutes.
• Remove items immediately. Hang
or fold.
Add a few bath towels to small loads
for proper tumbling.
Some "silk-like" fabrics should be air
dried.
Use proper drying temperature.
Place fabric softener sheet on top of
load before starting the dryer.
Do not overload dryer.
Use fabric softener in washer or dryer
to reduce static electricity.
Remove items when they are slightly
damp to avoid overdrying.
Check that lint filter is clean and in
place.
Use fabric softener to lubricate fibers.
When ironing, use spray starch or
fabric finish on collars and cuffs.
Turn items inside out to reduce abra-
sion.
Follow fabric care label directions.
If shrinking is a concern, check load
often.
Remove items while slightly damp and
hang or lay fiat to complete drying.
Block knits into shape.
Do not overload dryer.
Remove items as soon as cycle ends.

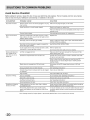
Avoid Service Checklist
Before calling for service, review this list. It may save both time and expense. The list includes common occurrences
that are not the result of defective workmanship or materials in this dryer.
OCCURRENCE POSSIBLE CAUSE SOLUTION
Dryer does not start. Electrical power cord is not securely plugged in or plug Make sure the plug fits tightly in wall outlet.
may be loose.
House fuse blown or circuit breaker tripped. Reset circuit breaker or replace fuse.
Make sure electrical line is not overloaded and the dryer is on a
separate circuit.
Call authorized service person for replacement.
Replace fuse.
Thermal limiter tripped.
Dryer runs but won't There are 2 house fuses in the dryer circuit. If 1 of the 2
heat. fuses is blown, the drum may turn but the heater will not
operate. (electric models)
Gas supply valve is not open (gas models). Check to make sure supply valve is open. See INSTALLATION
INSTRUCTIONS for procedure.
Dryer does not have enough air supply to support the See INSTALLATION INSTRUCTIONS.
burner flame (gas models).
LPgas supply tank is empty or there has been a utility Refill or replace tank.
interruption of natural gas (gas models). Dryer should heat when utility service is restored.
Drying cycle takes too Lint filter is clogged with lint. Make sure all lint has been removed from the dryer lint filter
long, outside of the before starting each cycle.
dryer feels too hot or Exhaust duct requirements have not been met. Exhaust duct must be at least 4 inches in diameter and made
smells hot. of rigid or semi-rigid metal.
When in place, the duct must have no more than two 90°
bends and must not exceed length listed in INSTALLATION
INSTRUCTIONS.
Electric dryer is connected to a 208 volt circuit. Drying time will be 20% longer than drying on a 240 volt
circuit.
Drying procedures have not been followed. See "Operating Instructions."
Outside exhaust hood or exhaust duct may be clogged Clean out any obstruction.
or restricted.
High humidity. Use a dehumidifier near the dryer.
Excessive wrinkling. Dryer is overloaded. Do not overload. See "Operating Instructions."
Items left in dryer too long. Remove items as soon as cycle ends.
Insufficient sorting of items. See "Operating Instructions."
Drying temperature too high. Follow fabric care label instructions.
Scratching or chipping Foreign objects such as coins, pins, clips or buttons Always remove foreign objects from pockets before laundering.
of the drum finish, are inside the dryer.* Remove objects from drum and restart dryer.
Permanently attached items such as belt buckles, It may be necessary to sew a scrap of material securely around
zippers and fasteners may be hitting the inside of the ornaments before drying to prevent scratching and damage to
drum.* the dryer.
*Drum damage caused by foreign objects or permanently attached items is not covered by the warranty.
Page is loading ...
Page is loading ...
-
 1
1
-
 2
2
-
 3
3
-
 4
4
-
 5
5
-
 6
6
-
 7
7
-
 8
8
-
 9
9
-
 10
10
-
 11
11
-
 12
12
-
 13
13
-
 14
14
-
 15
15
-
 16
16
-
 17
17
-
 18
18
-
 19
19
-
 20
20
-
 21
21
-
 22
22


Frigidaire FAQG7072LR0 Owner's manual
- Category
- Tumble dryers
- Type
- Owner's manual
Ask a question and I''ll find the answer in the document
Finding information in a document is now easier with AI
Related papers
-
Frigidaire FASG7021NW User manual
-
Frigidaire FFRE1001PW User manual
-
Frigidaire FFQG5100PW Operating instructions
-
-
-
Frigidaire FAQG7011LB0 Owner's manual
-
-
-
Frigidaire FARE4044MW User manual
-
Frigidaire FARG4044MW User guide
Other documents
-
Crosley CDE4700LB0 Owner's manual
-
Crosley CDE7500KB0 Owner's manual
-
-
-
-
Electrolux EIMGD60JIW User manual
-
Electrolux EIGD50LIW User manual
-
 Airlux Group 13467-1200 (0512) User manual
-
Electrolux EFME627UIW User manual
-
