
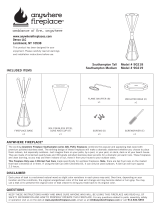
gel replaces and accessories
Model # 700
Envision Wall Fireplace
12
Ninety-Day Warranty: The Jensen Company warrants Real Flame® vent-less fireplaces and
accessories to be free from defects in parts and workmanship under normal use and service
for a period of 90 days from date of shipment. In the event of such defect in parts or workman-
ship, Jensen will, at its option, replace the defective product or refund the purchase price to
the extent of the defective product’s replacement cost. The foregoing is the exclusive remedy
and The Jensen Company disclaims all other warranties, including any implied warranty of
merchantability or fitness for a particular purpose. In addition, The Jensen Company will not be
responsible for consequential damages in excess of the purchase price of the product on
which such liability is based.
Replacement Parts: Replacement parts are available for most units. Occasionally, parts may
arrive damaged due to mishandling during shipping. If you are in need of a replacement part,
please contact our customer service department with the fireplace model number and part
number needed. We will ship out a replacement part due to shipping damage at no charge.
Returns: Please inspect all items immediately after receiving. We hope you will be completely
happy with your purchase. If you find within 15 days of receipt of your product that you do not
wish to keep it, you may return it unused by following our return procedure. Shipping charges
are not refundable unless the return is a result of our error. Return freight charges are the
responsibility of the buyer. Items must be returned in their original packaging.
All returns must be authorized. Product that has been used may not be returned. A 15%
restocking fee will be assessed on returned merchandise to compensate for repackaging,
warehousing and administrative labor. The return procedure is listed below. For specific
questions relating to returns or warranty, please contact Customer Service department toll-free
at 1-800-654-1704 or at [email protected].
Step 1: Contact Customer Service department by phone or email to receive your Return
Merchandise Authorization number (RMA#). The RMA# is necessary for all returns. Please
indicate a reason for the return so we can better meet customer needs in future.
Step 2: Note your RMA# on the packing slip and repack the item in the original packaging. Be
sure to include your packing slip with the returned product.
Step 3: Include your RMA# on the outside of the box and ship the package back to us via
common carrier. Please provide us with the tracking number for your shipment.
Step 4: We will contact you when the package has been received and inspected. Provided a
satisfactory return, we will credit your account for the returned merchandise less the applicable
restocking charges.
Customer Service:
1-800-654-1704 or
Warranty & Return Policies

Care and Cleaning
2 11
Trough should be cleaned every two burns. This can be cleaned
using the scraper tool included.
- Allow trough to cool completely before attempting to clean.
- Place the straight edge of the scraper into the can and
pull along the edge.
- Residue should be thrown away in the trash.
WARNINGS
!
!!
Using your Fireplace
- Unit can be used indoors or outdoors; there is no need for ventilation.
- Use extreme caution while burning. Some surfaces become extremely hot during use.
- Follow all instructions included with gel fuel before use.
- Before using unit, be sure you have read and understood the step-by-step instructions.
-
After unit is burned several times, soot may develop on the inside of the glass and on the
stainless steel surround.
Clean with a damp soapy rag or any household glass cleaner or
stainless steel cleaner.
- During the initial burn you may experience a slight odor. Odor is temporary and will be absent on
following burns.
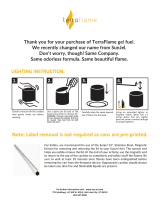
Welcome to the Real Flame family of gel fuel products.
If you have questions please call customer service at
1-800-654-1704 or log on to www.REALFLAME.com
Use a soft cloth and a standard household glass cleaner to clean
the glass and body of the Envision.
Use stainless steel cleaner or polish to clean the stainless parts.
Discoloration is normal for stainless steel that is in direct contact
with the ame.
Read all instructions included with Real Flame
®
gel fuel and fireplace
Never leave burning cans unattended
NOTICE: Buyer assumes all responsibility for safety and use that is not
in accordance with instructions and warnings.
1. Unit is designed to be used with REAL FLAME® Pour Gel fuel only. Do not use
with any other gel fuel or any other flammable liquid or gel.
2. Read entire label and instructions before using REAL FLAME® Pour Gel fuel.
3. Never leave a burning fire unattended, especially around children or pets.
4. When operating unit be sure that the material surrounding the unit is
non-combustible and is clear and free of all flammable materials.
5. Never touch unit while gel fuel is burning or immediately afterwards. Burner and
cup may be extremely HOT. Allow unit, trough and burner assembly to cool for
30 minutes before touching them.
6. Keep away from children and pets. Unit is not to be operated by children.
7. Do not attempt to refill or replace gel cup while unit is burning.
8. Make sure unit is properly secured to the wall before use.
9. Do not alter unit in any manner. Real Flame® is not responsible for any damages
that may be incured due to any modification of this product.
10. Do not burn gel fuel outside designated burn area.
11. Do not store or use gasoline or other flammable vapors or liquids in the vicinity
of this product.
12. Do not wear flammable or loose clothing when using the unit.
13. Do not attempt to move or store the unit until 30 minutes after gel fuel cans
have been extinguished.
14. Do not lean over unit when lighting or when in use.
15. Do Not mount the fireplace on a wall that is covered with wood paneling or
wallpaper.
16. In case of an emergency use a CO2 extinguisher to extinguish the fire.
17. Death, serious injury or damage to property may occur if the above warnings and
instructions are not followed exactly.
18. If for any reason you cannot follow these warnings please call us at 1-800-654-1704.

3
Parts List
Number Description Part Number Quantity
1 Wall Unit 701 1
2 Glass 702 1
3 Mounting Bracket 126 1
4 Scraper 127 1
5 Eco Burner (S) 128 1
6 Trough 129 1
Hardware:
#10 1.25” Screws 3
Drywall Anchors 2
5
1
2
4
3
6
10
Step Seven
To Light:
Open the sliding
damper with the hook
end of the scraper as
shown.
Use an extended
lighter or fireplace
match to light gel fuel
To Extinguish:
Close the sliding
damper with the hook
end of the scraper as
shown.
Leave closed for
10-20 seconds before
attempting to reopen
or lift open lid.
Note: Eco Burn insert,
glass and surround
will be extremely hot.
Use caution when
attempting to close the
damper or refill trough
after unit has been burning.

4 9
Floor
Eye Level
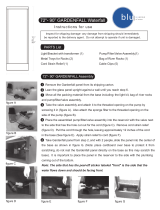
Installing the Mounting Bracket:
Find a suitable location on a wall where the fireplace will be a minimum of
2 feet from anything flammable or combustible.
Locate a stud. At eye level drill a 1/8” pilot hole into stud where the center
of the mounting bracket will be attached.
Using a level, mark where the next two holes will be made 8“ to the left
and right side of the center. Drill a 3/16” hole and insert a drywall anchor
into each.
Attach the mounting bracket first by the center hole with a #10 -1¼”
screw.
Level the mounting bracket and install the #10-1¼” screws through the
bracket and into the drywall anchors.
Stud
Mounting
Bracket (3)
8” 8”
Step One
Step Six
Filling gel fuel trough:
The damper must be closed in order to open the insert.
Using the included Scraper (4) open the Eco Burn insert using the
hook end of the tool. Insert the hook end into the slot at the back of
the insert. Pull up and towards you until fully open, lid should remain
open until you are finished filling trough.
Pour desired amount of fuel into the trough without over filling. Gel fuel should
not be filled more than ½” from the rim of the trough. Fill trough when inside
unit. Do Not attempt to fill trough outside the unit and place into insert.
Pour Gel
To open use
Scraper as
shown.
1/2” down from the rim,
do not ll past this point.
WARNING
!
!!
• It is highly recommended that the middle screw be inserted into a wall stud.
• Do not mount this fireplace on a wall covered with wood paneling or
wall paper
• Make sure not to drill into any electrical wiring or plumbing pipes.

58
Step Two
With the mounting bracket secured to the wall. Slide the
body of the Envision fireplace down onto the bracket. The
top of the fireplace and the bracket will interlock.
Center the fireplace from left to right on the bracket.
NOTE: Do not pull down or try to force the fireplace into
place. Simply slide the fireplace down onto the bracket and
sdjust left or right to center fireplace on bracket.
Wall
Stud
Drywall
Step Five
Insert the glass (3) into the opening in the front of the
fireplace as shown.

Step Three
Place the Eco Burner (5) into the Envision Fireplace (1).
NOTE: The insert should be placed into the fireplace so
that the lid of the insert opens towards you.
76
5
Step Four
Open the lid of the Eco Burn insert (5) and place the
trough (6) inside making sure that the rim of the trough is
sitting flat on the plate inside.
NOTE: The trough may have been shipped already inside
the insert.
5
6
-
 1
1
-
 2
2
-
 3
3
-
 4
4
-
 5
5
-
 6
6


Ask a question and I''ll find the answer in the document
Finding information in a document is now easier with AI
Related papers
-
Real Flame A11812 User manual
-
Real Flame 730-PG Owner's manual
-
-
-
-
-
-
-
-
Other documents
-
 Anywhere Fireplace Lexington 90204 User manual
-
 Anywhere Fireplace 90299 User guide
-
 Anywhere Fireplace SOHO User manual
-
Superior Fireplaces VRE4600 Series Operating instructions
-
 Terra Flame OD-FTP User manual
-
Harman Stove Company P35i User manual
-
-
 Anywhere Fireplace Southampton Tall 90218 User manual
-
 Nu-Flame GF6SG-FIRE Installation guide
-
Harman Accentra Pellet Insert Installation & Operating Manual


