Philips MCM7000/12 User manual
- Category
- Home audio sets
- Type
- User manual
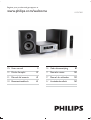
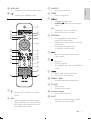
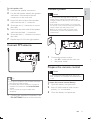
Philips MCM7000/12 lets you play audio from discs, USB storage devices, and other external devices, as well as listen to radio stations. It features sound effects like treble and bass control, loudness control, and preset sound styles. Other features include the ability to skip tracks, search within a track or radio station, program radio stations, set alarms and sleep timers, connect headphones, and play tracks randomly.
Philips MCM7000/12 lets you play audio from discs, USB storage devices, and other external devices, as well as listen to radio stations. It features sound effects like treble and bass control, loudness control, and preset sound styles. Other features include the ability to skip tracks, search within a track or radio station, program radio stations, set alarms and sleep timers, connect headphones, and play tracks randomly.


-
 1
1
-
 2
2
-
 3
3
-
 4
4
-
 5
5
-
 6
6
-
 7
7
-
 8
8
-
 9
9
-
 10
10
-
 11
11
-
 12
12
-
 13
13
-
 14
14
-
 15
15
-
 16
16
-
 17
17
-
 18
18
-
 19
19
-
 20
20


Philips MCM7000/12 User manual
- Category
- Home audio sets
- Type
- User manual
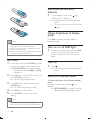
Philips MCM7000/12 lets you play audio from discs, USB storage devices, and other external devices, as well as listen to radio stations. It features sound effects like treble and bass control, loudness control, and preset sound styles. Other features include the ability to skip tracks, search within a track or radio station, program radio stations, set alarms and sleep timers, connect headphones, and play tracks randomly.
Ask a question and I''ll find the answer in the document
Finding information in a document is now easier with AI