Page is loading ...

PARTS INCLUDED
MADE IN U.S.A.
Copyright © 1999-2000 Atoc Inc. All rights reserved.
Atoc Inc.
6615 180th St SW
Lynnwood, W A 98037
(425) 745-2131
TT24-1
When using Atoc / Topper Rack Products carriers and accessories, the user must understand
the precautions. The points listed below will assist you in using the rack system and will
encourage safety .
Please review the instructions and warranty carefully . Assembly and installation are the end
user's responsibility and beyond Atoc's control. Therefore, Atoc exclusively limits its warranty to
the repair or replacement of a defective Atoc product for up to one (1) year from the date of the
original retail purchase. Damage to your vehicle, cargo, or to any person or property is excluded.
n For quality fits and safety , use only base racks (load bars and towers) recommended by the
rack manufacturer for your vehicle. Do not assume a base rack will fit, always check the
rack manufacturer's current fit guide when choosing a base rack for your vehicle. Using a
base rack not recommended for your vehicle will void your warranty .
n Do not exceed the carrying capacity of your base rack. Base racks do not increase gutter or
roof strength. Neither Atoc or the base rack manufacturer can warranty loads that exceed
this limit. Total load equals cargo weight plus weight of accessories used to carry cargo.
n Always make sure car doors are open when mounting a roof rack system. Make sure all
knobs, bolts, screws, straps, and locks are firmly attached, tightened and locked before
every trip. Knobs, bolts, screws, straps, and locks must be periodically inspected for signs
of wear, corrosion, and fatigue. Check your load at stops during the trip to ensure continued
fastening security .
n Check local and state laws governing projection of objects beyond the width of a vehicle.
Be aware of the width and height of your cargo since low clearance branches, bridges, and
parking garages can af fect the load. All cargo will af fect the vehicle's driving behavior. .
Never drive with any lock, knob or rack in an open or unlocked position. All long loads such
as, but not limited to, sailboards, surfboards, kayaks, canoes, and lumber must be tied
down front and rear to the bumpers or tow hooks of the vehicle.
n Remove your Atoc carrier and accessories when they are not in use and before entering
automatic car washes. Do not attach Atoc carrier to base rack and vehicle combinations not
listed in the base rack manufacturer's current fit guide.
n For safety to your vehicle and rack system, obey all posted speed limits and traf fic cautions.
Adapt your speed to the conditions of the road and the load being carried.
n Do not use Atoc carriers and accessories for purposes other than those for which they were
designed. Do not exceed their carrying capacity . Failure to follow these guidelines or the
product's instructions will void the warranty.
n Consult with your Atoc dealer if you have any questions regarding the operations and limits
of Atoc products. Review all instructions and warranty information carefully .
ATOC RACK GUIDELINES
n Bike must come equipped with a quick release front skewer .
n Measure the dimensions of your bike's front fork dropouts. Not compatible with fork drop
outs less than 4 mm thick. Dropouts must be 100 mm apart.
n Not all bike forks are compatible with Atoc / Topper Rack Products carriers and accesso-
ries. If your fork has a unique feature or design that prevents your using the carrier in
accordance with these instructions, do not use the carrier .
n The Tandem T opper must be the outer most carrier on your roof.
n Due to their wind resistance, it is not recommended to carry disk wheels or wheels with
covers on Atoc/TRP bike carriers.
n Remove all bags, panniers, pumps, child seats, and other detachable accessories from
bike before loading as these may be lost in transport.
n Do not stand in traf fic while loading or unloading bikes from carrier . Always load/unload
bikes in a safe area.
n Failure to properly install, adjust, use, and maintain the quick release mechanism on this
carrier may result in damage to the vehicle and bike as well as serious personal injury .
n Any modification to bike dropouts can cause insuf ficient fork mount clamping pressure and
may result in damage or loss of bike.
COMP ATIBILITIES / RESTRICTIONS
n If you are having dif ficulty inserting the pivot pin: A) Make sure the swivel plates are lined
up by squeezing them together from the sides. B) Make sure the handlebar strap is
installed symmetrically . C) Check to be sure the holes do not have any road grit in them. If
necessary , clean the holes with a cotton swab. Lubricate the pivot pin by rubbing it with
candle wax. Do not use oil or grease as these will attract more grit.
n If your vehicle is a minivan with a side cargo door position the carrier so that the fork mount
is over the cargo door . Open the cargo door when loading your tandem. This should
eliminate side clearance problems, plus you can step up on the door sill to help reach the
fork mount.
n If your tandem's chain rings contact the side of your vehicle during loading/unloading:
A) Experiment with the position of the carrier on your vehicle's roof. Try moving the carrier
forward or back on the roof. The carrier should be as far outboard as possible (straddling
the base rack towers) without being completely outboard of the towers. You can install the
carrier facing either forward or backward on your vehicle. B) If the chain rings are
contacting a side window , roll down the window . You can also open the door and load/
unload from between the vehicle body and door .
n The pivot pin and tail pin assemblies are identical. If you permanently installed the tail
beam extension by positioning the rear bracket on the tail beam, you can replace the tail
pin with a
1
/4
-20 x 2 bolt and nylok nut. Remove the tail pin assembly and save it as a
spare for the pivot pin.
HELPFUL HINTS
TM
TM
LIMITED WARRANTY
ATOC, Inc. (A TOC) warrants for one year from purchase date and only to the original retail buyer (Buyer) that ATOCÕs products a re free from
defects in materials and workmanship. If Buyer discovers a covered defect, Buyer shall deliver the product to an authorized ATOC dealer with proof of
purchase. ATOC will then issue an authorization to the dealer for the return of the product. If there is not a local ATOC dea ler or the Buyer purchased
the product directly from ATOC, then the Buyer may request to return the defective product directly to ATOC by first contacting ATOC at the address or
telephone number set forth below (together with proof of purchase) for authorization. Unauthorized returns will not be accepte d. Buyer is responsible
for the cost of shipping the product to ATOC.
Upon ATOC's examination and satisfaction ofthe defect, it will, at its option, repair or replace a defective product free of charge. This is the full
extent of ATOC's liability under this Warranty and, upon expiration of the above time periods, allsuch warranties shall terminate.
Product W arranty Exclusions: No warranty is given for normal wear and tear , unauthorized modifications or alterations, improper installation or
maintenance, misuse, negligence, damage, or if its products are used for a purpose for which they were not intended. Specifica lly, no warranty is
given for defects caused by (i) accidents, unlawful vehicle operation, or defects/inconsistencies in the vehicle upon which the product is installed; and
(ii) the user Õs failure to properly secure cargo as recommended by ATOC. This W arranty gives Buyer specific legal rights, and Buyer may also have
other rights that may vary from state to state. Except as expressly stated in this W arranty , ATOC shall not be liable for direct, indirect, inciden-
tal, or other types of damages arising out of, or resulting from the use of its Product. This W arranty is in lieu of all other warranties, express
or implied, including, but not limited to, implied warranties of merchantability or fitness for a particular purpose (Some states do not allow the
exclusion or limitation of incidental or consequential damages or allow limitations on the duration of an implied warranty , so the above exclusions may
not apply to Buyer).
Part Description
Qty
A Front Beam 1
B Tail Beam Extension 1
C Pivot / Tail Pin Assembly 2
D Wheel Strap Assembly 2
E Handlebar Strap 1
F Skewer 1
G Mounting Clamp 4
H Mounting Clamp Bolt Set (
5
/16-18 x 2
1
/4
carriage bolt, nylok nut, washer) 4
J Rear Bracket 1
K Rear Bracket Bolt Set (
5
/16-18 x
3
/4 carraige bolt, nylok nut, washer) 2
L End Cap 2
M Top Cap 1
SEE
ADDENDUM

SEE
ADDENDUM

22 i
nc
hes (56 cm)
mi
nimum
Carrier (main beam)
Bolt (short)
Load Bar
Load Bar Tower
Mounting Clamp
Bracket
Bolt (long)
Mounting Tab
Washer
Nut
A
B
C
D
D E
E
MNL0027, Rev -
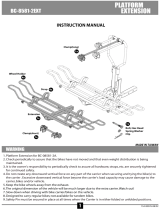
Installation with New Improved brackets
Compatible with wide load bar towers
(These brackets replace those shown in step 1 of main instructions)
Check load bar spacing. The bars must be at least 22 inches apart.
Attach 1st bracket to mounting tabs on carrier using 2 short bolts, washers, and nuts.
Tighten nuts firmly.
Attach 2nd bracket to carrier using 1 short bolt, washer, and nut by sliding the bolt head in
the slot on bottom of carrier. Loosely tighten nut so that bracket position can be adjusted.
Place the mounting clamps on the load bars so that
the carrier will straddle the load bar towers. Attach
carrier using the long bolts, washers, and nuts.
The adjustable bracket must not overlap
the joint between the carrier's main and
tail beams. The adjustable bracket may be
positioned under the tail beam if desired.
Tighten all nuts firmly.
A
B
C
D
E
/