Pioneer DDJ-800 Owner's manual

Category
DJ controllers
Type
Owner's manual

This manual is also suitable for

DDJ
-
800
pioneerdj.com/support/
rekordbox.com
DJ Controller / Contrôleur pour DJ / DJ Controller / DJ Controller /
DJ Controller / Controlador DJ / Controlador para DJ / DJ Контроллер
EnglishFraaisDeutsch Italiano Nederlands EspañolPortuguêусский
Operating Instructions (Quick Start Guide) /
Mode d’emploi (Guide de démarrage rapide) /
Bedienungsanleitung (Kurzanleitung) /
Istruzioni per l’uso (Guida di avvio veloce) / Handleiding (Snelstartgids) /
Manual de instrucciones (Guía de inicio rápido) /
Manual de instruções (Guia de início rápido) /
Инструкции по эксплуатации (Краткое руководство пользователя)
For FAQs and other support information for this product, visit the above site. / Pour les FAQ et autres informations de support sur
ce produit, consultez le site ci-dessus. / Häufig gestellte Fragen und weitere Support-Informationen für dieses Produkt finden Sie
auf der oben genannten Seite. / Per la sezione FAQ e altre informazioni di supporto per questo prodotto, visitare il sito indicato
sopra. / Bezoek de bovenstaande website voor vaak gestelde vragen en andere informatie over ondersteuning voor dit product. /
Para consultar las preguntas más frecuentes y otras informaciones de asistencia para este producto, visite el sitio indicado
anteriormente. / Para obter informações sobre as FAQs e outras informações de apoio relativas a este produto, consulte o site
indicado acima. / Ответы на часто задаваемые вопросы и другую дополнительную информацию о данном изделии см. на
указанном выше сайте.
2
En
2
CAUTION
TO PREVENT THE RISK OF ELECTRIC SHOCK, DO NOT
REMOVE COVER (OR BACK). NO USER-SERVICEABLE
PARTS INSIDE. REFER SERVICING TO QUALIFIED
SERVICE PERSONNEL.
D3-4-2-1-1_B1_En
WARNING
This equipment is not waterproof. To prevent a fire or
shock hazard, do not place any container filled with
liquid near this equipment (such as a vase or flower
pot) or expose it to dripping, splashing, rain or
moisture.
D3-4-2-1-3_A1_En
WARNING
To prevent a fire hazard, do not place any naked flame
sources (such as a lighted candle) on the equipment.
D3-4-2-1-7a_A1_En
CAUTION
The switch on this unit will not completely shut off
all power from the AC outlet. Since the power cord
serves as the main disconnect device for the unit,
you will need to unplug it from the AC outlet to shut
down all power. Therefore, make sure the unit has
been installed so that the power cord can be easily
unplugged from the AC outlet in case of an accident.
To avoid fire hazard, the power cord should also be
unplugged from the AC outlet when left unused for a
long period of time (for example, when on vacation).
D3-4-2-2-2a*_A1_En
POWER-CORD CAUTION
Handle the power cord by the plug. Do not pull out the
plug by tugging the cord and never touch the power
cord when your hands are wet as this could cause a
short circuit or electric shock. Do not place the unit, a
piece of furniture, etc., on the power cord, or pinch the
cord. Never make a knot in the cord or tie it with other
cords. The power cords should be routed such that they
are not likely to be stepped on. A damaged power cord
can cause a fire or give you an electrical shock. Check
the power cord once in a while. When you find it
damaged, ask your nearest service center or your
dealer for a replacement.
S002*_A1_En
If you want to dispose this product, do not mix it with general household waste. There is a separate collection system for used
electronic products in accordance with legislation that requires proper treatment, recovery and recycling.
P
rivate households in the member states of the EU, in Switzerland and Norway may return their used electronic products free of charge to
designated collection facilities or to a retailer (if you purchase a similar new one).
Fo
r countries not mentioned above, please contact your local authorities for the correct method of disposal.
By doing so you will ensure that your disposed product undergoes the necessar
y treatment, recovery and recycling and thus prevent potential
negative effects on the environment and human health.
K058b_A1_En
When using this product, confirm the safety
information shown on the bottom of the unit.
D3-4-2-2-4_B1_En
The graphical symbol placed on the product
means alternating current.
The graphical symbol placed on the product
means direct current.
The graphical symbol placed on the product
means Class II equipment.
D3-8-2-4_A1_En
Operating Environment
Operating environment temperature and humidity:
+5 °C to +35 °C (+41 °F to +95 °F); less than 85 %RH
(cooling vents not blocked)
Do not install this unit in a poorly ventilated area, or in
locations exposed to high humidity or direct sunlight (or
strong artificial light).
D3-4-2-1-7c*_A2_En
VENTILATION CAUTION
When installing this unit, make sure to leave space
around the unit for ventilation to improve heat radiation
(at least 5 cm at rear, and 5 cm at each side).
D3-4-2-1-7d*_A1_En
CAUTION
This product is evaluated in moderate and tropical
climate condition.
D3-8-2-1-7a_A1_En
3
DDJ
-
800
pioneerdj.com/support/
rekordbox.com
DJ Controller / Contrôleur pour DJ / DJ Controller / DJ Controller /
DJ Controller / Controlador DJ / Controlador para DJ / DJ Контроллер
Englis
hFraaisDeutsch Italiano Nederlands EspañolPortuguêусский
Operating Instructions (Quick Start Guide) /
Mode d’emploi (Guide de démarrage rapide) /
Bedienungsanleitung (Kurzanleitung) /
Istruzioni per l’uso (Guida di avvio veloce) / Handleiding (Snelstartgids) /
Manual de instrucciones (Guía de inicio rápido) /
Manual de instruções (Guia de início rápido) /
Инструкции по эксплуатации (Краткое руководство пользователя)
For FAQs and other support information for this product, visit the above site. / Pour les FAQ et autres informations de support sur
ce produit, consultez le site ci-dessus. / Häufig gestellte Fragen und weitere Support-Informationen für dieses Produkt finden Sie
auf der oben genannten Seite. / Per la sezione FAQ e altre informazioni di supporto per questo prodotto, visitare il sito indicato
sopra. / Bezoek de bovenstaande website voor vaak gestelde vragen en andere informatie over ondersteuning voor dit product. /
Para consultar las preguntas más frecuentes y otras informaciones de asistencia para este producto, visite el sitio indicado
anteriormente. / Para obter informações sobre as FAQs e outras informações de apoio relativas a este produto, consulte o site
indicado acima. / Ответы на часто задаваемые вопросы и другую дополнительную информацию о данном изделии см. на
указанном выше сайте.
En
3
Contents
How to read this manual
! Thank you for purchasing this Pioneer DJ product.
This manual provides a brief description of the procedures up until
connecting the unit to your PC/Mac and outputting audio. For the
detailed procedures, refer to the “Operating Instructions” on the
Pioneer DJ site. Read both this manual and “Operating Instructions”
which include important information to be understood before using
this unit. In particular, be sure to read safety regulations.
! In this manual, names of buttons and terminals indicated on the
unit, names of menus in the PC/Mac screen, etc., are indicated
within square bracket ([ ]). (e.g. [File], [CUE] button, [PHONES]
output terminal)
! The screens and specifications of the software and the external
appearance and specifications of the hardware described in this
manual are subject to change without notice for improvement and
so may differ from those in the explanations of this manual.
! Depending on the operating system version, web browser settings,
etc., operation may differ from the procedures described in this
manual.
! The language on the screens of the software described in this
manual may differ from the language on the actual screens.
Before start
Features ..............................................................................................4
Accessories .........................................................................................4
Viewing the manuals ...........................................................................4
rekordbox ............................................................................................5
Preparing rekordbox ............................................................................ 5
Part names
Browser section ................................................................................... 6
Deck sections ......................................................................................7
Mixer section .......................................................................................8
Rear panel ...........................................................................................9
Front panel ..........................................................................................9
Operation
Example of connections ....................................................................10
Connections ......................................................................................11
Starting the system ............................................................................13
Turning off the system .......................................................................14
Changing the settings........................................................................14
Additional information
Troubleshooting ................................................................................15
Trademarks and registered trademarks ............................................15
Cautions on copyrights ......................................................................15
Specifications ....................................................................................16
4
En
4
Before start
Features
This unit is a DJ controller designed specifically for rekordbox dj. It is
equipped with features such as COLOR ON JOG DISPLAY, BEAT
FX DISPLAY, and JOG ADJUST to enable intuitive DJ performances
without looking at your laptop. In the player section and mixer section,
the buttons and knobs are arranged in the same layout as those on our
club standard set-up. The controller is lightweight and compact, so you
can take it wherever you go.
Accessories
Power cord
AC adapter
USB cable
Operating Instructions (Quick
Start Guide) (this document)
DDJ
-
800
pioneerdj.com/support/
rekordbox.com
DJ Controller / Contrôleur pour DJ / DJ Controller / DJ Controller /
DJ Controller / Controlador DJ / Controlador para DJ / DJ Контроллер
English
F
r
a
nçais
Deut
schItaliano
Nederlands E
spañol Por
t
u
g
u
ês
Ру
сский
Operating Instructions (Quick Start Guide) /
Mode d’emploi (Guide de démarrage rapide) /
Bedienungsanleitung (Kurzanleitung) /
Istruzioni per l’uso (Guida di avvio veloce) / Handleiding (Snelstartgids) /
Manual de instrucciones (Guía de inicio rápido) /
Manual de instruções (Guia de início rápido) /
Инструкции по эксплуатации (Краткое руководство пользователя)
For FAQs and other support information for this product, visit the above site. / Pour les FAQ et autres informations de support sur
ce produit, consultez le site ci-dessus. / Häufig gestellte Fragen und weitere Support-Informationen für dieses Produkt finden Sie
auf der oben genannten Seite. / Per la sezione FAQ e altre informazioni di supporto per questo prodotto, visitare il sito indicato
sopra. / Bezoek de bovenstaande website voor vaak gestelde vragen en andere informatie over ondersteuning voor dit product. /
Para consultar las preguntas más frecuentes y otras informaciones de asistencia para este producto, visite el sitio indicado
anteriormente. / Para obter informações sobre as FAQs e outras informações de apoio relativas a este produto, consulte o site
indicado acima. / Ответы на часто задаваемые вопросы и другую дополнительную информацию о данном изделии см. на
указанном выше сайте.
Warranty (for some regions)
* The included warranty is
for the European region.
WARRANTY CERTIFICATE / GARANTIEKARTE / GARANTIECERTIFICAAT / CERTIFICATO DI GARANZIA / CERTIFICAT DE GARANTIE /
CERTIFICADO DE GARANTIA / ГАРАНТИЙНЫЙ СЕРТИФИКАТ / CERTIFICADO DE GARANTIA / GARANTI -CERTIFICAT / GARANTIBEVIS /
GARANTIBEVIS / TAKUUTODISTUS / GARANTIJOS LIUDIJIMAS / GARANTIJAS SERTIFIKĀTS / ΠΙΣΤΟΠΟΙΗΤΙΚΟ ΕΓΓΥΗΣΗΣ / CERTYFIKAT
GWARANCJI / GARANTIISERT / GARANTİ BELGESİ / ГАРАНТIЙНИЙ СЕРТИФIКАТ
Model / Typ / Model /Modello / Type / Modelo / Модель / Modelo / Modell / Model /
Modell / Malli / Modelka / Modelis / Μοντέλο / Model / Mudel / Model / Модель
Serial number / Seriennummer / Serienummer / Numero di matricola / Numéro de
série / Número de serie / Серийный номер / Número de série / Serie nummer /
Serienummer / Serienummer / Sarjanumero / Serijos numeris / Sērijas numurs /
Αριθμός σειράς / Numer seryjny / Seerianumber / Seri numarasI / Серiйний номер
Date of purchase / Kaufdatum / Aankoopdatum / Data d' acquisto / Date d' achat /
Fecha de compra / Дата продажи / Data de compra / Inköpsdatum / Köpsdato /
Salgsdato / Ostoppäivä / Pirkimo data / Pirkuma datums / Ημερομηνία αγοράς / Data
sprzedaży / Ostukuupäev / Satın alındığı tarih / Дата продажy
Purchaser's name and address / Name und Anschrift des Käufers / Naam en adres
van de koper / Nome ed indirizzo dell' acquirente / Nom et adresse de l'acheteur /
Nombre y Dirección del comprador / Имя и адрес покупателя / Nome e endereço
do comprador / Köparens namn och adress / Köbers navn og adresse / Kundens
navn og adresse / Ostajan osoite / Pirkėjo vardas, pavardė ir adresas / Pircēja vārds
un adrese / Όνομα και διεύθυνση αγοραστή / Imię/Nazwisko i adres nabywcy /
Ostja nimi ja aadress / Satın alanın adı ve adresi / Iм'я та адреса покупця
Signature / Unterschrift / Handtekening / Firma / Signature / Firma / Подпись /
Assinatura / Signatur / Underskrift / Signatur / Allekirjoitus / Parašas / Paraksts /
Υπογραφή / Podpis / Allkiri / Ímza / Пiдпис
Dealer (stamp) / Händlerstempel / Verdeler (stempel) / Rivenditore (timbro) /
Cachet du revendeur / Distribuidor (sello) / Дилер (печать) / Agente (carimbo) /
Återförsäljare / Forhandler (stempel) / Forhandler (stempel) / Myyjäliike (leima) /
Prekybos atstovas (antspaudas) / Izplatītājs (zīmogs) / Μεταπωλητής (σφραγίδα) /
Sprzedawca (pieczęć) / Müüja (pitsat) / Satıcının mühürü / Дилер (печатка)
English
The Pioneer DJ Products Warranty is valid in all
listed countries for a period of three years from
the date of first delivery. Pioneer DJ Europe Ltd of
Anteros Building, Odyssey Business Park, West
End Road, South Ruislip, Middlesex HA4 6QQ,
United Kingdom warrants this product to be free
of defects in materials and workmanship, subject
to the warranty conditions.
You may obtain a copy of the warranty conditions
from the dealer where you purchased your prod-
uct, by downloading it from your local Pioneer DJ
website or by contacting our customer helpdesk.
IMPORTANT: Keep this certificate together with
the original invoice or receipt in a safe place and
show them to the retailer or authorized service
centre whenever a warranty repair is necessary.
Français
La garantie des Produits Pioneer DJ est applicable
dans tous les pays listes pour une periode de trois
ans a partir de la date de livraison. Pioneer DJ
Europe Ltd, Anteros Building, Odyssey Business
Park, West End Road, South Ruislip, Middlesex
HA4 6QQ, Royaume-Uni, garantit ce produit
contre tous vices de fabrication ou d’assemblage
sous réserve du respect des conditions suivantes.
Pour obtenir une copie des conditions de garantie,
renseignez-vous auprès du revendeur du produit,
téléchargez-la depuis votre site Web Pioneer DJ
local ou contactez notre service d’assistance à la
clientèle.
IMPORTANT: Nous vous conseillons de conserver
soigneusement ce certificat de garantie avec
l'original de votre facture d'achat ou votre ticket
de caisse. Ces documents vous seront réclamés
par votre revendeur ou par votre centre technique
agréé lors d'une éventuelle réparation demandée
au titre de la garantie.
Svenska
Pioneer DJs produktgaranti garanti för dess
DJ-produkter gäller i alla länder som anges i för-
teckningen i det här garanti-certificatet under en
tid av tre år från leverans. Pioneer DJ Europe Ltd
på adressen Anteros Building, Odyssey Business
Park, West End Road, South Ruislip, Middlesex
HA4 6QQ, Storbritannien garanterar att produkten
inte är behäftad med något material- eller tillverk-
ningsfel enligt de villkor som anges nedan.
Du kan erhålla ett exemplar av garantivillkoren
från återförsäljaren där produkten köptes eller ge-
nom att ladda ner dem från din lokala Pioneer DJ
webbplats eller genom att kontakta vår kundsup-
port.
VIKTIGT: Förvara det här garantibeviset tillsam-
mans med originalfakturan eller kvittot på en
säker plats och visa dem för återförsäljaren eller
en auktoriserad serviceverkstad när du vill att en
garantireparation skall utföras.
Deutsch
Die Verbrauchergarantie von Pioneer DJ gilt in al-
len in dieser Bescheinigung aufgeführten Ländern
für einen Zeitraum von drei Jahren ab dem Datum
der ersten Auslieferung. Pioneer DJ Europe
Ltd. ansässig unter Anteros Building, Odyssey
Business Park, West End Road, South Ruislip,
Middlesex HA4 6QQ, Vereiniges Königreich
garantiert, dass dieses Gerät frei ist von Material-
und Verarbeitungsfehlern und dabei folgenden
Bedingungen unterliegt.
Eine Kopie der Garantiebedingungen erhalten
Sie über den Händler, über den Sie das Gerät
gekauft haben, oder durch einen Download von
der lokalen Pioneer DJ Website. Darüber hinaus
können Sie diese Informationen auch über die
unsere Hotline abrufen.
WICHTIG: Bitte bewahren Sie dieses Dokument
zusammen mit der Originalrechnung an einem
sicheren Platz auf und legen Sie die Belege Ihrem
Händler oder der autorisierten Vertragswerkstatt
vor, falls eine Garantiereparatur erforderlich sein
sollte.
Español
La Garantía de productos Pioneer DJ es válida
en todos los países listados en este Certificado
por el plazo de, tres años a partir de la fecha de
la primera entrega. Pioneer DJ Europe Ltd, con
sede en Anteros Building, Odyssey Business
Park, West End Road, South Ruislip, Middlesex
HA4 6QQ, Reino Unido, garantiza este producto
contra todo defecto de fabricación en materiales y
mano de obra, bajo las condiciones expuestas a
continuación.
Usted puede obtener una copia de las condicio-
nes de garantía solicitándosela al distribuidor que
le vendió su producto, descargándola de la web
local de Pioneer DJ o contactando con nuestro
servicio de asistencia al cliente.
IMPORTANTE: Guarde esta tarjeta junto con la
Factura o Albararán original de compra en un sitio
seguro y preséntela al Servicio Técnico Autoriza-
do siempre que sea necesaria una reparación en
garantía.
Dansk
Pioneer DJs produktgaranti gælder i alle lande på
listen i nærværende garantibevis, i en periode på
tre år fra datoen for første levering. Pioneer DJ
Europe Ltd, Anteros Building, Odyssey Business
Park, West End Road, South Ruislip, Middlesex
HA4 6QQ, Storbritanien garanterer at dette pro-
dukt er fri for fejl i materialer og udførelse, under
forudsætning af at nedennævnte betingelser
overholdes.
En kopi af garantibetingelserne kan fås hos den
forhandler, hvor produktet blev købt, ved down-
load fra det lokale Pioneer DJ-website eller ved at
man kontakter vores kunde-helpdesk.
VIGTIGT: Gem dette garantibevis sammen med
den originale købskvittering, på et sikkert sted, og
medbring begge dele til forhandler eller autori-
seret service center, hvis garantireparation er
nødvendigt.
Nederlands
De Pioneer DJ productgarantie is gedurende een
periode van drie jaar vanaf de datum van eerste
levering geldig in alle landen die vermeld worden
in de lijst van dit certificaat. Pioneer DJ Europe
Ltd te Anteros Building, Odyssey Business Park,
West End Road, South Ruislip, Middlesex HA4
6QQ, Verenigd Koninkrijk waarborgt volgens de
garantievoorwaarden dat dit product geen gebre-
ken vertoont in materiaal en vakmanschap.
U kan een kopie van de garantievoorwaarden
verkrijgen via de dealer waar u het product
gekocht heeft, door het te downloaden van uw
lokale Pioneer DJ website, ofwel door contact op
te nemen met onze klantendienst.
BELANGRIJK: Bewaar dit garantiebewijs zorgvul-
dig, samen met uw originele factuur of kassabon,
en toon het aan het verkooppunt of het geautori-
seerde service-station als u aanspraak wilt maken
op reparatie onder garantie.
Русский
Гарантия на продукцию Pioneer DJ действи-
тельна во всех перечисленных странах в
течение трех лет с даты первой доставки.
Компания Pioneer DJ Europe Ltd, располо-
женная по адресу Anteros Building, Odyssey
Business Park, West End Road, South Ruislip,
Middlesex HA4 6QQ, United Kingdom (здание
Антерос, Одиссей Бизнес-парк, Вест-Энд Роуд,
Сауз Руислип, Мидлэссекс, HA4 6QQ, Велико-
британия), гарантирует, что этот продукт не
будет иметь дефектов в материалах и изготов-
лении, согласно гарантийным обязательствам.
Получить копию гарантийных обязательств
можно у дилера по месту приобретения про-
дукции; копию гарантийных обязательств также
можно скачать с местного веб-сайта Pioneer DJ
или же запросить в нашей службе поддержки
клиентов.
ВАЖНО: Храните этот сертификат вместе
с оригиналом счета-фактуры или чека и
предъя
вляйте продавцу или авторизованному
сервисному центру в случае необходимости
гарантийного ремонта.
Norsk
Pioneer DJs produktgaranti er gyldig i alle land
nevnt i listen i garantikortet, i tre år fra første leve-
ring. Pioneer DJ Europe Ltd., med hovedkontor i
Anteros Building, Odyssey Business Park, West
End Road, South Ruislip, Middlesex HA4 6QQ,
Storbritannia, garanterer at dette produktet er fri
for defekter i materiale og utførelse. I forhold til
vilkår nevnt nedenfor.
Du kan få en kopi av garantivilkårene fra forhand-
leren der du kjøpte produktet, ved å laste ned den
ned fra det lokale nettstedet for Pioneer DJ eller
ved å kontakte vår kundestøtte.
VIKTIG: Oppbevar dette sertifikatet/beviset sam-
men med den originale kvitteringen eller fakturaen
på et sikkert sted, og fremvis dette til forhandler
eller autorisert verksted når en garanti reparasjon
er nødvendig.
Italiano
La garanzia dei prodotti di Pioneer DJ è valida in
tutti i paesi elencati nel presente certificato per un
periodo di tre anni dalla data di consegna. Pioneer
DJ Europe Ltd, con sede in Anteros Building,
Odyssey Business Park, West End Road, South
Ruislip, Middlesex HA4 6QQ, Regno Unito, garan-
tisce il prodotto contro tutti i difetti di materiale
e di fabbricazione, alle condizioni qui di seguito
specificate.
È possibile ottenere una copia delle condizioni di
garanzia dal rivenditore presso il quale si è acqui-
stato il prodotto, scaricandola dal sito Web locale
di Pioneer DJ o contattando il servizio clienti.
IMPORTANTE: Conservare il presente certificato
unitamente al documento d'acquisto originale
(fattura, scontrino o ricevuta fiscale), da esibirsi
al Centro di Assistenza autorizzato nel caso di
riparazione in garanzia.
Português
A Garantia dos Produtos Pioneer DJ é válida em
todos os países mencionados na lista por um
período de três anos a partir da data da primeira
entrega. A Pioneer DJ Europe Ltd localizada em
Anteros Building, Odyssey Business Park, West
End Road, South Ruislip, Middlesex HA4 6QQ,
United Kingdom, garante este produto contra
defeitos de mão-de-obra e de materiais, sujeito às
condições da garantia.
Pode obter uma cópia destas condições no agen-
te onde adquiriu o seu produto, descarregando-a
da página Web local da Pioneer DJ ou contactan-
do o nosso serviço de apoio ao cliente.
IMPORTANTE: Conserve este certificado
juntamente com o original da Fatura ou Venda
a Dinheiro em local seguro e apresente-os ao
retalhista ou oficina autorizada sempre que seja
necessário efetuar uma reparação dentro da
garantia.
Suomi
Pioneerin DJ-tuotteiden takuu on voimassa
kaikissa tässä kortissa luetelluissa maissa kolmen
vuoden ajanalkuperäisestä hankintapäivästä
lukien. Pioneer DJ Europe Ltd of Anteros Buil-
ding, Odyssey Business Park, West End Road,
South Ruislip, Middlesex HA4 6QQ, Yhdistynyt
Kuningaskunta, antaa tuotteele takuun, koskien
materiaali ja valmistusvirheitä jäljempänä olevan
erittelyn mukaisesti.
Kopion takuuehdoista voi saada jälleenmyyjältä,
josta tuote ostettiin, lataamalla se paikalliselta
Pioneer DJ-verkkosivustolta tai ottamalla yhteys
asiakastukipalveluun.
TÄRKEÄÄ: Säilytä tämä takuukortti huolellisesti ja
esitä se yhdessä ostokuitin kanssa takuuhuoltoa
tilatessasi.
Printed in China/Imprimé en Chine
EWP0717-3
rekordbox dj license key card
* For the latest information,
see the site below.
rekordbox.com
Note
The license key cannot be reis-
sued. Be careful not to lose it.
Viewing the manuals
Viewing the latest version of the “Operating
Instructions”
1 Launch a web browser on the PC/Mac and access the
Pioneer DJ site below.
pioneerdj.com
! To select your language, click the flag icon or GLOBAL icon on the
upper-right screen, and then select an area and language.
2 Click [Tutorials, manuals & documentation] under
[Support].
3 Click [DDJ-800] in the [DJ CONTROLLER] category.
4 Click the desired language from the Operating
Instructions list.
Download the manual as necessary.
Viewing “Introduction” / “Operating
Instructions” of rekordbox
! “Introduction” guides you through setting up rekordbox.
! “Operating Instructions” explains about track collection, EXPORT
mode, and PERFORMANCE mode.
1 Launch a web browser on the PC/Mac and access the
following site.
rekordbox.com
2 Click [Manual] under [Support].
3 Click the required language of “rekordbox
Introduction” or “Operating Instructions”.
5
DDJ
-
800
pioneerdj.com/support/
rekordbox.com
DJ Controller / Contrôleur pour DJ / DJ Controller / DJ Controller /
DJ Controller / Controlador DJ / Controlador para DJ / DJ Контроллер
Englis
hFraaisDeutsch Italiano Nederlands EspañolPortuguêусский
Operating Instructions (Quick Start Guide) /
Mode d’emploi (Guide de démarrage rapide) /
Bedienungsanleitung (Kurzanleitung) /
Istruzioni per l’uso (Guida di avvio veloce) / Handleiding (Snelstartgids) /
Manual de instrucciones (Guía de inicio rápido) /
Manual de instruções (Guia de início rápido) /
Инструкции по эксплуатации (Краткое руководство пользователя)
For FAQs and other support information for this product, visit the above site. / Pour les FAQ et autres informations de support sur
ce produit, consultez le site ci-dessus. / Häufig gestellte Fragen und weitere Support-Informationen für dieses Produkt finden Sie
auf der oben genannten Seite. / Per la sezione FAQ e altre informazioni di supporto per questo prodotto, visitare il sito indicato
sopra. / Bezoek de bovenstaande website voor vaak gestelde vragen en andere informatie over ondersteuning voor dit product. /
Para consultar las preguntas más frecuentes y otras informaciones de asistencia para este producto, visite el sitio indicado
anteriormente. / Para obter informações sobre as FAQs e outras informações de apoio relativas a este produto, consulte o site
indicado acima. / Ответы на часто задаваемые вопросы и другую дополнительную информацию о данном изделии см. на
указанном выше сайте.
En
5
rekordbox
! rekordbox
rekordbox is music management software for DJs to prepare tracks
and perform DJ play.
! rekordbox dj
The DJ performance function of rekordbox is called rekordbox dj.
rekordbox dj can be used by simply connecting the unit to a PC/
Mac. If you wish to use rekordbox dj on a PC/Mac without connect-
ing the unit, enter the license key shown on the rekordbox dj license
key card included with this product to use rekordbox dj.
* For the latest information, see the site below.
rekordbox.com
Operating environment
Supported operating systems CPU and required memory
Mac:
Intel
®
processor Core™ i7, i5, i3
macOS Mojave 10.14
macOS High Sierra 10.13
macOS Sierra 10.12
4 GB or more of RAM
(latest update)
Windows:
Intel
®
processor Core™ i7, i5, i3
Windows
®
10
Windows
®
8.1
Windows
®
7
4 GB or more of RAM
32-bit version or 64-bit version
(latest service pack)
Others
USB port
A USB 2.0 port is required to connect the PC/Mac with
this unit.
Display resolution 1 280 x 768 or greater
Internet connection
An Internet connection is required for registering
the rekordbox user account and downloading the
software.
! Operation is not guaranteed on all PC/Mac, even if all the required operating
environment conditions indicated here are fulfilled.
! Depending on power saving settings, etc. of the PC/Mac, the CPU and hard
disk may not provide sufficient processing capabilities. For a laptop PC/Mac,
in particular, make sure the PC/Mac is in the proper conditions to provide
constant high performance (for example, by keeping the AC power connected)
when using rekordbox.
! A separate contract with an Internet service provider and payment of the
utilization fee are required to access the Internet.
! Use the latest version/service pack of the operating system.
! To check the latest information on the operating environment and compatibility
of rekordbox, and to acquire the latest operating system, refer to [System
requirements] under [Support] of the rekordbox product site below.
rekordbox.com
Preparing rekordbox
Install the software by following the procedure below when you use
rekordbox for the first time or if you are using rekordbox 4.x or an ear-
lier version.
If rekordbox Ver.5.x is already installed, update rekordbox to the lat-
est version using the Update Manager which is shown when starting
rekordbox.
Installing rekordbox
1 Launch a web browser on PC/Mac, open rekordbox
download page from the following site, and then
download rekordbox.
rekordbox.com
For Windows, select 32-bit or 64-bit version according to your PC.
2 Double-click the downloaded file to unzip it.
3 Double-click the unzipped file to launch the installer.
4 Carefully read the Software End User License
Agreement, and proceed with the installation by
following the instructions on the screen if you agree to
the terms.
! If you do not agree to the license agreement, cancel the
installation.
5 When the installation completion screen appears,
close the installer by following the instructions on the
screen.
The installation is completed.
6
En
6
Part names
For details on the functions of the various buttons and controls, see “Part names and functions” in the “Operating Instructions”.
1 Browser section
2 Deck sections
3 Mixer section
Browser section
32 4
1 LOAD button
2 BACK button
3 Rotary selector
4 VIEW button
7
DDJ
-
800
pioneerdj.com/support/
rekordbox.com
DJ Controller / Contrôleur pour DJ / DJ Controller / DJ Controller /
DJ Controller / Controlador DJ / Controlador para DJ / DJ Контроллер
Englis
hFraaisDeutsch Italiano Nederlands EspañolPortuguêусский
Operating Instructions (Quick Start Guide) /
Mode d’emploi (Guide de démarrage rapide) /
Bedienungsanleitung (Kurzanleitung) /
Istruzioni per l’uso (Guida di avvio veloce) / Handleiding (Snelstartgids) /
Manual de instrucciones (Guía de inicio rápido) /
Manual de instruções (Guia de início rápido) /
Инструкции по эксплуатации (Краткое руководство пользователя)
For FAQs and other support information for this product, visit the above site. / Pour les FAQ et autres informations de support sur
ce produit, consultez le site ci-dessus. / Häufig gestellte Fragen und weitere Support-Informationen für dieses Produkt finden Sie
auf der oben genannten Seite. / Per la sezione FAQ e altre informazioni di supporto per questo prodotto, visitare il sito indicato
sopra. / Bezoek de bovenstaande website voor vaak gestelde vragen en andere informatie over ondersteuning voor dit product. /
Para consultar las preguntas más frecuentes y otras informaciones de asistencia para este producto, visite el sitio indicado
anteriormente. / Para obter informações sobre as FAQs e outras informações de apoio relativas a este produto, consulte o site
indicado acima. / Ответы на часто задаваемые вопросы и другую дополнительную информацию о данном изделии см. на
указанном выше сайте.
En
7
Deck sections
This section is used to control the four decks. The buttons and controls for operating decks 1 and 3 are located on the left side of the controller, and
those for operating decks 2 and 4 are located on the right side of the controller.
42 5 76 83
9
a
b
c
d
e
jk
f g h i
l
m
o
r
p
s
q
n
1 LOOP IN/4 BEAT (IN ADJUST) button
2 LOOP OUT (OUT ADJUST) button
3 RELOOP/EXIT button
4 QUANTIZE button
5 CUE/LOOP CALL, c (LOOP 1/2X) button
6 CUE/LOOP CALL, d (LOOP 2X) button
7 DELETE button
8 MEMORY button
9 JOG FEELING ADJUST control
a BEAT SYNC button
b KEY SYNC button
c TEMPO RANGE button
d MASTER TEMPO button
e TEMPO slider
f HOT CUE mode button
g PAD FX1 mode button
h BEAT JUMP mode button
i SAMPLER mode button
j PAGE c, d button
k Performance pads
l PLAY/PAUSE f button
m CUE button
n TRACK SEARCH m, n/SEARCH button
o SHIFT button
p Jog dial display section
The LCD display is manufactured using extremely high precision
technology, but even so defective pixels (small number of black
dots or constantly lit red, blue, and green dots) may be visible on
some parts of the screen. Also, color unevenness and brightness
unevenness may be visible depending on the angle of view. These
phenomena are due to the characteristics of LCD displays and are
not an indication of a failure.
q Jog dial
r SLIP button
s SLIP REVERSE button
8
En
8
Mixer section
1 2 3 4 6 7 4
8
9
a
b
c
d
e
f
g
hijih
k
l
m
n
o
p
q
u
r rs s
t
5
1 MIC ON, OFF selector switch
2 Microphone indicator
3 PHONO/LINE, DECK3, DECK1 selector switch
4 TRIM control
5 Master level indicator
6 CLIP indicator
7 DECK2, DECK4, PHONO/LINE selector switch
8 MASTER LEVEL control
9 MASTER CUE button
a BOOTH LEVEL control
b Effect section display
c BEAT c, d buttons
d BEAT FX SELECT control
e BEAT FX CH SELECT control
f BEAT FX LEVEL/DEPTH control
g BEAT FX ON/OFF button
h Headphones CUE button
i Channel fader
j Crossfader
k HEADPHONES LEVEL control
l HEADPHONES MIXING control
m SOUND COLOR FX SELECT buttons
n AUX TRIM control
o MIC EQ (HI, LOW) control
p MIC 2 LEVEL control
q MIC 1 LEVEL control
r EQ (HI, MID, LOW) control
s Channel level indicator
t SAMPLER LEVEL control
u COLOR control
9
DDJ
-
800
pioneerdj.com/support/
rekordbox.com
DJ Controller / Contrôleur pour DJ / DJ Controller / DJ Controller /
DJ Controller / Controlador DJ / Controlador para DJ / DJ Контроллер
Englis
hFraaisDeutsch Italiano Nederlands EspañolPortuguêусский
Operating Instructions (Quick Start Guide) /
Mode d’emploi (Guide de démarrage rapide) /
Bedienungsanleitung (Kurzanleitung) /
Istruzioni per l’uso (Guida di avvio veloce) / Handleiding (Snelstartgids) /
Manual de instrucciones (Guía de inicio rápido) /
Manual de instruções (Guia de início rápido) /
Инструкции по эксплуатации (Краткое руководство пользователя)
For FAQs and other support information for this product, visit the above site. / Pour les FAQ et autres informations de support sur
ce produit, consultez le site ci-dessus. / Häufig gestellte Fragen und weitere Support-Informationen für dieses Produkt finden Sie
auf der oben genannten Seite. / Per la sezione FAQ e altre informazioni di supporto per questo prodotto, visitare il sito indicato
sopra. / Bezoek de bovenstaande website voor vaak gestelde vragen en andere informatie over ondersteuning voor dit product. /
Para consultar las preguntas más frecuentes y otras informaciones de asistencia para este producto, visite el sitio indicado
anteriormente. / Para obter informações sobre as FAQs e outras informações de apoio relativas a este produto, consulte o site
indicado acima. / Ответы на часто задаваемые вопросы и другую дополнительную информацию о данном изделии см. на
указанном выше сайте.
En
9
Rear panel
1 2 3 4 5 7 769a ac fedg88 b
3
Top panel
1 DC cord hook
2 DC IN terminal
3 u switch
Turns this unit on or puts this unit into standby mode.
4 BOOTH output terminals
5 MASTER 2 output terminals
6 MASTER 1 output terminals
! Be careful not to accidentally insert the power cord plug of
another product into an output terminal.
! Do not connect terminals capable of supplying phantom power
to the output terminals.
7 LINE/PHONO input terminals
8 LINE/PHONO switches
9 SIGNAL GND terminal
This terminal helps reduce noise when an analog player or other
device is connected.
a MIC attenuator
b MIC 1 input terminal
c MIC 2 input terminal
d AUX gain selector switch
e AUX input terminals
f USB terminal
g Kensington security slot
Front panel
1
1 PHONES output terminals
Do not use the two output terminals (one for a stereo phone jack
and one for a mini-phone jack) simultaneously. If a cable is con-
nected to or disconnected from one of the terminals while another
terminal is in use, the volume for the terminal in use may increase
or decrease unintentionally.
10
En
10
Operation
! Connect the power cord to a power outlet after all the connections are completed.
Turn off this unit and disconnect the power cord from the power outlet before connecting components or changing the connections.
Refer to the operating instructions for the components to be connected.
! Be sure to use the included power cord and AC adapter.
! Be sure to use the USB cable included with this product or one that conforms to USB 2.0.
! Do not use a USB hub.
Example of connections
Connecting input terminals
Rear panel
R
L
R
L
R
L
AUDIO OUT
R L
CONT
R
*1 Analog player
DJ player
*2 DJ player
Portable audio
device
Microphone
*2 DJ player
*1 Analog player
To power outlet
Power cord
(included)
AC adapter
(included)
PC/Mac
*1 When connecting an analog player, switch the [LINE/PHONO] switch beside the terminals to [PHONO].
*2 When connecting a DJ player, switch the [LINE/PHONO] switch beside the terminals to [LINE].
11
DDJ
-
800
pioneerdj.com/support/
rekordbox.com
DJ Controller / Contrôleur pour DJ / DJ Controller / DJ Controller /
DJ Controller / Controlador DJ / Controlador para DJ / DJ Контроллер
Englis
hFraaisDeutsch Italiano Nederlands EspañolPortuguêусский
Operating Instructions (Quick Start Guide) /
Mode d’emploi (Guide de démarrage rapide) /
Bedienungsanleitung (Kurzanleitung) /
Istruzioni per l’uso (Guida di avvio veloce) / Handleiding (Snelstartgids) /
Manual de instrucciones (Guía de inicio rápido) /
Manual de instruções (Guia de início rápido) /
Инструкции по эксплуатации (Краткое руководство пользователя)
For FAQs and other support information for this product, visit the above site. / Pour les FAQ et autres informations de support sur
ce produit, consultez le site ci-dessus. / Häufig gestellte Fragen und weitere Support-Informationen für dieses Produkt finden Sie
auf der oben genannten Seite. / Per la sezione FAQ e altre informazioni di supporto per questo prodotto, visitare il sito indicato
sopra. / Bezoek de bovenstaande website voor vaak gestelde vragen en andere informatie over ondersteuning voor dit product. /
Para consultar las preguntas más frecuentes y otras informaciones de asistencia para este producto, visite el sitio indicado
anteriormente. / Para obter informações sobre as FAQs e outras informações de apoio relativas a este produto, consulte o site
indicado acima. / Ответы на часто задаваемые вопросы и другую дополнительную информацию о данном изделии см. на
указанном выше сайте.
En
11
Connecting output terminals
Rear panel
Component, amplifier,
Power amplifier,
(for booth monitor),
powered speakers, etc.
R
L
Front panel
Headphones
! Be sure to use the [MASTER 1] output terminals for a balanced
output. If they are connected to an unbalanced input (such as RCA)
using an XLR to RCA converter cable (or converter adapter), etc.,
the sound quality may be lowered or noise may occur.
For connection with an unbalanced input (such as RCA), use the
[MASTER 2] output terminals.
! Be careful not to accidentally insert the power cord plug of
another unit into a [MASTER 1] output terminals.
Do not connect terminals capable of supplying phantom power
to the [MASTER 1] output terminals.
! Be sure to use the [BOOTH] output terminals for a balanced output.
If they are connected to an unbalanced input (such as an RCA or
TS terminal) with an TRS to RCA converter cable (or converter
adapter), TS cable, etc., the sound quality may be lowered or noise
may occur.
Connections
For more information on how to use this product with rekordbox dj,
refer to this product’s Operating Instructions that is available on the
Pioneer DJ site.
1 Connect headphones to the [PHONES] output
terminals.
2 Connect devices such as powered speakers, a
power amplifier, and components to the [MASTER 1] or
[MASTER 2] output terminals.
Powered speakers, etc.
! To output the sound from the [BOOTH] output terminals,
connect devices such as speakers to the [BOOTH] output
terminals.
12
En
12
3 Connect your PC/Mac to the unit via a USB cable.
USB cable
(included)
4 Turn on your PC/Mac.
5 Connect the AC adapter.
To power outlet
Power cord
included
AC adapter
(included)
6 Press the [u] switch on the rear panel of this unit to
turn this unit on.
This unit turns on.
! For Windows
The [Installing device driver software] message may appear
when this unit is first connected to the PC or when it is con-
nected to a different USB port on the PC. Wait a while until the
[Your devices are ready for use] message appears.
7 Turn on the devices connected to the output
terminals (powered speakers, power amplifier,
components, etc.).
! If a microphone, DJ player or other external device is connected
to the input terminals, turn on the connected device.
13
DDJ
-
800
pioneerdj.com/support/
rekordbox.com
DJ Controller / Contrôleur pour DJ / DJ Controller / DJ Controller /
DJ Controller / Controlador DJ / Controlador para DJ / DJ Контроллер
Englis
hFraaisDeutsch Italiano Nederlands EspañolPortuguêусский
Operating Instructions (Quick Start Guide) /
Mode d’emploi (Guide de démarrage rapide) /
Bedienungsanleitung (Kurzanleitung) /
Istruzioni per l’uso (Guida di avvio veloce) / Handleiding (Snelstartgids) /
Manual de instrucciones (Guía de inicio rápido) /
Manual de instruções (Guia de início rápido) /
Инструкции по эксплуатации (Краткое руководство пользователя)
For FAQs and other support information for this product, visit the above site. / Pour les FAQ et autres informations de support sur
ce produit, consultez le site ci-dessus. / Häufig gestellte Fragen und weitere Support-Informationen für dieses Produkt finden Sie
auf der oben genannten Seite. / Per la sezione FAQ e altre informazioni di supporto per questo prodotto, visitare il sito indicato
sopra. / Bezoek de bovenstaande website voor vaak gestelde vragen en andere informatie over ondersteuning voor dit product. /
Para consultar las preguntas más frecuentes y otras informaciones de asistencia para este producto, visite el sitio indicado
anteriormente. / Para obter informações sobre as FAQs e outras informações de apoio relativas a este produto, consulte o site
indicado acima. / Ответы на часто задаваемые вопросы и другую дополнительную информацию о данном изделии см. на
указанном выше сайте.
En
13
Starting the system
Launching rekordbox
It is necessary to register an account for using rekordbox.
For details about procedure, click [Manual] under [Support] of the fol-
lowing site, and then refer to “rekordbox Introduction”.
rekordbox.com
For Mac
Open the [Applications] folder in Finder and then double-click the
[rekordbox 5] > [rekordbox.app] icon.
For Windows 10
From the [Start] menu, click [Pioneer] > [rekordbox] icon.
For Windows 8.1
Click the [rekordbox] icon in [Apps view].
For Windows 7
From the [Start] menu, click [All Programs] > [Pioneer] >
[rekordbox 5.X.X] and the [rekordbox] icon.
Checking audio settings
Check that the [Audio] settings in [Preferences] of rekordbox are set
as follows.
For Mac
[Audio]: [DDJ-800]
[Output channels]:
[Master Output]: [DDJ-800: MASTER]
[Booth Output]: [DDJ-800: BOOTH]
[Headphones Output]: [DDJ-800: PHONES]
For Windows
[Audio]: [DDJ-800 ASIO]
[Output channels]:
[Master Output]: [DDJ-800 ASIO: MASTER]
[Booth Output]: [DDJ-800 ASIO: BOOTH]
[Headphones Output]: [DDJ-800 ASIO: PHONES]
! If PC MASTER OUT is enabled, the “+ Name of audio device in
PC/Mac” information will also be displayed after [MASTER] of the
[Master Output] item in the [Audio] settings.
Adding track files to [Collection]
A list of track files managed by rekordbox is displayed on the
[Collection] screen.
Registering the track files on the PC/Mac as the track collection of
rekordbox and then analyzing them enables those tracks to be used
with rekordbox.
1 Click [Collection] in the tree view.
A list of the tracks registered in [Collection] is displayed.
2 Open Finder (Mac) or Explorer (Windows), and drag
and drop track files or folders containing track files to
the track list.
The track files are added to [Collection], and the waveform analysis
of the track files starts. Wait until the analysis of all the track files is
finished.
Loading a track into a deck of the unit
This section explains how to load a track into Deck 1 (left) as an
example.
2
1
1 LOAD button
2 Rotary selector
Turn the rotary selector to select a track in [Collection]
and then press the [LOAD] button of deck 1 (left side).
The track is loaded into deck 1.
14
En
14
Play tracks
The following describes the procedure for outputting the sound of deck
1 (left side) as an example.
b
7
8
6
5
9
a
4
3
2
1
1 Channel level indicator
2 PHONO/LINE, DECK3, DECK1 selector switch
3 TRIM control
4 EQ (HI, MID, LOW) control
5 COLOR control
6 Headphones CUE button
7 HEADPHONES MIXING control
8 HEADPHONES LEVEL control
9 Channel fader
a Crossfader
b MASTER LEVEL control
1 Set the positions of the controls, etc., as shown
below.
Names of controls, etc. Operation
PHONO/LINE, DECK3, DECK1 selector switch [DECK1] position
TRIM control Turn it fully counterclockwise.
EQ (HI, MID, LOW) control Center position
COLOR control Center position
Channel fader Move it downward.
MASTER LEVEL control Turn it fully counterclockwise.
Crossfader Center position
2 Press the [PLAY/PAUSE f] button to play the
track.
3 Turn the [TRIM] control.
Adjust the [TRIM] control so that the channel level indicator’s orange
indicator lights at the peak level.
4 Move the channel fader upward.
5 Turn the [MASTER LEVEL] control to adjust the audio
level of the speakers.
Adjust the level of the sound output from the [MASTER 1] and
[MASTER 2] output terminals to an appropriate level.
! To output sound from the speakers of the PC/Mac, adjust not
the [MASTER LEVEL] control but the volume of the speakers of
the PC/Mac.
Monitoring channel audio with headphones
Set the positions of the controls, etc., as shown below.
Names of controls, etc. Operation
HEADPHONES MIXING control Center position
HEADPHONES LEVEL control Turn it fully counterclockwise.
1 Press the headphones [CUE] button.
2 Turn the [HEADPHONES LEVEL] control.
Adjust the level of sound output from the headphones to an appropriate
level.
Note
This unit and rekordbox dj include many functions to allow for more
individualistic DJ performances. For details on each function, access
the site below and see the “rekordbox Operating Instructions”.
rekordbox.com/manual
Turning off the system
1 Close rekordbox.
2 Press the [u] switch on the rear panel of this unit to
set the unit to standby.
3 Disconnect the USB cable from the PC/Mac.
Changing the settings
! For details on how to change the settings of this unit, refer to
“Changing the settings” in the Operating Instructions.
15
DDJ
-
800
pioneerdj.com/support/
rekordbox.com
DJ Controller / Contrôleur pour DJ / DJ Controller / DJ Controller /
DJ Controller / Controlador DJ / Controlador para DJ / DJ Контроллер
Englis
hFraaisDeutsch Italiano Nederlands EspañolPortuguêусский
Operating Instructions (Quick Start Guide) /
Mode d’emploi (Guide de démarrage rapide) /
Bedienungsanleitung (Kurzanleitung) /
Istruzioni per l’uso (Guida di avvio veloce) / Handleiding (Snelstartgids) /
Manual de instrucciones (Guía de inicio rápido) /
Manual de instruções (Guia de início rápido) /
Инструкции по эксплуатации (Краткое руководство пользователя)
For FAQs and other support information for this product, visit the above site. / Pour les FAQ et autres informations de support sur
ce produit, consultez le site ci-dessus. / Häufig gestellte Fragen und weitere Support-Informationen für dieses Produkt finden Sie
auf der oben genannten Seite. / Per la sezione FAQ e altre informazioni di supporto per questo prodotto, visitare il sito indicato
sopra. / Bezoek de bovenstaande website voor vaak gestelde vragen en andere informatie over ondersteuning voor dit product. /
Para consultar las preguntas más frecuentes y otras informaciones de asistencia para este producto, visite el sitio indicado
anteriormente. / Para obter informações sobre as FAQs e outras informações de apoio relativas a este produto, consulte o site
indicado acima. / Ответы на часто задаваемые вопросы и другую дополнительную информацию о данном изделии см. на
указанном выше сайте.
En
15
Additional information
Troubleshooting
! If you think that there is something wrong with this unit, check
the items in the “Troubleshooting” section of the “Operating
Instructions” of this unit or access the Pioneer DJ support page and
then check [FAQ] of DDJ-800.
pioneerdj.com/support/
Also, refer to [Support] > [FAQ] at the rekordbox product site.
rekordbox.com
Some problems occur due to the connected components. If the
problem cannot be resolved after checking the connected compo-
nents, contact the service center or your dealer for repairs.
! This unit may not operate properly due to static electricity or other
external influences. In such cases, disconnect the power cord, wait
for approximately one minute, and connect it again to restore nor-
mal operation.
Trademarks and registered trademarks
! Pioneer DJ is a trademark of PIONEER CORPORATION and is
used under license.
! rekordbox is a registered trademark of Pioneer DJ Corporation.
! Mac, macOS and Finder are trademarks of Apple Inc., registered in
the U.S. and other countries.
! Windows is a registered trademark of Microsoft Corporation in the
U.S. and other countries.
! Intel and Intel Core are registered trademarks of Intel Corporation in
the U.S. and other countries.
! ASIO is a trademark of Steinberg Media Technologies GmbH.
The names of companies and products mentioned herein are trade-
marks or registered trademarks of their respective owners.
Cautions on copyrights
rekordbox restricts playback and duplication of copyright-protected
music contents.
! When coded data, etc., for protecting the copyright is embedded in
the music contents, it may not be possible to operate the program
normally.
! When rekordbox detects that coded data, etc., for protecting the
copyright is embedded in the music contents, processing (playback,
reading, etc.) may stop.
Recordings you have made are for your personal enjoyment and
according to copyright laws may not be used without the consent of the
copyright holder.
! Music recorded from CDs, etc., is protected by the copyright laws
of individual countries and by international treaties. It is the full
responsibility of the person who has recorded the music to ensure
that it is used legally.
! When handling music downloaded from the Internet, etc., it is the
full responsibility of the person who has downloaded the music to
ensure that it is used in accordance with the contract concluded
with the download site.
16
En
16
Specifications
AC adapter
Power requirements ............................. AC 100 V to 240 V, 50 Hz/60 Hz
Rated current ..................................................................................0.6 A
Rated output ...................................................................... DC 12 V, 2 A
General – Main Unit
Power consumption ................................................. DC 12 V, 1 400 mA
Main unit weight ............................................................................ 4.7 kg
Max. external dimensions
.........................632 mm (width) x 69.7 mm (height) x 334.5 mm (depth)
Tolerable operating temperature ....................................+5 °C to +35 °C
Tolerable operating humidity ...................5 % to 85 % (no condensation)
Audio Section
Sampling rate ............................................................................ 44.1 kHz
A/D, D/A converter .........................................................................24-bit
Frequency characteristic
USB, LINE, MIC 1, MIC 2 ......................................... 20 Hz to 20 kHz
S/N ratio (rated output, A-WEIGHTED)
USB .......................................................................................111 dB
LINE .........................................................................................94 dB
PHONO ....................................................................................80 dB
AUX (0 dB) ..............................................................................94 dB
AUX (12 dB) ............................................................................94 dB
MIC 1 .......................................................................................77 dB
MIC 2 .......................................................................................77 dB
Total harmonic distortion (20 Hz to 20 kHzBW)
USB .....................................................................................0.003 %
LINE ..................................................................................... 0.005 %
Standard input level / Input impedance
LINE .......................................................................... –12 dBu/47 kW
PHONO ..................................................................... –52 dBu/47 kW
AUX (0 dB) ............................................................... –12 dBu/47 kW
AUX (12 dB) ............................................................. –24 dBu/47 kW
MIC 1 .......................................................................... –57 dBu/3 kW
MIC 2 .......................................................................... –57 dBu/3 kW
Standard output level / Load impedance / Output impedance
MASTER 1 ............................................ +6 dBu/10 kW/410 W or less
MASTER 2 .............................................. +2 dBu/10 kW/1 kW or less
BOOTH ................................................. +6 dBu/10 kW/820 W or less
PHONES ................................................... +8 dBu/32 W/10 W or less
Rated output level / Load impedance
MASTER 1 .................................................................. 25 dBu/10 kW
MASTER 2 .................................................................. 21 dBu/10 kW
BOOTH ....................................................................... 25 dBu/10 kW
Crosstalk
LINE .........................................................................................82 dB
Channel equalizer characteristic
HI .............................................................. –26 dB to +6 dB (20 kHz)
MID ............................................................. –26 dB to +6 dB (1 kHz)
LOW............................................................–26 dB to +6 dB (20 Hz)
Microphone equalizer characteristic
HI ............................................................ –12 dB to +12 dB (10 kHz)
LOW........................................................–12 dB to +12 dB (100 Hz)
Input / Output terminals
LINE/PHONO input terminals
RCA pin jacks .......................................................................... 2 sets
AUX input terminal
RCA pin jacks ............................................................................ 1 set
MIC input terminals
XLR connector & 1/4” TRS jack ................................................. 1 set
1/4” TRS jack ............................................................................ 1 set
MASTER 1 output terminal
XLR connector .......................................................................... 1 set
MASTER 2 output terminal
RCA pin jacks ............................................................................ 1 set
BOOTH output terminal
1/4” TRS jack ............................................................................ 1 set
PHONES output terminal
1/4” stereo jack ......................................................................... 1 set
3.5 mm stereo mini jack............................................................. 1 set
USB terminals
B type ........................................................................................ 1 set
! Be sure to use the [MASTER 1] output terminals for a balanced
output. If they are connected to an unbalanced input (such as RCA)
using an XLR to RCA converter cable (or converter adapter), etc.,
the sound quality may be lowered or noise may occur.
For connection with an unbalanced input (such as RCA), use the
[MASTER 2] output terminals.
! Be sure to use the [BOOTH] output terminals for a balanced output.
If they are connected to an unbalanced input (such as an RCA or
TS terminal) with an TRS to RCA converter cable (or converter
adapter), TS cable, etc., the sound quality may be lowered or noise
may occur.
! The specifications and design of this product are subject to change
without notice.
© 2019 Pioneer DJ Corporation. All rights reserved.
17
DDJ
-
800
pioneerdj.com/support/
rekordbox.com
DJ Controller / Contrôleur pour DJ / DJ Controller / DJ Controller /
DJ Controller / Controlador DJ / Controlador para DJ / DJ Контроллер
EnglishF
raai
sDeutsch Italiano Nederlands EspañolPortuguêусский
Operating Instructions (Quick Start Guide) /
Mode d’emploi (Guide de démarrage rapide) /
Bedienungsanleitung (Kurzanleitung) /
Istruzioni per l’uso (Guida di avvio veloce) / Handleiding (Snelstartgids) /
Manual de instrucciones (Guía de inicio rápido) /
Manual de instruções (Guia de início rápido) /
Инструкции по эксплуатации (Краткое руководство пользователя)
For FAQs and other support information for this product, visit the above site. / Pour les FAQ et autres informations de support sur
ce produit, consultez le site ci-dessus. / Häufig gestellte Fragen und weitere Support-Informationen für dieses Produkt finden Sie
auf der oben genannten Seite. / Per la sezione FAQ e altre informazioni di supporto per questo prodotto, visitare il sito indicato
sopra. / Bezoek de bovenstaande website voor vaak gestelde vragen en andere informatie over ondersteuning voor dit product. /
Para consultar las preguntas más frecuentes y otras informaciones de asistencia para este producto, visite el sitio indicado
anteriormente. / Para obter informações sobre as FAQs e outras informações de apoio relativas a este produto, consulte o site
indicado acima. / Ответы на часто задаваемые вопросы и другую дополнительную информацию о данном изделии см. на
указанном выше сайте.
Fr
17
Si vous souhaitez vous débarrasser de cet appareil, ne le mettez pas à la poubelle avec vos ordures ménagères. Il existe un système de
collecte séparé pour les appareils électroniques usagés, qui doivent être récupérés, traités et recyclés conformément à la législation.
Les habitants des états membres de l’UE, de Suisse et de Norvège peuvent retourner gratuitement leurs appareils électroniques usagés aux
centres de collecte agréés ou à un détaillant (si vous rachetez un appareil similaire neuf).
Dans les pays qui ne sont pas mentionnés ci-dessus, veuillez contacter les autorités locales pour savoir comment vous pouvez vous débarrasser
de vos appareils.
Vous garantirez ainsi que les appareils dont vous vous débarrassez sont correctement récupérés, traités et recyclés et préviendrez de cette façon
les impacts néfastes possibles sur l’environnement et la santé humaine.
K058b_A1_Fr
ATTENTION
POUR ÉVITER TOUT RISQUE D’ÉLECTROCUTION, NE
PAS ENLEVER LE COUVERCLE (NI LE PANNEAU
ARRIÈRE). AUCUNE PIÈCE RÉPARABLE PAR
L’UTILISATEUR NE SE TROUVE À L’INTÉRIEUR.
CONFIER TOUT ENTRETIEN À UN PERSONNEL
QUALIFIÉ UNIQUEMENT.
D3-4-2-1-1_B1_Fr
AVERTISSEMENT
Cet appareil n’est pas étanche. Pour éviter les risques
d’incendie et de décharge électrique, ne placez près de
lui un récipient rempli d’eau, tel qu’un vase ou un pot
de fleurs, et ne l’exposez pas à des gouttes d’eau, des
éclaboussures, de la pluie ou de l’humidité.
D3-4-2-1-3_A1_Fr
AVERTISSEMENT
Pour éviter les risques d’incendie, ne placez aucune
flamme nue (telle qu’une bougie allumée) sur
l’appareil.
D3-4-2-1-7a_A1_Fr
ATTENTION
L’interrupteur de cet appareil ne coupe pas
complètement celui-ci de sa prise secteur. Comme le
cordon d’alimentation fait office de dispositif de
déconnexion du secteur, il devra être débranché au
niveau de la prise secteur pour que l’appareil soit
complètement hors tension. Par conséquent, veillez à
installer l’appareil de telle manière que son cordon
d’alimentation puisse être facilement débranché de
la prise secteur en cas d’accident. Pour éviter tout
risque d’incendie, le cordon d’alimentation sera
débranché au niveau de la prise secteur si vous
prévoyez une période prolongée de non utilisation
(par exemple avant un départ en vacances).
D3-4-2-2-2a*_A1_Fr
NOTE IMPORTANTE SUR LE CABLE
D’ALIMENTATION
Tenir le câble d’alimentation par la fiche. Ne pas
débrancher la prise en tirant sur le câble et ne pas
toucher le câble avec les mains mouillées. Cela risque
de provoquer un court-circuit ou un choc électrique. Ne
pas poser l’appareil ou un meuble sur le câble. Ne pas
pincer le câble. Ne pas faire de noeud avec le câble ou
l’attacher à d’autres câbles. Les câbles d’alimentation
doivent être posés de façon à ne pas être écrasés. Un
câble abîmé peut provoquer un risque d’incendie ou un
choc électrique. Vérifier le câble d’alimentation de
temps en temps. Contacter le service après-vente le
plus proche ou le revendeur pour un remplacement.
S002*_A1_Fr
Lorsque vous utilisez ce produit, vérifiez les
informations concernant la sécurité sous l’appareil.
D3-4-2-2-4_B1_Fr
Le symbole graphique indiqué sur le produit
représente le courant alternatif.
Le symbole graphique indiqué sur le produit
représente le courant continu.
Le symbole graphique indiqué sur le produit
représente un équipement de Classe II.
D3-8-2-4_A1_Fr
Milieu de fonctionnement
Température et humidité du milieu de fonctionnement :
De +5 °C à +35 °C (de +41 °F à +95 °F) ; Humidité
relative inférieure à 85 % (orifices de ventilation non
obstrués)
N’installez pas l’appareil dans un endroit mal ventilé ou
un lieu soumis à une forte humidité ou en plein soleil
(ou à une forte lumière artificielle).
D3-4-2-1-7c*_A1_Fr
PRÉCAUTION DE VENTILATION
Lors de l’installation de l’appareil, veillez à laisser un
espace suffisant autour de ses parois de manière à
améliorer la dissipation de chaleur (au moins 5 cm à
l’arrière et 5 cm de chaque côté).
D3-4-2-1-7d*_A1_Fr
ATTENTION
Ce produit a été testé dans des conditions de climats
tempéré et tropical.
D3-8-2-1-7a_A1_Fr
18
Fr
18
Sommaire
Comment lire ce manuel
! Merci d’avoir acheté ce produit Pioneer DJ.
Ce manuel décrit brièvement les procédures d’installation jusqu’au
branchement de l’appareil à votre PC/Mac et à la sortie audio.
Pour consulter les procédures détaillées, reportez-vous au
“Mode d’emploi” sur le site Pioneer DJ. Veuillez lire ce manuel et le
“Mode d’emploi” qui comprennent des informations importantes que
vous devez connaître avant d’utiliser cet appareil. Veuillez notam-
ment lire les règles de sécurité.
! Dans ce manuel, les noms des touches et des prises indiqués
sur l’appareil, les noms des menus s’affichant sur l’écran de votre
PC/Mac, etc., apparaissent entre crochets ([ ]). (Par exemple :
[Fichier], touche [CUE], prise de sortie [PHONES])
! Les écrans et les spécifications du logiciel ainsi que l’apparence
externe et les spécifications du matériel décrits dans ce manuel
sont susceptibles d’être modifiés sans avis préalable à des
fins d’amélioration, et peuvent donc être différents de ceux des
explications de ce manuel.
! Selon la version du système d’exploitation, les réglages du naviga-
teur Web, etc., le fonctionnement peut être différent des procédures
décrites dans ce manuel.
! La langue sur les écrans du logiciel décrit dans ce manuel peut être
différente de celle s’affichant sur les écrans réels.
Informations préliminaires
Caractéristiques ................................................................................19
Accessoires .......................................................................................19
Affichage des manuels ......................................................................19
rekordbox ..........................................................................................20
Préparation de rekordbox ..................................................................20
Noms des éléments
Section d’exploration .........................................................................21
Sections Platines ...............................................................................22
Section Mixeur...................................................................................23
Panneau arrière ................................................................................24
Face avant .........................................................................................24
Fonctionnement
Exemple de raccordements ..............................................................25
Raccordements .................................................................................26
Ouverture du système .......................................................................28
Fermeture du système ......................................................................29
Changement des réglages ................................................................29
Informations supplémentaires
En cas de panne ...............................................................................30
Marques commerciales et marques déposées .................................30
Précautions concernant les droits d’auteur .......................................30
Spécifications ....................................................................................31
19
DDJ
-
800
pioneerdj.com/support/
rekordbox.com
DJ Controller / Contrôleur pour DJ / DJ Controller / DJ Controller /
DJ Controller / Controlador DJ / Controlador para DJ / DJ Контроллер
EnglishF
raai
sDeutsch Italiano Nederlands EspañolPortuguêусский
Operating Instructions (Quick Start Guide) /
Mode d’emploi (Guide de démarrage rapide) /
Bedienungsanleitung (Kurzanleitung) /
Istruzioni per l’uso (Guida di avvio veloce) / Handleiding (Snelstartgids) /
Manual de instrucciones (Guía de inicio rápido) /
Manual de instruções (Guia de início rápido) /
Инструкции по эксплуатации (Краткое руководство пользователя)
For FAQs and other support information for this product, visit the above site. / Pour les FAQ et autres informations de support sur
ce produit, consultez le site ci-dessus. / Häufig gestellte Fragen und weitere Support-Informationen für dieses Produkt finden Sie
auf der oben genannten Seite. / Per la sezione FAQ e altre informazioni di supporto per questo prodotto, visitare il sito indicato
sopra. / Bezoek de bovenstaande website voor vaak gestelde vragen en andere informatie over ondersteuning voor dit product. /
Para consultar las preguntas más frecuentes y otras informaciones de asistencia para este producto, visite el sitio indicado
anteriormente. / Para obter informações sobre as FAQs e outras informações de apoio relativas a este produto, consulte o site
indicado acima. / Ответы на часто задаваемые вопросы и другую дополнительную информацию о данном изделии см. на
указанном выше сайте.
Fr
19
Informations préliminaires
Caractéristiques
Cet appareil est un contrôleur DJ conçu spécialement pour
rekordbox dj. Il présente des fonctionnalités, telles que COLOR ON
JOG DISPLAY, BEAT FX DISPLAY et JOG ADJUST, permettant des
performances DJ intuitives sans avoir besoin de regarder votre ordi-
nateur portable. La disposition des touches et des boutons rotatifs des
sections lecteur et mixeur est la même que celle de nos modèles stan-
dard de discothèque. Le contrôleur est léger et compact, vous pouvez
donc l’emporter partout.
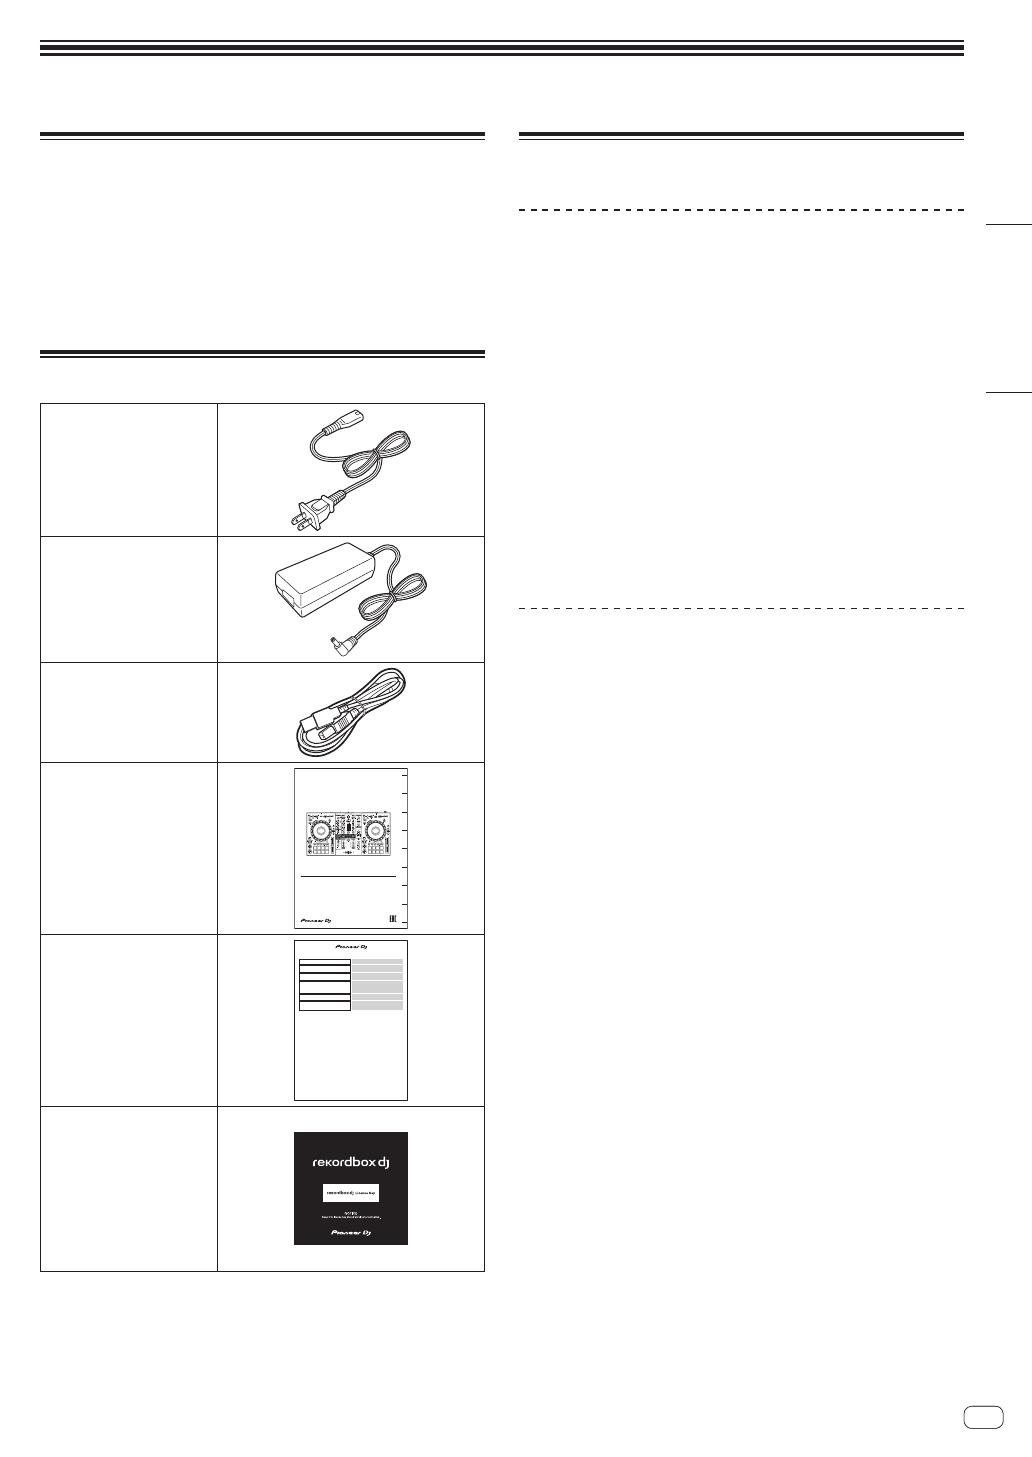
Accessoires
Cordon d’alimentation
Adaptateur secteur
Câble USB
Mode d’emploi (Guide de
démarrage rapide) (le présent
document)
DDJ
-
800
pioneerdj.com/support/
rekordbox.com
DJ Controller / Contrôleur pour DJ / DJ Controller / DJ Controller /
DJ Controller / Controlador DJ / Controlador para DJ / DJ Контроллер
English
F
r
a
nçais
Deut
schItaliano
Nederlands E
spañol Por
t
u
g
u
ês
Ру
сский
Operating Instructions (Quick Start Guide) /
Mode d’emploi (Guide de démarrage rapide) /
Bedienungsanleitung (Kurzanleitung) /
Istruzioni per l’uso (Guida di avvio veloce) / Handleiding (Snelstartgids) /
Manual de instrucciones (Guía de inicio rápido) /
Manual de instruções (Guia de início rápido) /
Инструкции по эксплуатации (Краткое руководство пользователя)
For FAQs and other support information for this product, visit the above site. / Pour les FAQ et autres informations de support sur
ce produit, consultez le site ci-dessus. / Häufig gestellte Fragen und weitere Support-Informationen für dieses Produkt finden Sie
auf der oben genannten Seite. / Per la sezione FAQ e altre informazioni di supporto per questo prodotto, visitare il sito indicato
sopra. / Bezoek de bovenstaande website voor vaak gestelde vragen en andere informatie over ondersteuning voor dit product. /
Para consultar las preguntas más frecuentes y otras informaciones de asistencia para este producto, visite el sitio indicado
anteriormente. / Para obter informações sobre as FAQs e outras informações de apoio relativas a este produto, consulte o site
indicado acima. / Ответы на часто задаваемые вопросы и другую дополнительную информацию о данном изделии см. на
указанном выше сайте.
Garantie (pour certaines
régions)
* La garantie incluse est
destinée à la région
européenne.
WARRANTY CERTIFICATE / GARANTIEKARTE / GARANTIECERTIFICAAT / CERTIFICATO DI GARANZIA / CERTIFICAT DE GARANTIE /
CERTIFICADO DE GARANTIA / ГАРАНТИЙНЫЙ СЕРТИФИКАТ / CERTIFICADO DE GARANTIA / GARANTI -CERTIFICAT / GARANTIBEVIS /
GARANTIBEVIS / TAKUUTODISTUS / GARANTIJOS LIUDIJIMAS / GARANTIJAS SERTIFIKĀTS / ΠΙΣΤΟΠΟΙΗΤΙΚΟ ΕΓΓΥΗΣΗΣ / CERTYFIKAT
GWARANCJI / GARANTIISERT / GARANTİ BELGESİ / ГАРАНТIЙНИЙ СЕРТИФIКАТ
Model / Typ / Model /Modello / Type / Modelo / Модель / Modelo / Modell / Model /
Modell / Malli / Modelka / Modelis / Μοντέλο / Model / Mudel / Model / Модель
Serial number / Seriennummer / Serienummer / Numero di matricola / Numéro de
série / Número de serie / Серийный номер / Número de série / Serie nummer /
Serienummer / Serienummer / Sarjanumero / Serijos numeris / Sērijas numurs /
Αριθμός σειράς / Numer seryjny / Seerianumber / Seri numarasI / Серiйний номер
Date of purchase / Kaufdatum / Aankoopdatum / Data d' acquisto / Date d' achat /
Fecha de compra / Дата продажи / Data de compra / Inköpsdatum / Köpsdato /
Salgsdato / Ostoppäivä / Pirkimo data / Pirkuma datums / Ημερομηνία αγοράς / Data
sprzedaży / Ostukuupäev / Satın alındığı tarih / Дата продажy
Purchaser's name and address / Name und Anschrift des Käufers / Naam en adres
van de koper / Nome ed indirizzo dell' acquirente / Nom et adresse de l'acheteur /
Nombre y Dirección del comprador / Имя и адрес покупателя / Nome e endereço
do comprador / Köparens namn och adress / Köbers navn og adresse / Kundens
navn og adresse / Ostajan osoite / Pirkėjo vardas, pavardė ir adresas / Pircēja vārds
un adrese / Όνομα και διεύθυνση αγοραστή / Imię/Nazwisko i adres nabywcy /
Ostja nimi ja aadress / Satın alanın adı ve adresi / Iм'я та адреса покупця
Signature / Unterschrift / Handtekening / Firma / Signature / Firma / Подпись /
Assinatura / Signatur / Underskrift / Signatur / Allekirjoitus / Parašas / Paraksts /
Υπογραφή / Podpis / Allkiri / Ímza / Пiдпис
Dealer (stamp) / Händlerstempel / Verdeler (stempel) / Rivenditore (timbro) /
Cachet du revendeur / Distribuidor (sello) / Дилер (печать) / Agente (carimbo) /
Återförsäljare / Forhandler (stempel) / Forhandler (stempel) / Myyjäliike (leima) /
Prekybos atstovas (antspaudas) / Izplatītājs (zīmogs) / Μεταπωλητής (σφραγίδα) /
Sprzedawca (pieczęć) / Müüja (pitsat) / Satıcının mühürü / Дилер (печатка)
English
The Pioneer DJ Products Warranty is valid in all
listed countries for a period of three years from
the date of first delivery. Pioneer DJ Europe Ltd of
Anteros Building, Odyssey Business Park, West
End Road, South Ruislip, Middlesex HA4 6QQ,
United Kingdom warrants this product to be free
of defects in materials and workmanship, subject
to the warranty conditions.
You may obtain a copy of the warranty conditions
from the dealer where you purchased your prod-
uct, by downloading it from your local Pioneer DJ
website or by contacting our customer helpdesk.
IMPORTANT: Keep this certificate together with
the original invoice or receipt in a safe place and
show them to the retailer or authorized service
centre whenever a warranty repair is necessary.
Français
La garantie des Produits Pioneer DJ est applicable
dans tous les pays listes pour une periode de trois
ans a partir de la date de livraison. Pioneer DJ
Europe Ltd, Anteros Building, Odyssey Business
Park, West End Road, South Ruislip, Middlesex
HA4 6QQ, Royaume-Uni, garantit ce produit
contre tous vices de fabrication ou d’assemblage
sous réserve du respect des conditions suivantes.
Pour obtenir une copie des conditions de garantie,
renseignez-vous auprès du revendeur du produit,
téléchargez-la depuis votre site Web Pioneer DJ
local ou contactez notre service d’assistance à la
clientèle.
IMPORTANT: Nous vous conseillons de conserver
soigneusement ce certificat de garantie avec
l'original de votre facture d'achat ou votre ticket
de caisse. Ces documents vous seront réclamés
par votre revendeur ou par votre centre technique
agréé lors d'une éventuelle réparation demandée
au titre de la garantie.
Svenska
Pioneer DJs produktgaranti garanti för dess
DJ-produkter gäller i alla länder som anges i för-
teckningen i det här garanti-certificatet under en
tid av tre år från leverans. Pioneer DJ Europe Ltd
på adressen Anteros Building, Odyssey Business
Park, West End Road, South Ruislip, Middlesex
HA4 6QQ, Storbritannien garanterar att produkten
inte är behäftad med något material- eller tillverk-
ningsfel enligt de villkor som anges nedan.
Du kan erhålla ett exemplar av garantivillkoren
från återförsäljaren där produkten köptes eller ge-
nom att ladda ner dem från din lokala Pioneer DJ
webbplats eller genom att kontakta vår kundsup-
port.
VIKTIGT: Förvara det här garantibeviset tillsam-
mans med originalfakturan eller kvittot på en
säker plats och visa dem för återförsäljaren eller
en auktoriserad serviceverkstad när du vill att en
garantireparation skall utföras.
Deutsch
Die Verbrauchergarantie von Pioneer DJ gilt in al-
len in dieser Bescheinigung aufgeführten Ländern
für einen Zeitraum von drei Jahren ab dem Datum
der ersten Auslieferung. Pioneer DJ Europe
Ltd. ansässig unter Anteros Building, Odyssey
Business Park, West End Road, South Ruislip,
Middlesex HA4 6QQ, Vereiniges Königreich
garantiert, dass dieses Gerät frei ist von Material-
und Verarbeitungsfehlern und dabei folgenden
Bedingungen unterliegt.
Eine Kopie der Garantiebedingungen erhalten
Sie über den Händler, über den Sie das Gerät
gekauft haben, oder durch einen Download von
der lokalen Pioneer DJ Website. Darüber hinaus
können Sie diese Informationen auch über die
unsere Hotline abrufen.
WICHTIG: Bitte bewahren Sie dieses Dokument
zusammen mit der Originalrechnung an einem
sicheren Platz auf und legen Sie die Belege Ihrem
Händler oder der autorisierten Vertragswerkstatt
vor, falls eine Garantiereparatur erforderlich sein
sollte.
Español
La Garantía de productos Pioneer DJ es válida
en todos los países listados en este Certificado
por el plazo de, tres años a partir de la fecha de
la primera entrega. Pioneer DJ Europe Ltd, con
sede en Anteros Building, Odyssey Business
Park, West End Road, South Ruislip, Middlesex
HA4 6QQ, Reino Unido, garantiza este producto
contra todo defecto de fabricación en materiales y
mano de obra, bajo las condiciones expuestas a
continuación.
Usted puede obtener una copia de las condicio-
nes de garantía solicitándosela al distribuidor que
le vendió su producto, descargándola de la web
local de Pioneer DJ o contactando con nuestro
servicio de asistencia al cliente.
IMPORTANTE: Guarde esta tarjeta junto con la
Factura o Albararán original de compra en un sitio
seguro y preséntela al Servicio Técnico Autoriza-
do siempre que sea necesaria una reparación en
garantía.
Dansk
Pioneer DJs produktgaranti gælder i alle lande på
listen i nærværende garantibevis, i en periode på
tre år fra datoen for første levering. Pioneer DJ
Europe Ltd, Anteros Building, Odyssey Business
Park, West End Road, South Ruislip, Middlesex
HA4 6QQ, Storbritanien garanterer at dette pro-
dukt er fri for fejl i materialer og udførelse, under
forudsætning af at nedennævnte betingelser
overholdes.
En kopi af garantibetingelserne kan fås hos den
forhandler, hvor produktet blev købt, ved down-
load fra det lokale Pioneer DJ-website eller ved at
man kontakter vores kunde-helpdesk.
VIGTIGT: Gem dette garantibevis sammen med
den originale købskvittering, på et sikkert sted, og
medbring begge dele til forhandler eller autori-
seret service center, hvis garantireparation er
nødvendigt.
Nederlands
De Pioneer DJ productgarantie is gedurende een
periode van drie jaar vanaf de datum van eerste
levering geldig in alle landen die vermeld worden
in de lijst van dit certificaat. Pioneer DJ Europe
Ltd te Anteros Building, Odyssey Business Park,
West End Road, South Ruislip, Middlesex HA4
6QQ, Verenigd Koninkrijk waarborgt volgens de
garantievoorwaarden dat dit product geen gebre-
ken vertoont in materiaal en vakmanschap.
U kan een kopie van de garantievoorwaarden
verkrijgen via de dealer waar u het product
gekocht heeft, door het te downloaden van uw
lokale Pioneer DJ website, ofwel door contact op
te nemen met onze klantendienst.
BELANGRIJK: Bewaar dit garantiebewijs zorgvul-
dig, samen met uw originele factuur of kassabon,
en toon het aan het verkooppunt of het geautori-
seerde service-station als u aanspraak wilt maken
op reparatie onder garantie.
Русский
Гарантия на продукцию Pioneer DJ действи-
тельна во всех перечисленных странах в
течение трех лет с даты первой доставки.
Компания Pioneer DJ Europe Ltd, располо-
женная по адресу Anteros Building, Odyssey
Business Park, West End Road, South Ruislip,
Middlesex HA4 6QQ, United Kingdom (здание
Антерос, Одиссей Бизнес-парк, Вест-Энд Роуд,
Сауз Руислип, Мидлэссекс, HA4 6QQ, Велико-
британия), гарантирует, что этот продукт не
будет иметь дефектов в материалах и изготов-
лении, согласно гарантийным обязательствам.
Получить копию гарантийных обязательств
можно у дилера по месту приобретения про-
дукции; копию гарантийных обязательств также
можно скачать с местного веб-сайта Pioneer DJ
или же запросить в нашей службе поддержки
клиентов.
ВАЖНО: Храните этот сертификат вместе
с оригиналом счета-фактуры или чека и
предъя
вляйте продавцу или авторизованному
сервисному центру в случае необходимости
гарантийного ремонта.
Norsk
Pioneer DJs produktgaranti er gyldig i alle land
nevnt i listen i garantikortet, i tre år fra første leve-
ring. Pioneer DJ Europe Ltd., med hovedkontor i
Anteros Building, Odyssey Business Park, West
End Road, South Ruislip, Middlesex HA4 6QQ,
Storbritannia, garanterer at dette produktet er fri
for defekter i materiale og utførelse. I forhold til
vilkår nevnt nedenfor.
Du kan få en kopi av garantivilkårene fra forhand-
leren der du kjøpte produktet, ved å laste ned den
ned fra det lokale nettstedet for Pioneer DJ eller
ved å kontakte vår kundestøtte.
VIKTIG: Oppbevar dette sertifikatet/beviset sam-
men med den originale kvitteringen eller fakturaen
på et sikkert sted, og fremvis dette til forhandler
eller autorisert verksted når en garanti reparasjon
er nødvendig.
Italiano
La garanzia dei prodotti di Pioneer DJ è valida in
tutti i paesi elencati nel presente certificato per un
periodo di tre anni dalla data di consegna. Pioneer
DJ Europe Ltd, con sede in Anteros Building,
Odyssey Business Park, West End Road, South
Ruislip, Middlesex HA4 6QQ, Regno Unito, garan-
tisce il prodotto contro tutti i difetti di materiale
e di fabbricazione, alle condizioni qui di seguito
specificate.
È possibile ottenere una copia delle condizioni di
garanzia dal rivenditore presso il quale si è acqui-
stato il prodotto, scaricandola dal sito Web locale
di Pioneer DJ o contattando il servizio clienti.
IMPORTANTE: Conservare il presente certificato
unitamente al documento d'acquisto originale
(fattura, scontrino o ricevuta fiscale), da esibirsi
al Centro di Assistenza autorizzato nel caso di
riparazione in garanzia.
Português
A Garantia dos Produtos Pioneer DJ é válida em
todos os países mencionados na lista por um
período de três anos a partir da data da primeira
entrega. A Pioneer DJ Europe Ltd localizada em
Anteros Building, Odyssey Business Park, West
End Road, South Ruislip, Middlesex HA4 6QQ,
United Kingdom, garante este produto contra
defeitos de mão-de-obra e de materiais, sujeito às
condições da garantia.
Pode obter uma cópia destas condições no agen-
te onde adquiriu o seu produto, descarregando-a
da página Web local da Pioneer DJ ou contactan-
do o nosso serviço de apoio ao cliente.
IMPORTANTE: Conserve este certificado
juntamente com o original da Fatura ou Venda
a Dinheiro em local seguro e apresente-os ao
retalhista ou oficina autorizada sempre que seja
necessário efetuar uma reparação dentro da
garantia.
Suomi
Pioneerin DJ-tuotteiden takuu on voimassa
kaikissa tässä kortissa luetelluissa maissa kolmen
vuoden ajanalkuperäisestä hankintapäivästä
lukien. Pioneer DJ Europe Ltd of Anteros Buil-
ding, Odyssey Business Park, West End Road,
South Ruislip, Middlesex HA4 6QQ, Yhdistynyt
Kuningaskunta, antaa tuotteele takuun, koskien
materiaali ja valmistusvirheitä jäljempänä olevan
erittelyn mukaisesti.
Kopion takuuehdoista voi saada jälleenmyyjältä,
josta tuote ostettiin, lataamalla se paikalliselta
Pioneer DJ-verkkosivustolta tai ottamalla yhteys
asiakastukipalveluun.
TÄRKEÄÄ: Säilytä tämä takuukortti huolellisesti ja
esitä se yhdessä ostokuitin kanssa takuuhuoltoa
tilatessasi.
Printed in China/Imprimé en Chine
EWP0717-3
Carte de clé de licence
rekordbox dj
* Pour obtenir les dernières
informations, consultez le
site ci-dessous.
rekordbox.com
Remarque
La clé de licence ne peut pas
être redélivrée. Veillez à ne
pas la perdre.
Affichage des manuels
Affichage de la dernière version du
“Mode d’emploi”
1 Lancez un navigateur Web sur votre PC/Mac et
accédez au site Pioneer DJ suivant.
pioneerdj.com
! Pour sélectionner votre langue, cliquez sur l’icône du drapeau ou
sur l’icône GLOBAL en haut à droite de l’écran, puis sélectionnez
une région et une langue.
2 Cliquez sur [Tutoriels, manuels & documentation]
sous [Aide].
3 Cliquez sur [DDJ-800] dans la catégorie
[CONTRÔLEUR DJ].
4 Cliquez sur la langue souhaitée dans la liste de
modes d’emploi.
Téléchargez le manuel si nécessaire.
Affichage de la section “Présentation” /
“Mode d’emploi” de rekordbox
! La section “Présentation” vous guide à travers la configuration de
rekordbox.
! La section “Mode d’emploi” fournit des explications relatives
à la collection de morceaux, au mode EXPORT et au mode
PERFORMANCE.
1 Lancez un navigateur Web sur votre PC/Mac pour
accéder au site suivant.
rekordbox.com
2 Cliquez sur [Guide] sous [Aide].
3 Cliquez sur la langue souhaitée de la section
“rekordbox Introduction” ou “Operating Instructions”.
20
Fr
20
rekordbox
! rekordbox
rekordbox est un logiciel de gestion musicale permettant aux DJ de
préparer des morceaux et d’exécuter des prestations DJ.
! rekordbox dj
La fonction de performances DJ de rekordbox s’appelle
rekordbox dj. rekordbox dj peut être utilisé en raccordant simple-
ment l’appareil à un PC/Mac. Si vous souhaitez utiliser rekordbox dj
sur un PC/Mac sans raccorder l’appareil, saisissez la clé de licence
indiquée sur la carte de clé de licence rekordbox dj fournie avec ce
produit pour utiliser rekordbox dj.
* Pour obtenir les dernières informations, consultez le site
ci-dessous.
rekordbox.com
Environnement opérationnel
Systèmes d’exploitation pris en
charge
Processeur et mémoire requise
Mac :
Processeur Intel
®
Core™ i7, i5, i3
macOS Mojave 10.14
macOS High Sierra 10.13
macOS Sierra 10.12
4 Go ou plus de RAM
(dernière mise à jour)
Windows :
Processeur Intel
®
Core™ i7, i5, i3
Windows
®
10
Windows
®
8.1
Windows
®
7
4 Go ou plus de RAM
Version 32 bits ou version 64 bits
(dernier service pack)
Divers
Port USB
Un port USB 2.0 est indispensable pour raccorder
votre PC/Mac à cet appareil.
Résolution de l’écran 1 280 x 768 ou plus
Connexion Internet
Une connexion Internet est nécessaire pour l’enregis-
trement du compte utilisateur de rekordbox et pour le
téléchargement du logiciel.
! Le fonctionnement sur tous les PC/Mac n’est pas garanti, même lorsque les
conditions de fonctionnement mentionnées ci-dessus sont remplies.
! Selon les réglages d’économie d’énergie, etc. du PC/Mac, la capacité de
traitement du processeur et du disque dur peut être insuffisante. Notamment
pour un ordinateur portable PC/Mac, assurez-vous que le PC/Mac est en état
de fournir sa performance optimale (par exemple, en laissant le cordon d’ali-
mentation raccordé), lorsque vous utilisez rekordbox.
! Un contrat séparé avec un fournisseur de services Internet et le paiement de
droits sont nécessaires pour accéder à Internet.
! Utilisez la dernière version/le dernier Service Pack du système d’exploitation.
! Pour consulter les dernières informations sur l’environnement opérationnel et
la compatibilité de rekordbox et pour obtenir le dernier système d’exploitation,
reportez-vous à la section [Configuration Requise] sous [Aide] du site du
produit rekordbox ci-dessous.
rekordbox.com
Préparation de rekordbox
Installez le logiciel en procédant de la façon suivante lorsque vous
utilisez rekordbox pour la première fois ou si vous utilisez rekordbox 4.x
ou une version antérieure.
Si la version 5.x de rekordbox est déjà installée, veuillez mettre à jour
rekordbox pour passer à la dernière version à l’aide du Gestionnaire de
mises à jour qui s’affiche lorsque vous démarrez rekordbox.
Installation de rekordbox
1 Lancez un navigateur Web sur votre PC/Mac, ouvrez
la page de téléchargement de rekordbox à partir du site
ci-après, puis téléchargez rekordbox.
rekordbox.com
Sous Windows, sélectionnez la version 32 bits ou 64 bits selon votre
PC.
2 Double-cliquez sur le fichier téléchargé pour le
décompresser.
3 Double-cliquez sur le fichier décompressé pour
lancer le programme d’installation.
4 Lisez attentivement l’Accord de licence du logiciel et
procédez à l’installation en suivant les instructions qui
apparaissent à l’écran si vous acceptez les conditions.
! Si vous n’acceptez pas le contenu de l’accord de licence, annu-
lez l’installation.
5 Lorsque l’écran de fin de l’installation apparaît,
fermez le programme d’installation en suivant les
instructions qui apparaissent à l’écran.
L’installation est terminée.
  • Page 1 1
  • Page 2 2
  • Page 3 3
  • Page 4 4
  • Page 5 5
  • Page 6 6
  • Page 7 7
  • Page 8 8
  • Page 9 9
  • Page 10 10
  • Page 11 11
  • Page 12 12
  • Page 13 13
  • Page 14 14
  • Page 15 15
  • Page 16 16
  • Page 17 17
  • Page 18 18
  • Page 19 19
  • Page 20 20
  • Page 21 21
  • Page 22 22
  • Page 23 23
  • Page 24 24
  • Page 25 25
  • Page 26 26
  • Page 27 27
  • Page 28 28
  • Page 29 29
  • Page 30 30
  • Page 31 31
  • Page 32 32
  • Page 33 33
  • Page 34 34
  • Page 35 35
  • Page 36 36
  • Page 37 37
  • Page 38 38
  • Page 39 39
  • Page 40 40
  • Page 41 41
  • Page 42 42
  • Page 43 43
  • Page 44 44
  • Page 45 45
  • Page 46 46
  • Page 47 47
  • Page 48 48
  • Page 49 49
  • Page 50 50
  • Page 51 51
  • Page 52 52
  • Page 53 53
  • Page 54 54
  • Page 55 55
  • Page 56 56
  • Page 57 57
  • Page 58 58
  • Page 59 59
  • Page 60 60
  • Page 61 61
  • Page 62 62
  • Page 63 63
  • Page 64 64
  • Page 65 65
  • Page 66 66
  • Page 67 67
  • Page 68 68
  • Page 69 69
  • Page 70 70
  • Page 71 71
  • Page 72 72
  • Page 73 73
  • Page 74 74
  • Page 75 75
  • Page 76 76
  • Page 77 77
  • Page 78 78
  • Page 79 79
  • Page 80 80
  • Page 81 81
  • Page 82 82
  • Page 83 83
  • Page 84 84
  • Page 85 85
  • Page 86 86
  • Page 87 87
  • Page 88 88
  • Page 89 89
  • Page 90 90
  • Page 91 91
  • Page 92 92
  • Page 93 93
  • Page 94 94
  • Page 95 95
  • Page 96 96
  • Page 97 97
  • Page 98 98
  • Page 99 99
  • Page 100 100
  • Page 101 101
  • Page 102 102
  • Page 103 103
  • Page 104 104
  • Page 105 105
  • Page 106 106
  • Page 107 107
  • Page 108 108
  • Page 109 109
  • Page 110 110
  • Page 111 111
  • Page 112 112
  • Page 113 113
  • Page 114 114
  • Page 115 115
  • Page 116 116
  • Page 117 117
  • Page 118 118
  • Page 119 119
  • Page 120 120
  • Page 121 121
  • Page 122 122
  • Page 123 123
  • Page 124 124

Pioneer DDJ-800 Owner's manual

Category
DJ controllers
Type
Owner's manual
This manual is also suitable for

Ask a question and I''ll find the answer in the document

Finding information in a document is now easier with AI