Page is loading ...

Please read this Owner’s Manual before installing,
setting up and using your new phone.
www.radioshack.com
43-140
Big Button
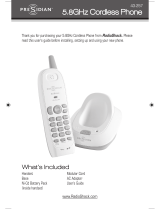
Corded/5.8 GHz Cordless Phone
with Answering System and Caller ID
Base (1) (Wall Mount
Adapter is attached.)
Corded Handset (1)
Handset Cord (1)
Charger (1)
Cordless Handset (1)
AC Adapters (2)
•
•
•
•
•
•
Ni-Cd Battery Pack (1)
(Pre-installed)
Modular Cord (1)
Belt Clip (1)
Owner’s Manual (1)
Quick Start Guide (1)
•
•
•
•
•
Base (1) (Wall Mount
Ni-Cd Battery Pack (1)
What’s Included
UC044ZH_43-140_OM5.indd 1 12/18/2006 3:33:47 PM

Contents
2
Features ................................................................. 6
Introduction ........................................................... 7
Important Information
........................................... 8
FCC Statement .............................................................................. 8
Important Safety Instructions .............................. 10
Important Caller ID Information
.......................... 11
Controls & Functions
............................................ 12
Installation ........................................................... 16
Selecting a Location ..................................................................... 16
On a Desk Top ............................................................................. 17
On a Wall Plate or Wall ................................................................ 18
Adjusting the Visual Ringer Brightness .......................................... 19
Turning Talking Caller ID On/Off ................................................... 20
Installing the Charger .................................................................. 20
Connecting/Charging the Battery Pack .......................................... 21
Using the Interface .............................................................. 23
Using the Base Menus ................................................................. 23
Using the Handset Menus ............................................................ 23
Base Setup ........................................................... 24
Changing the Dial Mode .............................................................. 24
UC044ZH_43-140_OM5.indd 2 12/18/2006 3:33:47 PM

3
Contents
Selecting a Language for your Answering Machine
and Base Display ..................................................................... 24
Setting the Day and Time ............................................................ 25
Adjusting the Base Display (LCD Contrast) .................................... 25
Setting the Area Code .................................................................. 26
Setting Caller ID on Call Waiting (CIDCW) .................................... 26
Handset Setup ...................................................... 27
Selecting a Language for the Handset Display ............................... 27
Setting Auto Talk ......................................................................... 27
Checking the Area Code Setting from the Handset ........................ 27
Emergency Dialing From the Base &
Cordless Handset
................................................ 28
One-touch Speed Dialing from the Base
............... 29
Speed Dialing from the Cordless Handset
............. 30
Storing Names and Numbers for Speed Dialing ............................ 30
Storing Caller ID Information to Speed Dial Locations ................... 33
Using Your Phone ................................................. 34
During a Power Failure ................................................................ 34
Making and Receiving Calls ......................................................... 35
Redialing the Last Number Dialed ................................................ 39
Call Waiting ................................................................................ 40
Adjusting the Ringer, Earpiece and Speaker Volume ...................... 40
Audio Boost for the Cordless Handset .......................................... 41
UC044ZH_43-140_OM5.indd 3 12/18/2006 3:33:47 PM

Contents
4
Traveling Out of Range ................................................................ 42
Selecting a Different Channel ....................................................... 42
Finding the Lost Handset ............................................................. 42
Placing a Call on Hold from the Base ........................................... 42
Conferencing ............................................................................... 43
Intercom ..................................................................................... 44
Transferring a Call........................................................................ 46
Tone Dialing Switch Over ............................................................. 46
Using Caller ID and CIDCW
(Caller ID on Call Waiting)
.................................. 47
Using the Talking Caller ID (Base Only) ......................................... 48
Viewing Caller ID Information ...................................................... 48
Deleting Information from the Caller ID List ................................. 49
Setting Up the Answering Machine ...................... 50
Features ...................................................................................... 50
Selecting a Language ................................................................... 50
Setting the Record Time (or Announce Only) ................................ 51
Activating Call Screening .............................................................. 51
Setting the Number of Rings ........................................................ 51
Activating the Message Alert ........................................................ 52
Setting Your Greeting ................................................................... 52
Selecting Your Greeting ................................................................ 53
Setting a Security Code or Personal Identication Number (PIN) ... 54
UC044ZH_43-140_OM5.indd 4 12/18/2006 3:33:48 PM

5
Contents
Using Your Answering Machine ............................ 54
Turning your Answering System On & Off ..................................... 55
Reviewing Messages .................................................................... 55
Screening Calls ............................................................................ 57
Remotely Operating Your Answering Machine .............................. 57
Additional Information ........................................ 59
Installing the Belt Clip ................................................................. 59
Installing the Optional Headset ................................................... 59
Troubleshooting .................................................... 60
Care ...................................................................... 63
Service and Repair
............................................... 63
Glossary ................................................................ 64
Index .................................................................... 65
Limited One-Year Warranty
.................................. 68
UC044ZH_43-140_OM5.indd 5 12/18/2006 3:33:48 PM

The Basics
6
Features
Corded Handset — lets you make/receive calls even if there is an
AC power failure.
Handset Remote Operation — lets you listen to your incoming
messages from the cordless handset.
Visual Ringer LED — let you know there is an incoming call at
sight.
Large Backlit keys — let you press the keys easily.
Audio Boost — help the elder people to hear high frequency tone.
Toll-Saver — Avoids unnecessary charges when you call by long
distance to check your messages.
Message Alert — beeps when you have new incoming message.
Call Waiting/Caller ID — lets you answer a call even when you
are on the phone and see who’s calling before you answer.
Talking Caller ID — The Caller ID that Talks. The base will
announce the name of incoming callers if you subscribe to Caller
ID service.
Ten-Number Memory Dialing — Stores up to ten numbers in
memory for easy dialing.
Auto Talk — Lets you answer a call by simply lifting the handset
from the charger.
Ample Talk and Standby Time — When fully charged, provides
about six hours of talk time or 11 days of standby time.
Speakerphone — lets you conduct a hands-free conversation
using the base speaker.
Headset Jack — Supports an optional headset for hands-free
convenience.
UC044ZH_43-140_OM5.indd 6 12/18/2006 3:33:48 PM

7
The Basics
Introduction
Thank you for purchasing a RadioShack Corded/5.8 GHz Cordless
Phone. Your phone’s advanced technology gives you superior
audio quality and extended range. Your telephone provides
excellent clarity and range and integrates Caller ID, Caller ID on
Call Waiting, and a digital answering system into one space-
saving device. The 5.8 GHz band provides superior audio quality
and extended range.
The digital answering system provides clear, reliable messaging
with call screening, day/ time stamp, call counter, remote access
and instant skip or replay messaging.
The phone’s Caller ID unit records each caller’s telephone number
(and name, if available in your area) and the date and time of
the call, as provided by your local phone company to Caller ID
service subscribers. If you subscribe to Call Waiting with Caller ID,
the phone shows you the incoming caller information, even when
you are already talking on the phone.
Corded handset does not need AC power to operate. It allows you
to make/receive calls if there is an AC power failure.
Cordless phones require AC power to operate. When the power
is off, you cannot make or receive calls by using your cordless
handset.
IMPORTANT
Your phone operates on standard radio frequencies
as allocated by the FCC.
It is possible for other radio units operating
nearby on similar frequencies to unintentionally
intercept your conversation or cause interference.
This possible lack of privacy can occur with any
cordless phone.
•
•
UC044ZH_43-140_OM5.indd 7 12/18/2006 3:33:48 PM

The Basics
8
Important Information
This telephone has been tested and found to comply with all
applicable UL and FCC standards.
FCC Statement
This equipment complies with Part 68 of the FCC rules and
the requirements adopted by the ACTA. On the base of this
equipment is a label that contains, among other information,
requested, this number must be provided to the telephone
company.
Your phone is not intended to be used with party-line systems.
Connection to party line service is subject to state tariffs. Contact
the state public utility commission, public service commission, or
corporation commission for information.
NOTES
You must not connect your phone to:
coin-operated systems
most electronic key telephone systems
•
•
line may result in the devices not ringing in response to an
contact the local telephone company. For products approved
on the label.
In the unlikely event that your phone causes problems on the
phone line, the phone company can temporarily discontinue your
service. If this happens, the phone company attempts to notify
UC044ZH_43-140_OM5.indd 8 12/18/2006 3:33:48 PM

9
The Basics
you in advance. If advance notice is not practical, the phone
Also, the phone company can make changes to its lines,
equipment, operations, or procedures that could affect the
these changes in advance, so you can take the necessary steps to
prevent interruption of your telephone service.
This device complies with part 15 of the FCC rules. Operation
not cause harmful interference, and (2) This device must accept
any interference received, including interference that may cause
undesired operation. Privacy of communications, may not be
ensured when using this phone.
Surge Protection
Your telephone has built-in protection circuits to reduce the risk
of damage from surges in telephone line and power line current.
These protection circuits meet or exceed the FCC requirements.
However, lightning striking the telephone or power lines can
damage your telephone.
Lightning damage is not common. Nevertheless, if you live in an
area that has severe electrical storms, we suggest that you unplug
your phone when storms approach to reduce the possibility of
damage.
UC044ZH_43-140_OM5.indd 9 12/18/2006 3:33:48 PM

The Basics
10
Important Safety Instructions
When using your telephone equipment, basic safety precautions
Do not use this product near water, for example, near a
bathtub, wash bowl, kitchen sink, or laundry tub, in a wet
basement or near a swimming pool.
Avoid using a telephone (other than a cordless type) during an
electrical storm. There may be a remote risk of electric shock
from lightning.
Do not use the telephone to report a gas leak in the vicinity of
the leak.
Use only the power cord and batteries indicated in this
manual.
with local codes for possible special disposal instructions.
SAVE THESE INSTRUCTIONS
1.
2.
3.
4.
5.
UC044ZH_43-140_OM5.indd 10 12/18/2006 3:33:49 PM

11
The Basics
Important Caller ID Information
To use Caller ID and Call Waiting, you must be in an area where
those services are available and you must subscribe to those
services through your local phone company.
Where Caller ID is offered, one or more options are generally
caller’s number only
caller’s name only
caller’s name and number
If you subscribe to Call Waiting ID and Caller ID, the system can
show you the incoming caller information, even when you are
already talking on the phone.
•
•
•
UC044ZH_43-140_OM5.indd 11 12/18/2006 3:33:49 PM

The Basics
12
Controls & Functions
Main Base Unit - Top View
1. IN USE light
2.
CID key
3. One-touch speed dial
A key
4. One-touch speed dial
B key
5. Base visual ringer
6. Base display
7. One-touch speed dial
C key
8. One-touch speed dial
D key
9. Corded base handset
11.
key (play/stop)
12.
key (repeat/rewind)
13.
key (skip/forward)
14. Curl cord
15.
key (delete)
16.
ON/OFF key &
answer on/off light
17. GREET
key
18.
FLASH key
19. PAGE/HOLD
key
REDIAL/PAUSE
key
key
22. MENU/SET
key
23.
SELECT/ key &
SELECT/ key
24.
TALK key & speaker light
25.
/TONE key
26.
# key
27. Microphone
UC044ZH_43-140_OM5.indd 12 12/18/2006 3:33:49 PM

13
The Basics
28
29
30
31 32 33 34
35
36
Main Base Unit - Side and Rear View
31. VISUAL RINGER HI/LO/OFF
switch
32. TALKING CALLER ID ON/
OFF switch
33.
DC IN 9V jack
34.
PHONE jack
35. Base antenna
36. Wall mount adapter
28. RINGER TONE
button
29. RINGER ON/OFF
switch
UC044ZH_43-140_OM5.indd 13 12/18/2006 3:33:50 PM

The Basics
14
7
6
8
9
10
11
12
13
1
3
4
5
2 22
23
14
16
15
17
18
21
19
20
1. Handset antenna
2. AUDIO BOOST ON/OFF
switch
3. RING/VOL
/ key
(ringer/volume up)
4. RING/VOL
/ key
(ringer/volume down)
5. Handset battery
compartment
6. Handset visual ringer
7. Handset earpiece
8. Handset display
9.
CID key
REDIAL/PAUSE
key
11.
/TONE/ key
12.
MEM key (memory)
13. MENU
key
14.
TALK key
key
16.
FLASH key
17.
#/ key (pound)
18. DEL/CH
key
(delete/channel)
19. SELECT/INT’COM
key
(select/intercom)
Cordless Handset
UC044ZH_43-140_OM5.indd 14 12/18/2006 3:33:50 PM

15
The Basics
2
3
1
1. Charging Contacts
2. CHARGE
3.
DC IN 9V jack
Charger
ringer speaker
21. Handset charging contacts
22. Headset jack
23. Beltclip hole
7
6
8
9
10
11
12
13
1
3
4
5
2 22
23
14
16
15
17
18
21
19
20
UC044ZH_43-140_OM5.indd 15 12/18/2006 3:33:50 PM

The Basics
16
NOTE
The USOC number of the jack to be installed is RJ11C
(or RJ11W for a wall plate jack).
Installation
during shipment and is not necessary for use.
Selecting a Location
You can place the phone’s base on a desk or table, or mount it on
near an accessible AC outlet
near a telephone line jack
out of the way of normal activities
away from electrical machinery, electrical appliances,
and room monitors
away from other cordless phones
NOTES
If your home has specially wired alarm equipment
connected to the telephone line, be sure that
installing the system does not disable your alarm
equipment.
If you have questions about what will disable
alarm equipment, contact your telephone company
or a qualied installer.
•
•
The base’s location affects the handset’s range. If you have a
choice of several locations, try each to see which provides the
best performance.
Your telephone connects directly to a modular telephone line jack.
If your telephone wiring does not have a modular jack, you can
update the wiring yourself using jacks and adapters (available at
your local RadioShack store), or have the telephone company
update the wiring for you. You must use compatible modular
jacks that are compliant with Part 68 of FCC Rules.
•
•
•
•
•
UC044ZH_43-140_OM5.indd 16 12/18/2006 3:33:51 PM

17
The Basics
On a Desk Top
1. Connect the corded handset
cord to left side of the base
and to the corded handset.
Route the curl cord inside the
molded wiring channel as
shown.
2. Plug one end of the supplied long modular cord into the
PHONE jack on the back of the base.
3. Insert the supplied AC adapter’s barrel plug into the
DC IN 9V
jack on the back of the base.
4. Route the adapter cord and
modular cord through the
slot as shown.
5. Plug the other end of the
modular cord into a modular
phone line jack.
6. Plug the adapter into a
standard AC outlet.
CAUTION: You must use a Class 2 power source that
supplies 9V DC and delivers at least 500 mA (for the
base)/210 mA (for the charger). Its center tip must
be set to positive and its plug must t the phone’s
DC IN 9V jack. The supplied adapter meets these
specications. Using an adapter that does not meet
these specications could damage the phone or the
adapter.
UC044ZH_43-140_OM5.indd 17 12/18/2006 3:33:52 PM

The Basics
18
On a Wall Plate or Wall
To mount the phone directly on a wall, you need two screws (not
Drill two holes 3
15
/
16
inches apart. Thread a screw into each hole,
letting the heads extend about
1
/
8
inch.
1. Remove the bracket from the base.
2. Insert the two tabs at the top of the
narrow end of the bracket into the
base’s lower tab slots, then press
down on the bracket’s latches and
insert them into the upper slots.
3. Plug one end of the supplied modular
cord into the PHONE jack on the back
of the base.
4. Plug the supplied AC adapter’s
barrel plug into the DC IN 9V jack
on the back of the base.
5. Route the adapter and modular
cords through the grooves on the
bracket.
6. Plug the adapter into a standard
AC outlet. And plug the modular
cord’s other end into a modular
phone line jack.
7. For a wall plate, align the base’s
keyhole slots with the wall
plate studs and slide the base
downward to secure it.
For direct wall mounting, align
the base’s keyhole slots with the
mounting screws and slide the
base downward to secure it.
UC044ZH_43-140_OM5.indd 18 12/18/2006 3:33:53 PM

19
The Basics
8. Press and push up on the
corded handset holder to lift and
remove it. Turn it over and rotate
slot and snap it back into place
so it holds the corded handset.
9. Connect the corded handset cord to left side of the base and
to the corded handset. Route the curl cord inside the molded
wiring channel on the bottom of the base.
Adjusting the Visual Ringer Brightness
Your new phone has visual ringers
located at the top of the base unit and
at the top of the cordless handset.
incoming calls, so if you are in a noisy
work environment you will be able to see
when the phone is ringing. The phone
comes with a switch for base visual
ringer control, so you can turn the visual
ringers off when you do not want the
The VISUAL RINGER HI/LO/OFF switch allows you to set the
brightness and turn off the visual ringer on the base. You can
and off. If you set the switch to off, the visual ringer on the base
UC044ZH_43-140_OM5.indd 19 12/18/2006 3:33:54 PM

The Basics
20
Turning Talking Caller ID On/Off
Your new phone comes with a feature
called Talking Caller ID. If you subscribe
to Caller ID services from your telephone
provider and when this feature is turned
on, your base unit will announce the
name of the incoming caller when you
receive a call. You can turn this feature
on or off by moving the TALKING
CALLER ID ON/OFF switch to the on or
off position as desired.
NOTE
Your phone will only be able to announce the
incoming caller names when that information is
available for that call. If a private caller rings you, the
announcement will say Private Caller.
Installing the Charger
adapter.
1. Insert the supplied AC
adapter’s barrel plug into
the DC IN 9V jack on the
bottom of the charger.
2. Route the cord through
the strain relief slot and
plug the adapter into a
standard AC outlet.
3. Before using your handset, you must charge the battery pack
Place the cordless handset on the charger face forward
to charge the battery pack. The CHARGE indicator on the
charger lights.
UC044ZH_43-140_OM5.indd 20 12/18/2006 3:33:55 PM
/