Avintage AV21SX Owner's manual

Category
Wine coolers
Type
Owner's manual

This manual is also suitable for

1
GROUPE CLIMADIFF
Cave à vin de service
NOTICE D’UTILISATION
A
A
V
V
7
7
X
X
(
(
-
-
I
I
X
X
)
)
-
-
A
A
V
V
2
2
1
1
S
S
X
X
(
(
-
-
I
I
X
X
)
)
-
-
A
A
V
V
5
5
1
1
S
S
X
X
(
(
-
-
I
I
X
X
)
)
-
-
P
P
R
R
O
O
5
5
1
1
C
C
-
-
A
A
V
V
5
5
3
3
C
C
D
D
Z
Z
-
-
C
C
V
V
5
5
2
2
I
I
X
X
D
D
Z
Z
-
-
A
A
V
V
4
4
1
1
S
S
X
X
D
D
P
P
(
(
-
-
I
I
X
X
)
)
A
A
V
V
5
5
4
4
S
S
X
X
D
D
Z
Z
(
(
-
-
I
I
X
X
)
)
GB – USE INSTRUCTIONS NL – HANDLEIDING
…………………………….. 34
…………………………… 95
D – GEBRAUCHSANWEISUNG SP – MANUAL DE UTILIZACION
……………………………… 64 ……………………………. 124
34
Before use, please read and follow the safety rules and operating instructions in this manual.
Firstly, we would like to thank you for purchasing a Climadiff product and hope that this appliance fully lives up to
your expectations.
This appliance enables you to store your bottles or bring them to service temperature (depending on the bottles)
thanks to its wide adjustment range.
35
1° TECHNICAL CHARACTERISTICS
Below is an example of the nameplate:
The nameplate attached to the inside or rear of the appliance (depending on the model) includes all the information
specific to your wine cellar.
We recommend that you make a note of its serial number in this booklet prior to installation, so that you can refer to
it later (technical work, request for assistance, etc.)
Once it is installed and loaded, access to it is not so easy.
CAUTION: No assistance can be provided without this information.
36
2° GENERAL SAFETY INSTRUCTIONS
For your own safety and for the proper utilisation of the appliance,
read this manual carefully, including the warnings and
recommendations, before installing the appliance and using it for
the first time. In order to avoid damage to the appliance and/or
personal injury, persons using the appliance should be fully familiar
with its operation and safety functions. Keep these
recommendations close to the appliance, for future reference, and
ensure that the document is transferred with the appliance, if it is
sold or in the case of moving. This will ensure optimum operation of
the appliance.
To avoid any risk of injury, keep this manual. The manufacturer
declines any liability whatsoever in the case of operating/handling
errors concerning the appliance.
Safety of children and other vulnerable persons
This appliance may be used by children aged 8 years and above,
and by persons who are physically, sensorially or mentally
handicapped, or who have not learned to use the appliance,
providing they are supervised by a person familiar with the
appliance and who is aware of the risks involved. Children should
not be allowed to play with the appliance. User cleaning and
servicing operations should not be carried out by children, unless
they are more than 8 years old and are supervised.
Keep all packaging out of the reach of children, as there is a risk
of suffocation.
If you decide to scrap the appliance, disconnect it from the wall
socket, cut the connection cable (as close to the appliance as
possible) and remove the door, in order to prevent children playing
with it, with the resulting risk of electric shock or being trapped
inside.
If an appliance with a magnetic door seal is being replaced by
another appliance with a latch on the door or on the seal, ensure
37
that the latch is disabled before selling or scrapping the old
appliance. This will prevent the appliance from being transformed
into a trap for children.
Keep the appliance and its power cable out of reach of children
less than 8 years old.
General safety
CAUTION This appliance is designed for home use.
CAUTION — Never store inflammable substances, such as
aerosols, inside the appliance, as they could leak or release fluids.
CAUTION — A damaged power cable should be immediately
replaced by the manufacturer or by a qualified retailer, in order to
avoid any risk of electric shock.
CAUTION — Keep the ventilation openings well open and ensure
that air can circulate, especially if the appliance is recessed into a
wall.
CAUTION — Do not damage the refrigerating circuit.
CAUTION — Do not use electrical appliances inside the
compartment, unless they are tolerated by the manufacturer.
CAUTION — The refrigerating and insulating systems contain
inflammable gases. When the appliance is scrapped, it should be
deposited at an accredited collection centre. Do not expose the
appliance to fire.
Refrigerating fluid
The refrigerating circuit in the appliance uses refrigerating
isobutane (R600a), which is a highly inflammable natural gas and is
therefore dangerous for the environment. When transporting or
installing the appliance, ensure that no element of the refrigerating
circuit is damaged. The refrigerating fluid (R600a) is inflammable.
Caution: Fire risk
If the refrigerating circuit is damaged:
38
- Avoid open flames or any source of combustion.
- Ensure that the room in which the appliance is installed is well
ventilated.
It is dangerous to change the specification of the appliance in any
way whatsoever.
Damage to the power cable may cause a short circuit and/or
electric shock.
Electrical safety
We decline any liability in respect of incidents caused by poor
electrical installation.
Do not extend the power cable. Do not use an extension cable, or
adapter, or multi-way socket.
Check that the wall socket is not damaged. A wall socket in poor
condition may cause the appliance to overheat and explode.
Check that the wall socket used for the appliance is properly
accessible.
Never pull on the main power cable.
Ensure that the appliance is always electrically earthed.
If the wall socket is loose, do not connect the cable, as there is a
risk of electric shock or fire.
Do not use the appliance if the interior lighting cover is not
installed.
Disconnect the appliance before replacing the lighting bulb.
The appliance operates on a single phase 220~240 V / 50 Hz
power supply. The appliance must be connected to an earthed wall
socket, in accordance with applicable recommendations.
Do not attempt to replace a damaged power cable, contact your
after-sales service.
The power socket must be easily accessible but out of reach of
39
children. In case of doubt, contact your installation technician.
Daily utilisation
Do not store inflammable substances or fluids inside the
appliance. This would create a risk of explosion.
Do not operate other electrical equipment inside the appliance
(mixers, whirling rotor for ice cream, etc.).
When disconnecting the appliance, grip the plug firmly and do not
pull on the cable.
Do not expose the appliance to direct sunlight.
Keep the appliance away from candles, luminaires and open
flames, in order to avoid fire risk.
This appliance is only designed to store wines and drinks.
The appliance is heavy. Be careful when moving it.
If your appliance is equipped with castors, remember that these
are only designed to facilitate minor movements. Do not move the
appliance over long distances.
Do not lean or climb on the appliance or its elements.
In order to avoid falling objects and to prevent damage to the
appliance, do not overload the compartments of the appliance.
Caution! Cleaning and servicing
Before carrying out servicing, switch off the power supply and
disconnect the appliance.
When cleaning the appliance, do not use metal objects, steam
systems, volatile fluids, organic solvents or abrasive substances.
Do not use sharp or pointed objects to remove ice. Use a plastic
scraper.
Important information concerning installation!
To ensure proper electrical connection, follow the
recommendations given in the present manual.
40
Unpack the appliance and visually check that it is not damaged.
Do not connect a damaged appliance. Inform your retailer or point
of sale of any damage. In such a case, keep the packaging.
It is recommended that the appliance be allowed to settle for at
least 4 hours before connecting the electrical power supply, so that
the compressor fluid feed is correct.
Proper air circulation is necessary to avoid overheating. To
ensure sufficient ventilation, observe the installation
recommendations provided.
In order to avoid fire risk, wherever possible, ensure that the
appliance is not in contact with walls or with any hot element
(compressor, condenser). Observe the installation
recommendations.
The appliance should not be placed close to radiators or cooking
hot plates or gas rings.
Check that electrical sockets remain accessible when the
appliance is installed.
POWER SAVING
To limit the electricity consumption of your appliance:
• Install it in an appropriate place (see “Installing your appliance”).
• Leave the doors open as little time as possible.
• Do not put food that is still hot into the appliance.
•To ensure that the appliance operates properly, clean the
condenser regularly (see “Routine servicing of your appliance”).
• Regularly inspect the door seals and ensure that they are still
closing properly. If this is not the case, contact your after-sales
service.
Trouble shooting
Any electrical work should be carried out by a qualified and
skilled technician.
41
The appliance should be repaired by an accredited repair centre,
using only manufacturer’s original spare parts.
The appliance is designed for home use only. The manufacturer
declines any liability whatsoever in the case of other utilisation.
42
R600a
Safety regulation
Warning: Keep ventilation openings in the
appliance enclosure or in the structure clear
of obstruction.
Do not store explosive substances such as
aerosol cans with a flammable propellant in
this appliance.
Warning: Do not damage the refrigerant
circuit.
Refrigerating units operating on Isobutane
(R600a) may not be placed in an area with
sources of ignition (e.g. unsealed electrical
contacts) or where the refrigerant could
gather in the event of a leak. The type of
refrigerant is indicated on the cabinet's type
plate.
Warning: Do not use electrical appliances
inside the food storage compartments of
the appliance, unless they are of the type
recommended by the manufacturer.
This appliance meets the requirements of all applicable European directives and their amendments, and notably
complies with the following standards:
1907/2006 (REACH)
2011/65/EU (ROHS)
2006/95/EC relating to electrical safety
2004/108/EC relating to electro-magnetic compatibility
2008/48 relating to electro-magnetic fields
2010/30 and 1060/2010 relating to energy labels
43
3° INSTALLATION INSTRUCTIONS
Before using your wine cellar
Remove the inner and outer packaging.
Before connecting the cellar to the electrical socket, leave it in position for 24 hours. This will reduce the
possibility of malfunction of the refrigeration circuit due to transport.
Clean the inside using a soft cloth and lukewarm water.
For electrical connection carefully, follow the instructions given in this manual.
Unpack the appliance and check if there are damages on it. Do not connect the appliance if it is
damaged. Report possible damages immediately to the place you bought it. In this case retain packing.
It is advisable to wait at least four hours before connecting the appliance to allow the oil to flow back in
the compressor.
Adequate air circulation should be around the appliance, lacking this leads to overheating. To achieve
sufficient ventilation, follow the instructions relevant to installation.
Wherever possible the back of the product should not be too close to a wall to avoid touching or catching
warm parts (compressor, condenser) to prevent the risk of a fire, follow the instructions relevant to
installation.
The appliance must not be locate close to radiators or cookers.
Make sure that the mains plug is accessible after the installation of the appliance.
Using your wine cellar:
Your wine cellar must be positioned in a room with an ambient temperature between + 16 and +32°C.
If the ambient temperature is higher or lower, the performance of your appliance may be affected and it may not
be possible to obtain temperatures between 5 and 18 degrees.
Installing your wine cellar
This wine cellar is designed for free-standing or built-in installation.
Position it in a place with sufficient strength to support its weight when loaded. To ensure that it is level,
adjust the height of the feet underneath.
To get the best from your appliance with the lowest energy consumption, do not place the appliance
close to a heat source (heater, cooker, etc.), do not expose it to direct sunlight, and do not place it in a
room which is too cold.
Connect the cellar to a single socket, leaving a 10 cm gap between the back of the cellar and the wall.
Be careful to support it, so that your wine cellar is perfectly level. (Use of a spirit level is recommended).
This will prevent any movement due to instability, causing noise and vibration, and will ensure that the
door seals perfectly.
44
Control panel
AV7X(-IX)/AV21SX(-IX)/AV51SX(-IX)/PRO51C/AV41SXDP(-IX):
“RUN”
Power indicator
“LIGHT” Button
Lighting control button
“POWER” Button
On/Off switch
“DISPLAY”
Electronic temperature display
“UP” Button
+ Temperature setting button.
“DOWN” Button
- Temperature setting button.
You can choose the desired chamber temperature by using the / ”. buttons
.
The temperature
selected increases/decreases by 1°C with each button press.
Temperatures of between 5 and 18°C can be selected. Once the desired temperature has been selected, the
display will flash for 5s before showing the current internal cooler temperature. The set temperature can be
viewed at any time by pressing and holding the temperature select buttons for 5s.
AV53CDZ/CV52IXDZ/AV54SXDZ(-IX)
Light
Lighting control button
RUN
Power indicator
Power
On/Off switch (press and hold for 3s)
“Set Upper” Button
Upper chamber temperature setting button.
“Set Lower” Button
Lower chamber temperature setting button.
“Upper Chamber”
Upper chamber electronic display
“Lower Chamber”
Lower chamber electronic display
Press Set Upper” to adjust the upper chamber temperature.. The relevant chamber display will start to flash and
each press on the button will alter the temperature by 1°C. Once the lowest set temperature of 5°C is reached,
45
the display automatically changes to the highest set temperature of 10°C. Once selected, the display will flash for
approximately 5s before showing the current internal temperature of the cellar. The set temperature can be
viewed at any time by pressing and holding the temperature select buttons.
Press Set Lower” to set the upper chamber temperature.. The relevant chamber display will start to flash and
each press on the button will alter the temperature by 1°C. Once the lowest set temperature of 10°C is reached,
the display automatically changes to the highest set temperature of 18°C. Once selected, the display will flash for
approximately 5s before showing the current internal temperature of the cellar. The set temperature can be
viewed at any time by pressing and holding the temperature select buttons.
In the event of a power cut, all previously selected temperature settings will be deleted and each chamber will re-
initialise to the factory-preset temperature of 6°C for the upper chamber and 12°C for the lower chamber.
The set temperature can be viewed at any time by pressing and holding the temperature select buttons for 5s.
LIGHT control :
1. In order to save energy consumption , the light will be automatically off after 10 minutes when turned on.
2. But if you want to keep the light on permanently, please keep pressing "LIGHT" button for 5 seconds until
the display shows "LP”.
3. If you want to reset (automatically off after 10 minutes), please keep pressing "LIGHT" button for 5 seconds
again until display shows "LF".
46
4° EQUIPMENT
The climate control system
According to advice from specialists, the ideal temperature for storing wine is around 12°C, within a bracket of 10
to 14°C. Do not confuse this with service temperature, which varies between 5 and 18°C, depending on the
specific nature of the wine.
It is especially important to avoid sudden changes in temperature. Designed by specialists for oenophiles, this
appliance, unlike a simple refrigerator, takes into account the sensitivity of grand cru wines to sudden variations in
temperature by ensuring the close control of a constant average temperature.
The anti-vibration system:
The refrigeration compressor is equipped with special dampers (silent-blocks) and the inner space is insulated
from the body by a thick layer of polyurethane foam. These characteristics prevent the transmission of vibration to
your wines.
The humidification system:
This appliance is fitted with a tray (according to the model) that maintains the correct level of humidity. If the
humidity is too low, top up the level in the reservoir to three quarters of its capacity. Check the level from time to
time and add water if necessary. Ensure that the tray always contains water.
Designed by specialists for oenophiles, Climadiff has taken into account the sensitivity of corks to too low a level
of ambient humidity. This is why the tray should be placed on the shelf below the fan situated in the bottom, to
provide minimum humidity. Be sure to check the water level, if you are storing wines over a long period and you
are not using the appliance solely for bringing wines to service temperature (with a quick rotation of bottles).
The anti-UV system:
Light accelerates the ageing of wine. In our solid door cellars, your wines are naturally protected, on condition, of
course, that the door is not opened too often. This glass-door model has been specially treated and filters out
harmful ultraviolet rays, thus ensuring your wines are perfectly shielded.
Defrosting:
Your appliance is equipped with an automatic defrost cycle. When a cooling cycle finishes, the appliance’s
refrigerated surfaces are defrosted automatically. The defrost water is channelled into a condensates evaporation
tray which is located in the back of the appliance near the compressor. The heat produced by the compressor
then evaporates the condensates collected in the tray.
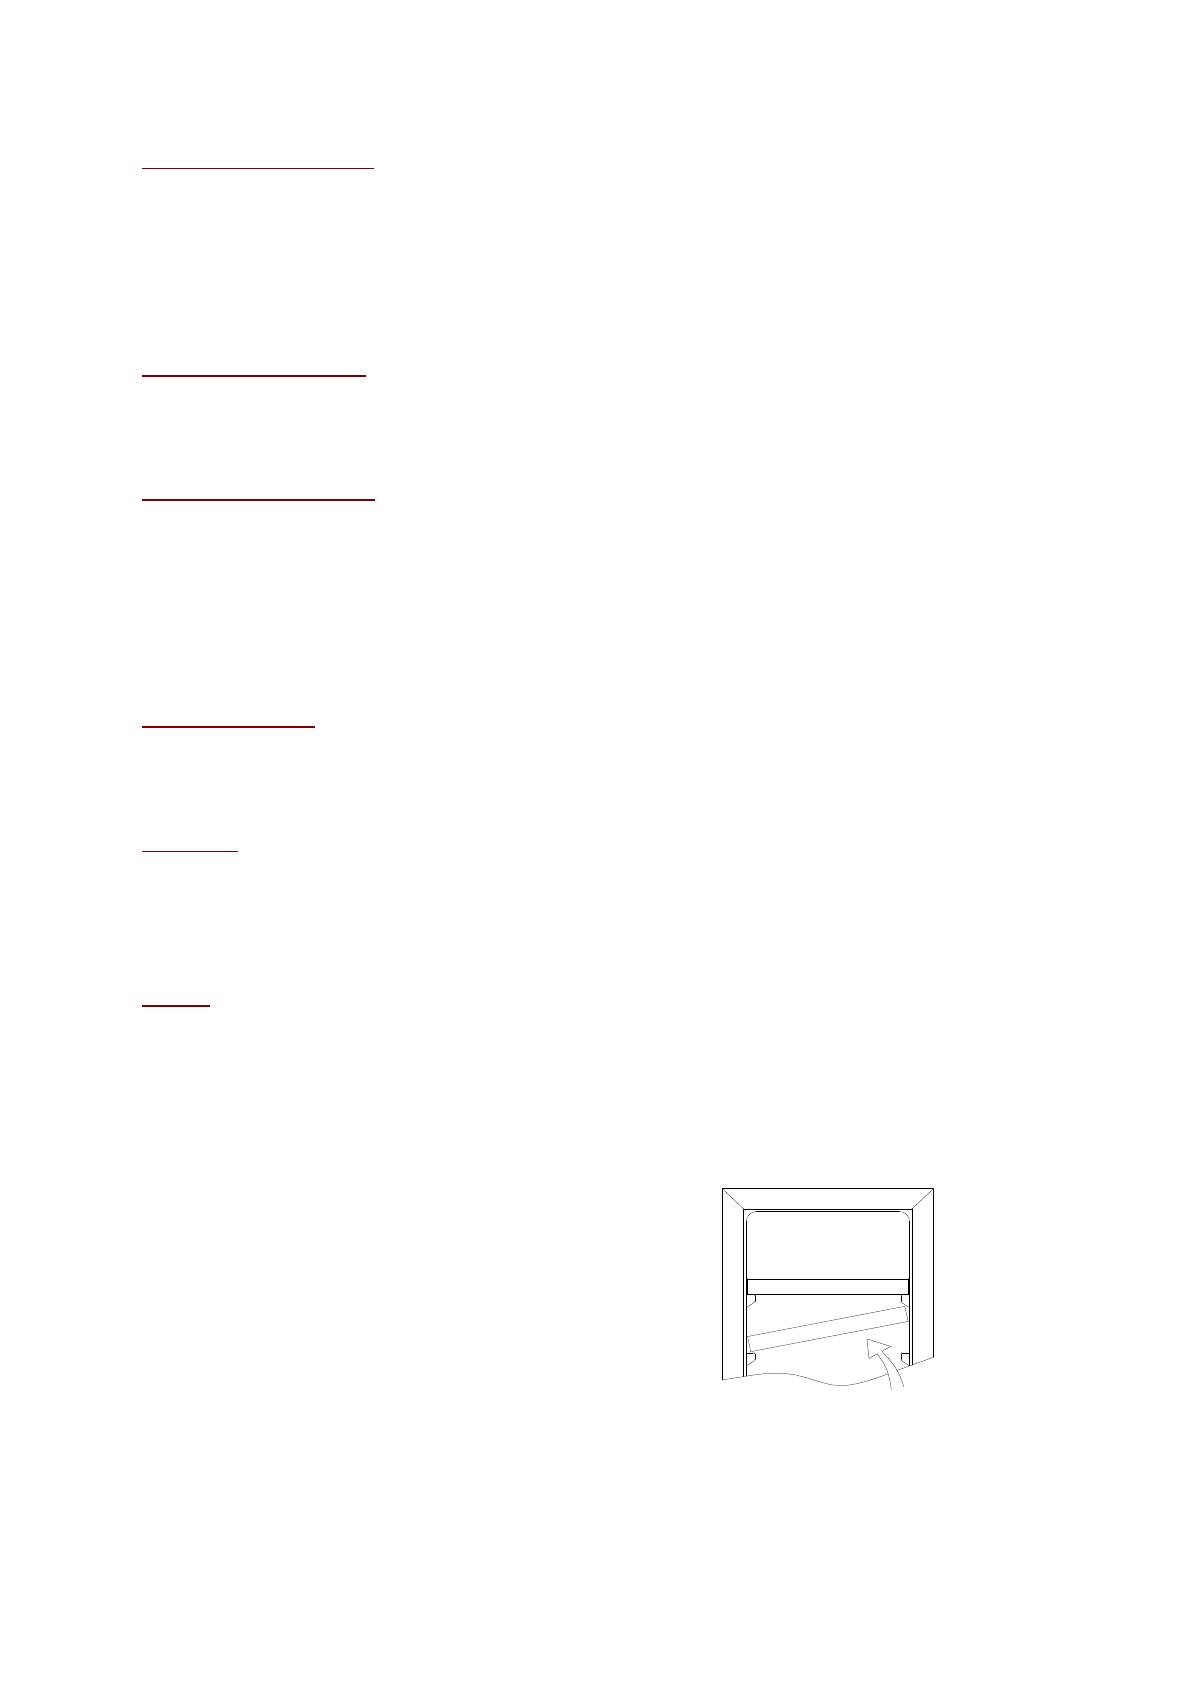
Shelves
To prevent damage to the door seal, ensure that the door is fully open before pulling out the shelves to add
or remove bottles.
For easier access to the contents of the shelves, slide the shelf out approximately one third of the way. The
shelves are, however, fitted with a stop to prevent the bottles falling out.
To remove or reposition the shelves, incline the shelf as indicated in the diagram, then push or pull as
required.
47
For AV41SXDP(-IX)
Place the shelves in the spaces provided.
a. spare part cardboard box b. small shelf c. large shelf
1. After removing the wrapping, take the spare parts cardboard box(a) out of the cabinet.
2. There are four small shelves(b) in the left compartment. Remove the two lower shelves.
There are four large shelves(c) in the right compartment. Remove the two upper shelves.
3. Swap the large and small shelves(fig 2). Place the two small shelves in the upper positions and the two large
shelves in the lower positions in both compartments.
4. When the shelves have been positioned correctly, you can use the wine cooler according to the instruction
manual.
Foot sliders
For models AV21SX(-IX) AV41SXDP(-IX) AV51SX(-IX) AV53CDZ CV52IXDZ PRO51C/1 AV54SXDZ(-IX)
Two foot sliders are provided with your appliance, allowing you to move it easily when your feet are adjusted to
maximum height. The foot sliders have to be installed in parallel under the feet in accordance with the location for
the front and for the back.
Front
Back
48
Enhanced safety:
Since this range of appliances is intended for storing items of value, we have been careful to select quality
components and to design suitable manufacturing techniques to ensure optimum safety in operation.
Installing the handle:
Your appliance has a stainless steel handle. To fit it, simply screw it onto the door with the screws supplied as
per the diagram below, having first removed the seal.
Reversing the door:
FOR AV21SX(-IX)/AV51SX(-IX)/AV7X(-IX)
1. Lower hinge (right) 2 . Screws 3 .Door axis
4. Door 5. Top hinge (Right) 6. Hinge Screws
7. Top hinge (left) 8. Decorative nail 9. Lower hinge (left)
10. Door limit device 11. Screw 12. Plug
1. Open the door to 90 degrees, remove the two screws (2) from the lower door axis (3), remove the door (4)
and door axis (Fig. A).
2. Position the door (4) safely and remove the plug (12) from the top of the door frame. Unscrew one screw (11)
at the bottom and remove the door limit device (10). Install the door limit device (10) at the top of the door
frame. Please use the spare plug (12) to block the hole at the top of the door frame. (Fig. A/B)
3. Take out three hinge screws (6) from the upper hinge (right) (5) and remove it. (Fig. C)
Front
Back
49
4. Remove the decorative nail (8) from the top left of the cabinet and install the spare top hinge (left) (7) on the
top left of the cabinet with three screws. (Fig. D)
5. Install the spare lower hinge (left) (9) according to the above procedure. (Fig. E)
6. The door opens to 180 degrees. Install the door in the same way as it was removed and fix it so that the door
is aligned.
7. Block the hole at the top right of the cabinet with the spare decorative nail (8).
PRO51C/AV53CDZ/AV54SXDZ(-IX):
1. Lower hinge (right) 2. Screws 3 .Door axis
4. Door 5. Top hinge (right) 6. Hinge Screws
7. Top hinge (left) 8. Decorative nail 9. Lower hinge (left)
1. Open the door to 90 degrees, take out two screws (2) from the lower door axis (3), remove the door (4) and
door axis (Fig. A).
2. Position the door (4) safely.
3. Take out three hinge screws (6) from the top hinge (right) (5) and remove it. (Fig. C)
4. Remove the decorative nail (8) from the top left of the cabinet and install the spare top hinge (Left) (7) on the
top left of the cabinet with three screws. (Fig. D)
5. Install the spare lower hinge (left) (9) according to the above procedure. (Fig. E)
6. The door opens to 180 degrees. Install the door in the same way as it was removed and fix it so that the door
is aligned.
7. Block the hole at the top right of the cabinet with the spare decorative nail (8).
50
CV52IXDZ:
1 Remove the aeration grille (1) by undoing the screws (2).
2 Use a Phillips screwdriver to remove the top hinge. Lift the door and set it down carefully.
3 Unscrew the bottom hinge.
4 Remove the plastic cap located on the opposite side.
5 Screw the hinge back into the opposite side of the door bottom.
6 Marry up the holies in the two hinges with the cabinet holes, then screw the hinges in. (figure E)
7 Reposition the plastic caps on the other side of the cellar so as to plug the holes which are now visible.
8 Reinstall the grille and screw it in (figure A).
Build-in diagram:
AV21SX(-IX):
51
AV51SX(-IX)/PRO51C/AV53CDZ/CV52IXDZ/AV54SXDZ(-IX):
AV41SXDP(-IX):
5° LOADING
The maximum recommended filling quantities of bottles are guidelines and are not contractual; they provide a
quick estimate of the size of the appliance (similar to the litre capacities of refrigerators).
They correspond to tests conducted with a standard bottle: the standard “75 cl tradition Bordeaux” bottle -
standards apply the geographical origin of each bottle shape (Bordeaux, Burgundy, Provence, etc.) and a type
(traditional, heavy, light, flute, etc.), each with its own diameter and height.
In reality and in extreme cases, you could store more bottles by stacking the same type of bottle without using
shelves, but a “varied cellar” comprises a wide variety of bottles and the “practical” aspect of everyday cellar
management limits its capacity. You will therefore probably use a little less capacity than the recommended
maximum.
How to fill and maintain your wine cellar:
Types of bottle:
52
We see here 4 kinds of 75 cl wine bottles: Burgundy and Bordeaux wine bottles of different dimensions.
There are many others of all shapes and sizes.
You will note the storage differences depending on bottle heights, diameters and alternating position method.
For example, if a wine cellar is loaded only with Burgundy wine bottles, there will be approximately 30% fewer
bottles than the initial quantity calculated for Bordeaux bottles.
Examples of serving temperatures:
(to be observed when tasting, in order to avoid missing out on the
rich aromas of your wines!)
Opinions vary, and the ambient temperature too, but many people agree on the following:
Prestigious Bordeaux wines – Reds 16 – 17°C
Prestigious Burgundy wines – Reds 15 – 16°C
Prestigious dry white vintages 14 – 16°C
Light, young, fruity reds 11 – 12°C
Provence rosés, primeur wines 10 – 12°C
Dry whites and vin de pays reds 10 – 12°C
Vin de pays whites 8 – 10°C
Champagnes 7 – 8°C
Sweet wines 6°C
6° MAINTENANCE
Before cleaning your appliance (something that should be done regularly), disconnect it by removing the plug or
by pulling the fuse on the circuit.
Before using your appliance for the first time and regularly after that, we recommend that you clean the inside and
outside (front, sides and top) with warm water mixed with a gentle cleaning product. Rinse with clean water and
allow to dry before reconnecting. Do not use solvents or abrasives.
Wash the plastic coating on the steel shelves with a mild detergent solution and then dry with a soft cloth.
Wooden shelves require no particular maintenance.
When the appliance is switched on for the first time, there may be a residual odour. In that case, run the appliance
empty for a few hours at the coldest possible temperature. The cold will kill any odours.
Do not clean the appliance with metal objects, steam cleaner, ethereal oils, organic solvents or abrasive
cleansers.
Do not use sharp objects to remove frost from the appliance. Use a plastic scraper.
Criss
-
crossing types:
Top-to-bottom neck-to-neck:
Note the difference in depth!
Top-to-bottom neck between bottle
bodies:
Increased loading.
  • Page 1 1
  • Page 2 2
  • Page 3 3
  • Page 4 4
  • Page 5 5
  • Page 6 6
  • Page 7 7
  • Page 8 8
  • Page 9 9
  • Page 10 10
  • Page 11 11
  • Page 12 12
  • Page 13 13
  • Page 14 14
  • Page 15 15
  • Page 16 16
  • Page 17 17
  • Page 18 18
  • Page 19 19
  • Page 20 20
  • Page 21 21
  • Page 22 22
  • Page 23 23
  • Page 24 24
  • Page 25 25
  • Page 26 26
  • Page 27 27
  • Page 28 28
  • Page 29 29
  • Page 30 30
  • Page 31 31
  • Page 32 32
  • Page 33 33
  • Page 34 34
  • Page 35 35
  • Page 36 36
  • Page 37 37
  • Page 38 38
  • Page 39 39
  • Page 40 40
  • Page 41 41
  • Page 42 42
  • Page 43 43
  • Page 44 44
  • Page 45 45
  • Page 46 46
  • Page 47 47
  • Page 48 48
  • Page 49 49
  • Page 50 50
  • Page 51 51
  • Page 52 52
  • Page 53 53
  • Page 54 54
  • Page 55 55
  • Page 56 56
  • Page 57 57
  • Page 58 58
  • Page 59 59
  • Page 60 60
  • Page 61 61
  • Page 62 62
  • Page 63 63
  • Page 64 64
  • Page 65 65
  • Page 66 66
  • Page 67 67
  • Page 68 68
  • Page 69 69
  • Page 70 70
  • Page 71 71
  • Page 72 72
  • Page 73 73
  • Page 74 74
  • Page 75 75
  • Page 76 76
  • Page 77 77
  • Page 78 78
  • Page 79 79
  • Page 80 80
  • Page 81 81
  • Page 82 82
  • Page 83 83
  • Page 84 84
  • Page 85 85
  • Page 86 86
  • Page 87 87
  • Page 88 88
  • Page 89 89
  • Page 90 90
  • Page 91 91
  • Page 92 92
  • Page 93 93
  • Page 94 94
  • Page 95 95
  • Page 96 96
  • Page 97 97
  • Page 98 98
  • Page 99 99
  • Page 100 100
  • Page 101 101
  • Page 102 102
  • Page 103 103
  • Page 104 104
  • Page 105 105
  • Page 106 106
  • Page 107 107
  • Page 108 108
  • Page 109 109
  • Page 110 110
  • Page 111 111
  • Page 112 112
  • Page 113 113
  • Page 114 114
  • Page 115 115
  • Page 116 116
  • Page 117 117
  • Page 118 118
  • Page 119 119
  • Page 120 120
  • Page 121 121
  • Page 122 122
  • Page 123 123
  • Page 124 124
  • Page 125 125
  • Page 126 126
  • Page 127 127
  • Page 128 128
  • Page 129 129
  • Page 130 130
  • Page 131 131
  • Page 132 132
  • Page 133 133
  • Page 134 134
  • Page 135 135
  • Page 136 136
  • Page 137 137
  • Page 138 138
  • Page 139 139
  • Page 140 140
  • Page 141 141
  • Page 142 142
  • Page 143 143
  • Page 144 144
  • Page 145 145
  • Page 146 146
  • Page 147 147
  • Page 148 148
  • Page 149 149
  • Page 150 150
  • Page 151 151
  • Page 152 152

Avintage AV21SX Owner's manual

Category
Wine coolers
Type
Owner's manual
This manual is also suitable for

Ask a question and I''ll find the answer in the document

Finding information in a document is now easier with AI