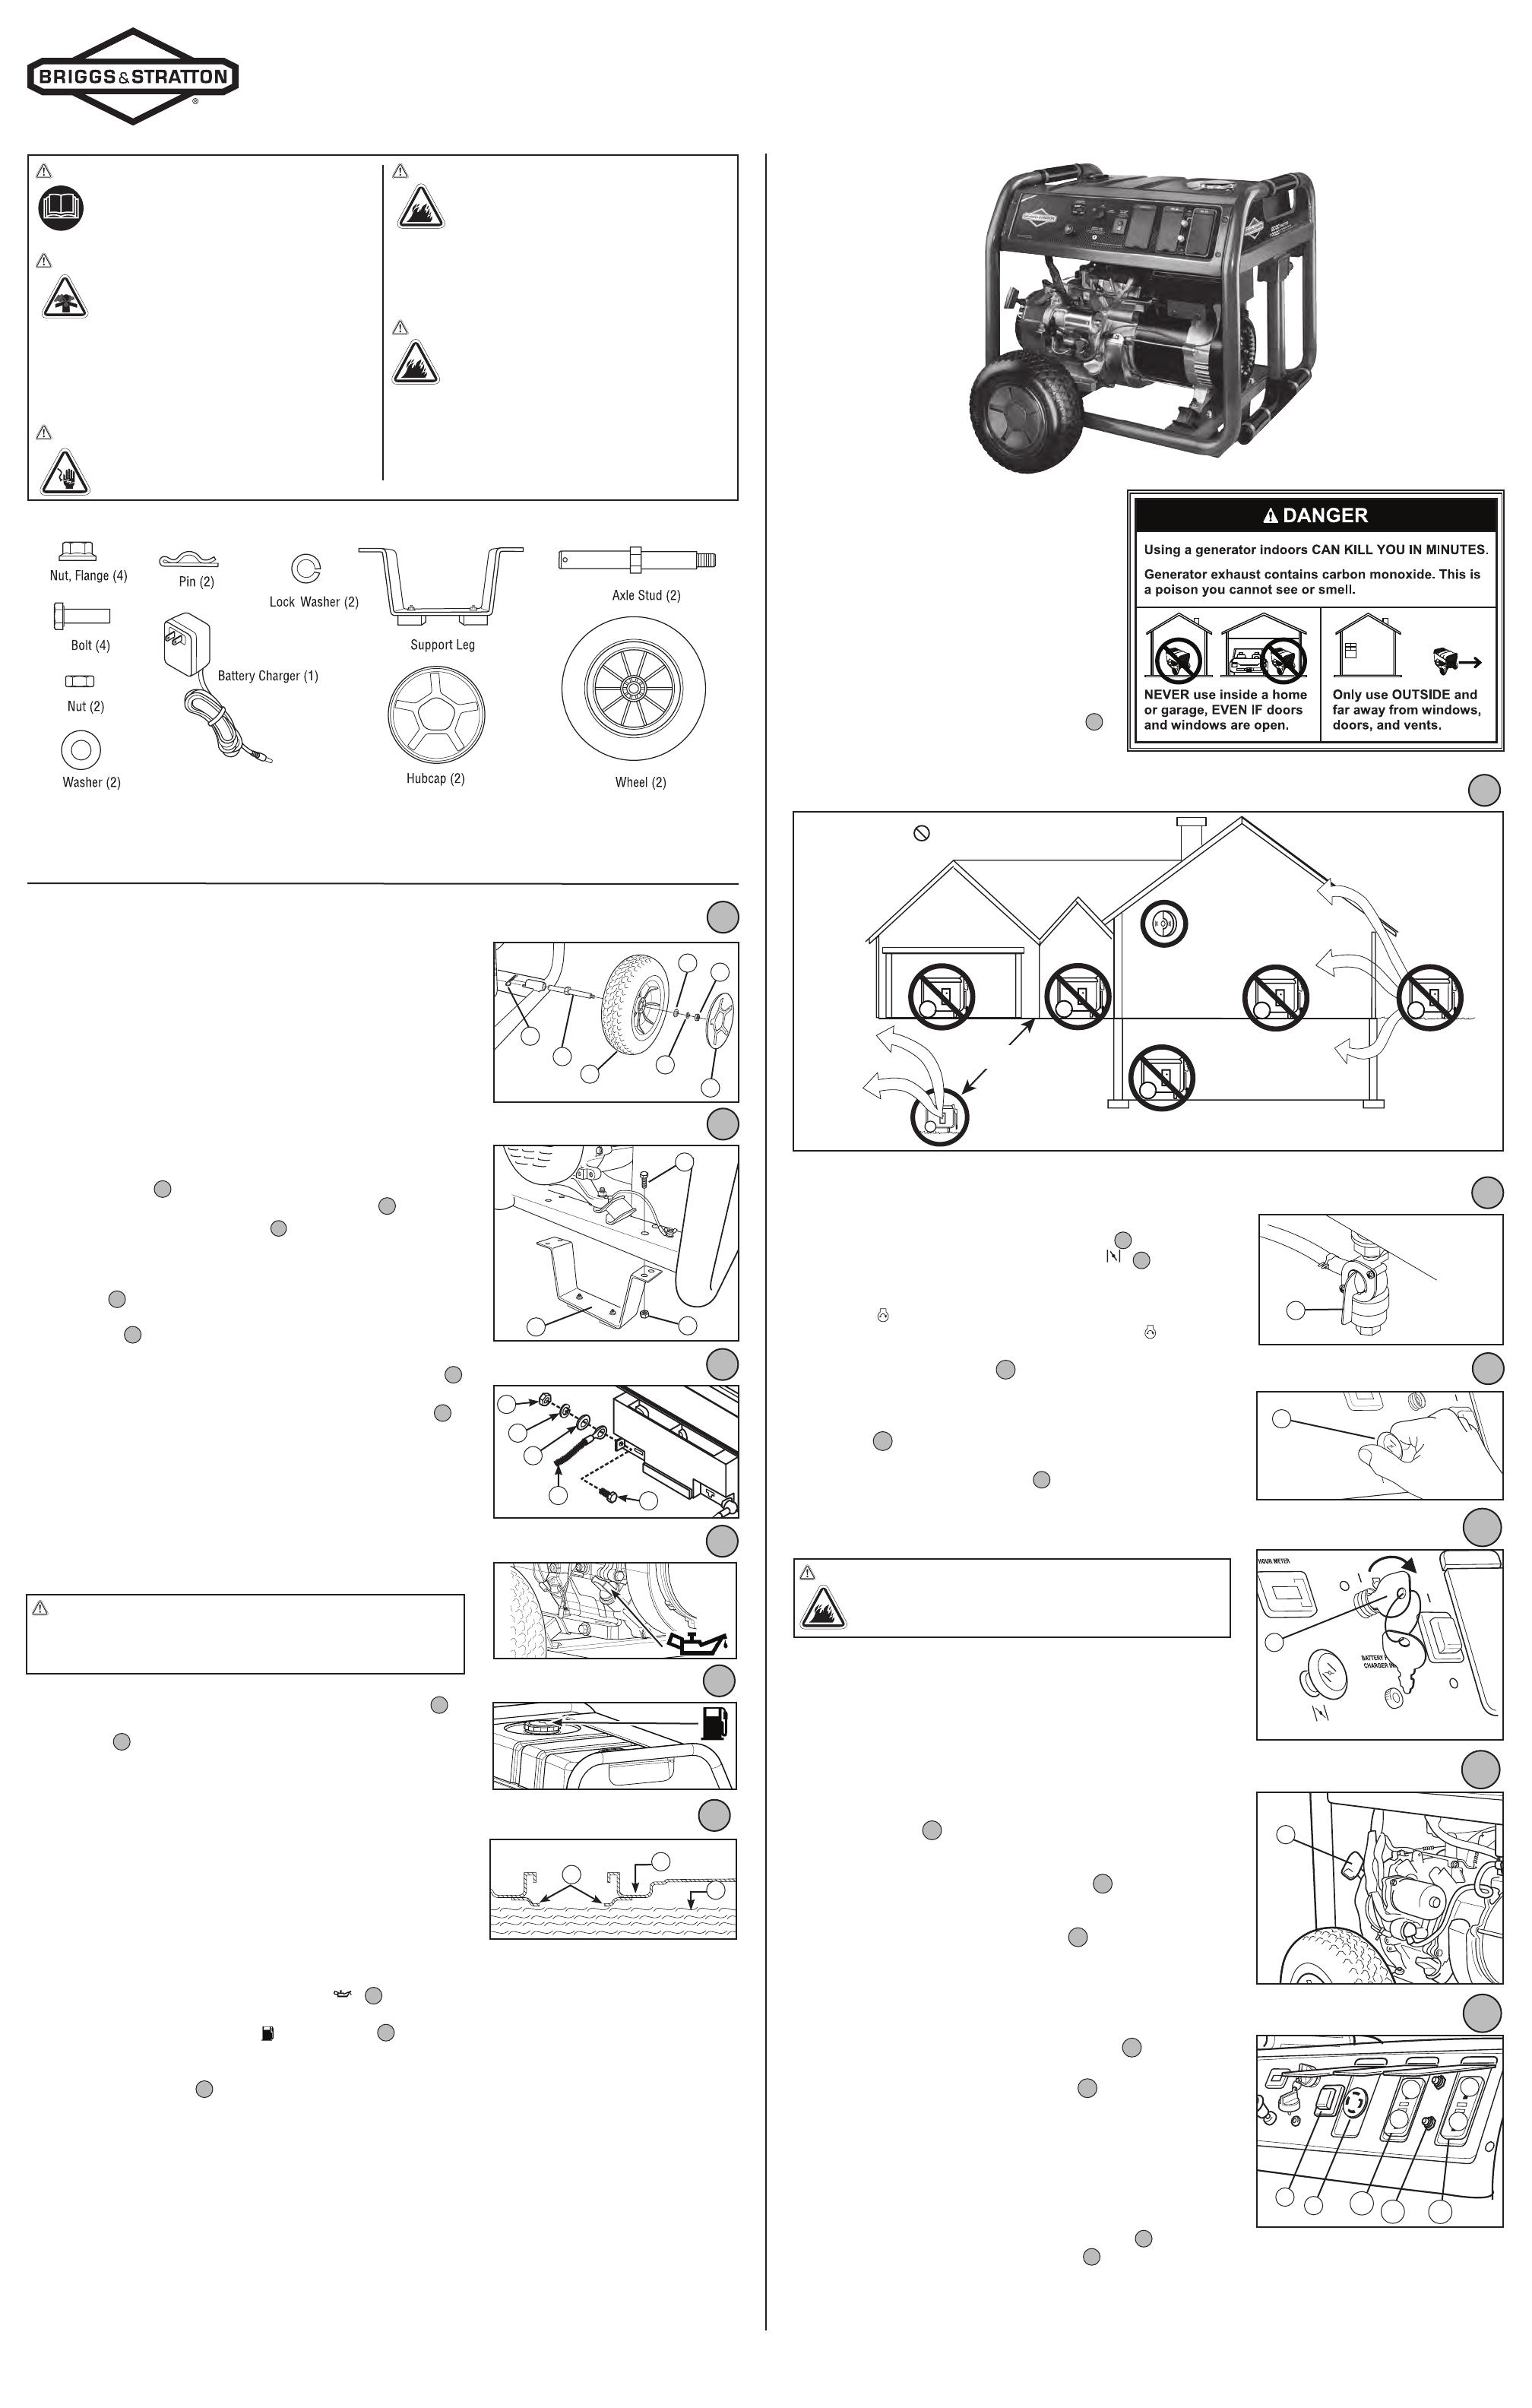
Move Generator to Safe
Operating Location
1. Move generator outside to a flat, level
surface, in an area that will not accumulate
deadly exhaust gas. Engine exhaust contains
carbon monoxide, a poisonous gas that could
kill you in minutes. You CANNOT smell it, see
it, or taste it. Operate ONLY outside far away
from windows, doors and vents. Install carbon
monoxide alarms. DO NOT run this product
inside homes or garages, even if using fans or
opening doors and windows. Direct exhaust
AWAY from windows, doors, and vents.
7
2. To reduce the risk of exhaust heat or
exhaust gases igniting nearby combustible
material, keep at least 5 ft. (1.5 m) clearance
on all sides of generator, including overhead.
Start Generator
1. Make sure unit is on a level surface. Disconnect all electrical
loads from the generator.
2. Turn the fuel valve (U) to the ON (I) position.
8
3. Pull choke control (V) out to close CHOKE ( ).
9
4. Start generator using Electric or Manual starting.
For electric starting, turn and hold key (W) in start switch to
START (
) position until generator starts. To prolong the life of
starter components, DO NOT hold key in START ( ) position
for more than 15 seconds, and pause for at least 1 minute
between starting attempts.
10
For manual starting, turn key in start switch to RUN (I)
position, grasp recoil handle (X) and pull slowly until slight
resistance is felt. Then pull rapidly one time only to start
engine.
11
5. Open the choke (V) gradually as the engine warms up by
pushing in on the choke handle.
9
6. If engine does not start, refer to operator’s manual for detailed
starting instructions.
Plug in Items to be Powered
1. Let engine stabilize and warm up for a few minutes after
starting.
NOTICE DO NOT connect 240 Volt loads to the 120 Volt GFCI
duplex receptacles.
NOTICE DO NOT connect 3-phase loads to the generator.
NOTICE DO NOT connect 50 Hz loads to the generator.
NOTICE DO NOT OVERLOAD THE GENERATOR. See Don’t
Overload Generator, in Operator’s Manual.
2. Ensure the circuit breaker (Y) on the control panel is in the
ON (I) position.
12
3. The 120 Volt AC, 20A duplex GFCI receptacles (BB) are
provided with “push to reset” circuit breakers (AA) to protect
the generator against electrical overload.
12
4. The 120/240 Volt (Z) AC, 30A locking receptacle is provided
with a 2 pole rocker switch circuit breaker (Y) to protect the
generator against electrical overload.
12
NOTICE Before using the GFCI receptacle, ALWAYS push the
test and reset buttons to insure it works.
5. Connect electrical loads in OFF position, then turn ON for
operation.
NOTICE When plugging into the 120 Volt (BB) GFCI receptacles,
plug items to be powered in sequence as shown.
12
6. Plug in and turn on the desired 120 Volt (BB) and/or 240 Volt (Z)
AC, single phase, 60 Hz electrical loads.
12
Shut Down Generator
1. Turn OFF and unplug all electrical loads from generator
panel receptacles. NEVER start or stop engine with electrical
devices plugged in and turned ON.
2. Let engine run at no-load for several minutes to stabilize
internal temperatures of engine and generator.
3. Turn key (W) in start switch to OFF (0) position.
10
4. Move fuel valve (U) to OFF (0) position.
8
5. To prepare for storage, refer to Operator’s Manual.
Unpack Generator
1. Set the carton on a rigid, flat surface.
2. Remove everything from carton except generator.
3. Open carton completely by cutting each corner from top to
bottom.
4. Ensure you have all included items prior to assembly.
If items are damaged or missing, call 1-800-743-4115.
5. Leave generator on carton to install the wheels.
Install Wheel Kit
NOTICE Wheels and support leg must be attached prior to
adding any fuel and oil.
1. Tip generator so that engine end is down.
2. Slide axle stud (A) through mounting bracket with threaded
end facing out.
1
3. Insert retaining pin (B) through hole on axle stud.
1
4. Slide a wheel (C) over axle stud.
1
NOTICE Be sure to install both wheels with raised hub inboard.
5. Attach wheel to axle stud with a washer (D), lock washer (E)
and nut (F). Tighten with a 16 mm socket wrench and 19 mm
wrench.
1
6. Place hub cap (G) into center of wheel and push until it snaps
into place.
1
7. Repeat steps 2 through 6 to secure second wheel.
8. Line up holes in support leg (H) with holes in generator frame.
2
9. Attach support leg using 4 bolts (J) and 4 flange nuts (K).
Tighten with a 10 mm socket wrench and 13 mm wrench.
2
10. Return generator to normal operating position (resting on
wheels).
Attach Negative Battery Cable
Your unit is equipped with electric start capability but can be
started manually. If you choose not to use the electric start
feature, you do not need to connect the negative battery cable.
The sealed battery on the generator is pre–installed except for the
negative (black) battery cable.
1. Cut off tie wrap securing loose end of negative (black) cable.
2. Using 8 mm or 5/16” wrenches, remove nut (L), lock washer
(M) and flat washer (N) on negative battery terminal (—).
3
3. Slide negative battery cable (P) over screw (Q) on negative
terminal.
3
4. Reattach washer and nut and tighten.
5. Verify that connections to battery and generator are tight and
secure.
Verify Engine Oil Level and Add
Fuel
NOTICE Be sure you have attached wheels and support leg prior
to this step.
NOTICE DO NOT use unapproved fuel such as E15 and E85.
DO NOT mix oil in fuel or modify engine to run on alternate fuels.
1. Move generator outdoors to a flat, level surface.
2. The generator engine is shipped from the factory filled with oil.
Before starting the engine, check oil level (
).
4
3. Replace and fully tighten oil fill cap.
4. Clean area around fuel fill cap (
), remove cap.
5
5. Slowly add unleaded fuel (R) to fuel tank (S). Be careful not
to fill above the baffle (T). This allows adequate space for fuel
expansion as shown.
6
6. Replace fuel cap, and let any spilled fuel evaporate before
starting engine.
© 2014 Briggs & Stratton Power Products Group, LLC. All rights reserved.
Every effort has been made to ensure that the information in this document is accurate and correct. However, we reserve the right to alter or otherwise improve the product and this document at any time without prior notice and without incurring obligation.
This generator is certified in accordance with CSA (Canadian Standards Association) standard C22.2 No. 100-04 (motors and generators) and rated in accordance with PGMA (Portable Generator Manufacturers’ Association) standard PGMA G200 (Standard for Testing and Validating
Performance of Portable Generators).
Quick Setup Guide
Portable Generator
Have Questions?
Do not return to store. We can help.
Call Customer Service Toll-Free 1-800-743-4115
or vist our web site BRIGGSandSTRATTON.COM
WARNING Failure to read and follow the
operator’s manual and all operating
instructions could result in death or serious
injury.
WARNING Engine exhaust contains carbon
monoxide, a poisonous gas that could kill
you in minutes. You CANNOT smell it, see
it, or taste it. Operate ONLY outside far
away from windows, doors and vents. Install carbon
monoxide alarms. DO NOT run this product inside
homes or garages, even if using fans or opening
doors and windows. Direct exhaust AWAY from
windows, doors, and vents.
WARNING Generator voltage could cause
electrical shock or burn resulting in
death or serious injury. DO NOT operate
under wet conditions.
WARNING Fuel and its vapors are extremely
flammable and explosive which could
cause burns, fire or explosion resulting
in death or serious injury. Turn generator
engine OFF and let it cool at least 2 minutes before
removing fuel cap. Let spilled fuel evaporate
before starting engine. Always allow space for fuel
expansion.
WARNING Hot exhaust and reflective exhaust
gases could cause burns and fires
resulting in death or serious injury. Keep
at least 5 ft. (1.5 m) clearance from any
combustibles or structures, including overhead.
80012145, Rev -
WARNING Damaged or overloaded electrical cords could
overheat, arc, and burn resulting in death or serious injury.
ONLY use cords rated for your loads. Follow all safeties on
electrical cords. Inspect cord sets before each use.
8
U
7
E
X
H
A
U
S
T
(
C
O
)
Basement
Crawlspace
Garage
Attic
Entryway,
Porch
Only use OUTSIDE and
FAR AWAY from windows,
doors and vents.
Direct exhaust AWAY
from windows,
doors and vents.
DO NOT operate in any of the below locations
KEEP
FAR AWAY
Generator too
close to home and
exhaust directed
towards windows,
doors and vents.
CO Alarm
In Living Areas
E
X
H
A
U
S
T
(
C
O
)
Items Included: Operator’s Manual and Two Keys (Not Shown)
2
J
H
K
1
G
E
C
A
B
F
D
9
V
10
W
11
X
WARNING Battery posts, terminals and related accessories
contain lead and lead compounds - chemicals known to the
State of California to cause cancer and reproductive harm. Wash
hands after handling.
6
FUEL
TANK
R
T
S
4
5
You Will Need:
• Carbon monoxide (CO) alarm(s) • Utility knife • Socket wrench with 8 mm, 10 mm, 13 mm and 16 mm
sockets • 13 mm and 19 mm wrench • Unleaded fuel • Oil Funnel (Optional)
12
1
3
2
4
Z
Y
BB
AA
BB
3
L
M
Q
P
N
