Brandt UD2202 Owner's manual

Category
Fridge-freezers
Type
Owner's manual

This manual is also suitable for

Brandt UD2202 is a frost-free upright freezer that offers convenient food preservation and freezing. Its adjustable feet and reversible door provide flexible installation options, while the electronic control board ensures precise temperature management. The appliance also features energy-saving capabilities and ample storage space with drawers and flaps for organized food storage.

Brandt UD2202 is a frost-free upright freezer that offers convenient food preservation and freezing. Its adjustable feet and reversible door provide flexible installation options, while the electronic control board ensures precise temperature management. The appliance also features energy-saving capabilities and ample storage space with drawers and flaps for organized food storage.

Instructions pour utilisation et installation
Instructions for installation and use
FROST FREE UPRIGHT FREEZER
CONGÉLATEUR ARMOIRE "NO FROST"
11
This appliance preserves and freezes foodstuffs for household use. Avoid any other use.
Installation of the appliance must be carried out according to the Instructions Manual.
An incorrect installation may damage the appliance.
Should you have any problems regarding the good performance of the appliance, kindly
contact the authorized Service Centres, or, specialized technicians only.
Prior to any maintenance operation, unplug the appliance from the power supply.
Avoid pulling off the feed cable or the appliance itself. Simply pull out the plug.
Keep the Instructions Manual in good condition and pass it on to any future owner of the
appliance.
In adherence to the most recent laws on the protection of the evironment, we use small
quantities of a coolant called R600a or R134a, according to the model. The type of refrigerant
is clearly specified on the data plate. In the case of damage to the components of the
refrigerating curcuit (tubing, etc) of apparatuses supplied with R600a, the room in which the
apparatus is situated must be aired and flames, sparks or other sources of fire must be
avoided for a few minutes.
The parts destined to be in contact with foods are in accordance with the EEC 89/109
directives.
You have made an excellent choice!
By purchasing our domestic appliance, you have chosen a reliable, highly performing,
non-cumbersome, efficient and useful product. Indeed, the perfect way to preserve your
foodstuffs for the preparation of varied, healthy meals.
Your new appliance is easy to use. Nevertheless, please read the instructions and the tips
described therein, to enable you to use your refrigerator to its highest capacity, whilst saving
on electricity.
We are certain that this appliance will meet with your requirements and we look forward to
having you as one of our permanent clients.
CONGRATULATIONS!
Should this appliance replace another equipped with snap, spring or lock closing devices, etc.
please remember to remove these before disposing of your old appliance, or better still, do
disassemble the door so as to prevent anyone, like for instance, children at play, animals, etc.
from becoming entrapped within.
Remove the plug from the socket and cut the power supply to the cables.
The refrigerators and freezers contain refrigerant gases and substances which require to be
properly disposed of. Furthermore, they contain others materials which can be recycled.
Please dispose of such materials by delivering them to specific collection centres. Your own
Municipality will be able to advise you on correct ecological disposal methods.
DISPOSAL OF USED APPLIANCES
CE marking certifies that this appliance complies with EEC Directives 89/336 (electromagnetic
compatibility), 73/23 (low voltage), 96/57 (energy efficiency) and their subsequent
amendments.
SAFETY REGULATIONS
INDEX
STARTING PROCEDURE
SAFETY REGULATIONS
YOUR APPLIANCE
REVERSIBILITY OF THE DOOR
APPLIANCE INSTALLATION
SAVING ENERGY
ELECTRICAL CONNECTION
USE OF THE APPLIANCE
FREEZING
DEFREEZING
CLEANING
MINOR BREAKDOWNS AND ANOMALIES
DISPOSAL OF USED APPLIANCES
WHAT IS REFRIGERATION VENTILATION AND
HOW DOES IT WORK?
CAPTION
A Electronic control board
B Adjustable feet
C Drawers and/or flaps
D Condenser
E Compressor
F Water collecting tray
G Fast freezing compartments
12
YOUR APPLIANCE
This appliance has been designed and built
so as to avoid condensation forming within
the refrigerator. Condensation dispersal is
carried out automatically by a specific
device. The ensuing water will flow through
a small pipe into a collection tank from
where it will evaporate.
"NO FROST": You are not required to carry
out any defrosting operation.
WHAT IS REFRIGERATION
VENTILATION AND HOW
DOES IT WORK?
If the model has a fixed vertical or
horizontal handle, unscrew it from the
left side and screw it to the right side
(fig. 16), by moving the protecting plugs
that close the holes.
Should the model have a hinged handle,
remove cover G (fig. 17) by unscrewing
the screw that is protected by a small lid.
Unscrew the handle L from the left side,
position it on the right side and make
the 4 fixing holes ø 3 mm by using the
handle it self as reference. Screw the
handle to the door and replace the cover
G. Unscrew the small contrasting block
H from the left and position it to the
right, aligning it to the handle and fitting
it perfectly on to the edge of the unit.
N.B. Do not use the drill to make
holes in the unit, the drill can be used
to make holes on the door.
Screw with the self tapping screw
supplied (there are no previous holes).
Seal the hole on the left with the small
plug supplied separately. Insert the
protecting plugs (supplied in the small
bag) into the holes of the left side (fig.
18).
13
REVERSIBILITY OF THE
DOOR
Reversibility of the handle
The opening of the door is normally on the left hand side of the equipment (the hinges are
on the right.) Should you require the opening on the right hand side, you could undertake
the change by following the instructions detailed hereunder.
1. Unfasten the screws which secure the base (R0)
2. Lay the equipment gently on its back (with the door facing upwards).
3. Remove the skirting by inserting your hands under it, and pull the levers downwards
that you will find towards the middle, and unhook the skirting by rotating it upwards
(R1). Remove the lever from its left seat and place it on the right seat (R2).
4. Unscrew the lower hinge (R3), unscrew the right pivot and re-screw it on the left (R4)
5. Remove the door of the freezer (R5) from the pivot of the upper hinge.
6. Unscrew the upper hinge (R6) and put it on the left (R7).
7. Insert the door on to the pivot of the upper hinge which is now on the left (R8).
8. Insert the pivot of the lower hinge (R3) modified as per item 4 above, in the left seat at
the bottom of the door, and re-screw the hinge to the equipment (R9).
9. Replace the skirting, refasten the screws and reposition the equipment vertically.
After installing your appliance, check that nothing has been damaged. Should you detect any
possible damage to the appliance, please contact your appliance salesman immediately.
Do not disperse packaging material such as plastic bags, polystyrene strips, etc., around the
environment. Keep such material away from children.
If the appliance has been transported in a horizontal position, do not plug in the
appliance but wait for a few hours in order to allow the oil to flow back into the
compressor. Place the appliance in a dry and aerated environment, duly protected from
weather elements. Avoid placing your appliance on balconies, verandas, terraces. Excessive
heat during summer and cold during winter could alter the good functioning operation of the
appliance or even damage it altogether.
Do not position your appliance near a source of heat like an oven or a central heating plant.
Do not place your appliance next to other pieces of furniture, but leave at least a 3 to 5 cm
space on the sides and 10 cm on the top.
Keep your appliance away from the wall by inserting spacers at the back of the said
appliance.
Adjust the front legs so that the appliance will lean slightly backwards, to allow the
door to close properly.
Clean your refrigerator compartment with a solution of sodium bicarbonate dissolved in water
(1 spoon for every 4 litres of water). Do not use alcohol, abrasive powders or detergents, as
these could ruin the surface.
This appliance works best when the ambient temperature is between 16 °C and 32 °C.
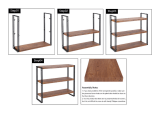
Hinges Adjustment
In case of any accidental bumps during
transport, the upper door may not be
perfectly aligned with the frame panel.
Should this occur, lightly loosen the
screw which fastens the pivot-holding
plate (A) to the upper hinge. Close the
door and align it with the frame panel.
Tighten the screw and check that the
gasket closes properly.
A
The first way to save electricity is to select the correct place for appliance installation as
specified above under installation instructions.
The second way to save electricity is to prevent heat from entering the refrigerator
compartments. Keep the refrigerator doors open for as little time as possible and never store
hot food inside, like soups or similar dishes in particular, as these will produce a great deal of
steam. Periodically check the door gaskets. Ensure the perfect closure of the doors. Should
this not be the case, please contact the Service Centre.
The third way to save electricity is to maintain the heat exchange parts in good condition.
Prevent condensation from accumulating in the refrigerator. Defrost the appliance whenever
the frost thickness exceeds 1-2 cm. This is not necessary with NO-FROST appliances. Clean
the condenser periodically as specified below in this Booklet.
Please ensure that the voltage (Volt, V) of the mains socket matches the indications on the
data plate which you will find inside your appliance.
Should the socket and the appliance plug not be compatible, do not use adapters,
multiple plugs or extensions, but have the socket replaced with another suitable kind
by qualified personnel.
The socket which feeds the appliance must be kept operational for future operations
(cleaning, defrosting, etc.).
Should the cable become damaged, replace it timeously by contacting specialized Service
Centres for the purchase and assembly of the said cable.
Electric safety of this appliance is assured only when it has been connected to a perfectly
effective earthing installation as specified in the electric safety norms in force.
14
Important: if the appliance has been transported to your house in a horizontal
position, please wait for a few hours before plugging in the appliance to allow oil to
flew back into the compressor.
Proceed with the Internal cleaning , then connect the appliance to the electric socket without
using an adaptor (see Electrical connection).
STARTING PROCEDURE
APPLIANCE INSTALLATION
ELECTRICAL CONNECTION
SAVING ENERGY
Installation of appliance equipped with wheels
If your appliance is equipped with wheels, remember that these do facilitate small handling
movements. However, do not pull the appliance for long stretches!
Adjust the legs so that the appliance leans slightly backwards.
BEWARE! before closing the freezer
door, ensure that every container flap
and/or drawer be perfectly closed
within the appliance.
15
USE OF THE APPLIANCE
Freezer Control
Operate the electronic control with
signals (C1) which is located on the
upper part of the equipment. You will
see the switching-on push-button 3 of
the equipment with a green light; the
push button 4 for fast freezing with a
yellow light; the switching off push
button with a sound alarm with a red
light (5), the push-button for
temperature adjustment 2 and the
temperature display 1.
Switching on and off
SWITCHING ON:
Press button 3 until the temperature is displayed.
The audible alarm will be activated when the appliance is switched on for the first time while
it is “warm”.
Press button 5 to turn the alarm off. For more information, see the “Temperature Alarm”
paragraph.
SWITCHING OFF:
Press button 3 again until the temperature display goes out.
Regulating the temperature
The appliance is pre-set for normal use. We recommend a temperature of -18°C.
To lower the temperature: press button 2
To raise the temperature: press button 2 until the temperature reaches –30°C.
Continue to press button 2; the temperature goes back to –15°C.
The temperature can be regulated between –15°C et –30°C.
When you press button 2 for the first time, the most recent setting (known as the reference
setting) will appear, flashing.
You can change the temperature one degree at a time. Keeping the button pressed down
changes the temperature more quickly.
The actual temperature in the appliance will be displayed about 5 seconds after the last press
of the button.
Child safety
There is a child safety system to ensure that the appliance is not turned off accidentally. The
safety setting is activated by pressing buttons 3 and 5 simultaneously for 2 seconds. The same
buttons have to be pressed again to de-activate the safety system.
Temperature display
In normal operation the highest temperature of the frozen food is displayed. A slight deviation
(normally not more than one degree) from the normal value may occur for a short time due to
the compressor cycle or the opening of the door.
Display brightness
To adjust the brightness of the display to the ambient light level, two levels of brightness are
available. The degree of brightness can be changed by simultaneously pressing buttons 5 and
2.
Temperature alarm
This starts up if the temperature inside the freezer is not low enough (according to the set
temperature). A visual warning (red flashing LED) and an audible alarm (buzzer) will switch
on. If the temperature is lowered again, the alarm stops. The audible alarm can be switched
off by pressing button 5 (Stop alarm).
Alarm power supply breakdown
If the temperature rises above the foodstuff safety level, following an electrical breakdown or
some other reason, and then falls again to the normal level, the alarm (audible and visual) will
not stop automatically, but must be switched off by pressing button 5.
Until the alarm is switched off, the actual temperature is displayed alternating with the highest
temperature recorded.
Alarm door open
If the door stays open for longer than a minute, an audible alarm sounds. This alarm stays on
until the door is closed or until button 5 is pressed.
Fast freeze
Pressing button 4 causes the freezer temperature to fall to the lowest possible level. The fast
freeze function stops when button 4 is pressed, or automatically after 48 hours.
Freezing
Ensure that your freezing operations are carried out under the most hygienic conditions as
freezing alone does not sterilise the food. It is advisable to freeze the food by packing it into
separate meal portions and not in bulk form. Never put hot or even warm foodstuffs into the
freezer! Prior to storing the frozen food, pack it in plastic bags, polyethylene sheets,
aluminium foil or freezing containers (this material is found on the market and is labelled
“suitable for freezing”). Each pack or container, etc. which you will store into the freezer must
follow the instructions below:
• freezing date and expiry date;
• number of portions;
• the glass containers must be of the Pyrex type and MUST NEVER be filled to the brim:
(freezing expands liquids);
• the packs must be pressed down for air elimination within and must be as flat as possible;
• all frozen food packs, whatever the type, must be closed in order to protect the food.
The maximum quantity of food which can be stored within a period of 24 hours is shown on
the data table. Never store a higher quantity of food than indicated.
Do not place fresh foodstuffs next to frozen food. This would cause an increase in the
temperature of the frozen foodstuffs.
The quick-freezing compartments are the first two at the top.
Wait for the next 24 hours before switching off the fast freezing. In any case the switching off
will take place automatically after 48 hours.
Defrost foodstuffs for immediate use only. Defrosting can be carried out in the following four
manners:
• inside the refrigerator;
• in ambient temperatures;
• inside an oven at 40/50° or in a micro-wave oven;
• directly by cooking.
Defrosting in the refrigerator is a slower but safer operation and allows you to save electricity.
The freezing temperature of the foodstuff is released into the refrigerator during defrosting.
Internal cleaning
Before carrying out any other operation, unplug the freezer. Clean the appliance by using
sodium bicarbonate dissolved in water (1 spoonful every 4 litres of water).
DO NOT USE ABRASIVE DETERGENTS.
Rinse off with water and dry with a cloth. Plug into the socket.
External cleaning
Before carrying out any other operation, unplug the freezer. Use the same delicate method for
external cleaning as you did for the internal cleaning. Remember to dust off the condenser
placed at the back of the appliance. Use a dry brush or better still, a vacuum cleaner.
Important notice
If you purchase frozen foodstuffs verify that:
the packing has boon well sealed and
not mishandled or damaged;
there are no iced lenses (this means that
the product has already been oven
partially thawed);
the processing date and dates relevant to
the type of freezer have boon clearly
marked (yours is * * * * );
in the meantime the products have not
thawed, not oven partially;
Never put into your mouth frozen products
that have just been taken out of the freezer
(ice-cream, ice-blues, ice cubes, etc.), where
the low temperature to which they have
been subjected may cause ice burns and
possible tongue damage.
In case of prolonged current absence transfer
the frozen foodstuffs into another working
freezer.
If the food stuffs have been thawed, even
partially, you may re-freeze them only
after having cooked them!
16
Before freezing fresh foodstuffs, you must empty the fast freezing compartment, place frozen
foodstuffs into the preservation compartments, then activate the fast freezing. After 24 hours
you may place the fresh foodstuffs into the fast freezing compartment.
FREEZING
DEFREEZING
CLEANING
Before calling the Service department, check whether you can solve the problem through the
following check-points:
Unusual noises - You haven't regulated the base properly and so the freezer vibrates.
Reduced cooling power - You have placed a larger quantity of food than advisable. You
have opened the door too many times. The door has not been properly closed.
The appliance does not cool - Check that the plug and socket are making contact. You may
have blown a mains fuse. The main light switch has tripped. The electronic control is off.
The exterior of the appliance is hot - This is NOT a defect, but helps to prevent formation
of condensate on the external parts of the appliance.
White streaking on frozen meats - The temperature is too low or you have not heeded the
expiry dates indicated on the freezing chart.
Part-freezing - Normally, products containing lots of sugar, fats and alcohol such as
ice-creams or juices, do not freeze completely and remain partially soft.
Water droplets on the external walls of the appliance - During the Spring and Autumn
seasons, when the house heating is turned off, it may happen that the external walls of the
appliance show some water droplets (condensate). This phenomenon does not interfere with
the good functioning of the appliance and is not dangerous to people.
Frost build up inside - The door is not properly shut. You have opened the door too often.
The door opens with difficulty - It is normal for the door to offer some resistance to
opening after being closed. This is to ensure a perfect seal of the doors. Wait a few minutes
before opening once again.
17
MINOR BREAKDOWNS AND
ANOMALIES
Fresh meat
We advise you to thaw the meat completely before cooking it to avoid meat from cooking
quicker on the outside than on the inside, with the exception of schnitzels that can be put
directly to cook with a low/medium flame and for boiled meats.
Poultry
They must be plucked, skinned and the innards removed, cut into pieces, washed and dried.
Feathered game
They must be plucked, skinned and the innards removed, cut into pieces, washed and dried.
Fish
Cooked food
N.B. The time limit of preservation of cooked food is reduced if you use fat bacon or lard as sauces.
Put directly onto the flame or into the oven without thawing.
PRODUCT TIME LIMIT
Small cuts of lamb 6 months
Roasted pig 5 months
Pork chops 4 months
Boiled beef, roast beef 10 months
Beef steaks, ribs, stew
8 months
Roast veal
Veal steaks, choice veal cuts 10 months
Minced meat 4 months
Giblets 3 months
Sausages 2 months
PRODUCT TIME LIMIT
Duck 4 months
Rabbit 6 months
Chicken for broth 7 months
Goose 4 months
Chicken 10 months
Turkey 6 months
Giblets 3 months
PRODUCT TIME LIMIT
Wild duck
8 monthsWoodcock
Pheasant
Hare 6 months
Partridge
8 months
Quail
PRODUCT TIME LIMIT PREPARATION
Carp
2 months Remove scales, gut and clean fish, remove head, wash, dry and freeze
Pike
Rhomb
Salmon
Mackerel
Tench
Trout
Gilthead
3 months
Remove scales, gut and clean fish, remove head, wash, immerse in cold salt water
for 30 seconds, dry and freeze
Sole
PRODUCT TIME LIMIT COOKING PREPARATIONS
Meat stew sauce
3 months
Not fully cooked
Tomato sauce Fully cooked
Vegetable soup 2 months Without pasta
Lasagne 4 months Not fully cooked
Roast 2 months Fully cooked
Osso buco (Marrow-bone) 1 month
Not fully cooked
Meat stews 3 months
Game in salmi
2 months
Fully cooked
Boiled fish
Baked fish
Pepperoni, eggplant (aubergines), Meat-stuffed
baby marrows
Not fully cooked
Boiled spinach
Pizza 6 months Fully cooked
18
Freezing tables
It is advisable to steam cook the vegetables so as not to loose the vitamins and minerals into
the water. Therefore there is no need to wait for them to dry before freezing them, but allow
them to cool first.
Generally, the vegetables are better if they are cooked directly without thawing. Reduce the
cooking times bearing in mind the boiling effected before freezing.
Fruit must be covered with sugar or syrup according to the cases. The quantity of sugar to
use in order to preserve it is about 250 gr. per kg of fruit. Syrups are to be used in different
percentages and they are prepared by boiling water with some sugar already melted in it.
The various concentration are:
30% solution, 450 gr. of sugar for every litre of water
40% solution, 650 gr. of sugar for every litre of water
50% solution, 800 gr. of sugar for every litre of water
To maintain the colour of the fruit unaltered, dip it into some lemon juice before covering it with
sugar, or otherwise add some lemon juice to the syrup. Fruit to be freezed needs an hour in the
fridge for setting before being placed into the freezer. The syrup must cover the fruit completely.
To be preserved for 2 months. Defreeze the bread in the oven at 50 C having put it in be-
fore switching the oven on.
Before freezing butter and cheese, cut them into pieces for weekly consumption. Butter is
preserved for 8 months and so is hard cheese (parmesan). Other types of cheese need 4
months. defreezing must be done in the fridge being careful about the condensation which
logically forms on these products.
Asparagus 12 months Wash, remove hard parts 2 minutes
Cabbage, cauliflower 6 months Wash, cut into pieces 2 minutes
(1)
Artichokes
12 months
Remove external leaves 6 minutes (1)
Beans Shell 3 minutes
French beans Wash, remove stalk 4 minutes
Mushrooms Wash 2 minutes
(1)
Eggplants Wash, slice 4 minutes (2)
Pepperonies (3) Wash, slice, remove pips
Do not boil
Peas, tomatoes (3)
Shell, freeze, immediately placing them on one layer
only, pack them
Parsley, basil 8 months
Wash
Spinach
12 months
2 minutes
Mixed vegetables ready for
soup (Celery, carrots,
beetroot, leaks, etc.)
Wash, cut into pieces, divide into portions, do not
put potatoes as they turn black
Do not boil
(1) Put a bit of vinegar or lemon in the cooking water.
(2) Salt well before cooking.
(3) The vegetables become mushy during the thawing, owing to the high content of water in them. We advise freezing only if you
intend consuming the cooked products.
Apricots 8 months Wash, stone, 40% syrup
Pineapple
10 months
Peel, slice, 50% syrup
Oranges Peel, slice, 30% syrup
Cherries Wash, stone, cover with sugar or with 30% syrup
Strawberries
12 months
Wash, remove stalks and cover with sugar
Melons Peel, slice, remove pips and cover with 30% syrup
Peaches 8 months Peel, stone, slice and cover with 50% syrup
Grapefruit 12 months Peel, slice, 30% syrup
Citrus juice 10 months Squeeze, remove pips, sugar according to taste
Plums
12 months
Peel, stone, cover with sugar or with 50% syrup
Grapes Separate the grapes from the stalk, wash, cover with sugar or with 30% syrup
Whortleberries, blackberries
red, black current goose
berries, raspberries
10 months Wash, remove stalks, cover with sugar
19
174.5896.0
  • Page 1 1
  • Page 2 2
  • Page 3 3
  • Page 4 4
  • Page 5 5
  • Page 6 6
  • Page 7 7
  • Page 8 8
  • Page 9 9
  • Page 10 10
  • Page 11 11

Brandt UD2202 Owner's manual

Category
Fridge-freezers
Type
Owner's manual
This manual is also suitable for

Brandt UD2202 is a frost-free upright freezer that offers convenient food preservation and freezing. Its adjustable feet and reversible door provide flexible installation options, while the electronic control board ensures precise temperature management. The appliance also features energy-saving capabilities and ample storage space with drawers and flaps for organized food storage.

Ask a question and I''ll find the answer in the document

Finding information in a document is now easier with AI