87
Using Other Functions
The LP-180 allows you to play back demo songs or adjust various functions by pressing a specic key
while also pressing and holding down the PIANO PLAY and SOUND buons. Please refer to the “MIDI”
section on the next page for more information on MIDI channels and program change messages.
While pressing and holding down the PIANO PLAY and SOUND buons, do not play the key-
board. Otherwise, you might get an unexpected result.
For information on the functions that are assigned to the keys, please refer to “Key Functions”
on
pages 7 and 8
.
About the conrmation sound
When you press a key to adjust seings for a function, you will hear the conrmation sound. To turn
this sound o, simultaneously press and hold down the PIANO PLAY and SOUND buons and press
the A
#
0 key. To turn on the conrmation sound, repeat the previous procedure but press B0 instead of
A
#
0. The conrmation sound is set to On by default (when you turn the unit on).
Playing Back Songs
The LP-180 features 10 songs that use 10 preset sounds.
While pressing and holding down the PIANO PLAY and
SOUND buons, press one of the keys ranging from C6 to
A6 (on the right side of the keyboard). The song assigned to
the key that you pressed (as shown below) will start play-
ing. Playback starts from the selected song, then continues
and repeats all songs in ascending order until you stop
playback.
1
2
479
3568
10
To stop playback, press the PIANO PLAY and SOUND but-
tons simultaneously.
During playback of a song, you can switch the sound
using the PIANO PLAY and SOUND buttons while
playing the keyboard. The effect setting of the song
will also be applied to the sound.
Even if you change the sound during playback of a
song, the corresponding MIDI data (such as MIDI Pro-
gram Change messages) will not be output.
Song name
1 (Piano 1): Un Sospiro /F.Liszt
2 (Piano 2): Amazing Grace/Hymn (arr. : N.Nishi)
3 (E. Piano 1): Ramble/M.Sakaguchi
4 (E. Piano 2): KORG Orignal
5 (Harpsichord): Invention No.8/J.S.Bach
6 (Clavichord): KORG Orignal
7 (Vibraphone): KORG Orignal
8 (P. Organ): Toccata in D moll/J.S.Bach
9 (E. Organ): KORG Orignal
10 (Strings): First Snow/M.Sakaguchi
Effects (Reverb and Chorus)
You can use a reverb eect to add depth to the sound, and a
chorus eect to add width and space.
•
Simultaneously press and hold down the PIANO PLAY
and SOUND buons, and then press the A5 key to turn on
the reverb eect. To turn o the reverb eect, repeat the
previous procedure but press the G
#
5 key instead of A5.
•
Simultaneously press and hold down the PIANO PLAY
and SOUND buons, and then press the B5 key to turn on
the chorus eect. To turn o the chorus eect, repeat the
previous procedure but press the A
#
5 key instead of B5.
You can apply eects to each preset sound.
When you turn on the power to the unit, the eects will use
the optimum seings for each preset sound.
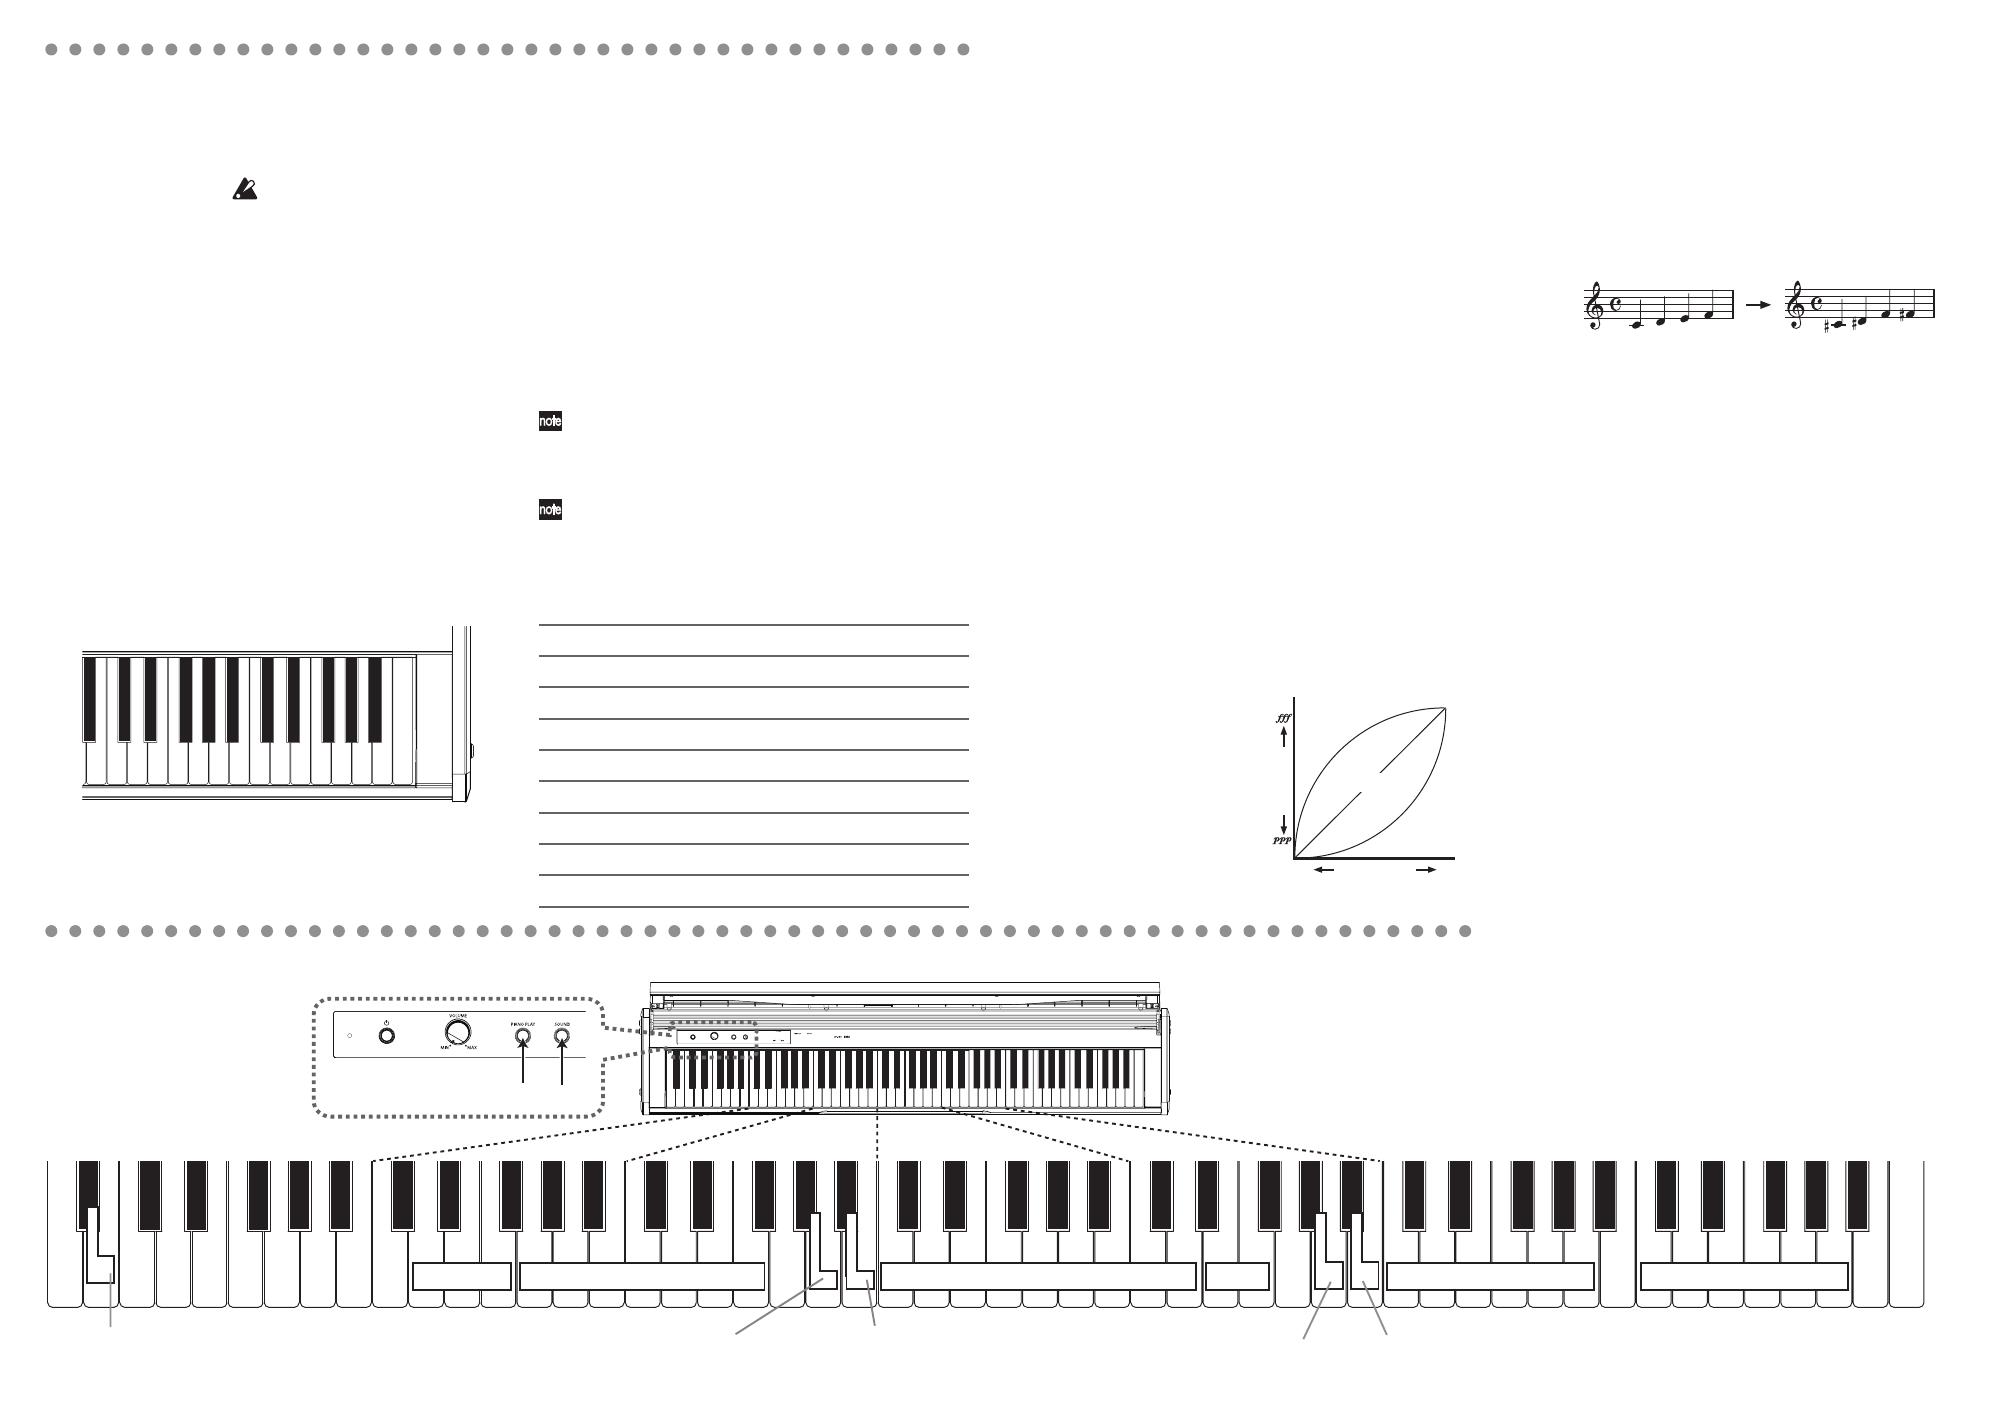
Key Touch Control function
The Key Touch Control function enables you to change the
way that your playing strength will aect the output level.
You can set this function by using the white keys in a range
from D2 to F2. (See the gure on the left.)
• To play fortissimo with soft strokes (Light touch), press
and hold down the PIANO PLAY and SOUND buons ,
and then press the D2 key.
• To play fortissimo with very strong strokes (Heavy
touch), press and hold down the PIANO PLAY and
SOUND buons, and then press the F2 key.
• To simulate a normal piano touch (Standard touch), press
and hold down the PIANO PLAY and SOUND buons,
and then press the E2 key.
The default setting (when
you t urn on the unit) is
Standard touch.
Transpose function (Shifting the key)
In some cases, a song may be wrien in a dicult key (e.g.,
using many black keys), or you may wish to shift the key
to match another instrument or vocalist. In such cases, you
can transpose (shift the key) to use an easier ngering, or
to use the same familiar ngering to play in a dierent key.
This is called the Transpose function. You can shift the key
in a range of eleven semitones.
For example if you transpose upward by one semitone,
playing the notes shown in the score on the left below will
produce the pitch that’s shown in the score on the right.
• To transpose the key, press and hold down the PIANO
PLAY and SOUND buons, and then press a key from
F
#
2 to B3 or from C
#
3 to F3. The name of the key that you
pressed will become the transposed key.
For example, if you wish to use the C3 key to play note
A2 (lower by three semitones), press and hold down the
PIANO PLAY and SOUND buons, and press the A2 key. If
you wish to use the C3 key to play note D
#
3 (higher by three
semitones), press and hold down the PIANO PLAY and
SOUND buons, and press the D
#
3 key.
To reset the Transpose function to “No Transposition (+/-0),”
press and hold down the PIANO PLAY and SOUND but-
tons, and then press the C3 key.
The default setting (when you turn on the unit) is “No
Transposition.”
Pitch Control function (Tuning)
When you’re playing together with other instruments, you
can use this the Pitch Control function to x any slight dif-
ferences in pitch between instruments. You can adjust the
tuning of the LP-180 in half-step (0.5) Hz intervals over a
range of 427.5–452.5 Hz (Her) by using the E5 and F5 keys.
•
Press and hold down the PIANO PLAY and SOUND but-
tons, then press the E5 key to lower the pitch in 0.5Hz steps
each time your press it, or press the F5 key repeatedly to
raise the pitch in 0.5Hz steps each time you press it.
• To reset the pitch to 440Hz, press and hold down the
PIANO PLAY and SOUND buons, and press the E5 and
F5 keys simultaneously.
The default sett ing (when you turn on the unit) is
A4=440Hz.
Loudness
Quiet
Playing
strength
Light
Standard
Heavy
Key Functions
[ ]* indicates MIDI Note number.
C1[24]*C2[36]*C3[48]*C4[60]* C7[96]*
C8[108]
C5[72]* C6[84]*
EBF
AG
F
G
A
C
D
2
4
5
7
9
10
12
14 16
16
86
11
13
15
31
2
4
5
7
9
10
8631
DIS
DIS
ENA
ENA
DC
D2
E2 F2
A3 B3
G
3A
3
A
0
B0
G
5A
5
E5 F5 A5 B5
Down
Up
Reverb On/Off
Chorus On/Off
Enabling/Disabling
Program Change transmission
Enabling/Disabling
Control Change transmission
Preset Sounds (C7–A7)
Demo Songs (C6–A6)
Key Touch
Std.
Transpose (F
2–F3)
Light
Heavy
Pitch
Off
Off
On
On
Piano 1
E. Piano 1
Vibraphone
P. Organ
E. Organ
Strings
Piano 2
E. Piano 2
Off
On
Press and hold simultaneously
Confirmation sound On/Off
MIDI Channel (C4–D
5)
Clavichord
Harpsichord