
101 91 34-95
Rider Pro 15
Operator´s manual
Please read these instructions carefully and make sure
you understand them before using the machine.

English – 1
Operator’s Manual for
Rider Pro 15
CONTENTS
IMPORTANT INFORMATION
Read through these instructions carefully so that you know how to use and maintain the
machine before using it.
For servicing other than described in this manual contact an authorised dealer for parts and
service.
Safety instructions..............................................2
Safety rules for USA ........................................2
Introduction .........................................................4
Driving and transport on public roads ..............4
Towing..............................................................4
Use...................................................................4
Serial number...................................................5
Explanation of symbols......................................6
Safety instructions..............................................7
General use .....................................................7
Driving on slopes .............................................8
Children............................................................9
Maintenance ....................................................9
Presentation ...................................................... 11
Location of the controls.................................. 11
Throttle control ...............................................12
Choke lever....................................................12
Speed limiter ..................................................12
Cutting unit.....................................................13
Lift lever for cutting unit..................................13
Lever for adjustment of cutting height............14
Parking brake.................................................14
Seat................................................................14
Fuelling ..........................................................14
Driving................................................................15
Before starting................................................15
Starting the engine.........................................15
Driving the machine .......................................16
Cutting tips .....................................................17
Stopping the engine .......................................18
Disengage lever .............................................18
Maintenance ......................................................19
Maintenance schedule ...................................19
Removing of the machine hoods ...................21
Checking and adjusting the steering wires ....22
Adjusting the brakes ......................................23
Checking and adjustment of throttle wire.......23
Checking and adjusting the choke wire .........23
Replacement of fuel filter ...............................24
Checking the fuel pump’s air filter..................24
Replacing the air filter ....................................25
Checking the transmission’s air intake...........26
Checking the engine’s cooling air intake........26
Muffler air intake.............................................26
Check the level of the battery acid.................27
Check the safety system................................28
Checking the tyre pressure ............................29
Fitting the cutting unit.....................................30
Installing BioClip 90 .......................................31
Checking and adjustment of the cutting
unit´s ground pressure ...................................31
Checking the cutting unit´s parallelism ..........32
Adjusting the parallelism of the cutting unit....32
Removing the cutting unit ..............................33
Removing the belts ........................................33
Replacing the cutting unit’s belts....................34
Service position for the cutting unit ................36
Checking the blades ......................................39
Replacing the break-pin (BioClip) ..................40
Lubrication.........................................................41
Lubrication chart ............................................41
General lubrication.........................................42
Lubricating wires ............................................42
Lubrication instructions according to chart.....42
Trouble shooting schedule ..............................48
Storage...............................................................49
Winter storage................................................49
Service ...........................................................49
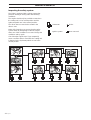
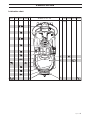
Wiring diagram ..................................................50
Technical data ...................................................51
Servicejournal ...................................................53

2 – English
SAFETY INSTRUCTIONS
1. Safety rules for USA
Safe operation practices for ride-on mowers
IMPORTANT!
This cutting machine is capable of amputating hands and feet and throwing objects. Failure to ob-
serve the following safety instructions could result in serious injury or death.
I. General operation
1. Read, understand and follow all instructions in
the manual and on the machine before start-
ing.
2. Only allow responsible adults, who are familiar
with the instructions, to operate the machine.
3. Clear the area of objects such as rocks, toys,
wire, etc., which could be picked up and
thrown by the blade.
4. Be sure the area is clear of other people
before mowing. Stop the machine if anyone
enters the area.
5. Never carry passengers.
6. Do not mow in reverse unless absolutely
necessary. Always look down and behind
before and while backing.
7. Be aware of the mower discharge direction
and do not point it at anyone. Do not operate
the mower without either the entire grass
catcher or the guard in place.
8. Slow down before turning.
9. Never leave a running machine unattended.
Always turn off blades, set parking brake, stop
engine and remove keys before dismounting.
10. Turn off blades when not mowing.
11. Stop engine before removing grass catcher or
unclogging chute.
12. Mow only in daylight or good artificial light.
13. Do not operate the machine while under the
influence of alcohol or drugs.
14. Watch for traffic when operating near or
crossing roadways.
15. Use extra care when loading or unloading the
machine into a trailer or truck.
II. Slope operation
Slopes are a major factor related to loss-of-control
and tip-over accidents, which can result in severe
injury or death.
All
slopes require extra caution. If
you cannot back up the slope or if you feel uneasy
on it, do not mow it.
DO
Mow up and down slopes, not across.
Remove obstacles such as rocks, tree limbs,
etc.
Watch for holes, ruts or bumps. Uneven terrain
could overturn the machine.
Tall grass can
hide obstacles.
Use slow speed. Choose a low gear so that
you will not have to stop or shift while on the
slope.
Follow the manufacturer’s recommendations
for wheel weights or counterweights to improve
stability.
Use extra care with grass catchers or other
attachments. These can change the stability of
the machine.
Keep all movement on the slopes
slow
and
gradual.
Do not make sudden changes in
speed or direction.
Avoid starting or stopping on a slope. If tires
lose traction, disengage the blades and pro-
ceed slowly
straight
down the slope.
DO NOT
Do not turn on slopes unless necessary and
then, turn slowly and gradually downhill, if
possible.
Do not mow near drop-offs, ditches or
embandments. The mower could suddenly turn
over if a wheel is over the edge of a cliff or
ditch, or if an edge caves in.
Do not mow on wet grass. Reduced traction
could cause sliding.
Do not try to stabilize the machine by putting
your foot on the ground.
Do not use grass catcher on steep slopes.
III. Children
Tragic accidents can occur if the operator is not
alert to the presence of children. Children are often
attracted to the machine and the mowing activity.
Never
assume that children will remain where you
last saw them.
1. Keep children out of the mowing area and
under the watchful care of another responsible
adult.
2. Be alert and turn machine off if children enter
the area.
3. Before and when backing, look behind and
down
for small children.
4. Never carry children. They may fall off and be
seriously injured or interfere with safe machine
operation.
5. Never allow children to operate the machine.
6. Use extra care when approaching blind cor-
ners, shrubs, trees or other objects that may
obscure vision.

English – 3
SAFETY INSTRUCTIONS
IV. Service
1. Use extra care in handling gasoline and other
fuels. They are flammable and vapours are
explosive.
a) Use only an approved container.
b) Never remove gas cap or add fuel with the
engine running. Allow engine to cool before
refuelling. Do not smoke.
c) Never refuel the machine indoors.
d) Never store the machine or fuel container
inside where there is an open flame, such as
in a water heater.
2. Never run a machine inside a closed area.
3. Keep nuts and bolts, especially blade attach-
ment bolts, tight and keep equipment in good
condition.
4. Never tamper with safety devices. Check their
proper operation regularly.
5. Keep machine free of grass, leaves or other
debris build-up. Clean up oil or fuel spillage.
Allow machine to cool before storing.
6. Stop and inspect the equipment if you strike an
object. Repair, if necessary, before restarting.
7. Never make adjustments or repairs with the
engine running.
8. Grass catcher components are subject to wear,
damage and deterioration, which could expose
moving parts or allow objects to be thrown.
Frequently check components and replace with
manufacturer’s recommended parts, when
necessary.
9. Mower blades are sharp and can cut. Wrap the
blade(s) or wear gloves and use extra caution
when servicing them.
10. Check brake operation frequently. Adjust and
service as required.
Danger, keep hands and feet
away
Travel and transport on public roads
Check the relevant road traffic regulations before
driving the machine on a public road. If transporting
the machine on another vehicle always use ap-
proved securing devices and make sure that the
machine is securely held.
Towing
If your machine has a hydrostatic transmission you
should only tow it very short distances at low speed
if absolutely necessary, otherwise the transmission
may be damaged.
Intended use
This machine is designed solely for cutting grass
on conventional lawns and other cleared and
leveled ground without obstacles, as rocks, stumps
etc., and, in conjunction with accessories supplied
by the manufacturer even for other special tasks
for which instructions are delivered with the acces-
sory. Use in any other way is considered as con-
trary to the intended use. Compliance with and
strict adherence to the conditions of operation,
service and repair as specified by the manufacturer
also constitute essential elements of the intended
use.
This machine should be operated, serviced and
repaired only by persons who are familiar with its
particular characteristics and who are acquainted
with the relevant safety procedures.
Accident prevention regulations, all other generally
recognised regulations on safety and occupational
medicine, and all road traffic regulations must be
observed at all times.
Any arbitrary modifications carried out to this
machine may relieve the manufacturer of liability
for any resulting damage or injury.
Safe operation practices for Ride-On Mowers
Before starting cutting operations, train different
driving operations on an open ground without
people nearby until you feel familiar with handling
the equipment. This is particularly important if you
have no or little prior experience of driving a vehi-
cle.
Data indicates that operators, age 60 years and
above, are involved in a large percentage of riding
mower-related injuries. These operators should
evaluate their ability to operate the riding mower
safely in order to protect themselves and others
from serious injury.
Never carry children, even with the blades off. They
may fall off and be seriously injured or interfere with
safe machine operation.

4 – English
INSTRUCTION
Dear customer
Thank you for choosing a Husqvarna Rider. Husqvarna Riders are built to a unique design with a front-
mounted cutting unit and a patented rear-wheel steering system. Riders are designed for maximum efficiency
even in small or confined areas. The closely grouped controls and pedal-operated hydrostatic transmission
also contribute to the performance of this machine.
We hope you will find this operator’s manual very useful. By following its instructions (on operation, service,
maintenance, etc.) you will significantly extend the life of the machine and even its second-hand value.
When you sell your Rider, make sure you pass on the operator’s manual to the new owner. The last chapter
in the operator’s manual consists of a Service Journal. Make sure that all service work and repairs are
recorded. A well-documented service history reduces the costs of seasonal maintenance and influences the
second-hand value of the machine. Remember to take along the operator’s manual when you take the Rider
to the workshop for servicing.
Driving and transport on public roads
Check the relevant road traffic regulations before driving the machine on a public road. If transporting the
machine on another vehicle always use approved securing devices and make sure that the machine is
securely held.
Towing
When your machine is equipped with a hydrostatic transmission you should, if necessary, only tow the
machine over short distances and at a low speed, otherwise there is a risk of damaging the transmission.
Intended use
This machine is designed solely for cutting grass on conventional lawns and other cleared and leveled
ground without obstacles, as rocks, stumps etc., and, in conjunction with accessories supplied by the
manufacturer even for other special tasks for which instructions are delivered with the accessory. Use in any
other way is considered as contrary to the intended use. Compliance with and strict adherence to the
conditions of operation, service and repair as specified by the manufacturer also constitute essential
elements of the intended use.
This machine should be operated, serviced and repaired only by persons who are familiar with its particular
characteristics and who are acquainted with the relevant safety procedures.
Accident prevention regulations, all other generally recognised regulations on safety and occupational
medicine, and all road traffic regulations must be observed at all times.
Any arbitrary modifications carried out to this machine may relieve the manufacturer of liability for any
resulting damage or injury

English – 5
SAFETY INSTRUCTIONS
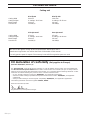
Good service
Husqvarna products are sold all over the world and only through servicing dealers. This is to ensure that you,
the customer, get the best support and service. For example, before this machine was delivered it was
inspected and adjusted by your dealer. See the certificate in the Service Journal in this manual.
When you need spare parts or advice on service issues, warranty terms, etc., contact:
This Operator’s Manual belongs to
machine with serial number:
Serial number
The serial number can be found on the printed plate attached to the front, left-hand side under the seat.
Stated on the plate, from the top are:
• The machines type designation.
• The manufacturer’s type number.
• The machine’s serial number.
State the type designation and serial number when ordering spare parts.
The engine serial number is given on a bar code decal. This is located on the left side of the crankcase, in
front of the starter motor. The sign states
• The engine serial number (E/NO).
• Code.
Please quote these when ordering parts.
The transmission’s serial number is stated on the barcode decal located on the front of the housing on the
left-hand drive axle:
• Type designation is stated above the barcode and starts with the letter “K”.
• The serial number is stated above the barcode and has the prefix “s/n”.
• The manufacturer’s type number is stated under the barcode and has the prefix “p/n”.
State the type designation and serial number when ordering spare parts.
Engine Transmission

6 – English
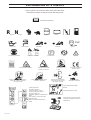
These symbols are on the machine and in the instructions.
Study them carefully so that you know what they mean.
Read the instructions.
Reverse Neutral Fast Slow Engine off Battery Choke Fuel
Oil pressure Cutting height Backwards Forwards Ignition
Use hearing protection Hydrostatic freewheel Parking brake Brake Warning
Speed limiter pedal forwards
Neutral
Speed limiter pedal reverse
Keep hands and feet away
from under the hood when
the engine is running
Switch off the engine and take off
the ignition cable before repairs or
maintenance
N
R
EXPLANATION OF SYMBOLS
Never carry passengers on the
machine or equipment
Never use the machine if persons,
especially children, or animals,
are in the vicinity
Drive very slowly
without the cutting unit
European standard for
machine safety
Never drive across
a slope
Warning! Risk that the
machine can tip over
Warning! Rotating blades
Starting instructions
Read the instructions
Check the engine’s oil level
Check the hydrostat’s oil level
Lift up the cutting unit
Hydrostatic pedals in neutral position
Brake
If the engine is cold use the choke
Start the engine
Release the parking brake before
driving
Sound level

English – 7
These instructions are for your safety. Read them carefully.
SAFETY INSTRUCTIONS
This symbol implies that important safety rules are applicable. This is for your safety
and the operating reliability of the machine.
Read the instructions before starting the machine.
Clear the area from stones etc. before cutting.
Never carry passengers.
General use:
• Make yourself familiar with the controls and how
to stop quickly.
• Read all the instructions in Operator’s Manual
and on the machine before starting it. Make sure
you understand them, and then follow them.
• Only allow adults who are familiar with the
machine to use it.
• Wear approved safety glasses or a visor during
assembly and driving.
• Never use the machine barefoot. Always wear
heavy-duty shoes, preferably toe-capped.
• Never wear loose fitting clothes which can
fasten in moving parting.
• Clear the area of objects such as stones, toys,
and wires, etc. which can be caught up by the
blades and thrown out.
• Check that there are no other persons in the
area before starting to cut.
• Stop the machine if anyone comes into the work
area.
• Never carry passengers.
• Do not cut backwards unless absolutely neces-
sary.
• Always look down and behind before and during
reversing.
• Keep an eye on the ejected grass and do not
direct it towards anyone.
• Slow down before turning.
• Never leave the machine unattended when the
engine is running. Always switch off the blades,
pull on the parking brake, stop the engine and
take out the keys before leaving the machine.
• Switch off the blades when you are not cutting.
• Only cut in daylight or good artificial lighting.
• Never use the machine when you have con-
sumed alcohol, drugs, or certain medicines.
WARNING!
This machine can cut off hands and feet, and eject objects. Failure to follow
the safety instructions can lead to severe injury.
R
I
D
E
R
9
7
0
RIDER
970
R
I
D
E
R
9
7
0
R
ID
E
R
8
5
0
RIDER
850
R
ID
E
R
8
5
0
RIDER 850
RIDER
850
RIDER 850
R
ID
E
R
8
5
0
RIDER
850
R
ID
E
R
8
5
0
RIDER 850
RIDER
850
RIDER 850

8 – English
• Watch out for traffic when working close to a
road, or crossing one.
• Be careful when rounding a fixed object so that
the blades do not hit it. Never drive intentionally
over a foreign object.
• The machine is heavy and can cause very
severe crush injuries. Be extra careful when
loading it on a trailer or truck.
• Be careful when pulling a load or using heavy
equipment.
a. Only use approved tow hooks.
b. Limit the load to what you can manage safely.
c. Do not make sharp turns. Be careful when
reversing.
d. Use counterweights or wheel weights when
indicated in the instructions.
Driving on slopes
Driving on slopes is one of the situations where
there is the most serious risk that the driver can
loose control or that the machine tips over, which
can cause severe injuries or be fatal. All slopes
require extra care. If you cannot reverse up the
slope or if you feel uncertain avoid cutting it.
Do as follows:
• Remove obstacles such as stones and branches
etc.
• Cut upwards and downwards, not sideways.
• Look out for and avoid driving over furrows,
holes or mounds. On uneven surfaces it is
easier for the machine to tip over. High grass
can conceal obstacles.
• Drive slowly. Use small movement on the
hydrostat pedals.
• Follow the manufacturer’s recommendations on
wheel weights or counterweights to increase
stability.
• Be extra careful with the grass collector or other
equipment which can alter the stability of the
machine.
• Always drive smoothly and slowly on slopes.
Avoid sudden changes of speed or direction.
• Avoid starting or stopping on a slope. If the tyres
begin to skid switch off the blades and drive
slowly down the slope.
• Avoid unnecessary turns on slopes, and if
turning is necessary turn slowly and gradually,
downwards if possible.
SAFETY INSTRUCTIONS
Be extra careful when driving on slopes.
Cut slopes upwards and downwards, not sideways.
R
ID
E
R
850
RIDER
850
R
ID
E
R
850
R
I
D
E
R
8
5
0
RIDER
850
R
I
D
E
R
8
5
0
R
ID
E
R
850
RIDER
850
R
ID
E
R
850
R
I
D
E
R
8
5
0
RIDER
850
R
I
D
E
R
8
5
0
• Do not cut close to edges, ditches or banks. The
machine can suddenly tip over if a wheel goes
over the edge of a drop or a ditch, or if a bank
gives way.
• Do not cut wet grass. It is slippery and the tyres
can loose their grip so that the machine slides.
• Do not try to stabilise the machine by placing
one foot on the ground.
• The Rider lawn mower must never be driven
close to an edge or ditch when cleaning the
chassis.

English – 9
SAFETY INSTRUCTIONS
Keep children away from the mowing area.
Never allow children to drive the machine.
Never fill up with fuel indoors.
R
ID
E
R
9
7
0
RIDER
970
R
ID
E
R
9
7
0
R
ID
E
R
8
5
0
RIDER
850
R
I
D
E
R
8
5
0
RIDER 850
RIDER
850
RIDER 850
R
I
D
E
R
8
5
0
RIDER
850
R
I
D
E
R
8
5
0
RIDER 850
RIDER
850
RIDER 850
Children
Tragic accidents can occur if the driver does not
pay attention to children in the vicinity. Children are
often attracted to the machine and the work of
mowing. Never assume that children stay where
you last saw them.
• Keep children away from the mowing area and
under the close supervision of another adult.
• Be on your guard and switch off the machine if
children come into the work area.
• Before and during reversing look behind and
down for small children.
• Never allow children to ride on the machine.
They can fall off and become seriously injured or
obstruct an otherwise safe manoeuvre of the
machine.
• Never allow children to steer the machine.
• Be extra careful close to corners, bushes, trees
or other objects which obstruct your view.
Maintenance
• Petrol/gasoline and petrol/gasoline fumes are
toxic and highly inflammable. Be extra careful
when handling petrol.
a. Store the fuel in containers approved for this
purpose.
b. Never fill up the machine with fuel when the
engine is running. Let the engine cool before
filling up with fuel.
Do not smoke. Do not fill fuel in the vicinity of
sparks or naked flames.
c. Never fill up with fuel indoors.
d. If leakage has occurred in the fuel system the
engine must not be started until this is rectified.
e. Never store the machine or fuel containers
indoors if there are naked flames, such as in a
boiler room or where there is electrical equip-
ment which can emit sparks.
• Check the fuel level each time before using the
machine, and leave space for the fuel to expand
since the heat from the engine and hot sun can
cause the fuel to run over.
• Avoid overfilling. If fuel has been spilt on the
Rider wipe it up and wait until it has evaporated
before starting the engine. If petrol is spilt on
clothes, change them.
• Be extra careful when handling battery acid.
Spilling acid on the skin can cause severe burn
injuries. Rinse immediately with water. If acid
gets into the eyes this can cause blindness.
Contact a doctor.

10 – English
SAFETY INSTRUCTIONS
Never smoke in the vicinity of the battery or the
fuel.
Never drive the machine in an enclosed space.
Clean the machine regularly from grass, leaves and
other waste.
R
I
D
E
R
8
5
0
RIDER
850
R
ID
E
R
8
5
0
RIDER 850
R
ID
E
R
8
5
0
RIDER
850
R
ID
E
R
8
5
0
RIDER 850
R
I
D
E
R
9
7
0
RIDER
970
R
I
D
E
R
9
7
0
• Be careful with the maintenance of the battery.
Explosive gas is formed in the battery. Never
handle the battery when smoking or in the
vicinity of naked flames or sparks. Otherwise
the battery can explode and cause severe
injuries.
• Never drive the machine in an enclosed space.
The exhaust fumes contain carbon monoxide,
an odourless, toxic and fatal gas.
• Make sure that bolts and nuts, especially
attachment bolts for the blade units are properly
tightened and that the equipment is in good
order.
• Never alter the safety devices. Check regularly
that they function. The machine must not be
driven with defective or unmounted safety
devices.
• Do not alter the setting of the governor and do
not race the engine.
• Reduce the fire risk. Keep the machine clean
from grass, leaves and other refuse which
fastens in it. Allow the machine to cool before
placing it in the storage area.
• Stop and inspect the equipment if you drive over
an object. If necessary repair the machine
before starting.
• Never make adjustments with the engine
running.
• The parts on the grass collector can become
worn, damaged and aged, so that moving parts
are exposed or so that an object can be thrown
out. Check the parts regularly and if necessary
replace them with spare parts recommended by
the manufacturer.
• The machine is tested for safety and approved
only for equipment supplied or recommended by
the manufacturer.
• The blades are sharp and can cause cutting
injuries. Wrap over the blades or use protective
gloves when handling them.
• The BioClip cutting unit should only be used to
give high quality results on lawn surfaces that
you are familiar with. If the blades of the cutting
unit strike an obstacle this could change their
spacing and lead to expensive repairs.

English – 11
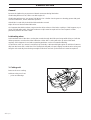
Presentation
Congratulations on choosing an excellent quality
product, Rider ProFlex. These instructions describe
the Rider Pro 15.
The Rider Pro 15 is equipped with a 15-horsepower
four-stroke V-twin Kawasaki engine.
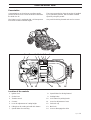
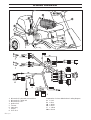
Location of the controls
1. Ignition lock
2. Choke lever
3. Throttle control
4. Counter
5. Lever for adjustment of cutting height
6. Lifting lever for cutting unit with lock button
7. Speed limiter for reversing
PRESENTATION
8. Speed limiter for driving forward
9. Parking brake
10. Lock button for parking brake
11. Lever for adjustment of seat
12. Fuel tank cap
13. Main lock
14. Lever to disengage the drive
The power transmission from the engine is handled
by a hydrostatic gearbox, which enables variable
speed by using the pedals.
One pedal for driving forward and one for reverse.
8
9
87 654321
91011 12 13 14

12 – English
Throttle control
The throttle control regulates the engine speed, and
thereby also the rotation speed of the blades.
To increase or reduce the engine speed the control
is moved forwards or backwards.
Choke lever
The choke lever is used for cold starting and to give
the engine a richer fuel mixture.
For cold starting the lever is moved backwards to
its end position.
Speed limiter
The speed of the machine is steplessly regulated
with two pedals. Pedal (1) is used to drive forwards,
and pedal (2) to reverse.
PRESENTATION
2
1
WARNING!
Make sure that branches do not
obstruct the pedals when mowing
under bushes, otherwise you may
lose control.

English – 13
Cutting unit
Rider Pro 15 can be equipped with numerous
attachments.
The BioClip unit finely cuts the lawn by cutting the
grass several times before returning the clippings to
the lawn as fertiliser.
Cutting unit with side ejection or rear ejection, i.e.
the cuttings are ejected from the side or rear of the
unit.
PRESENTATION
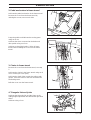
Lift lever for cutting unit
The lift lever is used to set the cutting unit in trans-
port or mowing position.
1. Pull back the lever to the locked position for
transport.
The cutting unit will lift up and the blades stop
rotating.
Lifting of the cutting unit
2. Press in the lock button and move the lever
forwards for the mowing position.
The unit will lower down and the blades start to
rotate.
3. The lever can also be used to temporarily
regulate the cutting height, e.g. for a small
mound in the lawn.
Lowering of the cutting unit

14 – English
PRESENTATION
WARNING!
Petrol is highly inflammable.
Exercise care and refuel outdoors
(see safety instructions).
Fuelling
The engine runs on unleaded petrol with a mini-
mum octane rating of 87 (not mixed with oil). We
recommend the use of Aspen biodegradable
alkylate petrol. Refer to the “Technical data” for
information on methanol and ethanol fuels.
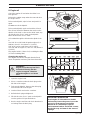
Seat
The seat has a jointed attachment on the front edge
and can be tipped forward.
The seat can also be adjusted lengthways.
To adjust move the lever under the front edge of the
seat to the left, so that the seat can be moved
forward or backwards to the required position.
Parking brake
The parking brake is applied as follows:
1. Push down the brake pedal (1).
2. Fully depress the lock button on the steering
column (2).
3. Release the brake pedal while holding the
button pressed.
The parking brake lock disengages automatically
when the brake pedal is pressed.
Lever for adjustment of the cutting
height
The cutting height can be adjusted to 9 different
positions with the cutting height lever.
Cutting unit with side/rear ejector, 40-90 mm.
BioClip cutting unit, 45-95 mm.
1
2

English – 15
Before starting
• Read the safety instructions and information on
the location and function of the controls before
starting (see pages 7–14).
• Conduct daily maintenance before starting (see
maintenance schedule on page 19-20).
• Adjust the seat to the required position.
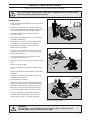
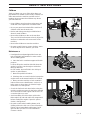
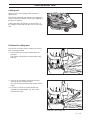
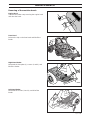
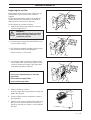
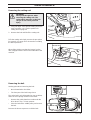
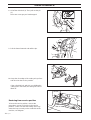
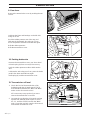
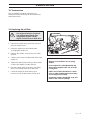
Starting the engine
1. Lift up the cutting unit by pulling the lever back-
wards to locked position (transport position) and
apply the parking brake.
DRIVING
4. Turn the ignition key to the start position.
3. If the engine is cold move the choke lever
backwards to its end position.
2. Move the throttle control to the middle position.

16 – English
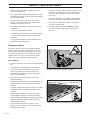
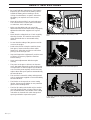
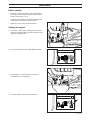
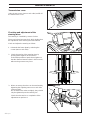
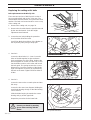
5. When the engine starts release the ignition key
immediately back to neutral position.
IMPORTANT INFORMATION
Do not run the starter for more than about
5 seconds at a time. If the engine does not
start, wait about 15 seconds before trying
again.
6. Push the choke lever gradually forward when
the engine has started.
7. Set the required engine speed with the throttle
control.
Let the engine run at moderate speed or half
throttle for 3-5 minutes before subjecting it to
heavy load.
DRIVING
WARNING!
Never run the engine indoors, in
enclosed or poorly ventilated
areas. The exhaust fumes con-
tain toxic carbon monoxide.
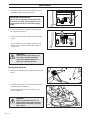
Driving the machine
1. Release the parking brake by pressing the brake
pedal.
2. Carefully press down one of the pedals until the
required speed is obtained.
To drive forward press down pedal (1), or to
reverse pedal (2).
2
1
WARNING!
Make sure that branches do not
obstruct the pedals when mowing
under bushes, otherwise you may
lose control.

English – 17
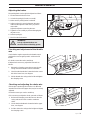
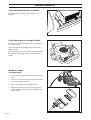
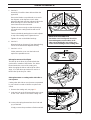
3. Push in the lock button on the lift lever and lower
down the cutting unit.
DRIVING
4. Select the required cutting height (1–9) with the
cutting height lever.
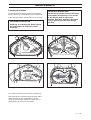
Mowing pattern
WARNING!
Clear the lawn from stones and
other objects which can be
thrown out by the blades.
Cutting tips
• Localise and mark stones and other fixed objects
to avoid collision.
• Start with a high cutting height and reduce down
until the required mowing results are obtained.
• The mowing results are best with a high engine
speed (fast rotating blades) and low driving
speed (slow moving machine). If the grass is not
too high and thick the driving speed can be
increased or the engine speed reduced without
noticeably affecting the mowing results.
• The best lawns are achieved if the grass is cut
often. Mowing becomes more uniform and the
grass cuttings become more evenly distributed
over the surface.
The total time consumption is not greater since it
is possible to select a higher driving speed
without inferior mowing results.
• Avoid mowing a wet lawn. The mowing results
are inferior since the wheels sink down into the
soft lawn.
• Hose down the cutting unit with water
underneath each time it is used. Put the cutting
unit in the service position first.
• If you use the BioClip unit it is important to mow
the grass regularly.

18 – English
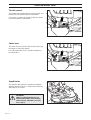
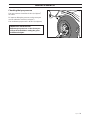
Stopping the engine
Preferably allow the engine to idle for a minute to
obtain normal working temperature before stopping
it if it has been working hard.
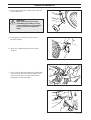
1. Lift up the cutting unit by pulling the lever back
to the locked position.
DRIVING
WARNING!
Never drive the machine on
ground at an angle of more than
15°. Mow slopes upwards and
downwards, never across. Avoid
sudden changes in direction.
MAX 15
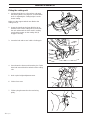
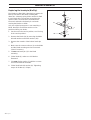
Release lever
The release control must be pulled out in order for
the Rider to be moved when the engine is shutoff.
The diagram shows the release lever in the out
position.
2. Move the throttle control to the MIN. position.
Turn the ignition key to the STOP.
3. When the Rider is at a standstill, press down the
parking brake and push in the locking button.

English – 19
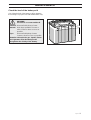
MAINTENANCE
Maintenance interval in
hours
Daily main-
tenance
before after
Weekly
3)
main-
tenance
At least
once a
year
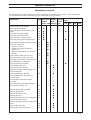
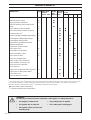
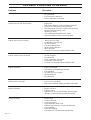
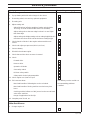
Maintenance schedule
The following is a list of the maintenance which should be conducted on the machine. For the items which
are not described in these instructions go to an authorised service workshop.
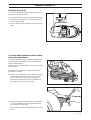
Check for fuel and oil leakage - ❍
Check the parking brake 23 ●
Check the engine oil level (when you
refuel) 45 ●●
Check the fuel pump air filter 24 ●
Check the seat safety switch 28 ●
Check the lift lever safety switch 28 ●
Check the parking brake safety switch 28 ●●
Check/clean the engine cooling air intake 26 ●
Check the cutting unit: 31 ●
• blades are secure 39 ●
• condition of blades (sharpness,
shape, etc.) 39 ●
• blade synchronisation (90° between
BioClip) 39 ●
Check steering wires (for play, etc.) 22 ●
Check fasteners (screws, nuts, etc.) - ❍
Start engine and blades, listen for noise - ❍
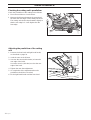
Clean underside of cutting unit 36 ●
Clean transmission air intake 26 ●●
Check battery acid level 27 ●
Check transmission oil level 46 ●
Check the condition of belts, pulleys, etc. - ❍
Check for damage - ❍
Check tyre pressures (60 kPa) 29 ●
Check for damage to wire guide at
articulated joint - ❍
Clean the area around the engine
thoroughly - ❍
Clean thoroughly around transmission - ❍
Clean all belts, pulleys, etc. 42 ●
Lubricate belt tensioner (nipple) 44 ●
Lubricate triangle link 43 ●
Lubricate the driver’s seat 44 ●
Lubricate all wires 42 ●
Lubricate bearing surfaces on cutting unit 42 ●
Clean inside frame tunnel - ❍
Lubricate pedal mechanism inside frame
tunnel 43 ●
Lubricate the gear lever 46 ●
Lubricate the parking brake wire 46 ●
25 50 100 300
PageMaintenance
Page is loading ...
Page is loading ...
Page is loading ...
Page is loading ...
Page is loading ...
Page is loading ...
Page is loading ...
Page is loading ...
Page is loading ...
Page is loading ...
Page is loading ...
Page is loading ...
Page is loading ...
Page is loading ...
Page is loading ...
Page is loading ...
Page is loading ...
Page is loading ...
Page is loading ...
Page is loading ...
Page is loading ...
Page is loading ...
Page is loading ...
Page is loading ...
Page is loading ...
Page is loading ...
Page is loading ...
Page is loading ...
Page is loading ...
Page is loading ...
Page is loading ...
Page is loading ...
Page is loading ...
Page is loading ...
Page is loading ...
Page is loading ...
Page is loading ...
Page is loading ...
Page is loading ...
Page is loading ...
Page is loading ...
Page is loading ...
Page is loading ...
-
 1
1
-
 2
2
-
 3
3
-
 4
4
-
 5
5
-
 6
6
-
 7
7
-
 8
8
-
 9
9
-
 10
10
-
 11
11
-
 12
12
-
 13
13
-
 14
14
-
 15
15
-
 16
16
-
 17
17
-
 18
18
-
 19
19
-
 20
20
-
 21
21
-
 22
22
-
 23
23
-
 24
24
-
 25
25
-
 26
26
-
 27
27
-
 28
28
-
 29
29
-
 30
30
-
 31
31
-
 32
32
-
 33
33
-
 34
34
-
 35
35
-
 36
36
-
 37
37
-
 38
38
-
 39
39
-
 40
40
-
 41
41
-
 42
42
-
 43
43
-
 44
44
-
 45
45
-
 46
46
-
 47
47
-
 48
48
-
 49
49
-
 50
50
-
 51
51
-
 52
52
-
 53
53
-
 54
54
-
 55
55
-
 56
56
-
 57
57
-
 58
58
-
 59
59
-
 60
60
-
 61
61
-
 62
62
-
 63
63


Ask a question and I''ll find the answer in the document
Finding information in a document is now easier with AI
Related papers
Other documents
-
Murray 7800336 Owner's manual
-
HTC Z4824 User manual
-
Poulan 968999302 User manual
-
-
Jonsered Front Rider FR13 User manual
-
Mountfield T35M Operating instructions
-
-
-
-