Page is loading ...

EPSON
®
LX-86
TM
PRINTER
User's Manual

FCC COMPLIANCE STATEMENT
FOR AMERICAN USERS
This equipment generates
and
uses radio frequency energy and if not installed and
used properly, that is, in strict accordance with the manufacturer’s instructions,
may cause interference to radio and television reception. It has been type tested and
found to comply with the limits for a Class B computing device in accordance with
the specifications in Subpart J of Part 15 of FCC rules, which are designed to
provide reasonable protection against such interference in a residential installation.
However, there is no guarantee that interference will not occur in a particular
installation. If this equipment does cause interference to radio or television
reception, which can be
determined by turning the equipment off and on, the user
is encouraged to try to correct the interference by one or more of the following
measures:
-Reorient the receiving antenna
-Relocate the printer with respect to the receiver
-Plug the printer into a different outlet so that printer and receiver are on
different branch circuits.
If necessary, the user should consult the dealer or an experienced radio/ television
technician for additional suggestions. The user may find the following booklet
prepared by the Federal Communications Commission helpful:
“How to Identify and Resolve Radio-TV Interference Problems. ”
This booklet is available from the U.S. Government Printing Office, Washington
DC
20402.
Stock No.
004-000-00345-4.
WARNING
The connection of a non-shielded printer interface cable to this printer will
invalidate the FCC Certification of this device and may cause interference levels
which exceed the limits established by the FCC for this equipment. If this
equipment has more than one interface connector, do not leave cables connected
to unused interfaces.
Apple is a registered trademark of Apple Computer, Inc.
Applesoft is a trademark of Apple Computer, Inc.
Centronics is a registered trademark of Centronics Data Computer
Corporation.
Epson is a registered trademark of Seiko Epson Corporation.
LX-80
is a trademark of Epson America, Inc.
IX-86 is a trademark of Epson America, Inc.
IBM is a registered trademark of International Business Machines
Corporation.
Microsoft is a trademark of Microsoft Corporation.
NOTICE:
l
All rights reserved. Reproduction of any part of this manual in any form
whatsoever without EPSON’s express written permission is forbidden.
l
The contents of this manual are subject to change without notice.
l
All efforts have been made to ensure the accuracy of the contents of this
manual. However, should any errors be detected, EPSON would greatly
appreciate being informed of them.
l
The above notwithstanding, EPSON can assume no responsibility for any
errors in this manual or their consequences.
© Copyright 1986 by SEIKO EPSON CORPORATION
Nagano, Japan

Contents
List
of Figures . . . . . . . . . . . . . . . . . . . . . . . . . , . . . . .
vii
List of Tables. . . . . . . . . . . . . . . . . . . . . . . . . . . . . . . .
Introduction
................................
1
LX-86 Features
..............................
1
About This Manual
..........................
2
1
Setting Up Your LX-86 Printer
.................
3
Printer Parts..
..............................
3
Printer Location
.............................
4
Paper Feed Knob Installation.
..................
4
Ribbon Installation
..........................
5
Ribbon Replacement
.........................
8
Paper Loading...............................
9
Control Panel
...............................
10
Lights
...................................
11
Buttons..................................
11
Test Pattern.
................................
12
Connecting the LX-86 to Your Computer
.........
13
First Printing Exercise
.........................
14
2
SelecType . . . . . . . . . . . .
. . . .
. . . *
SelecType Operation . . .
. . . .
. . . .
Turning SelecType on .
. . . .
. . . .
Selecting typestyles. . .
. . . . . . . .
SelecType exercise . . . .
. . . .
. . . .
SelecType Tips . . . . . . . .
. . . .
. . . .
......
......
......
......
......
......
. . .
. . .
. . .
. . .
. . .
3
Elements of Dot Matrix Printing
................
21
The Print Head
.............................
21
Bidirectional Printing.
........................
22
Changing Pitches
............................
22
NLQ Mode
.................................
24
4
Printer Control Codes
........................
27
ASCII Codes
................................
27
ESCape Code
...............................
28
Printer Codes
...............................
29
Embeddedcodes
..........................
30
Inserted codes.
............................
30
Programming Languages
......................
31
Viii
15
15
15
16
17
19
iii

5
IX-86 Features
......................
Demonstration Programs
..............
Pica Printing.
.......................
Changing Pitches
....................
Cancelling Codes
....................
Resetting the Printer
.................
Pitch Comparison.
...................
Near Letter Quality Mode
.............
.......
33
.......
33
.......
34
.......
35
.......
35
.......
36
.......
36
.......
37
6
Print Enhancements and Special Characters
.......
39
Bold Modes
................................
39
Emphasized mode
.........................
39
Master program
...........................
40
Double-strike
.............................
41
Double-width Mode.
.........................
42
Mode Combinations.
.........................
43
Italic Mode..
...............................
43
Underline Mode
.............................
44
Master Select.
...............................
45
Superscript and Subscript
.....................
47
Special Characters.
...........................
47
Epson character graphics set
..................
47
International characters
.....................
48
Graphics character set.
......................
51
7
Page Formatting
.............................
53
Margins
....................................
53
Justification with NIQ
........................
54
Skip Over Perforation
.........................
55
Line Spacing
................................
55
Paper-Out Sensor
............................
57
8
User-Defined Characters
......................
Defining Your Own Characters
.................
Designing Process.
...........................
First definition program.
....................
Running the program.
......................
Second definition program
..................
Running the program.
......................
Defining NLQ Characters.
.....................
NIQ grid
................................
First NLQ definition program
................
Second NLQ definition program
..............
59
60
61
62
63
64
65
65
68
69
iv

9
Introduction to Dot Graphics
..................
71
Dot Patterns
................................
72
Print Head
.................................
73
Graph&Mode ..............................
73
Pin Labels
..................................
74
First Graphics Program.
.......................
76
Multiple-Line Exercise
........................
76
Density Varieties.
............................
78
Reassigning Code
............................
79
Column Reservation Numbers
..................
79
WIDTH Statements
..........................
80
Design Your Own Graphics
....................
81
Graphics Programming Tips
...................
84
Semicolons and command placement
..........
84
String variables
............................
86
Graphics and low ASCII codes
................
87
Appendixes
A
B
C
D
E
LX-86 Characters
............................
A-l
Epson Character Graphics
.....................
A-3
Commands in Numerical Order
......
:
.........
Control Key Chart
...........................
B-l
B-4
Command S
ummary
.........................
c-1
Near Letter Quality
..........................
c-1
Character Width
............................
c-2
Print Enhancement
..........................
c-4
Mode and Character Set Selection
...............
C-6
Special Printer Features
.......................
c-9
Line Spacing ................................
c-11
Forms Control.
..............................
c-13
Page Format..
..............................
C-16
User-defied Characters
.......................
c-19
Dot Graphics
...............................
c-20
Miscellaneous Codes.
.........................
C-23
The DIP Switches
............................
Using the Optional Tractor Unit
................
Printer Location
.............................
Tractor Unit Installation
.......................
Loading Continuous Paper.
....................
D-l
E-l
E-l
E-2
E-4
V

F
Troubleshooting and Advanced Features
..........
Problem / Solution Summary
...................
Setting print styles
.........................
Tabbing
.................................
Graphics
.................................
Paper-out sensor
...........................
Beeper Error Warnings
........................
Data Dump Mode
...........................
Coding Solutions
............................
Solutions for Specific Systems
..................
Applesoft BASIC solutions.
..................
Apple II solutions.
.........................
IBM-PC solutions
..........................
G
Printer Maintenance.
........
.
................
Always
....................................
Now and Then
..............................
Rarely
.....................................
H
.........
Technical Specifications
Printing
.....................
Character size
...............
Characters per line
...........
Paper
........................
Printer.
......................
Dimensions and Weight.
........
Environment.
.................
Interface
.....................
I
The Parallel Interface
...........
Data Transfer Sequence
.........
Interface timing
.............
Signal relationships
..........
......
. . . . . .
H-l
......
. . . . , .
H-l
......
. . . . . .
H-l
......
. . . . . .
H-2
......
. . . . . . H-2
......
. . . . . *
H-2
......
. . . . . .
H-2
......
. . . . . *
H-3
......
. * . . . .
H-3
......
......
I-l
......
......
I-3
......
......
I-3
...... ......
I-3
F-l
Fl
F-l
Fl
Fl
F3
F-3
F-3
F5
F6
F6
F-6
F7
G-l
G-l
G-l
G-l
vi

List
of
Figures
l-l Printer parts
................................
l-2
Paper feed knob installation
...................
l-3
Ribbon cassette.
.............................
l-4 Print head assembly
..........................
l-5
Ribbon cassette installation
....................
l-6 Ribbon placement
...........................
l-7 IX-86 ready for paper loading
..................
l-8 Control panel
...............................
l-9
Test patterns
................................
l-10 Cable connection
............................
2-l Turning SelecType on . . . . . . . . . . . . . . . . . . . . . . . . .
16
3-l
A capital T
.................................
21
3-2
The three pitches of the LX-86
.................
23
3-3
IX-86 dot matrix characters
....................
24
6-l Emphasized and standard print.
........
.......
6-2
Double-strike and standard print.
.......
.......
6-3
Double-width and standard characters
...
.......
6-4
Italic and pica.
......................
.......
6-5
The underline mode
.................
.......
6-6 Special graphics characters
.............
.......
7-1
Standard line spacing. . . . . . . . . . . . . . . . . . . . . . . . .
56
8-l Grid for designing draft characters
..............
60
8-2
Correct and incorrect designs
...................
61
8-3
Design for character
..........................
62
8-4
Using the bottom eight rows
...................
63
8-5
Grid for NLQ characters
.......................
66
8-6
Data numbers for one column
..................
67
8-7
Arrow design and data numbers
................
68
9-l Pin labels
..................................
9-2
Calculating numbers for pin patterns
............
9-3
Designing in different densities
.................
9-4
Arrow design
...............................
9-5
First line of arrow figure
.......................
9-6
Result of incorrect program
....................
9-7
Pin patterns of incorrect program
...............
D-l DIP switch location
..........................
3
5
6
7
8
9
10
12
13
39
41
42
44
45
51
75
75
81
82
82
84
85
D-l
vii

E-l
E-2
E-3
E-4
E-5
E-6
E-7
E-8
I-l
2-l
5-1
6-1
6-2
6-3
9-l
D-l
D-2
I-l
I-2
Continuous paper with printer stand.
............
Continuous paper without stand
................
Tractor placement.
...........................
Paper separator and paper guide
................
Tractor release levers
..........................
Pin feed holder adjustment
....................
Open pin feed cover
..........................
Top of page position.
.........................
Parallel interface timing
.......................
List of Tables
SelecType modes
............................
Summary of LX-86 pitches.
....................
International characters in NLQ mode.
...........
International characters in draft mode.
...........
International characters in draft italic
............
Graphics modes
.............................
DIP switch functions
.........................
International DIP switch settings
................
Pins and signals
.............................
Signal interrelations
..........................
E-l
E-2
E-2
E-3
E-4
E-5
E-5
E-6
I-3
17
38
49
49
50
78
D-2
D-2
I-l, I-2
I-4
. . .
Vlll

Introduction
The Epson IX-86
printer combines low price with the high quality
and advanced features formerly available only on more expensive
printers.
LX-86 Features
In addition to the high performance and reliability you’ve come
to expect from Epson printers, the LX-86 offers:
l Draft mode for quick printing of ordinary work
l Near Letter Quality mode for top quality printing
l Selection of typestyles with the control panel
l Fast printing (120 characters per second in draft pica)
l A variety of print styles, including Roman, italic, six widths,
and two kinds of bold printing
l User-definable characters so you can create and print your own
symbols or characters
l High-resolution graphics for charts, diagrams, and illustrations
l Easy paper loading
l Ribbon cassette for quick and clean ribbon changing
l Epson Standard Character Graphics set, which includes char-
acter graphics that are used on IBM@ and compatible
computers as well as international characters used by IBM
software. These characters are shown below:
1

About This Manual
We’re not going to waste your time with unnecessary information,
but we won’t neglect anything you need to know about the Ix-86
and its many features.
You can read as much or as little of this manual as you wish. If you
have used printers before and have a specific program that you want
to use with the LX-86, a quick reading of the first chapter may be all
you need. If, on the other hand, you are new to computers and
printers, you will find this manual easy to follow and the LX-86 easy
to use. No matter what your background, if you want to learn about
and experiment with all the advanced features of the LX-86, the
information you need is here.
For a preview of what your LX-86 can do, look at the following
samples of a few of its typestyles.
*
NEAR LETTER QUALITY
NLQ standard
ABCDEFGHI.JKLMnopqrstuvwxyz
NLQ
emphasized
ABCDEFGHIJKLMnopqrstuvwxyz
*DRAFT MODE
Pica
ABCDEFGHIJKLMnopqrstuvwxyz
Elite
ABCDEFGHIJKLMnopqrstuvwxyz
Condensed
ABCDEFGHIJKLMnopqrstuvwxyz
Italic
ABCDEFGHIJKLMnopqrstuvwxyz
Underlined
ABCDEFGHIJKLMnopqrstuvwxyz
Emphasized double-width
2

Chapter
1
Setting Up Your LX-86 Printer
Setting up your LX-86 printer is a simple matter of attaching two
parts, putting in the ribbon and paper, and connecting the printer to
your computer.
This chapter will have you printing a test pattern within fifteen to
twenty minutes and doing more complicated work not long after.
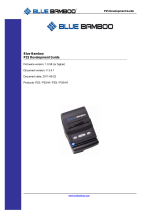
Printer Parts
First, see that you have all the parts you need. In addition to this
manual, the printer box should contain the items shown in Figure 1-l.
* In the United States, the printer is delivered with the power
cord attached.
Figure l-l. Printer parts
3

In addition to the items in the box, you need a cable and possibly
an interface board. The cable connects the printer to your computer,
and the interface board is necessary only for those computers that
can’t use the LX-86’s Centronics
®
paralle1 interface. Your computer
manual or your dealer will tell you which cable you need and whether
or not you need a special interface.
Printer Location
Now that you have unpacked your printer, you should choose a
suitable location for it. The main requirement, of course, is that the
printer be close enough to your computer for the cable to reach. Also
remember the following:
l Use a grounded outlet, and do not use an adapter plug.
l Avoid using electrical outlets that are controlled by wall switches.
Accidentally turning off a switch can wipe out valuable informa-
tion in your computer’s memory and disrupt your printing.
l Avoid using an outlet on the same circuit breaker with any large
electrical machines or appliances. These can cause disruptive pow-
er fluctuations.
l Keep your printer and computer away from base units for cordless
telephones.
l Protect the printer from direct sunlight, excessive heat, moisture,
and dust. Make sure that it is not close to a heater or other heat
source.
Paper Feed Knob Installation
Now that you have chosen where to set up your LX-86, the first
and simplest piece to install is the paper feed knob, which you use to
manually advance the paper-lust as you do on a typewriter. To
install the knob, merely push it onto the shaft found in the hole on the
right side of the printer. (See Figure l-2.) The shaft has one flat side
that must be matched with the flat side of the hole in the knob.
4

Figure 1-2. Paper feed knob installation
Ribbon Installation
The LX-86 printer uses a continuous-loop, inked fabric ribbon,
which is enclosed in a cassette that makes ribbon installation and
replacement a clean and easy job. The parts of this cassette are labelled
in Figure
l-3.
Ribbon
Knob
Pin
Pin
Figure
l-3.
Ribbon cassette
5

To install the ribbon, first open the lid at the front of the LX-86 so
that you can see the print head assembly shown in Figure
l-4.
Move
the assembly by hand to the center of the printer so that the other
parts of the printer will not get in your way. Also be sure that the
paper bail is against the black roller so it too will not be in your way.
Note: Moving the print head by hand when the printer is turned on
can harm the printer. Always be sure that the printer is turned
off before you move the print head.
Figure 1-4. Print bead assembly
6

Then hold the ribbon cassette so that the small knob is on top and
the exposed section of ribbon is away from you. Insert the cassette in
its holder by first sliding the pins at the back of the ribbon cassette
under the small hooks on the holder. (See Figure l-5.) Then lower the
front of the cassette so that the exposed section of ribbon can fit
between the print head nose and the silver ribbon guide. Push down
until the cassette fits firmly in place.
Figure 1-5. Ribbon cassette installation
7

Now turn the knob on the cassette in the direction of the arrow to
tighten the ribbon. As you turn the knob, see that the ribbon slips
down into its proper place between the print head nose and the silver
ribbon guide (Figure l-6). If it doesn’t, guide it with a pen or a pencil.
Figure l-6. Ribbon placement
Ribbon Replacement
When your printing begins to become light and you need to re-
place the ribbon, lift the front of the cassette to remove it and then
follow the above instructions with a new cassette. If you have been
using your printer just before you change cassettes, be aware that the
print head becomes hot during use. Be careful not to touch it. Also
remember never to move the print head by hand when the printer is
turned on.
8

Paper Loading
Now put a sheet of paper in your LX-86 so you can test it. Figure
l-7 shows the names of the parts
that you need to know.
Friction lever
Figure l-7. LX-86 ready for paper loading
9

See that the printer is turned off, open the front lid, and push the
friction lever back and the paper bail forward. Then move the print
head by hand to the center of the printer and feed the paper into the
paper slot in the top of the printer.
When the paper will not go any farther, turn the paper feed knob
to advance it as you would with a typewriter. Turn the knob until the
top of the paper is at least 3/4-inch above the ribbon guide. Then push
the paper bail against the paper. If the paper becomes crooked, pull
the friction-release lever forward, straighten the paper, and push the
friction lever back.
If you have the optional tractor unit for continuous pin-feed paper,
see Appendix E for instructions on its use.
Control Panel
Now that your paper is loaded, it is time to plug in the printer
and see what the buttons on the control panel do. First, see that
the power switch on the right side of the printer is off. Then plug
in the power cord. Now turn on the power switch and look at the
control panel.
Figure l-8. Control panel
10

There are three buttons and four indicator lights on the control panel.
Lights
l
The POWER light glows green when the power is on.
l
The READY light glows green when the printer is ready to accept data.
This light flickers somewhat during printing.
• The PAPER OUT light glows red to indicate that the printer is out of
paper or the paper is loaded incorrectly.
• The ON LINE light glows green when the printer can receive data.
Buttons
The buttons have several functions, including selecting draft or NLQ
(Near Letter Quality) printing. Draft is good for quick printing of
ordinary work, and NLQ has more fully-formed characters for final
copies or special purposes.
This is high-quality NLQ printing.
This is fast
draft
printing.
l
ON LINE/OFF LINE. This button switches the printer between
on-line and off-line status. When the printer is on line, the ON
LINE light glows and the printer is ready to accept data.
l FORM FEED/NLQ. When the printer is on line, pressing this
button turns on NLQ. When the printer is off line, this button
advances the paper to the top of the next page.
l LINE FEED/DRAFT. When the printer is on line, this button
turns on draft printing. When the printer is off line, this button
advances the paper one line at a time.
11

Test Pattern
Now you’ll see your Lx-86 print something even though it’s not
connected to a computer yet. Make sure that your printer has paper in it
and that the power switch is off. Now, hold down the LINE FEED button
on the control panel while you turn the printer on with the power switch.
The Lx-86 will begin printing all the letters, numbers and other
characters that are stored in its ROM (Read Only Memory) for the draft
mode. When the printing starts, you can release the LINE FEED button;
the printing will continue until you turn the printer off or until the print
head gets near the end of the page. To see the same test in the NLQ (Near
Letter Quality) mode, turn the printer on while holding down the
FORM FEED button. Partial results of both tests are shown in Figure 1-9.
<Draft>
123456789 : <=>
?@ABCDEFGHIJKLMNOPQRSTUVWXY
23456789:;<=>
?@ABCDEFGHIJKLMNOPQRSTUVWXYZ
3456789:;<=>
?@ABCDEFGHIJKLMNOPQRSTUVWXYZ[
456789:;<=>
?@ABCDEFGHIJKLMNOPQRSTUVWXYZ[\
56789:;<=>
?@ABCDEFGHIJKLMNOPQRSTUVWXYZ[\]
6789:'<=> ?@ABCDEFGHIJKLMNOPQRSTUVWXYZ[\]ˆ
789 : ;<=>
?@ABCDEFGHIJKLMNOPQRSTUVWXYZ[\]ˆ_
89:;<=>
?@ABCDEFGHIJKLMNOPQRSTUVWXYZ[\]ˆ_`
9 : ;<=>
?@ABCDEFGHIJKLMNOPQRSTUVWXYZ[\]ˆ_`a
: ; <=>
?@ABCDEFGHIJKLMNOPQRSTUVWXYZ[/]ˆ_`ab
;<=>?@ABCDEFGHIJKLMNOPQTRSTUVWXYZ[\]ˆ_’abc
<=>?@ABCDEFGHIJKLMNOPQTRSTUVWXYZ[\]ˆ._'
abcd
<NLQ>
123456789: ; <=>?@ABCDEFGHIJKLMOPQPSTUVWXY
23456789: ; <=>?@ABCDEFGHIJKLMHOPQRSTUVWXYZ
3456789: ; <=>?@ABCDEFGHIJKLMNOPQRSTUVWXYZ[
456789: ; <=>?@ABCDEFGHIJKLMNOPQRSTUVWXYZ[\
56789: ; <=>?@ABCDEFGHIJKLMHOPQRSTUVWXYZ[\]
6789: ; <=>?@ABCDEFGHIJKLMNOPQRSTUVWXYZ[\]ˆ
789: ; <=>?@ABCDEFGHIJKLMNOPQESTUVWXYZ[\]ˆ-
89: ; <=>?@ABCDEFGHIJKLMNOPQESTUVWXYZ[\]ˆ_'
9: ; <=>?@ABCDEFGHIJKLMHOPQRSTUVWXYK[\]ˆ_'a
: ; <=>?@ABCDEFGHIJKLMNOPQESTUVWXYZ[\]ˆ_' ab
; <=>?BABCDEFGHIJKLMNOPQRSTUVWXYZ[\]ˆ
’ abc
<=> ?@ABCDEFGHIJKLMNOPQESTUVWXYZ[\]ˆ ‘abed
Figure l-9. Test patterns
12
/