Samsung 731B User manual

Category
TVs & monitors
Type
User manual
Install drivers Install
p
ro
g
rams
SyncMaster 731B / 931B / 731BF / 931BF
Notation
Failure to follow directions noted by this symbol could result in bodily harm or damage to
equipment.
Prohibited Important to read and understand at all times
Do not disassemble Disconnect the plug from the outlet
Do not touch Grounding to prevent an electric shock
Powe
r
When not used for extended period of time, set your computer to DPMS.
If using a screen saver, set it to the active screen mode.
Do not use a damaged or loose plug.
This may cause an electric shock or fire.
Do not pull the plug out by the wire nor touch the plug with wet hands.
This may cause an electric shock or fire.
Use only a properly grounded plug and receptacle.
An improper ground may cause electric shock or equipment damage.
Insert the power plug firmly so that it does not come loose.
A bad connection may cause fire.
Do not excessively bend the plug and wire nor place heavy objects upon them, which
could cause damage.
This may cause an electric shock or fire.
Do not connect too many extension cords or plugs to an outlet.
This may cause fire.
Installation
Be sure to contact an authorized Service Center when installing your set in a location
with heavy dust, high or low temperatures, high humidity, and chemical substances,
or where it will be operated for 24 hours continuously such as an airport, train station
or etc.
Failure to do so may cause serious damage to your set.
Put your monitor in a location with low humidity and a minimum of dust.
Failure to do so may cause an electric shock or fire inside the monitor.
Do not drop the monitor when moving it.
This may cause damage to the product or human body.
Install the monitor base in a showcase or shelf so that the end of the base does not
protrude from the showcase or shelf.
Dropping the product may cause damage to the product or personal injury.
Do not place the product on an unstable or small surface area.
Place the product on an even, stable surface, as the product may fall and cause
harm to someone walking by, specifically children.
Do not place the product on the floor.
Someone, specifically children could trip over it.
Keep any flammable objects such as candles, insecticides or cigarettes away from
the product.
Otherwise, this may cause a fire.
Keep any heating devices away from the power cable.
A melted coating may lead to electric shock or fire.
Do not install the product in places with poor ventilation, for instance, a bookshelf,
closet, etc.
Any increase in internal temperature may cause fire.
Set down the monitor carefully.
The monitor could be damaged or broken.
Do not place the monitor face down.
The TFT-LCD surface may be damaged.
Installing a wall bracket must be done by a qualified professional.
Installation by unqualified personnel may result in injury.
Always use the mounting device specified in the owner's manual.
When installing the product, make sure to keep it away from the wall (more than 10
cm/4 inch ) for ventilation purposes.
Poor ventilation may cause an increase in the internal temperature of the product,
resulting in a shortened component life and degraded performance.
Cleanin
g
and Use
When cleaning the monitor case or the surface of the TFT-LCD screen, wipe with a
slightly moistened, soft fabric.
Do not spray water or detergent directly on the monitor.
This may cause damage, electric shock or fire.
Use the recommended detergent with a smooth cloth.
If the connector between the plug and the pin is dusty or dirty, clean it properly with a
dry cloth.
A dirty connector may cause an electric shock or fire.
Make sure to unplug the power cord before cleaning the product.
Otherwise, this may cause electric shock or fire.
Unplug the power cord from the power outlet and wipe the product using a soft, dry
cloth.
Do not use any chemicals such as wax, benzene, alcohol, thinners, insecticide, air
freshener, lubricant or detergent.
Contact the Service Center or Customer Center for interior cleaning once a year.
Keep the product's interior clean.
Dust which has accumulated in the interior over an extended period of time may
cause malfunction or fire.
Others
Do not remove cover (or back).
This may cause an electric shock or fire.
Refer servicing to qualified service personnel.
If your monitor does not operate normally - in particular, if there are any unusual
sounds or smells coming from it - unplug it immediately and contact an authorized
dealer or service.
This may cause an electric shock or fire.
Keep the product away from places exposed to oil, smoke or moisture; do not install
inside a vehicle.
This may cause malfunction, an electric shock or fire.
Especially avoid operating the monitor near water or outdoors where the monitor
could be exposed to snow or rain.
If the monitor is dropped or the casing is damaged, turn the monitor off and unplug
the power cord. Then contact the Service Center.
The monitor may malfunction, causing an electric shock or fire.
Disconnect the plug from the outlet during storms or lightening or if it is not used for a
long period of time.
Failure to do so may cause an electric shock or fire.
Do not try to move the monitor by pulling only the wire or the signal cable.
This may cause a breakdown, electric shock or fire due to damage to the cable.
Do not move the monitor right or left by pulling only the wire or the signal cable.
This may cause a breakdown, electric shock or fire due to damage to the cable.
Do not cover the vents on the monitor cabinet.
Bad ventilation may cause a breakdown or fire.
Do not place water containers, chemical products or small metal objects on the
monitor.
This may cause malfunction, an electric shock or fire.
If a foreign substance enters the monitor, unplug the power cord and contact the
Service Center.
Keep the product away from combustible chemical sprays or inflammable
substances.
This may cause an explosion or fire.
Never insert anything metallic into the monitor openings.
This may cause an electric shock, fire or injury.
Do not insert metal objects such as chopsticks, wire and gimlet or inflammable
objects such as paper and match into the vent, headphone port or AV ports.
It may cause a fire or an electric shock.
If an alien substances or water flows into the product, turn the product off, unplug
the power connector from the wall outlet and contact Service Center.
If you view a fixed screen for an extended period of time, residual image or blurriness
may appear.
Change the mode to energy save or set a screensaver to moving picture when
you need to be away from the monitor for an extended period of time.
A
djust the resolution and frequency to the levels appropriate for the model.
Inappropriate resolution may cause undesirable picture quality.
17 inch (43 cm) - 1280 x 1024
19 inch (48 cm) - 1280 x 1024
Watching the monitor continuously at a too close angle may result in eyesight
damage.
To ease eye strain, take at least a five-minute break after every hour of using the
monitor.
Do not install the product on an unstable, uneven surface or a location prone to
vibrations.
Dropping the product may cause damage to the product or personal injury.
Using the product in a location prone to vibrations may shorten the lifetime of the
product or may catch fire.
When moving the monitor, turn off and unplug the power cord. Make sure that all
cables, including the antenna cable and cables connected to other devices, are
disconnected before moving the monitor.
Failure to disconnect a cable may damage it and lead to fire or an electric shock.
Place the product out of children's reach, as they could damage it by hanging onto it.
A falling product could cause physical damage even death.
When not using the product for an extended time period, keep the product
unplugged.
Otherwise, this may cause heat emission from the accumulated dirt or degraded
insulation, leading to electric shock or fire.
Do not place children's favorite objects (or anything else that may be tempting) on the
product.
Children may try to climb on the product to retrieve an object.
The product could fall, causing physical damage or even death.
Correct Disposal of This Product
(Waste Electrical & Electronic Equipment) - Europe only
(Applicable in the European Union and other European countries with
separate collection systems)
This marking shown on the product or its literature, indicates that it should not
be disposed with other household wastes at the end of its working life. To
prevent possible harm to the environment or human health from uncontrolled
waste disposal, please separate this from other types of wastes and recycle it
responsibly to promote the sustainable reuse of material resources.
Household users should contact either the retailer where they purchased this
product, or their local government office, for details of where and how they
can take this item for environmentally safe recycling.
Business users should contact their supplier and check the terms and
conditions of the purchase contract. This product should not be mixed with
other commercial wastes for disposal.
PRODUCT INFORMATION (Image Retention Free)
LCD Monitors and TVs may have image retention when switching from one image to another
especially after displaying a stationary image for a long time.
This guide is to demonstrate correct usage of LCD products in order to protect them from Image
retention.
Warrant
y
Warranty does not cover any damage caused by image retention.
Burn-in is not covered by the warranty.
What is Ima
g
e retention ?
During normal operation of a LCD panel, pixel image retention doesn't occur. However,
if the same image is displayed for a long time, a slight difference in electric charge
accumulates between the two electrodes which encase the liquid crystal. This may
cause the liquid crystal to build up in a certain areas of the display. Thus, the previous
image is retained when switching to a new video image. All display products, including
LCD,are subject to image retention. This is not a product defect.
Please follow the suggestions below to protect your LCD from image retention
Power Off, Screen Saver, or Power Save Mode
Ex)
z Turn the power off when using a stationary pattern.
z Use a Screen saver if possible
z Set the Monitor to power off with the PC Display Properties Power Scheme.
- Turn the power off for 4 hours after 24 hours in use
- Turn the power off for 2 hours after 12 hours in use
- Screen saver in one color or a moving image is recommended.
Su
gg
estions for s
p
ecific a
pp
lications
Ex) Airports, Transit Stations, Stock Markets, Banks, and Controlling Systems
We recommend that you follow set up of your display system program as below:
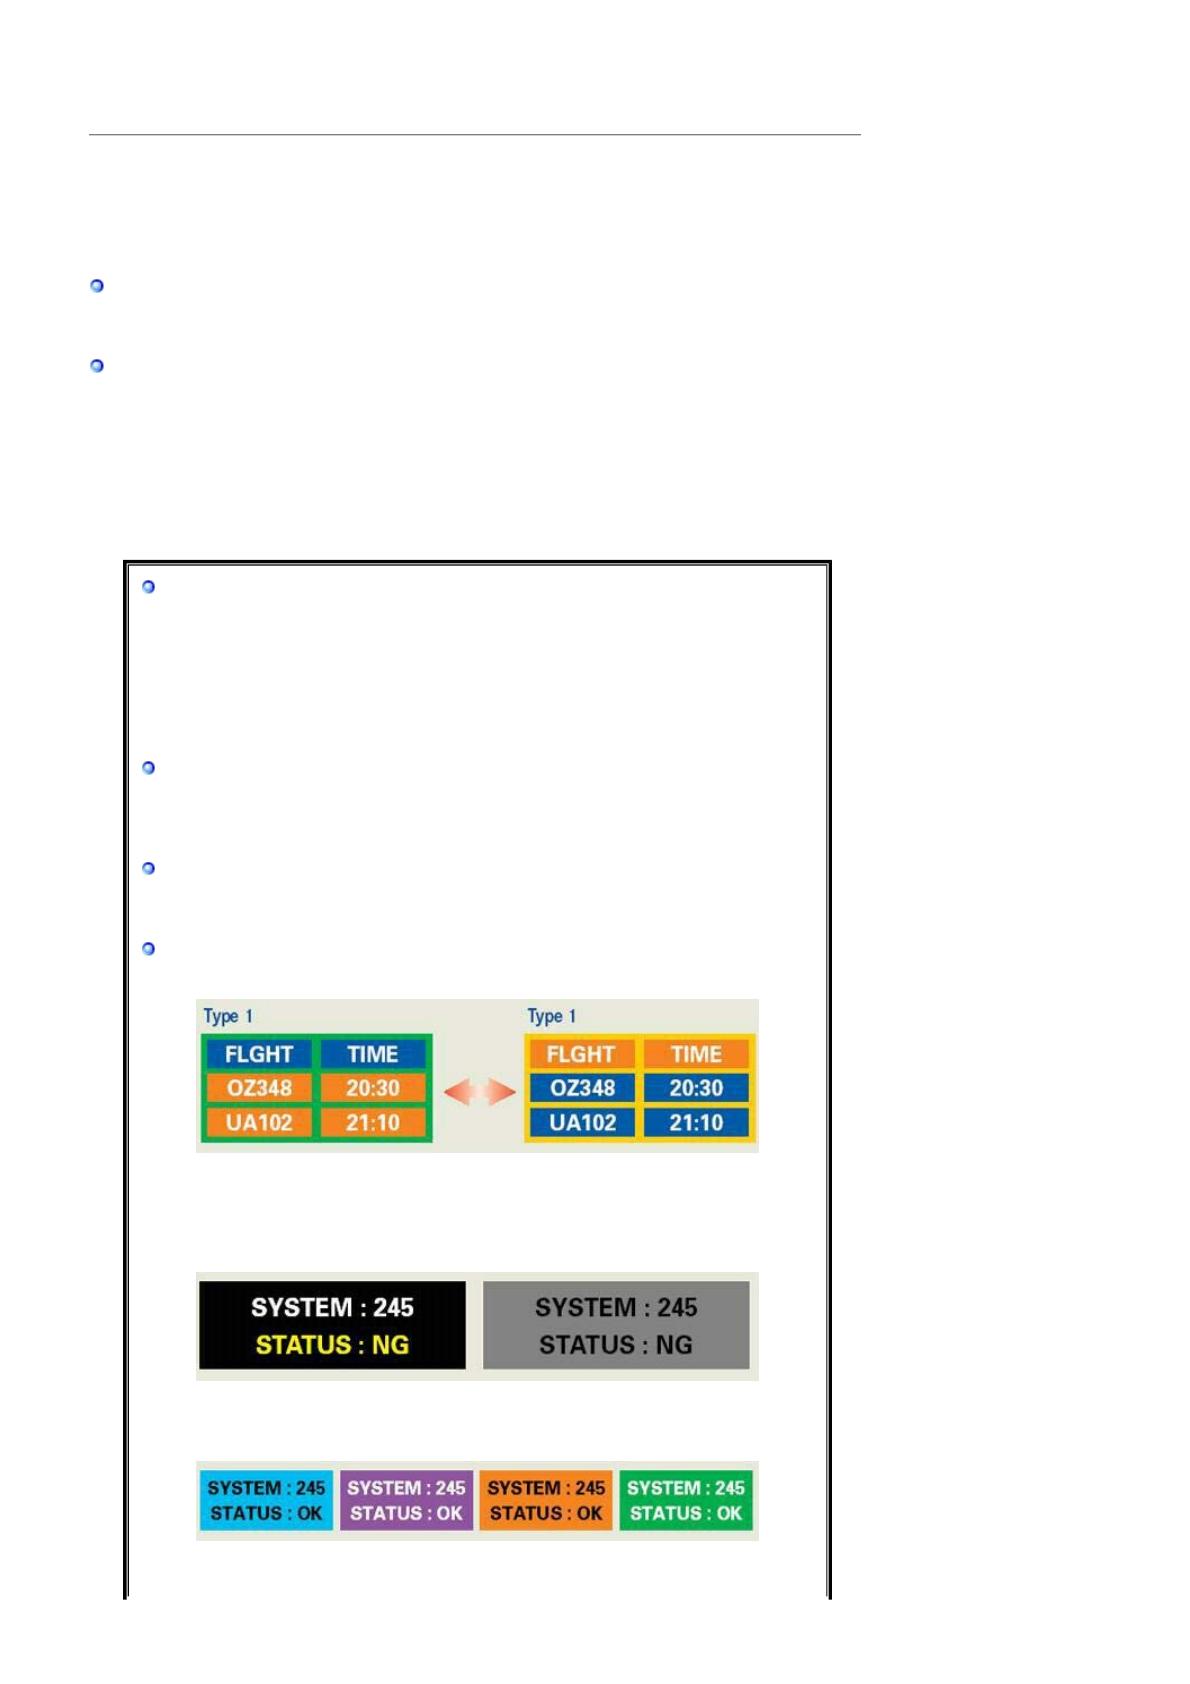
Dis
p
la
y
Information to
g
ether with Lo
g
o or Movin
g
ima
g
e c
y
cle.
Ex) Cycle : Display Information for 1 hour followed by a
Display Logo or moving image for 1 minute.
Chan
e the Color Information
eriodicall
Use 2 different colors
.
Ex) Rotate the Color Information with 2 colors every 30 minutes.
A
void using a combination of characters and background color with large
difference in luminance.
A
void using Grey colors, which can cause Image retention easily.
z Avoid: Colors with big difference in luminance (Black & White, Grey)
Ex)
z Recommended settings: Bright colors with little difference in luminance
- Change the characters color and background color every 30 minutes
Ex)
- Every 30 minutes, change the characters with movement.
Ex)
The best way to protect your monitor from Image retention is to set your PC or
S
y
stem to o
p
erate a Screen Saver
p
ro
g
ram when
y
ou are not usin
g
it.
Image retention may not occur when a LCD panel is operated under normal conditions.
Normal conditions are defined as continuously changing video patterns. When the LCD
panel is operated for a long time with a fixed pattern (-over 12 hours-), there may be
slight difference in voltage between electrodes that work the liquid crystal (LC) in a
pixel. The voltage difference between electrodes increases with time, forcing the liquid
crystal to lean. When this occurs, the previous image may be seen when the pattern is
changed.
To prevent this, the accumulated voltage difference must be decreased.
Our LCD Monitor satisfies ISO13406-2 Pixel fault Class II
Packa
g
e Contents
Please make sure the following items are included with your monitor.
If any items are missing, contact your dealer.
Contact a local dealer to buy optional items.
Un
p
ackin
g
Monitor
Manual
Quick Setup Guide
Warranty Card
(Not available in all
locations)
User's Guide, Monitor Driver,
Natural Color software,
MagicTuneâ„¢ software
Cable
Power Cord D-sub Cable
SyncMaster 731B / 931B
Sold se
p
aratel
y
DVI Cable
Y
our Monito
r
Front
MENU button [ ]
Opens the OSD menu. Also use to exit the OSD menu or return to the
previous menu.
MagicBrightâ„¢ button
[]
MagicBrightâ„¢ is a new feature providing optimum viewing
environment depending on the contents of the image you are
watching. Currently six different modes are available: Custom, Text,
Internet, Game, Sport and Movie. Each mode has its own pre-
configured brightness value. You can easily select one of six settings
by simply pressing MagicBrightâ„¢ control button.
1) Custom
Although the values are carefully chosen by our engineers, the
pre-configured values may not be comfortable to your eyes
depending on your taste.
If this is the case, adjust the brightness and contrast by using the
OSD menu.
2) Text
For documentations or works involving heavy text.
3) Internet
For working with a mixture of images such as text and graphics.
4) Game
For watching motion pictures such as a game.
5) Sport
For watching motion pictures such as a sport.
6) Movie
For watching motion pictures such as a DVD or Video CD.
>> Click here to see an animation clip
Brightness button [ ]
When OSD is not on the screen, push the button to adjust brightness.
>> Click here to see an animation clip
Adjust buttons [ ] Adjust items in the menu.
Enter button [ ] /
SOURCE button
Activates a highlighted menu item. /
Push the 'SOURCE', then selects the video signal while the OSD is
off. (When the source button is pressed to change the input mode, a
message appears in the upper left of the screen displaying the current
mode -- analog or digital input signal.)
If you select the digital mode, you must connect your monitor to the
graphic card's DVI port using the DVI cable.
AUTO button Use this button for auto adjustment.
>> Click here to see an animation clip
Power button [ ] Use this button for turn the monitor on and off.
Power indicator
This light glows blue during normal operation, and blinks blue once as
the monitor saves your adjustments.
See PowerSaver described in the manual for further information regarding power saving
functions. For energy conservation, turn your monitor OFF when it is not needed, or
when leaving it unattended for long periods.
Rea
r
The configuration at the back of the monitor may vary from product to product.
POWER port Connect the power cord for your monitor to the power port on the back of the
monitor.
DVI IN port Connect the DVI Cable to the DVI port on the back of your monitor.
RGB IN port Connect the signal cable to the 15-pin, D-sub port on the back of your
monitor.
Kensington Lock The Kensington lock is a device used to physically fix the system when using
it in a public place.
The locking device has to be purchased separately.
For using a locking device, contact where you purchase it.
See Connecting Cables for further information regarding cable connections.
Features
RTA Monito
r
RTA (Response Time Accelerator)
A function that accelerates the response speed of the panel so as to provide a sharper and more
natural video display.
RTA On Activates the RTA function so that the panel operates at a higher response speed than
its original speed.
RTA OFF Deactivates the RTA function so that the panel operates at its original response speed.
If you turn the power off and on again after switching RTA off, the RTA function is automatically
switched On (Factory Setting)
Packa
g
e Contents
Please make sure the following items are included with your monitor.
If any items are missing, contact your dealer.
Contact a local dealer to buy optional items.
Un
p
ackin
g
Monitor
Manual
SyncMaster 731BF / 931BF
Quick Setup Guide
Warranty Card
(Not available in all
locations)
User's Guide, Monitor Driver,
Natural Color software,
MagicTuneâ„¢ software
Cable
Power Cord D-sub Cable
Sold se
p
aratel
y
DVI Cable
Y
our Monito
r
Front
MENU button [ ]
Opens the OSD menu. Also use to exit the OSD menu or return to the
previous menu.
MagicBrightâ„¢ button
[]
MagicBrightâ„¢ is a new feature providing optimum viewing
environment depending on the contents of the image you are
watching. Currently six different modes are available: Custom, Text,
Internet, Game, Sport and Movie. Each mode has its own pre-
configured brightness value. You can easily select one of six settings
by simply pressing MagicBrightâ„¢ control button.
1) Custom
Although the values are carefully chosen by our engineers, the
pre-configured values may not be comfortable to your eyes
depending on your taste.
If this is the case, adjust the brightness and contrast by using the
OSD menu.
2) Text
For documentations or works involving heavy text.
3) Internet
For working with a mixture of images such as text and graphics.
4) Game
For watching motion pictures such as a game.
5) Sport
For watching motion pictures such as a sport.
6) Movie
For watching motion pictures such as a DVD or Video CD.
>> Click here to see an animation clip
Brightness button [ ]
When OSD is not on the screen, push the button to adjust brightness.
>> Click here to see an animation clip
Adjust buttons [ ] Adjust items in the menu.
Enter button [ ] /
SOURCE button
Activates a highlighted menu item. /
Push the 'SOURCE', then selects the video signal while the OSD is
off. (When the source button is pressed to change the input mode, a
message appears in the upper left of the screen displaying the current
mode -- analog or digital input signal.)
If you select the digital mode, you must connect your monitor to the
graphic card's DVI port using the DVI cable.
AUTO button Use this button for auto adjustment.
>> Click here to see an animation clip
Power button [ ] Use this button for turn the monitor on and off.
Power indicator
This light glows blue during normal operation, and blinks blue once as
the monitor saves your adjustments.
See PowerSaver described in the manual for further information regarding power saving
functions. For energy conservation, turn your monitor OFF when it is not needed, or
when leaving it unattended for long periods.
Rea
r
The configuration at the back of the monitor may vary from product to product.
POWER port Connect the power cord for your monitor to the power port on the back of the
monitor.
DVI IN port Connect the DVI Cable to the DVI port on the back of your monitor.
RGB IN port Connect the signal cable to the 15-pin, D-sub port on the back of your
monitor.
Kensington Lock The Kensington lock is a device used to physically fix the system when using
it in a public place.
The locking device has to be purchased separately.
For using a locking device, contact where you purchase it.
See Connecting Cables for further information regarding cable connections.
Connectin
g
Cables
Connect the power cord for your monitor to the power port on the back of the monitor.
Plug the power cord for the monitor into a nearby outlet.
Using the D-sub (Analog) connector on the video card.
- Connect the signal cable to the 15-pin, D-sub port on the back of your monitor.
[RGB IN]
Using the DVI (Digital) connector on the video card.
- Connect the DVI Cable to the DVI Port on the back of your Monitor.
[DVI IN]
Connected to a Macintosh.
- Connect the monitor to the Macintosh computer using the D-sub connection cable.
If you are using an old model Macintosh, connect the monitor and the Macintosh using a Macintosh
adapter (sold separately).
If the monitor and the computer are connected, you can turn them on and use them.
Usin
g
the Stand
SyncMaster 731B / 931B / 731BF / 931BF
  • Page 1 1
  • Page 2 2
  • Page 3 3
  • Page 4 4
  • Page 5 5
  • Page 6 6
  • Page 7 7
  • Page 8 8
  • Page 9 9
  • Page 10 10
  • Page 11 11
  • Page 12 12
  • Page 13 13
  • Page 14 14
  • Page 15 15
  • Page 16 16
  • Page 17 17
  • Page 18 18
  • Page 19 19
  • Page 20 20
  • Page 21 21
  • Page 22 22
  • Page 23 23
  • Page 24 24
  • Page 25 25
  • Page 26 26
  • Page 27 27
  • Page 28 28
  • Page 29 29
  • Page 30 30
  • Page 31 31
  • Page 32 32
  • Page 33 33
  • Page 34 34
  • Page 35 35
  • Page 36 36
  • Page 37 37
  • Page 38 38
  • Page 39 39
  • Page 40 40
  • Page 41 41
  • Page 42 42
  • Page 43 43
  • Page 44 44
  • Page 45 45
  • Page 46 46
  • Page 47 47
  • Page 48 48
  • Page 49 49
  • Page 50 50
  • Page 51 51
  • Page 52 52
  • Page 53 53
  • Page 54 54
  • Page 55 55
  • Page 56 56
  • Page 57 57
  • Page 58 58
  • Page 59 59
  • Page 60 60
  • Page 61 61
  • Page 62 62
  • Page 63 63
  • Page 64 64
  • Page 65 65
  • Page 66 66
  • Page 67 67
  • Page 68 68
  • Page 69 69
  • Page 70 70
  • Page 71 71
  • Page 72 72
  • Page 73 73
  • Page 74 74
  • Page 75 75
  • Page 76 76
  • Page 77 77
  • Page 78 78
  • Page 79 79
  • Page 80 80
  • Page 81 81
  • Page 82 82
  • Page 83 83
  • Page 84 84

Samsung 731B User manual

Category
TVs & monitors
Type
User manual

Ask a question and I''ll find the answer in the document

Finding information in a document is now easier with AI