Aeg-Electrolux FM4513K-AN User manual
- Category
- Hobs
- Type
- User manual
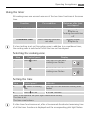
Aeg-Electrolux FM4513K-AN ceramic hob offers precise cooking control with its touch controls and 9 heat settings. It features a Stop+Go function to pause and resume cooking, and an automatic warm-up function to quickly reach the desired temperature. For safety, it includes a child lock and residual heat indicators.
Aeg-Electrolux FM4513K-AN ceramic hob offers precise cooking control with its touch controls and 9 heat settings. It features a Stop+Go function to pause and resume cooking, and an automatic warm-up function to quickly reach the desired temperature. For safety, it includes a child lock and residual heat indicators.


-
 1
1
-
 2
2
-
 3
3
-
 4
4
-
 5
5
-
 6
6
-
 7
7
-
 8
8
-
 9
9
-
 10
10
-
 11
11
-
 12
12
-
 13
13
-
 14
14
-
 15
15
-
 16
16
-
 17
17
-
 18
18
-
 19
19
-
 20
20
-
 21
21
-
 22
22
-
 23
23
-
 24
24
-
 25
25
-
 26
26
-
 27
27
-
 28
28
-
 29
29
-
 30
30
-
 31
31
-
 32
32
-
 33
33
-
 34
34
-
 35
35
-
 36
36


Aeg-Electrolux FM4513K-AN User manual
- Category
- Hobs
- Type
- User manual
Aeg-Electrolux FM4513K-AN ceramic hob offers precise cooking control with its touch controls and 9 heat settings. It features a Stop+Go function to pause and resume cooking, and an automatic warm-up function to quickly reach the desired temperature. For safety, it includes a child lock and residual heat indicators.
Ask a question and I''ll find the answer in the document
Finding information in a document is now easier with AI