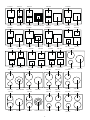
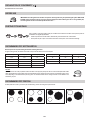
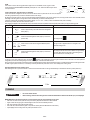
HOTPOINT/ARISTON KID 640 C is a sleek and efficient induction hob that offers precise temperature control and rapid heating for a seamless cooking experience. Its intuitive touch controls allow for easy adjustment of heat settings, while the residual heat indicators keep you informed about the status of each cooking zone. With its elegant design and advanced features, the KID 640 C is an excellent choice for modern kitchens.
HOTPOINT/ARISTON KID 640 C is a sleek and efficient induction hob that offers precise temperature control and rapid heating for a seamless cooking experience. Its intuitive touch controls allow for easy adjustment of heat settings, while the residual heat indicators keep you informed about the status of each cooking zone. With its elegant design and advanced features, the KID 640 C is an excellent choice for modern kitchens.


-
 1
1
-
 2
2
-
 3
3
-
 4
4
-
 5
5
-
 6
6
-
 7
7
-
 8
8
-
 9
9
-
 10
10
-
 11
11
-
 12
12


HOTPOINT/ARISTON KID 640 C is a sleek and efficient induction hob that offers precise temperature control and rapid heating for a seamless cooking experience. Its intuitive touch controls allow for easy adjustment of heat settings, while the residual heat indicators keep you informed about the status of each cooking zone. With its elegant design and advanced features, the KID 640 C is an excellent choice for modern kitchens.
Ask a question and I''ll find the answer in the document
Finding information in a document is now easier with AI
Related papers
-
Hotpoint CID 641 B B User guide
-
Indesit CID 641 B B User guide
-
-
Hotpoint IKIA 630 L C User guide
-
HOTPOINT/ARISTON HKID 630 LD C User guide
-
Hotpoint IKID 631 BLT F User guide
-
-
-
-
Whirlpool CIS 640 B User guide
Other documents
-
Whirlpool CTAI 9740C IN User guide
-
Privileg PCTAI K7040C IN Owner's manual
-
ELICA LIEN DIAMOND 604 BL Owner's manual
-
Bauknecht CTAI9640 Owner's manual
-
Whirlpool IVIA 630 L D C User guide
-
-
-
Whirlpool ACM 868/BA/IXL/N User guide
-
-
Whirlpool ACM 1032/BA User guide