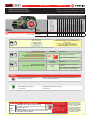
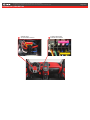
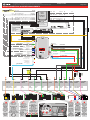
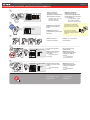
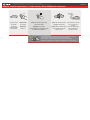
Fortin 81861 is a versatile interface module compatible with KIA RIO vehicles featuring Push-to-Start functionality. It allows for remote start, lock, unlock, and keyless entry, providing convenience and security. The module integrates seamlessly with the vehicle's original systems, ensuring a reliable and user-friendly experience.
Fortin 81861 is a versatile interface module compatible with KIA RIO vehicles featuring Push-to-Start functionality. It allows for remote start, lock, unlock, and keyless entry, providing convenience and security. The module integrates seamlessly with the vehicle's original systems, ensuring a reliable and user-friendly experience.


-
 1
1
-
 2
2
-
 3
3
-
 4
4
-
 5
5
-
 6
6


Fortin 81861 is a versatile interface module compatible with KIA RIO vehicles featuring Push-to-Start functionality. It allows for remote start, lock, unlock, and keyless entry, providing convenience and security. The module integrates seamlessly with the vehicle's original systems, ensuring a reliable and user-friendly experience.
Ask a question and I''ll find the answer in the document
Finding information in a document is now easier with AI
in other languages
- français: Fortin 81861 Guide d'installation
Related papers
-
Fortin Suzuki Equator 2009 Installation guide
-
Fortin 108601 Installation guide
-
Fortin 81851 Installation guide
-
Fortin 90271 Installation guide
-
-
Fortin 72051 Installation guide
-
-
Fortin 88681 Installation guide
-
Fortin 111581 Subaru Ascent Remote Starters and Alarm Systems Installation guide
-
Fortin 111591 Installation guide