
CONNECTING TO DEVICES
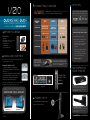
What’s In the Box
så6):)/å($46
så6):)/å2EMOTEå#ONTROLåINCLUDINGåå!!åBATTERIES
så5SERå-ANUALåREADå3AFETYå'UIDELINES
så2EGISTRATIONå#ARD
så1UICKSTARTå'UIDE
så3CREENå#LEANINGå#LOTH
BEFORE YOU BEGIN
HDTV TIPS
HIGH DEFINITION
HOME THEATER
"!#+å/&å46
å'ETåAå6):)/å"LURAY
™
å$ISCå0LAYER
å#ONTACTåYOURåCABLEåCOMPANYåORåSATELLITEå
ååååPROVIDERåTOåLEARNåMOREåABOUTå($å
ååååPROGRAMMINGåINåYOURåLOCALåAREAåANå($å
ååååCABLEåBOXåORåSATELLITEåRECEIVERåMAYå
ååååBEåREQUIREDå
å9OUåMAYåBEåABLEåTOåGETå($åSIGNALSåUSINGå
ååååANåOFFAIRåANTENNAå4OåSEEåIFåYOUåCANå
ååååRECEIVEåOFFAIRå($åSIGNALSåANDåFORåHELPå
ååååCHOOSINGåTHEåRIGHTåANTENNAåVISITå
www.antennaweb.org
6ISITåwww.VIZIO.comåORåCALLå
HIGH-DEFINITION SOUND
#OMPLETEåYOURåTOTALå(OMEå4HEATREåEXPERIENCEåWITHåSTUNNINGå
AUDIOåFROMå6):)/åACCESSORIESåSUCHåASåTHEå3OUNDå"ARå
WITHå7IRELESSå3UBWOOFER
-AKEåSUREåYOUåHAVEåCOMPONENTSåWITHå($-)å
OUTPUTSåTOåENSUREåTHEå"%34åPOSSIBLEåPICTURE
3!4%,,)4%åå#!",% '!-).'å#/.3/,%
",52!9
™
åå$6$
1
3
POWER THE TV
4URNåONåYOURå46åBYåPRESSINGåTHEå0OWERåBUTTONåON
EITHERåTHEå46åORåTHEåREMOTEåCONTROLåååå
YOU DESERVE
THE BEST!
VIZIO Blu-ray
™
"RINGåYOURåMOVIESåTOåLIFEäPå&ULLå($åPLAYBACKå
DELIVERSåCRYSTALåCLEARåIMAGESåWITHåLIFELIKEåDETAILåANDå(IGHå
$EFINITIONå!UDIOåPUTSåYOUåINåTHEåCENTERåOFåTHEåACTIONä6ISITå
www.VIZIO.comåFORåMOREåDETAILS
4
4HEåINPUTSåLISTEDåINåTHEå"%34åCOLUMNåAREå/04)-):%$åFORå(IGHå$EFINITIONå6IDEOå
ANDå!UDIOå#ONNECTåUSINGåTHESEåINPUTSåWHEREVERåPOSSIBLE
3 WAYS TO WATCH
HIGH DEFINITION VIDEO
0REPARINGåTHEå46åFORå7ALLå-OUNTINGååPLEASEåREFERåTOå7ALLåMOUNTINGå
YOURå($46åINåYOURå5SERå-ANUALåFORåMOREåINFORMATION
7EåPROVIDEåPROFESSIONALåINSTALLATIONåSERVICESå6ISITåWWW6):)/COMåORå
CALLå åTOåORDERåTODAY
INSTALLING YOUR HDTV
!TTACHINGåTHEå3TANDå"ASEåTOåTHEå46
å0LACEåTHEå46åFACEåDOWNåONåAåSOFTåFLATåSURFACE
å!LIGNåTHEåSTANDåHOOKSåWITHåTHEåHOLESåATåTHEåBOTTOM
SURFACEåOFå46å
(SEEåFIGå
å0USHåTHEåBASEåGENTLYåINTOåPLACEå!åSNAPåSOUNDåCOULDåBEå
HEARDåITåMEANSåTHATåTHEåBASEåISåLOCKEDåINTOåPLACEå
(SEEåFIGå
å-OVEåTHEå46åINTOåANåUPRIGHTåPOSITIONåANDåPLACEåSOå
THATåTHEåREARåCONNECTORSåREMAINåACCESSIBLE
4ESTEDåANDåCERTIFIEDåBYå6):)/åENGINEERSåFORåCOMPATIBILITYåWITHåYOURå46
¥å6):)/å)NC
M190VA / M190VA-W / M220VA / M220VA-W
M260VA / M260VA-W LCD LED HDTV
&)'å
&)'å
HDMI
DTV/TV
HIGHEST DIGITAL
QUALITY PICTURE
PICTURE QUALITY
CONNECTION TYPE
CONNECTOR IMAGE
ANALOG HD
QUALITY PICTURE
LOW RESOLUTION
NOT RECOMMENDED
CONNECTION
ADVICE
BETTERBEST
GOOD
COMPONENT
AV/S-VIDEO
2
TILT MOUNT VMT13-30 SWING MOUNT VMA13-26
MATCH YOUR VIZIO TO A
CERTIFIED* WALL MOUNT
&ORåMOREåINFORMATIONåABOUTå6):)/å#ERTIFIEDå(IGHå$EFINITION
CABLESåPLEASEåVISITåUSåATååwww.VIZIO.com
-!+%å4(%å"%34
()'(å$%&).)4)/.
#/..%#4)/.
6):)/å()'(å$%&).)4)/.å#!",%3
9/52å6):)/å46å%6%.
(!3å%!39å4/å!##%33
3)$%å).0543
SPDIF
AUDIO
Y Pb/Cb Pr/Cr L R
RGB PC
DTV/TV
1
2
COMPONENT (BETTER)
HDMI (BEST)
L
R
V
AV (GOOD)
USB

HELP TOPICS
Fig. 1
Fig.2
Fig. 3
Fig. 4
Fig. 5
SETUP (Cont.)
M190VA, M190VA-W
M220VA, M220VA-W
M260VA, M260VA-W
LCD LED HDTV QUICKSTART GUIDE
Initial Setup
Please select your language: English
Français
Español
Language
NextBack Select Exit
EXIT
Initial Setup
Congratulations !!
Initial Setup completed
Complete
Back Next
Initial Setup
Please select your input source:
NextBack Select
Antenna
Cable
Tuner
Exit
EXIT
Initial Setup
Channel Scan will take a few
minutes to complete.
Status: Scanning..
Analog Channels: 0
Digital Channels: 4
Channel Scan
Exit
EXIT
Initial Setup
Please select your input location:
NextBack Select
Home
Retail
Mode Setting
Exit
EXIT
1. The Initial Setup menu should appear on-screen (see Fig. 1). Use your remote control to
follow the directions on the HDTV. Be sure to insert the batteries in your remote first.
2. Select your desired language (see Fig. 2).
3. Choose Home Mode for optimal energy savings.
IF YOU USE A CABLE OR SATELLITE BOX:
1. Exit the Setup Wizard.
2. Select the input source for the device you are connecting to your HDTV.
3. You’re done! Enjoy the show.
IF YOU USE A CABLE FROM THE WALL OR AN
ANTENNA TO RECEIVE TV CHANNELS:
1. Choose between Antenna or Cable to match your input source (see Fig. 3).
2. Begin the scan for channels
(see Fig. 4).
Note: Your Service Provider may provide access to HD channels during the channel scan.
Please be patient and wait for 100% completion.
3. Once the scan is complete, follow the on-screen instruction to exit the
Initial Setup menu
(see Fig. 5).
5
EXTENDED
WARRANTIES
LEARN MORE
REGISTER NOW
Register your product today and receive the latest VIZIO news
and special offers.
Protect your VIZIO product with up to 5 years of added
repair service! Extended coverage begins when the
manufacturer's warranty expires so you’ll receive
maximum protection!
Visit us online at:
or Call:
For more info on Extended Warranties
Refer to your User Manual for in-depth descriptions or
more information.
(888) 849. 4623
www.VIZIO.com
www.VIZIO.com
No Power
Picture is blurry or fuzzy/
image quality issues
Cannot change channels up and
down with direct cable hookup
from wall or antenna
Cannot return to the Setup Wizard
Screen is displaying blue/no
signal and/or turning off after a
few seconds
Panoramic mode is not available
Black or gray bars on top, bottom,
and/or sides of picture
PROBLEM SOLUTION
Make sure the power button is ON . Make sure the AC power cord is securely connected to the AC socket and try plugging the TV
directly into the wall. Plug another electrical device (like a radio) to the outlet to verify the outlet is supplying power.
For the best image quality, view HD wide screen programs where possible. If HD content is not available, view Standard Definition
from a digital source. Standard analog TV will always be noticeably inferior to HD because your digital flat panel TV has video that
is many times better than old TVs, and thus you can see interference and deficiencies you did not know you had.
Press the MENU button. Use the arrows to navigate to the TV TUNER MENU. Highlight the first option, called Tuner Mode. Select the
appropriate input by using the left and right arrows. Once Tuner Mode is correct, highlight "AutoSearch", then press the right
arrow.
The Setup Wizard is no longer accessible after being run once, but all of the same settings can still be changed. Press the MENU
button to access them. For channel scan, see the above topic.
Your TV may be on an inactive input. After powering on the TV, press the INPUT button on your remote repeatedly until a picture
re-appears. If this does not work, try it a second time but press the button slower this time; it can take as long as 30 seconds for
the image to reappear.
When the TV displays an HD resolution the Panoramic viewing mode will not be available.
Try setting your TV to wide or zoom mode; the image should fill the screen. If you still see bars, they are part of the image the TV is
receiving. Cable and satellite boxes may add black bars to the picture, especially when HDMI cables are used. For more
information, please contact your service provider.
PROGRAM YOUR CABLE OR SATELLITE REMOTE
Call your Cable or Satellite provider to determine if you need a 3, 4 or 5-digit code. Refer to the following chart of VIZIO codes and follow your provider's instructions to program your Cable or Satellite remote.
SERVICE PROVIDER
CABLE 11758, 10178, 10128 1758, 0178, 0128
DIRECT TV
DISH NETWORK 627
11758, 10178, 10128 1758, 0178, 0128
5-DIGIT CODES 4-DIGIT CODES 3-DIGIT CODES
-
 1
1
-
 2
2


Ask a question and I''ll find the answer in the document
Finding information in a document is now easier with AI
Related papers
-
Vizio E470VL User manual
-
Vizio LUMIA820BLKATT User manual
-
-
Vizio SV370XVT - 37" LCD TV Quick start guide
-
-
-
Vizio M160MV Quick start guide
-
Vizio E320VP Quick start guide
-
-