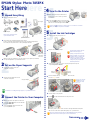
Epson Stylus Photo 785EPX is a versatile color photo printer capable of producing high-quality photos and documents. With its advanced features, it's perfect for photographers, graphic artists, and home users who demand the best in printing. You can print directly from a memory card or via USB connection. It also has a built-in roll paper adapter for continuous printing. Unleash your creativity with the included photo software and bring your digital images to life with stunning clarity and vibrant colors.
Epson Stylus Photo 785EPX is a versatile color photo printer capable of producing high-quality photos and documents. With its advanced features, it's perfect for photographers, graphic artists, and home users who demand the best in printing. You can print directly from a memory card or via USB connection. It also has a built-in roll paper adapter for continuous printing. Unleash your creativity with the included photo software and bring your digital images to life with stunning clarity and vibrant colors.


-
 1
1
-
 2
2


Epson Stylus Photo 785EPX Quick start guide
- Type
- Quick start guide
- This manual is also suitable for
Epson Stylus Photo 785EPX is a versatile color photo printer capable of producing high-quality photos and documents. With its advanced features, it's perfect for photographers, graphic artists, and home users who demand the best in printing. You can print directly from a memory card or via USB connection. It also has a built-in roll paper adapter for continuous printing. Unleash your creativity with the included photo software and bring your digital images to life with stunning clarity and vibrant colors.
Ask a question and I''ll find the answer in the document
Finding information in a document is now easier with AI
Related papers
-
Epson Stylus Photo 890 User manual
-
-
Epson R800 Start Here Card
-
-
-
-
Epson Stylus Photo 2200 Ink Jet Printer Start Here Card
-
-
-