Page is loading ...

A
CO2SET
200
A
CO2SET
400 / 600
B
CO2SET
200
B
CO2SET
400 / 600
A
b
A
b
C
f
f
f
f
C
D
4

C
CO2SET
200 /400
C
CO2SET
600
Bar
0
3
0
5
0
7
0
1
0
0
1
5
0
2
0
0
2
5
0
Bar
1
0
8
7
6
5
4
3
2
1
0
Ba
r
0
30
50
70
1
0
0
1
5
0
2
0
0
2
5
0
Bar
1
0
8
7
6
5
4
3
2
1
0
CO2SET
400
Bar
0
3
0
5
0
7
0
1
0
0
1
5
0
2
0
0
2
5
0
Bar
1
0
8
7
6
5
4
3
2
1
0
Ba
r
0
30
50
70
1
0
0
1
5
0
2
0
0
2
5
0
Bar
1
0
8
7
6
5
4
3
2
1
0
CO2SET
600
D
Bar
0
3
0
5
0
7
0
1
0
0
1
5
0
2
0
0
2
5
0
Bar
1
0
8
7
6
5
4
3
2
1
0
Ba
r
0
30
50
70
1
0
0
1
5
0
2
0
0
2
5
0
Bar
1
0
8
7
6
5
4
3
2
1
0
CO2SET
200
E
G
H
I
f
f
L
K
f
f
K
J
R
CO
2
SET
M
P
e
O
Optional
Optional
Optional
Optional
5

English
CO2SET disposable set 200 (Art.-No. 6063200)
CO2SET returnable set 400 (Art.-No. 6063400)
CO2SET returnable set 600 (Art.-No. 6063600)
Thank you
for buying the new EHEIM CO
2SET. You have chosen aquality product from EHEIM. CO2 fertiliza-
tion represents the most important nutrient supply for aquatic plants. Plants assimilate CO2 after
it has been released by the fish, and release oxygen which in turn is vital to fish. However naturally
occuring CO2 levels are usually insufficient for adequate plant growth.
1. General user instructions
1.1 Information about the rse of the rser instructions
Before using the device for the first time, the user instructions must be fully read and
understood.
Consider the user instructions to be a part of the product and keep them safely and
readily accessible.
Include these user instructions when passing on the device to a third party.
1.2 Explanation of the symbols
The following symbols are used on the device
The device must only be used indoors for aquaristic application areas.
The device is certified in accordance with the respective national regulations and guidelines
and complies with the EU standards.
The following symbols and signal words are used in these user instructions.
WARNING!
The symbol indicates an imminent danger that can result in a moderate or slight bodily
injury or is a risk to health.
RISK OF BREAKAGE!
This symbol indicates imminent risk of breaking that can result in mild to moderate physical
injury or a health risk.
This symbol indicates imminent danger that could be caused by gas cylinders under pres-
sure.
Dangerous goods class 2.2: non-flammable, non-poisonous gases.
12

Recycling number 40 FE (steel)
This symbol serves for identification for return into the recycling loop.
Advice with useful information and tips.
Presentation conventions
A Reference to an illustration, here reference to Illustration A.
You are prompted to take action.
2. Applications
The device and all items included in the scope of supply are intended for use in private areas and
must be exclusively used:
• CO2 supply of aquariums
• only in interior spaces
• under compliance with the technical data
The following restrictions apply to the device:
• not to be used for commercial or industrial purposes
• the water temperature must be kept between +4°C to 35°C
3. Safety instructions
H280 Contains gas under pressure; can explode if heated.
P101 Keep the packaging and identification label in an accessible place in case
medical advice is required.
P102 Keep out of reach of children.
P103 Read the identification label before use.
P403 Store in a well-ventilated location.
P410 Protect from direct sunlight.
There are risks for people and property associated with this device if it is not used correctly
and properly or in accordance with its intended purpose or if the safety instructions are not
observed.
This equipment can be used by children above the age of 8 or by persons with re-
duced physical, mental or sensory capacities or a lack of experience or knowledge,
provided they are supervised or have received instruction in the safe use of the
equipment and therefore understand the risks involved. Do not allow children to
play with this equipment. Do not allow children to clean or conduct user mainten-
ance without supervision.
13

• Inspect the device before use to make sure that the device and in particular
the hose connections are not damaged.
• Never use the device with a damaged CO2 hose.
• Repairs may only be performed at an authorized EHEIM service depot.
• Only perform tasks that are described in these instructions.
• Never make technical changes to the device.
• Only use original replacement parts and accessories for this device.
• In principle, always disconnect all devices in the aquarium from the power
supply when they are not being used, before you install or uninstall them and
before all cleaning and maintenance operations.
Safety instructions for carbon dioxide (CO
2)
• CO
2 - bottles are under pressure. Do not throw them. Store them in a cool place.
Protect them from direct sunlight and from heat of above 50°C.
• CO2 - withdrawal only with appropriate pressure regulators for:
- disposable CO
2 bottles with connection threads M 10 x 1.0
- returnable CO
2 bottles with connection threads W 21.8 x 1/14”
• Refilling of CO
2 returnable bottles only at authorized CO2 filling depots. Please
note: Tara weight with CAGE (valve protection cage).
• Disposable CO2 bottles may not be refilled and have to be disposed after use.
Recycling number 40 FE (steel).
• Withdrawal of CO2 only from upright positioned bottles that are protected against
falling over.
• Do not open CO2 bottles by force.
• CO
2 gas is odorless, heavier than air and has a suffocating effect in high concentration.
- do not breathe in CO
2 gas.
- keep out of reach of children.
- store CO
2 bottles in a well ventilated location.
- do not operate or store in basement rooms.
• Please make sure of the following during transport of individual CO2 bottles in
vehicles: Secure the bottle against sliding and rolling. The valve may not be da-
maged or there is a danger that the CO2 escapes. The vehicle must be sufficiently
ventilated (such as with a fan or open window).
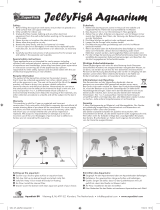
4. Function
CO2SET
200
a
Disposable CO2 bottle with 500 g CO2.
14

b
Pressure regulator with:
A
adjustment knob
B
connection thread M 10x1
C
hose connection
D
fine control valve.
c
CO2 diffuser with:
G
screw cap
H
gasket
I
diffuser plate
J
bubble counter
K
check valve
Q
2x elbow.
d
CO2 - long-term test:
M
cap
O
gasket and color contrast band
P
bottom part with siphon.
e
indicator fluid.
f
CO2 - SAFE safety hose.
CO2SET
400
a
CO2 - Returnable bottle with 500 g CO2, refillable.
b
Pressure regulator with:
A
adjustment knob
B
connection thread M 21.8x1/14”
C
hose connection
D
fine control valve
E
manometer bottle pressure gauge
F
manometer system pressure gauge.
c
CO2 - diffuser with:
G
screw cap
H
gasket
I
diffuser plate
J
bubble counter
K
check valve
Q
2x elbow.
d
CO2 - long-term test:
M
cap
O
gasket and color contrast band
P
bottom part with siphon.
e
indicator fluid.
f
CO2 - SAFE safety hose.
g
Bottle holder.
CO2SET
600
a
CO2 - Returnable bottle with 2.000 g CO2, refillable.
b
Pressure regulator with:
A
adjustment knob
B
connection thread M 21.8x1/14”
C
hose con-
nection
D
fine control valve
E
manometer bottle pressure gauge
F
manometer system pressure
gauge.
c
CO2 - diffuser with two parts:
J
bubble counter with
K
check valve
L
diffuser
R
silicon ad-
apter.
d
CO2 - long-term test:
M
hood
O
gasket and color contrast band
P
bottom part with siphon.
e
indicator fluid.
f
CO2 - SAFE safety hose.
5. Assembly
Assembly of the pressure regulator
DANGER! POSSIBLE INJURY! – CO
2 bottles are under pressure.
Make sure that the pressure regulator is closed before connection.
Close the fine control valve.
15

A
CO2SET
200
Connection of the pressure regulator
b
to the CO2 disposable bottle
a
.
Turn the adjustment knob
A
of the pressure regulator counter-clockwise to “–“. Close the fine
control valve
D
. Check the gasket in the connection thread
B
of the pressure regulator and the
sealing surface of the bottle valve for cleanliness and damages. Screw the locking nut of the pres-
sure regulator straight onto the connection thread of the bottle valve and tighten it hand-tight.
You may hear a brief hiss. Do not use a tool!
A
CO2SET
400 / 600
Connection of the pressure regulator
b
to the CO2 returnable bottle
a
.
Turn the adjustment knob
A
of the pressure regulator counter-clockwise to “–“. Close the fine
control valve
D
. Check the gasket in the connection thread
B
of the pressure regulator and the
sealing surface of the bottle valve for cleanliness and damages. Unscrew the pressure regulator
evenly and tighten it hand-tight. Do not use a tool! You can dissemble the pressure regulator
again at any time. Follow the above procedure in reverse order.
B
CO2SET
200 / 400 / 600
Connection of the CO2 SAFE safety hose
f
to the pressure regulator
b
.
Unscrew the locking nut of the hose connection
C
. Cut the necessary length from the
CO2 SAFE special hose. Guide the locking nut over the hose. Push the CO2 SAFE special hose until
it hits the hose connection
C
of the pressure regulator and tighten the locking nut again.
Assembly of the CO2 diffuser
WARNING!
Always operate the CO2 bottle upright; protect it from heat.
CO2 Set 600 contains a glass diffuser, injury danger due to broken glass.
C
CO2SET
200 / 400
Unscrew the screw cap
G
of the diffuser
c
and push the diffuser plate
I
into the gasket
H
. Fill
the diffuser two thirds with water. Push the diffuser plate
I
with gasket
H
into the diffuser
c
until the stop. Unscrew the screw cap
G
again. Unscrew the lower locking nut of the diffuser
c
and pull it across the free end of the hose. Push the CO2 SAFE special hose onto the hose connec-
tion of the diffuser
c
until the stop and screw the locking nut tight again. The diffuser is now at-
tached to the aquarium with the delivered suction cup as close to the bed as possible. Two elbows
Q
are included for better guiding of the hose in the aquarium.
CAUTION: The white diffuser plate should be cleaned regularly with a soft brush. Larger CO
2 bub-
bles indicate that the diffuser plate requires cleaning.
C
CO2SET
600
Unscrew the locking nut of the bubble counter
J
and pull it across the free end of the hose.
16

Push the CO2 SAFE special hose onto the hose connection of the bubble counter
J
until the stop
and screw the locking nut tight again. Open the top screw cover of the bubble counter
J
, fill in
approximately two thirds water and close the cover again. Now loosen the cap nut at the top of
the bubble counter
J
, lead the CO2 SAFE special hose through the cap nut and insert it in the
fitting on the top of the bubble counter
J
, Now unscrew the cap nut again. Push the silicon
adapter
R
halfway onto the CO2 SAFE special hose. Now carefully push the hose connector onto
the diffuser
L
. The diffuser
L
is attached as close to the bed as possible with the suction cups.
The bubble counter
J
is attached to the aquarium from the outside. The check valve
K
has to be
on the bottom.
CAUTION: The white diffuser plate should be cleaned regularly with a soft brush. Larger CO2 bub-
bles indicate that the diffuser plate requires cleaning.
Assembly of the CO2 long-term test
D
CO2SET
200 / 400 / 600
Fill the cover with aquarium water up to the mark (≈ 1 mL). Add 4 drops of indicator fluid
e
.
Push on the gasket and contrast ring
O
and mount the lower part on the hood and turn it. Position
the CO2 long-term test in the aquarium at an easily visible location at medium height. For an exact
measurement of CO2 content by means of the color scale, install the CO2 long-term test on the
opposite side of the CO2 diffuser.
The discoloration of the indicator fluid displays the CO2 content of the aquarium water. The com-
parison with the color scale reveals the current CO2 value:
blue = not enough, yellow/light green = too much, green/dark green = proper amount.
Please note: The correct display of the CO2 content is displayed with a time delay of approximately
3 hours. The CO2 long-term test should be refilled with new indicator solution after every change
of water or at the latest after 2 weeks.
6. Putting into operation
CO2SET
200
After all components are installed, the CO2 supply can be opened on the adjustment knob of the
pressure regulator. Turn direction clockwise.
CO2SET
400 / 600
After all components are installed, the CO2 supply can be opened on the main valve of the pressure
regulator. Turn direction counter clockwise.
The CO2 supply is opened on the adjustment knob of the pressure regulator (turn direction clockwise)
until the manometer for the system pressure gauge
F
displays approximately 1.5 bar.
CO2SET
200 / 400 / 600
Open the fine control valve
D
on the pressure regulator until bubbles rise in the diffuser. It makes
sense to adjust the amount of bubbles to a low amount in the beginning. The amount can be increased
after a few hours until the right content is displayed in the CO2 long-term test.
17
/