Ham­mond 2103 mk2 User manual

Category
Supplementary music equipment
Type
User manual

This manual is also suitable for

OWNER'S MANUAL
"...music so
beautiful that
it has to
be heard."
2101mk2
2
IMPORTANT SAFETY INSTRUCTIONS
*The company name and the product name published in the manual are the trademarks or registered
trademarks of each company respectively.
*The illustrations published in the manual are all the one for the operation explanation.
Therefore, it might be different from an actual specification.
Read these instructions.
Keep these instructions.
Heed all warnings.
Follow all instructions.
Do not use this apparatus near water.
Clean only with dry cloth.
Do not block any ventilation openings.
Install in accordance with the manufacturer's instructions.
Do not install near any heat sources such as radiators, heat
registers, stoves or other apparatus (including amplifiers) that
produce heat.
Do not defeat the safety purpose of the polarized or
grounding-
type plug. A polarized plug has two blades with one wider
than the other. A grounding type plug has two blades and a
third grounding prong. The wider blade or third prong is
provided
for your safety. If the provided plug does not fit into your
outlet, consult an electrician for replacement of the obsolete
outlet.
Protect the power cord from being walked on or pinched,
particularly at plugs, convenience receptacles, and the point
where they exit from the apparatus.
Only use attachments/accessories
specified by the manufacturer.
Use only with the cart, stand, tripod,
bracket, or table specified by the
manufacturer, or sold with the apparatus.
When cart is used: use caution
when moving the cart/apparatus
combination to avoid injury from tipover.
Unplug this apparatus during lightning storms, or when unused
for long periods of time.
Refer all servicing to qualified service personnel. Servicing is
required when the apparatus has been damaged in any way,
such as power-supply cord or plug is damaged, liquid has been
spilled or objects have fallen into the apparatus, the apparatus
has been exposed to rain or moisture, does not operate
normally, or has been dropped.
Apparatus shall not be exposed to dripping or splashing
and no objects filled with liquids, such as vases, shall be
placed on the apparatus.
3
4
thank
you...
for your purchase of the Leslie
®
Speaker System. Your new Leslie Speaker
culminates many years of research and dedication to the art of sound reproduction.
This new Leslie Speaker has been designed to provide the utmost in musical
enchantment, plus dependable service.
The Leslie Speaker system sets revolutionary new standards of organ speaker
performance, achieving heights of musical excellence never before considered
possible. Not just another speaker - it marks a major breakthrough in organ sound,
perhaps the most significant step forward since the introduction of the electronic
organ.
Many features have been included in the speaker to insure the finest organ sound
possible. Please take a moment to read this manual, then turn on your new Leslie
Speaker and enjoy your organ playing to the fullest.
IMPORTANT - PLEASE READ
Your new Leslie Speaker is designed to give you the true and authentic Leslie Sound, as well as provide you great
flexibility in how you want to play. This Guide is designed to explain the operating features of your
Leslie Speaker as simply and graphically as possible.
This new Leslie has a number of Advanced Features which this Guide will explain in detail. Each feature is
treated as an explanation unto itself, and does not
require you to already have prior working knowledge of
some other feature.
Do not be daunted by the number of steps required to perform each operation. Each step is simple.
Simply bear these things in mind:
1. Read each step carefully.
2. Don't skip any of the steps.
3. Don't perform the steps out of sequence.
With these guidelines, you are well on your way to mastering all of the many sounds and features of your Leslie
Speaker.
5
- Table of Contents –
A Brief History of the Leslie Speaker......................................................................................................................... 6
Why Leslie Speed Controls?....................................................................................................................................... 6
2101mk2 Specifications & Description....................................................................................................................... 7
Control Panel Guide................................................................................................................................................ 8, 9
Connecting Your Leslie 2101.................................................................................................................................... 10
Connecting to a single-channel Hammond Organ using the 11-pin socket.................................................. 10
Connecting to the XK-3c/XK-3/XE-1/CMS-100/XT-series/XH-series using the 11-pin socket................. 11
Connecting using the 8-pin socket (XK-1, XB-1, XM-2, XM-1) ................................................................ 12
Connecting using the ROTARY IN jack without the special 8-pin cable .................................................. 12
Connecting the Leslie 2121 Stationary-Unit................................................................................................ 13
Connecting two Stationary-Units for Stereo Separation .............................................................................. 14
Connecting two Horn Units to two Stationary-Units................................................................................... 14
Function and Preset Settings ..................................................................................................................................... 15
Function Descriptions................................................................................................................................................ 16
How to change a Preset Parameter............................................................................................................................ 17
To return to the Factory Default settings .................................................................................................................. 17
Setting of system parameters..................................................................................................................................... 18
Controlling the speaker from another instrument via MIDI...................................................................................... 19
Controlling the Advanced Features of the Leslie via MIDI......................................................................... 19
Preset Parameters ...................................................................................................................................................... 21
System Parameters .................................................................................................................................................... 21
Parameter Settings..................................................................................................................................................... 22
MIDI Information...................................................................................................................................................... 23
MIDI Implementation Chart...................................................................................................................................... 24
6
Ë A Brief History of the Leslie Speaker
The Leslie Speaker was first developed in the late 1930's by Donald J. Leslie as a way to improve the
sound of then-current Hammond Organs. Mr. Leslie found that rotating a baffle in front of a stationary
speaker added a very pleasing “tremolo-type” sound to organ music. This technique is a musical
application of the “Doppler effect,” which is the apparent variation in pitch that a stationary listener hears
from a moving sound source. The loudness of the sound also appears to vary, and it is this combination
of frequency (vibrato) and amplitude (tremolo) modulation that give Leslie Speakers their characteristic
sound.
In the majority of Leslie Speakers, there are actually two rotating baffles and two speakers. One speaker
handles the high frequencies and is mounted in the upper part of the cabinet. The baffle and motor for
this speaker are collectively called the Horn
Rotor. The other larger speaker reproduces the bass or pedal
frequencies and uses a larger baffle, and is therefore called the Bass
or Low Rotor.
In addition to rotating a baffle at a high rate of speed to produce Tremolo, it is also possible to create a
pleasing “Chorale “ or “celeste” effect by rotating the baffle at a slow rate of speed - hence the rotor speed
designations of Fast and Slow. The Chorale or effect is similar the effect produced by two ranks of pipes
being slightly out of tune with each other and being played simultaneously on a pipe organ.
Ë Why Leslie Speed Controls?
For many years, Leslie Speakers only had one speed - Fast or Tremolo. Even after the Chorale speed was
introduced in the mid ‘60's. variations in the basic speed were introduced by relocating the motor drive belt
to a different pulley to make the baffles turn either faster or slower. Although each Leslie Speaker cabinet
was and is carefully calibrated at the factory, several factors such as motor age and placement of the belts
on the pulleys can affect the speeds of the rotors as well as the time required for the rotors to speed up
(Rise
Time), slow down (Fall Time) or come to a complete stop (Brake Time).
Your new Leslie Speaker features a new brushless DC-controlled motor for the Horn and a newly-designed
digital Low rotor which allows control of these parameters to an unprecedented degree. You can now
“customize” your Leslie Speaker to produce exactly the characteristics you want.
7
SPECIFICATIONS:
Type:
3-channel(ROTARY, STATIONARY-L,
STATIONARY-R)
Animation:
Horn Rotor, Digital Bass Rotor
Power
Output:
Rotary Horn 50W. Stationary Channels
75W×2. 200 watts total.
Speakers:
Compression Driver for Horn,
13cm Woofer × 2, 5cm Tweeter × 2.
Controls:
Volume: STA-L , STA-R , ROTARY ,
OVERDRIVE,TUBE MODE(SOFT-HARD),
8-position Function Selector
Touch Buttons: PRESET 1-2, MEMORY
Value: UP,DOWN
Stationary
Channel Mode:
MONO/STEREO
Display:
7-segment, 2-digit LED display
Terminals:
Leslie11-pin Socket,Leslie8-pin
Socket , ROTARY INPUT,LINE OUT
(STATIONARY-L,STATIONARY-R,
ROTARY-L, ROTARY-R), MIDI IN, MIDI
OUT, REMOTE (Remote Power for #2121)
External Speaker OUT.
Foot
Switch:
Foot Switch 1(PRESET),Foot Switch 2
(SLOW/FAST/STOP)
Powre
Consumption:
AC 120V,220-230V,230-240V 190W.
Dimensions:
51(W)×52(D)×33(H) cm
Weight:
23 kg
Optional
Accessories:
Stationary-Unit #2121, Leslie 11-pin Cable(LC11-7M),
Leslie 8-pin Cable (LC8-7M), Stand Adapter(LSA-21),
Foot Switch (FS-9H),Speaker Stand(TS-70B).
External Speaker System(LPS-21)
to insure
your
enjoyment
of
performing
music.
The Leslie
®
model 2101mk2 contain
t
wo
r
otors to produce
the world-renowned Leslie Speaker "Sound-In-Motion
®
."
The sound is "separated" with the highs reproduced
by a horn rotor and the lows
reproduced by a two 5" speakers
with electronic rotor capability.
Both the mechanical and electronic rotors can be operated
in two modes - Fast (Tremolo) or Slow (Chorale).
In addition, there is a stationary channel designed to
accommodate the audio signal from another sound
source such as a synthesizer or external sound module.
This audio signal is handled by three speakers
-the two 13cm speakers which also handle
the lower frequencies for the rotary channel,
and two 5cm dome tweeters for the high frequencies.
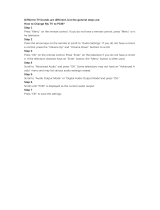
high
lev el
2"tweeter
5"woofer
5"woofer
2"tweeter
treble driver
variable speed
horn rotor
Lch
amp
75w
Rch
amp
75w
horn
amp
50w
DSP
crossover
network
DSP rotary
simulator
above
fc
below
fc
volume controls
*fc is crossover frequency
    700,
800,1KHz
Woofer doesn't sound when the
  external speaker is connected
.
rotary
Lch
L/mono
L/mono
Lineout
EXT.Speaker
11pin leslie connector
low rotary
stationary & bass
sta tio n ary
Rc h
Rch
Rch
line amp line amp
External Speaker
terminal
Lch
station ar y
Rc h
rotary
Line in
middle
lev el
low
lev el
tube amp
tube is off
8
Control Panel Guide
11-pin Socket
Allows direct connection between the a Leslie Speakers
and the Hammond Organs
The LC11-7M 11-pin cable is optional
and may be purchased from your authorized
Hammond/Leslie Dealer.
8-pin DIN Socket
Allows direct connection between a Leslie Speaker
and Hammond Models XK-1,XB-1,XM-2 and XM-1
Using the special 8-pin cable provided.
LINE IN JACK
ROTARY: Input for the Rotary speakers
for Organs/Instruments
without the multi-pin Leslie connector.
STATIONARY L,R:
Input for the stereo stationary speakers.
Signals received here will not be passed through the Rotary system.
STATIONARY Input Select
STEREO : L and R input are output in stereo.
MONO : L and R input are summed into mono.
LINE OUT JACK
Each LINE OUT JACK is Stereo Jack.
The maximum effect is achieved by using "Y" cable of the stereo.
Please let me output only "L" signal by using the mono-cable for the thing.
STATIONARY & BASS (L/MONO, R) : Allows both the STATIONARY and the LOW ROTARY channels
to be connected to an external amplifier. To connect the STATIONARY UNIT
(Optional) Companion Leslie Model #2121 Stationary Amplifier, connect
the L/MONO OUT to INPUT 2 on the Leslie Model #2121.
ROTARY (L/MONO, R) : Allows the LOW ROTARY channel to be connected to an external amplifier.
To connect the STATIONARY UNIT (Optional) companion Leslie Model #2121
Stationary Amplifier, connect the L/MONO OUT to INPUT 3.
NOTE
: The HORN ROTOR channel has no LINE OUT connection due to the acoustic nature of the sound produced.
Using the HORN Rotary channel with external amplification requires a microphone.
AC Inlet
Plug the female end of a grounded AC power cord into this receptacle, and the male end into an AC outlet.
CAUTION
This unit shall be connected to a MAINS socket outlet with a protective earth connection.
REMOTE
When the Leslie 2121 Stationary-Unit is connected, connect to the REMOTE IN with a DCC-2 cable. The power
for the Stationary-Unit can be turned “ON” and “OFF” by the power switch of the Horn-Unit.
Power Switch ON / OFF
This allows the Leslie Speaker to be turned “ON” or “OFF”.
When the 11PIN Leslie Cable is connected.
set the Power switch to the "Off" position. When the attached Hammond Organ is switched "on",
the Leslie 21 system will also power on.
CAUTION
Even when the POWER switch is turned off, electricity is still flowing to the instrument at the minimum level.
When you are not using the instrument for a long time,make sure you unplug the power cord from the wall AC outlet.
FOOT SW
PRESET : Allows switch alternate between PRESET 1 and 2 using a latching-type Foot Switch.
SLOW/FAST/STOP : Allows you to control the speed of the Leslie rotors using the optional FS-9H Foot Switch.
Each time the Foot Switch is activated, the rotors will switch between SLOW and FAST.
If the Foot Switch is pressed and held for more than 1 second, the Rotors will Stop.
Continued on next page.
9
MIDI IN
Connects to the MIDI OUT of an organ or keyboard organ, keyboard, or external device.
MIDI OUT
Connects to the MIDI IN of an additional Leslie model 21 Horn-Unit when 2 units are connected in series.
The MIDI IN from the organ and the FOOT SW signal of the Horn-Unit are merged in the MIDI OUT.
STATIONARY VOLUME CONTROLS
L : Allows the volume adjustment of the Stationary Left channel.
R : Allows the volume adjustment of the Stationary Right channel.
ROTARY
Adjusts the volume of the Rotary channel.
OVERDRIVE
Adjusts the Overdrive Level of the Rotary channel.
TUBE MODE
Controls the characteristics of the genuine Tube preamp.
At "soft" the overdrive is warm and smooth, as you progress to "hard" the overdrive
becomes stronger and "crunchier".
EXT.Speaker
Neutrik NL4FX type Spicon output terminal.
For the optional Leslie External Speaker LPS-21.
The connectors are four-contact, with the legend shown at right.
The impedance of the speaker must be greater than 4 ohm.
Power Amp Overload
Illuminates as the maximum output of the power amplifier is approached.
Refer to the preset and the
setting of the function.
2
1
10
Connecting Your Leslie 2101
Ë Connecting to a single-channel Hammond Organ using the 11-pin socket
New B-3 , XK-2
The above example shows a Hammond XK-2 connected to a Leslie model 2101 Horn Unit. The audio signal is
connected connection is made via an the optional 11-pin Leslie Cable.
Properly connect:
1. Make sure the power of both units is “OFF.”
2. Set the STATIONARY Volume Controls on the Leslie Speaker to “0” or Off ,
since the XK-2 only uses the Rotary channel.
3. Set the ROTARY Volume Control to a low setting
(the 10 o’clock position is recommended) when first making the connection.
4. Plug the female end of the Leslie Connector Cable into the 11-pin socket on the back of
the Leslie model 21 Speaker.
5. Plug the male end of the Connector Cable into the 11-pin Leslie socket on of the organ.
6. Turn the organ “ON.” After about 5 seconds, the Leslie Speaker will turn “ON.”
Then adjust the volume settings of both units to your liking need.
NOTE
: In addition, a MIDI cable can be connected from the MIDI OUT of the XK-2 to the MIDI IN of the Leslie
to allow the XK-2 to control the Advanced Features of the Leslie. Please see page 22 for more information.
NOTE: The above connection instructions will also work with older Hammond products such as XB-2, XB-5 and XB-3;
however, all MIDI features may not be available. Please see page 21 for more information.
MIDI Cable
MIDI OUT
MIDI INLeslie 11-pin Cable
XK-2
HAMMOND
11
Ë Connecting to the XK-3c/XK-3/XE-1/CMS-100/XT-series/XH-series using
the 11-pin socket
The above example shows a Hammond XK-3c connected to a Leslie model 2101 Horn Unit. The audio signal is
connected via an the optional 11-pin Leslie Cable. The above connection instructions can be used with any current Hammond
Organ; however, all MIDI features may not be able to be controlled. Please see page 21 for more information.
To make this connection:
For XK-3c , XK-3
Locate the LESLIE mode on the XK-3c
1. Press the [MENU/EXIT] button to display the MENU.
Select PAGE C by the PAGE button and press [3] LESLIE
2. Or, hold down either [LESLIE BRAKE], [LESLIE ON], or [LESLIE FAST]
3. Press the [PAGE UP] button until the "EXT. LESLIE CH" appears in the display
4. Select "2 or 3" as the value in this display
1. Make sure the power to both units is “OFF.”
2. Set the STATIONARY Volume Controls on the Leslie Speaker to a low setting (the 10
o’clock position is recommended) when first making the connection.
3. Set the ROTARY Volume Control to a low setting (the 10 o’clock position is
recommended) when first making the connection.
4. Plug the female end of the Leslie Connector Cable into the socket on the back of the Leslie Speaker.
5. Plug the male end of the Connector Cable into the 11-pin Leslie socket of the organ.
6. Turn the organ “ON.” After about 5 seconds, the Leslie Speaker will turn “ON.”
Then adjust the volume settings of both units to your liking.
NOTE:
In addition, a MIDI cable can be connected from the MIDI OUT of the organ to the MIDI IN
of the Leslie to allow the organ to control the Advanced Features of the Leslie.
MIDI Cable
Leslie 11-pin Cable
MIDI OUT
MIDI IN
12
Ë Connecting using the 8-pin socket (XK-1, XB-1, XM-2, XM-1)
The above example shows a Hammond XK-1 connected to a Leslie Model 2101 Horn Unit. The audio
signal is connected via the special 8-pin cable. In addition, a MIDI cable can be connected from
the MIDI OUT of the XK-1 to the MIDI IN of the Leslie to allow the XK-1 to control the
Advanced Features of the Leslie.
NOTE: The Remote Turn-on feature is not available when using the 8-pin interface.
Ë Connecting using the ROTARY IN jack without the special 8-pin cable
You may use the Leslie Model 2101 with other organs, keyboards and external devices
that do not have the special 8-pin jack
The above example shows a connection using the LINE OUT of another instrument. The audio
signal is connected via a 1/4”patch cord from the LINE OUT jack( or the L/MONO jack if there is
more than one) to the ROTARY IN jack of the Leslie.
Set the rotary volume on the Leslie Model 2101 to is made about 10 o'clock.
Set the STATIONARY L and R volume so that the rhythm machine and the or music player, etc.
may become proper are at the desired volume.
Turn off any Rotary speaker simulator installed on keyboard or organ when you use the Leslie Model 2101.
NOTE:
You may also use the L/MONO jack of a Hammond instrument in this fashion; however, you will NOT
be able to control the rotor speed using the Touch Tabs. Use a Foot Switch for this purpose.
MIDI Cable
MIDI IN
Audio Cable
ROTARY IN
STATIONARY L,R
SLOW/FAST/STOP
FOOT SWITCH
FS-9H etc.
LINE OUT
Rhythm machine
Music player etc.
MIDI Cable
MIDI IN8-pin LC8-7M Cable
MIDI OUT
13
Ë Connecting the Leslie 2121 Stationary-Unit
To connect the Leslie 2121 Stationary-Unit to the Leslie 2101 Horn-Unit, do the following:
1. Make sure the power to all units, including the connecting instrument, is “OFF.”
2.
Connect the Stationary Unit as shown below. Set the controls on the Stationary-Unit
similar to the settings shown below.
The rotary channel each part volumes are set to the following factory values .
HORN LEVEL : 90 / LOWER LEVEL : 99 / BASS LEVEL : 90
3. Please set the Volume levels of 2121 INPUT 2 and of INPUT 3
of the Leslie Model 2121 stationary unit referring to the figure below.
NOTE:
the two LI-40 audio cables and the DCC-2 power connecting cable are supplied with the
2121 Stationary-Unit.
4. Turn on the connected instrument. Both Leslie units will be powered up automatically.
5. Finally, turn the
MASTER VOLUME Rotary Control of the 2121 to the center (12
o’clock) position
to check the sound level, then adjust the sound to your taste need.
21
LINE
LINE LINE
POWER
ON
FROM
Leslie #21 01/2
102
TW. LEVE
MIC
GAIN
OFF ON
(XLR ONLY)
TIP: RETURN
RING: SEND
INPUT 2
BASSVOLUME INSERT VOLUME VOLUME VOLUMETREBLE
PHANTOM
XLR: Lo-Z
PHONE: Hi-Z
INPUT 1 INPUT 3 TONE MASTER
LINE OUT
-10-10 +10+10
-5+
010 010010 010
REMOT
PUSH
14
Ë Connecting two Stationary-Units for Stereo Separation
The digital LESLIE low rotor can be heard three-dimensionally by use of a stereo connection.
The remote Power-On function will not work in on the second Leslie Model 2121 Stationary Unit.
Ë Connecting two Horn-Units to two Stationary-Units
The ultimate performance of the Leslie 21 system.
21 21
Leslie 11-pin"Y"Cable
Stereo"Y"Cable
Stereo"Y"Cable
LINE
LINE LINE
POWER
ON
FROM
Leslie #2101/2
102
TW. LEVE
MIC
GAIN
OFF ON
(XLR ONLY)
TIP: RETURN
RING: SEND
INPUT 2
BASSVOLUME INSERT VOLUME VOLUME VOLUMETREBLE
PHANTOM
XLR: Lo-Z
PHONE: Hi-Z
INPUT 1 INPUT 3 TONE MASTER
LINE OUT
-10-10 +10+10
-5+
010 010010 010
REMOT
PUSH
LINE
LINE LINE
POWER
ON
FROM
Leslie #2 101 /2
102
TW. LEVE
MIC
GAIN
OFF ON
(XL R ONL Y)
TIP: RETURN
RING: SEND
INPUT 2
BASSVOLUME INSERT VOLUME VOLUME VOLUMETREBLE
PHANTOM
XLR: Lo-Z
PHONE: Hi-Z
INPUT 1 INPUT 3 TONE MASTER
LINE OUT
-10-10 +1 0+10
-5+
010 010010 010
REMOT
PUSH
LINE
LINE LINE
POWER
ON
FROM
Leslie #2101/2
102
TW. LEVE
MIC
GAIN
OFF ON
(XL R ONL Y)
TIP: RETURN
RING: SEND
INPUT 2
BASSVOLUME INSERT VOLUME VOLUME VOLUMETREBLE
PHANTOM
XLR: Lo-Z
PHONE: Hi-Z
INPUT 1 INPUT 3 TONE MASTER
LINE OUT
-10-10 +1 0+10
-5+
010 010010 010
REMOT
PUSH
Stereo"Y"Cable
Stereo"Y"Cable
21
LINE
LINE LINE
POWER
ON
FROM
Leslie #2101/2
102
TW. LEVE
MIC
GAIN
OFF ON
(XLR ONLY)
TIP: RETURN
RING: SEND
INPUT 2
BASSVOLUME INSERT VOLUME VOLUME VOLUMETREBLE
PHANTOM
XLR: Lo-Z
PHONE: Hi-Z
INPUT 1 INPUT 3 TONE MASTER
LINE OUT
-10-10 +10+10
-5+
010 010010 010
REMOT
PUSH
15
Function and Preset Settings
Editing of 16 different parameters for both rotors and saving those settings to memory using 2 presets.
PRESET SELECT
Whenever the button is pushed, PRESET 1 and PRESET 2 are alternately selected.
You may select the PRESET with the optional the foot switch connected with to the PRESET Jack.
Factory Default Set : PRESET1---- Imaged model 122.
PRESET2---- Imaged model 21H.
FUNCTION SELECT SWITCH
Pressing the button alternates the editing focus between the Horn rotor and the Digital Low Rotor.
The indicator light will illuminate under the currently selected function.
Holding the button for one second or more switches the editing focus to the MIDI functions.
Both indicator lights will illuminate.
FUNCTION DIAL
An 8-position dial that selects the parameter to edit.
LED DISPLAY
Displays the value of the currently selected parameter.
VALUE UP/DOWN
An infinite rotary control to set the value of the currently selected parameter.
MEMORY
Pressing and holding the Memory switch for one second will save all the adjustable parameters
in the preset currently selected.
The corresponding LED will blink to confirm the save.
The presets are held in memory even when the power switch is off and the mains are disconnected.
21
16
Function Descriptions
HORN ROTOR
1. Slow Speed : The horn rotor's slow speed is set.
2. Fast Speed : The horn rotor's fast speed is set.
3. Rise Time : The transition time from slow to fast is set in seconds.
4. Fall Time : The transition time from fast to slow is set in seconds.
5. Brake Time : The transition time from fast to full stop is set in seconds.
6. Rot.Level : The volume of the horn rotor is set.
7. Cross Over Freq : The crossover point from drum rotor to horn rotor is set.
There are three choices(fc=0.7 , 0.8 , 1.0kHz)
8. Horn Character : The frequency response of the horn rotor is set.
Flat…. The sound of usual characteristic.
1.0k…. 1.0kHz are emphasized.
1.6k…. 1.6kHz are emphasized.
2.0k…. 2.0kHz are emphasized.
LOW ROTOR
1. Slow Speed : The Digital Low rotor’s slow speed is set.
2. Fast Speed : The Digital Low rotor's fast speed is set
3. Rise Time : The transition time from slow to fast is set in seconds.
4. Fall Time : The transition time from fast to slow is set in seconds.
5.
Brake Time : The transition time from fast to full stop is set in seconds.
6. Rot.Level : The volume of the low rotor middle frequencies is set.
7. Bass Level : The volume of the low rotor bass frequencies is set.
8. Cabi.Character : The characteristic of the virtual leslie cabinet cabinet is set.
The characteristics include:The frequency response , the tremolo, the depth of the chorus,
and the simulation of reverberations.
The choice of types of cabinets are: 122 type…. The sound of the most familiar Leslie "Model 122"
21H type…. The 21H is a much-desired vintage Leslie,
with clear and distinct tone.
This setting is enhanced by using the vibrato/chorus
on your organ
Bright type….
Punchy "bright" sound. This setting compliments
an overdriven organ sound.
Flat type…. Plain sound near “Model2101”.
Fall Time Rise Time Brake Time
Speed
Fast
Speed
Slow
Speed
Slow
on
Fast
on
Brake
on
Stop
Time
Time of Leslie Rotar and concept
chart of speed change
fc
125Hz
(Fixation)
MiddleLow High
(Horn Rotor
frequency
Level
(Low Rotor)
(Cross Over Freq.)
17
How to change a Preset Parameter.
In this example, you will change the Level of the horn rotor.
STEP Preset 1 or 2 or is selected pushing the PRESET SELECT button.
--------Select a preset to change, in this case select Preset #2
by pressing the [SELECT] button until the #2 LED lights
STEP HORN ROTOR or LOW ROTOR is selected pushing the FUNCTION SELECT button.
--------Press the [SELECT] button until the LED for "Horn rotor" is illuminated.
STEP Use the FUNCTION DIAL to select which function to edit.
--------
Turn the function select dial to [ROT. LEVEL].
STEP The current value is shown in the LED display.
The Factory Default value is "50"
STEP The VALUE UP/DOWN dial is turned and the numerical value is changed.
-------- Using the [VALUE} dial, turn it fully to the right. The display will read "99"
and the horn volume is at maximum.
STEP Enter the edit into memory by pushing the [MEMORY] button for one second.
repeat the operation from STEP2 to STEP5
to change other parameters values.
When you change two or more settings in the same preset.
committing the preset to memory records all the changes made.
Attention. Changes made will revert back to the previous settings if not saved to memory,
if the preset is switched, or the 2101 is powered off
To return to the Factory Default settings.
Press and Hold the red MEMORY Button.
Continue to hold the MEMORY Button , and turn the Leslie 2101 Power “ON”
"In" is displayed in LED during the processing time.
The factory default settings have now been restored.
50
99
18
Setting of system parameters.
Press and hold the [FUNCTION SELECT] button for one second or more until both indicators are illuminated.
Attention. The System parameters are "global" and are common to both presets.
The settings are stored as you change them, and remain in storage after power-down.
MIDI FUNCTION
1.[Control Ch] : Sets Control change reception ON/OFF and MIDI channel (1-16).
2.[Prog. Ch] : Sets Program change reception ON/OFF and MIDI channel (1-16)
Presets 1 and 2 are switched by programs 1 and 2.
3.[Mod Rx] : Sets the reception of speed control by the modulation wheel ON/OFF.
4.[Exp Rx] : Sets the reception of speed control by the Exp. Pedal.
5.[S/F Type] : 6.By the control change to which is set
Latch(LA)/Unlatch (uL) of the Slow/Fast switch is set.
Sets the type of foot switch for Latched (LA) or Unlatched (uL) control.
For use of the optional Leslie "FS-10L" set this parameter to (LA).
uL : For momentary control. When the footswitch is pressed,
"Fast" speed is selected and held until the footswitch is released.
LA : "Slow" and "Fast" are alternately selected with each press of the footswitch.
6.[S/F Cont.Code] : The control code of the Slow/Fast switch is set.
The factory default is CC#64. The range is CC#0-#99.
7.[Dump Out] : The system dump is via the MIDI OUT Jack.
Use this function to record preset and system parameters into a MIDI sequencer,
or to synchronize another 2101mk2.
1. Select [DUMP OUT] with the [FUNCTION] dial.
2. Arm the MIDI sequencer for record, and begin recording.
3. Move the [VALUE] switch until the LED display "dp"
begins to blink. When the blinking stops,
the dump is complete.
Setting of foot switch
8.[P.F.SW Type] : Preset Foot Switch Type
Sets the type of foot switch for preset 1 and 2 switch is set control.
uL or LA
(See above for description of "uL" and "LA")
1
6
d p
19
Controlling the speaker from another instrument via MIDI
Your Leslie Speaker gives you the capability to control the Leslie parameters via MIDI.
The Low Rotor is controlled through software via DSP, while the Horn Rotor uses a special
brushless DC motor which responds to incoming MIDI Controller data.
Hammond Organ models which have Leslie parameter controls in the Information
Center Display such as XK-3c, XK-3, XK-1, XB-1, XK-2, XE-1, CMS-100-series, A-305,
and XT/XH-series home organs can control the rotors and sound characteristics of the
Leslie Speaker in addition to the built-in digital Leslie simulator.
Non-Hammond keyboards such as synthesizers, MIDI master keyboards, etc., can
also control the rotors and sound of this Leslie Speaker without going through the 11-pin
Leslie interface.
NOTE: The MIDI NRPN must be "ON."
Please consult Your instrument's Owner's Playing Guide/Manual
for the proper instructions .
ËControlling the Advanced Features of the Leslie via MIDI
Example of control by XK-3c
(Consult the Owners guide of the XK-3c for directions on how to navigate to the following screens)
1. Select "21" as the value of LES on the MAST screen of the MIDI page.
2. (On the Leslie 2101mk2)
Set FUNCTION switch to HORN ROTOR
Set FUNCTION DIAL to SLOW SPEED
(On the XK-3c)
Navigate to the HORN SPEED screen of the LESLIE PARAMETER page.
Move the cursor to SLOW SPPED
3. The LCD Display changes when HORN SLOW SPEED value of XK-3c is changed.
The LED display of this unit the Leslie 2101mk2 synchronizes at the same time.
Attention. The XK-3c's parameter value must correspond with the available values
offered by the 2101mk2. The 2101mk2 will not accept values outside the range.
5
20
  • Page 1 1
  • Page 2 2
  • Page 3 3
  • Page 4 4
  • Page 5 5
  • Page 6 6
  • Page 7 7
  • Page 8 8
  • Page 9 9
  • Page 10 10
  • Page 11 11
  • Page 12 12
  • Page 13 13
  • Page 14 14
  • Page 15 15
  • Page 16 16
  • Page 17 17
  • Page 18 18
  • Page 19 19
  • Page 20 20
  • Page 21 21
  • Page 22 22
  • Page 23 23
  • Page 24 24
  • Page 25 25
  • Page 26 26

Ham­mond 2103 mk2 User manual

Category
Supplementary music equipment
Type
User manual
This manual is also suitable for

Ask a question and I''ll find the answer in the document

Finding information in a document is now easier with AI