Grizzly G0594 Owner's manual
- Category
- Garden shredders
- Type
- Owner's manual
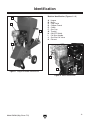
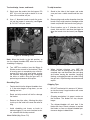
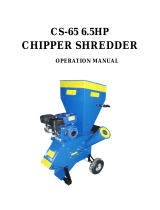
Grizzly G0594 is a large chipper/shredder designed to reduce wood into smaller pieces. It has a powerful 6.0 HP Briggs & Stratton gas-powered engine and can chip branches up to 3" in diameter and shred smaller pieces of wood up to 3/8" in diameter. The chipper funnel is designed to accept larger branches, while the hopper is ideal for smaller pieces of wood.
Grizzly G0594 is a large chipper/shredder designed to reduce wood into smaller pieces. It has a powerful 6.0 HP Briggs & Stratton gas-powered engine and can chip branches up to 3" in diameter and shred smaller pieces of wood up to 3/8" in diameter. The chipper funnel is designed to accept larger branches, while the hopper is ideal for smaller pieces of wood.


-
 1
1
-
 2
2
-
 3
3
-
 4
4
-
 5
5
-
 6
6
-
 7
7
-
 8
8
-
 9
9
-
 10
10
-
 11
11
-
 12
12
-
 13
13
-
 14
14
-
 15
15
-
 16
16
-
 17
17
-
 18
18
-
 19
19
-
 20
20
-
 21
21
-
 22
22
-
 23
23
-
 24
24


Grizzly G0594 Owner's manual
- Category
- Garden shredders
- Type
- Owner's manual
Grizzly G0594 is a large chipper/shredder designed to reduce wood into smaller pieces. It has a powerful 6.0 HP Briggs & Stratton gas-powered engine and can chip branches up to 3" in diameter and shred smaller pieces of wood up to 3/8" in diameter. The chipper funnel is designed to accept larger branches, while the hopper is ideal for smaller pieces of wood.
Ask a question and I''ll find the answer in the document
Finding information in a document is now easier with AI
Related papers
Other documents
-
Hyundai power products HYCH700 HYCH1400 Owner's manual
-
Simplicity 14E User manual
-
Powerhorse Wood Chipper/Shredder Owner's manual
-
 Blue Max CS-65 6.5HP Operating instructions
-
MILLASUR Anova BIO70D Owner's manual
-
Ryobi RGS-2540 Owner's Operating Manual
-
 Brush Master CH2 User manual
-
Wen 41121 User manual
-
Parkside PLH 2800 B2 Owner's manual
-
Parkside PLH 2800 B2 Owner's manual

