Electrolux EK226SRBR A User manual
- Category
- Fridges
- Type
- User manual
Page is loading ...
Page is loading ...
Page is loading ...
Page is loading ...
Page is loading ...
Page is loading ...
Page is loading ...
Page is loading ...
Page is loading ...
Page is loading ...
Page is loading ...
Page is loading ...
Page is loading ...
Page is loading ...
Page is loading ...
Page is loading ...
Page is loading ...
Page is loading ...
Page is loading ...
Page is loading ...
Page is loading ...
Page is loading ...
Page is loading ...
Page is loading ...
Page is loading ...
Page is loading ...
Page is loading ...
Page is loading ...
Page is loading ...
Page is loading ...
Page is loading ...
Page is loading ...
Page is loading ...
Page is loading ...
Page is loading ...
Page is loading ...
Page is loading ...
Page is loading ...
Page is loading ...
Page is loading ...
Page is loading ...
Page is loading ...
Page is loading ...

44
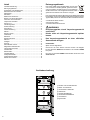
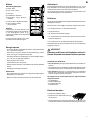
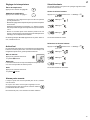
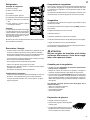
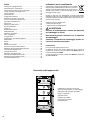
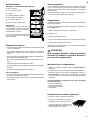
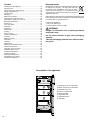
Description of the appliance
1Operating and control elements
2 Butter and cheese compartment
3Adjustabledoorrack
4Freezercompartment
5 Sectioned shelf
6 Adjustableshelf
7 Vegetable drawer
8 Type plate
Content
Description of the appliance ...................................................44
Disposal notes ........................................................................ 44
Safety instructions and warnings ...........................................45
Range of appliance use ..........................................................45
Climate rating .........................................................................46
Setting up ...............................................................................46
Electrical connection ..............................................................46
Operating and control elements ............................................. 46
Switchingtheapplianceonando ........................................46
Setting the temperature ..........................................................47
Action Cool ............................................................................. 47
Door open alarm .....................................................................47
Child lock ................................................................................47
Equipment ..............................................................................48
Interior light ............................................................................. 48
Cooling ...................................................................................49
Saving energy ........................................................................49
Freezercompartment ............................................................. 49
Freezing..................................................................................49
Making ice cubes ...................................................................49
Defrosting ...............................................................................50
Cleaning .................................................................................50
Malfunctions ........................................................................... 50
Shutting your appliance down ................................................50
Supplied accessories ............................................................. 51
Changing over door hinges ....................................................52
Appliance dimensions ............................................................54
Installation dimensions ........................................................... 54
Appliance venting ................................................................... 55
Decor panel dimensions ........................................................55
Assembling decor panels ....................................................... 55
Installing the appliance ...........................................................56
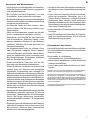
Disposal notes
The appliance contains reusable materials and should
be disposed of properly - not simply with unsorted
household refuse. Appliances which are no longer
needed must be disposed of in a professional and
appropriate way, in accordance with the current local
regulations and laws.
When disposing of the appliance, ensure that the refrigerant circuit
is not damaged to prevent uncontrolled escape of the refrigerant
it contains (data on type plate) and oil.
•Disabletheappliance.
• Pulloutthemainsplug.
•Cutthroughtheconnectioncable.
WARNING
Danger of suffocation due to packing material
and plastic film!
Do not allow children to play with packaging
material.
Take the packaging material to an official collec-
tion point.

45
GB
Range of appliance use
The appliance is suitable solely for cooling food
in a domestic environment or similar.
Thisincludes,forexample,use
- in staff kitchenettes, bed and breakfast establish-
ments,
- by guests in cottages, hotels, motels and other
forms of accommodation,
- in catering and similar services in the wholesale
trade.
Usetheappliancesolelyasiscustomarywithinadomesticen-
vironment. All other types of use are inadmissible.
The appliance is not suitable for storing and cooling medicines,
blood plasma, laboratory preparations or similar substances and
products covered by the 2007/47/EC Medical Devices Directive.
Any misuse of the appliance may result in damage to or spoilage
of stored goods.
Furthermore,theapplianceisnotsuitableforoperationinpoten-
tiallyexplosiveatmospheres.
Safety instructions and warnings
•Topreventinjuryordamagetotheunit,theap-
pliance should be unpacked and set up by two
people.
•Intheeventthattheapplianceisdamagedon
delivery, contact the supplier immediately before
connecting to the mains.
•Toguaranteesafeoperation,ensurethattheap-
pliance is set up and connected as described in
these operating instructions.
•Disconnecttheappliancefromthemainsifany
faultoccurs.Pullouttheplug,switchofforremove
the fuse.
•Whendisconnectingtheappliance,pullonthe
plug, not on the cable.
•Anyrepairsandworkontheapplianceshould
only be carried out by the customer service
department, as unauthorised work could prove
highly dangerous for the user. The same applies
to changing the mains power cable.
•Donotallownakedflamesorignitionsources
to enter the appliance. When transporting and
cleaning the appliance, ensure that the refrigerant
circuit is not damaged. In the event of damage,
make sure that there are no ignition sources
nearby and keep the room well ventilated.
•Donotstandontheplinth,drawersordoorsor
use them to support anything else.
•Thisappliancecanbeusedbychildrenof8years
old and over, and also by persons with restricted
physical, sensory or mental capacity or lack of
experienceandknowledge,iftheyaresupervised
or have been instructed on safe use of the appli-
ance and understand the resulting risks. Children
must not be allowed to play with the appliance.
Cleaning and user maintenance must not be
carried out by children without supervision.
•Avoidprolongedskincontactwithcoldsurfaces
or chilled/frozen food. This could cause pain,
numbness and frostbite. In the case of prolonged
skin contact, protective measures should be
taken, e.g. gloves should be worn.
•Donoteaticecream,particularyicelolliesorice
cubes, immediately after taking them from the
freezer compartment as there is a risk of "burn-
ing" because of the very cold temperatures.
•Donotconsumefoodwhichhasbeenstoredfor
too long, as it could cause food poisoning.
•Do notstoreexplosivesor spraysusingcom-
bustible propellants such as butane, propane,
pentane, etc. in the appliance. Electrical com-
ponents might cause leaking gas to ignite. You
may identify such sprays by the printed contents
or a flame symbol.
•Donotuseelectricalappliancesinsidetheap-
pliance.
•Ifyouhavealockableappliance,donotkeepthe
key near the appliance or within reach of children.
•TheLEDlightstripilluminatestheinteriorofthe
appliance. It is not suitable for lighting a room.

46
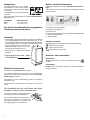
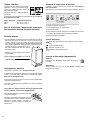
Setting up
• StandardEN378specifiesthattheroominwhichyouinstall
your appliance must have a volume of 1 m
3
per 8 g of R 600a
refrigerant used in the appliance, so as to avoid the formation of
inflammablegas/airmixturesintheroomwheretheappliance
is located in the event of a leak in the refrigerant circuit. The
quantity of refrigerant used in your appli-
ance is indicated on the type plate on the
inside of the appliance.
•Onlyusetheappliancewhenitisinstalled.
•
Do not cover ventilation openings
or grille.
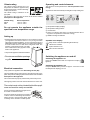
Switching the appliance on and o
Switching the appliance on
Press the On/Off button until the temperature display
lights up.
Switching the appliance o
Keep the On/Offbuttonpressedforapprox.3secondssothat
the temperature display goes out.
1 Temperature display (display)
2 Temperature setting buttons
3 On/Obutton
4 Action Cool button (The Action Cool button switches the re-
frigeratorcompartmenttomaximumcooling)
5Audiblewarningon/obutton
Symbols in the display
Setup mode is activated (activating the child lock)
Child lock is activated
Symbol ActionCool on
Demo mode is activated
Operating and control elements
The electronic control panel has the "touch capacitance tech-
nology".
Any function can be activated by touching the corresponding icon.
Climate rating
The climate rating indicates the room
temperature at which the appliance may
be operated in order to achieve full refrig-
eration performance.
The climate rating is indicated on the
type plate.
The position of the type plate is shown in the section entitled
Description of the appliance.
Climate rating Room temperature
SN-ST +10°Cto+38°C
SN-T +10°Cto+43°C
Do not operate the appliance outside the
specified room temperature range.
Electrical connection
Only operate the appliance with alternating current (AC).
The permissible voltage and frequency are indicated on the type
plate. The position of the type plate is shown in the section entitled
Description of the appliance.
The socket must be properly earthed and protected by a fuse.
The tripping current of the fuse must be between 10 A and 16 A.
The socket must not be situated behind the appli-
ance and must be easily accessible.
Donotconnecttheapplianceusinganexten-
sioncableorextensionsocket.
Do not use stand-alone inverters (conversion
of direct current to alternating current/three-
phase current) or energy-saving plugs. Risk
of damage to the electronic control system!

47
GB
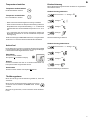
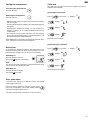
Child lock
The child lock is designed to protect the appliance from being
switched off accidentally.
Activating the child lock
Press for 5 seconds. >> Display =
Display =
Display =
Display =
The child lock is activated.
Deactivating the child lock
Press for 5 seconds. >> Display =
Display =
Display =
Display =
The child lock is deactivated.
ActionCool
By activating the ActionCool function, the temperature in the
refrigerator compartment will drop to its lowest value. It is recom-
mended if large quantities of food are to be cooled rapidly.
Switching on
PresstheActionCoolbutton.
The symbol
appears in the display.
Note
The ActionCool function switches off automatically after about
6 hours, but can be switched off earlier.
Switching o
PresstheActionCoolbutton.
The symbol
goes dark.
Setting the temperature
Increasing the temperature
Pressthe+ button.
Reducing the temperature
Pressthe- button.
- When pressing one of the buttons for the first time, the display
will start to flash.
-Pressingthisbuttonagainenablesyoutochangethetempera-
ture setting.
Recommended temperature setting: 5°C. An average tem-
peratureofapprox.-18°Cisthenestablishedinthefreezer
compartment.
- The electronic control system will switch over automatically
about 5 seconds after the last time you pressed the button, and
the actual temperature will be displayed.
If F0 to F9 appears in the display, the appliance has a fault. In this
case, contact the customer service department.
Door open alarm
If the door is left open for more than 60 seconds, the audible
warning signal will sound.
If the door must be opened for a lengthy period to place
items into the appliance, cancel the audible warning
signal by pressing the alarm button.
The alarm switches back to standby when the door is shut.

48
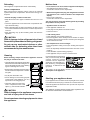
Interior light
The interior light will always switch on when
the appliance door is opened.
The light intensity of the LED light cor-
responds to laser class 1/1M.
Important
The light cover may only be removed by
customer service staff.
If the cover is removed, do not look di-
rectly at the light through optical lenses
from close distance. This can damage
your eyes.
Remove the roller rails for
cleaning.
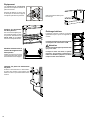
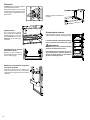
Equipment
You can re-arrange the storage
shelves as required.
Lift the glass shelf, align the recess
over the support and replace the
shelf in a higher or lower position.
Sectioned shelf
If you need to make space for
tall containers, simply slide
the front half of the sectioned
glass shelf carefully under-
neath the back half.
Repositioning the door racks
Lift door rack vertically, lift out to the front
and re-insert at a different height, following
these steps in the reverse order.
Adjusting the insertion
height of the sectioned
shelf
Remove the supporting strips
and place on the supports
above or below the previous
position.

49
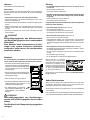
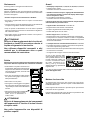
Cooling
Storage example
1 butter, cheese
2 eggs, cans, tubes
3 bottles
4 frozen food, ice cubes
5 baked goods, pre-cooked meals,
drinks
6 meat, sausage products, dairy prod-
ucts
7 salad, fruit, vegetables, fresh herbs
Note
Foodwhichgivesofforabsorbsodours
and flavours as well as liquids should
always be stored covered or in closed
containers.
High-percentagealcoholsshouldbe
tightly sealed and stored upright.
GB
Saving energy
- Always ensure good ventilation. Do not cover ventilation open-
ings or grille.
- Donotplaceapplianceinareasofdirectsunlightornexttoa
cooker,radiatororsimilarobject.
- The energy consumption depends on the installation conditions,
e.g. the ambient temperature.
- Keep the time the appliance is open to a minimum.
- Store food logically.
- Firstcoolwarmfoodtoroomtemperaturebeforestoringit.
- Defrost frozen food in the refrigerator.
Freezer compartment
- Ensure that all food is well packed and covered for storage. This
will prevent frost from forming.
- If there is a thick layer of frost in the appliance: defrost the ap-
pliance.
Making ice cubes
• Filltheicecubetraywithwater.
• Placetheicecubetrayintheappliance
and leave it to freeze.
• The ice cubes can be removed from the tray by twisting or by
holding upside down for a short time under running water.
Freezer compartment
You can store frozen food for several months, make ice cubes
and freeze fresh food in the freezer compartment at a temperature
of-18°Candlower.
The air temperature in the compartment, measured by thermom-
eter or other instruments, may fluctuate.
Freezing
Freshfoodshouldbefrozentocoreasquicklyaspossible.
You can freeze up to 2 kg/24 hours.
•
Setthetemperatureto5°Corlower.
• Wait4hours.
• Placethefreshfoodinthefreezer.
• Afterapprox.24hoursthefreshfoodwillbefrozen.
• Nowsetthetemperaturetothenormalsetting.
Deep frozen food can be placed into the cold freezer compart-
ment straight away.
CAUTION
Do not freeze bottles and cans of drinks. They
can burst during the freezing process.
Notes on freezing
• Pack frozen food in standard freezer bags or reuseable plastic,
metal or aluminium containers.
• Always writethe date and contents onthepackanddo not
exceedthestatedstoragetimeforthefood.
•Only takeout asmuch foodas is immediately required for
thawing.Usefoodwhichhasbeenthawedinpreparedmeals
as quickly as possible.
Frozen food can be thawed in the following ways:
– in a fan oven
– in a microwave oven
– at room temperature
– in the refrigerator

50
Malfunctions
• F0, F1, F2, F3, F4, F5, F6, F7, F8 or F9 appears in the display.
– The appliance has suffered a fault.
Contact the customer service department.
• When inserting the mains plug, the refrigeration unit does
not switch on, but a value is shown in the temperature
display.
– Demo mode is activated.
Contact the customer service department.
You may be able to rectify the following faults by checking
the possible causes yourself:
• Appliance does not function:
– Is the appliance switched on?
– Is the plug correctly fitted in the mains socket?
– Is the fuse intact?
• Loud running noise:
– Is the appliance set up firmly on the floor?
–Doestheappliancecausenearbyitemsoffurnitureorobjects
tovibrate?Pleasenotethatnoisescausedbytherefrigerant
circuit cannot be avoided.
• The temperature is not low enough:
– Is the temperature setting correct (see "Setting the tempera-
ture")?
– Does the separately installed thermometer show the correct
reading?
– Is the ventilation system working properly?
– Is the appliance set up too close to a heat source?
If none of the above causes apply
and you cannot rectify the fault
yourself, contact the nearest
customer service department
stating the type designation
1,
PNCnumber
2 and appliance
number
3 as indicated on the
type plate.
The position of the type plate is shown in the section entitled
Description of the appliance.
Shutting your appliance down
If your appliance is to be shut down for any length of time, switch
it off and disconnect the plug or switch off or unscrew the fuse.
Clean the appliance and leave the door open in order to prevent
unpleasant smells.
The appliance complies with the relevant safety regulations and
EC directives 2004/108/EC and 2006/95/EC.
Cleaning
Before cleaning, always switch off the appliance. Pull out
the plug or switch off the fuse!
• Cleantheinsideandequipmentpartswith
lukewarm water and a little detergent. Do
not use chemical solvents or any cleaning
agents containing sand or acid.
•Ensurethatnocleaningwaterpenetrates
into the electrical components or ventila-
tion grille.
• Dryallpartswellwithacloth.
• Donotdamageorremovethetypeplate
on the inside of the appliance. It is very
important for servicing purposes.
•Cleanthedrainholeintherefrig-
erator compartment with a thin
object,e.g.cottonswaborthelike.
CAUTION
Risk of damage to the appliance components
and risk of injury due to hot steam.
Do not use steam cleaning equipment to clean
the appliance.
Defrosting
The refrigerator compartment defrosts automatically.
Freezer compartment
After a long period of operation, a layer of frost or ice can build
up inside the freezer compartment. This increases energy con-
sumption.
• Pull out the plug or switch off the fuse!
• Wrapthefrozenfoodinpaperorblanketsandstoreinacool
place.
•Leavetheappliancedoorandthefreezercompartmentdoor
open when defrosting.
• Afteradefrostingtimeofapprox.20minutes,thelayeroffrost
or ice can be detached from the interior container by hand and
removed.
• Afterdefrosting,mopup the remainingwater and cleanthe
appliance.
CAUTION
Risk of damage to the refrigerant circuit and
flammability hazard due to leaking refrigerant.
Do not use any mechanical devices or other
artificial aids for defrosting other than those
recommended by the manufactur er.

51
GB
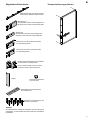
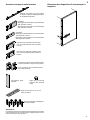
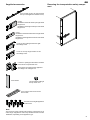
Supplied accessories
Cover profile (covers the gap between
the top of the appliance and the recess)
Covers
Installation on the left at the top for right-hand
hinged door.
Installation on the right at the top for left-hand
hinged door.
Cover
Installation on the left at the bottom for right-hand
hinged door.
Installation on the right at the bottom for left-hand
hinged door.
Cover for the top hinge bracket for right-
hand hinged door
Cover caps for the screws on the
decor frame
Plugforhingebushingin
the top of the door
Cover for the top hinge bracket for left-
hand hinged door
Door handle
Covers for openings in the interior container
in the freezer compartment area
These parts are required if the appliance
door hinges are changed over.
Removing the transportation safety compo-
nent
Note
The accessory pack contains all necessary components for an
entirerangeofappliances.Partsmaythereforebeleftoverafter
installation, depending on the appliance type.
Screws for securing the appliance
in the recess

52
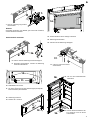
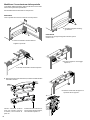
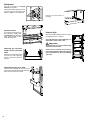
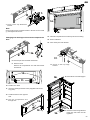
Changing over door hinges
Doorhingesshouldonlybechangedbyatrainedexpert.
Changing the door hinges must be done by two people.
Important
The door must now be held secure by somebody.
1. Unscrewthelowerhingebracket.
Remove door.
1.
2.Unscrewupperhingebracket.
2.
4.
5.
6.
Note
Screw in the screws, push the bracket to the left as
far as it will go, then tighten the screws.
This hinge bracket will later be
mounted at the bottom on the
left, as described in point 19.
This hinge bracket will later be
mounted at the top on the left,
as described in point 17.
3.
3. Remove the pins from each of the hinge brackets,
transfer to the other hinge bracket and tighten.
4. Transfer the bottom attach-
ment bracket.
5.Unscrew the top attachment
bracket.
6. Remove the retaining bracket and
transfer to the opposite side.

53
GB
18. Placethedooronthehingepin.
18.
19.
7.
Note
Screw in the screws, push the bracket to the left as far as it will
go, then tighten the screws.
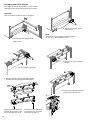
Changing over the hinges of the freezer compartment
door
8.
9.
10.
11.
12.
13.
14.
15.
16.
17.
7. Screw on the top attachment
bracket.
8. Tilt lower part of the bracket downwards.
9. Remove screw.
Remove the compartment door with the bracket
downwards.
10. Transfer door latch.
11. Close the openings with the covers (supplied in the acces-
sory pack).
14. Insert the compartment door in the top left door mounting.
15. Screw on bracket.
16. Close lower part of the bracket.
12. Transfer bracket to the opposite
side.
13. Turn the compartment door
through180°.
17. Screw on the top hinge
bracket.
19. Insert the bottom hinge bracket
in the door and screw onto the
appliance.

54
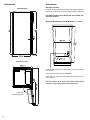
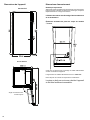
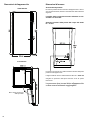
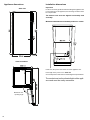
Installation dimensionsAppliance dimensions
In this area, the power cord comes out of the appliance rear.
Freelengthofthepowercord=2000 mm
Choose the position of the socket considering these specifications.
The socket must not be situated behind the appli-
ance and must be easily accessible.
Side view
View from above
Important
In order to avoid any problems when installing the appliance and
to avoid damage to the appliance, the following conditions must
be complied with.
The kitchen unit must be aligned horizontally and
vertically.
Minimum wall thickness of the body of the unit = 16 mm.
Maximumdoor
opening angle

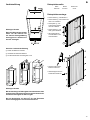
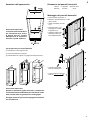
55
D
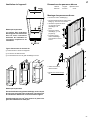
Assembling decor panels
• Unscrewdecorframe1.
•Loosendecorframes
2 and slide
forwards.
•Slidethedecorpanel
3 between the frames
and the door.
•Screw on the decor
frames
1 with handle
4.
•Slidealldecorframes
back and screw tightly.
• Fitthecovercapsonthe
screws.
• Insert the plug in the
hinge bushing.
Decor panel dimensions
Height Width Thicknessmax.
1224 mm 535 mm 2 mm
Appliance venting
Important
The clear ventilation cross-
section must be at least
200 cm² from the lower ven-
tilation opening right to the
upper one.
Types of air outlet
1 Directly above the appliance
2 Above the top unit
3 Fromthefrontofthetopunitwithdecorgrille
Important
When using decor grilles, it must be taken into account
that the clear ventilation cross-section corresponds
to the sum of the individual openings in the grille.
A cut-out section of merely 200 cm² for installing the
ventilation grille is thus not sucient.

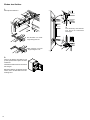
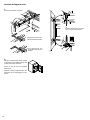
56
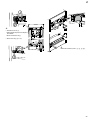
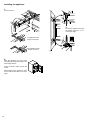
Installing the appliance
1.
Fitcoverprofile.
On appliances with
hinges on the right
On appliances with
hinges on the left
3.
Secure the appliance through
the hinges using two 4 x 17
screws per hinge.
2.
Slide the appliance into the recess
andadjustthedepthdependingonthe
desired appearance.
Route the mains cable towards the
socket.
When sliding in the appliance, make
sure that the mains cable is not dam-
aged.

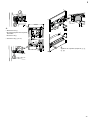
57
D
5.
Fit the coversinthefollowingorder:1,
2, 3, 4.
4.
• Undothescrews1.
•Slidebrackettowardstheunitwall.
• Tightenthescrews
1.
• Screwinthescrews
2(4x17).
Page is loading ...
Page is loading ...
Page is loading ...
-
 1
1
-
 2
2
-
 3
3
-
 4
4
-
 5
5
-
 6
6
-
 7
7
-
 8
8
-
 9
9
-
 10
10
-
 11
11
-
 12
12
-
 13
13
-
 14
14
-
 15
15
-
 16
16
-
 17
17
-
 18
18
-
 19
19
-
 20
20
-
 21
21
-
 22
22
-
 23
23
-
 24
24
-
 25
25
-
 26
26
-
 27
27
-
 28
28
-
 29
29
-
 30
30
-
 31
31
-
 32
32
-
 33
33
-
 34
34
-
 35
35
-
 36
36
-
 37
37
-
 38
38
-
 39
39
-
 40
40
-
 41
41
-
 42
42
-
 43
43
-
 44
44
-
 45
45
-
 46
46
-
 47
47
-
 48
48
-
 49
49
-
 50
50
-
 51
51
-
 52
52
-
 53
53
-
 54
54
-
 55
55
-
 56
56
-
 57
57
-
 58
58
-
 59
59
-
 60
60


Electrolux EK226SRBR A User manual
- Category
- Fridges
- Type
- User manual
Ask a question and I''ll find the answer in the document
Finding information in a document is now easier with AI
in other languages
- italiano: Electrolux EK226SRBR A Manuale utente
- français: Electrolux EK226SRBR A Manuel utilisateur
- Deutsch: Electrolux EK226SRBR A Benutzerhandbuch
Related papers
-
Electrolux EK140SRBR A User manual
-
Electrolux EK22811LISW BM User manual
-
-
-
-
-
-
-
-
Other documents
-
IFM E20896 Installation guide
-
-
-
Liebherr FKUv 1662 Operating instructions
-
Liebherr KID 2212 Comfort Operating instructions
-
SEVERIN KS 9863 Owner's manual
-
Dometic RM2356 Door Installation guide
-
SEVERIN KS 9866 Owner's manual
-
-
V-ZUG 51093 Installation guide