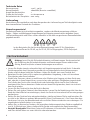
Rommelsbacher CT 2215 Owner's manual
- Category
- Hobs
- Type
- Owner's manual
This manual is also suitable for

CT 2215/IN
Induktions Kochtafel
Induction cooking plate
Bedienungsanleitung
Instruction manual
D
GB

2
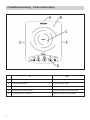
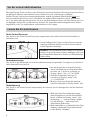
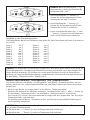
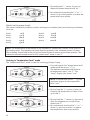
Produktbeschreibung - Product description
D GB
A Edelstahl-Rahmen Stainless steel frame
B Glaskeramikplatte Glass ceramic plate
C Kochstelle Cooking zone
D Bedienfeld für Kochstelle Control panel for cooking zone
E Griffmulden für Transport Recessed grips for transport

3
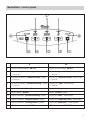
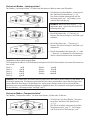
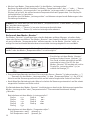
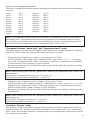
Bedienfeld - Control panel
D GB
1 Sensor für Haupschalter „ON/OFF“ Sensor for main switch “ON/OFF”
2 Sensoren für Modus „Leistungsstufen“ (power) Sensors for “power level” mode (power)
„-“ und „+“ “-“ and “+”
3 Sensoren für Modus „Temperaturstufen“ (temp) Sensors for “temperature level” mode (temp)
„-“ und „+“ “-” and “+”
4 Sensoren für Modus „Laufzeiteinstellung“ (timer) Sensors for “timer” setting (timer)
„-“ und „+“ “-” and “+”
5 Sensor für Modus „Booster“ Sensor for “booster” mode
6 LED für Modus „Booster“ LED for “booster” mode
7a Display für Modus „Laufzeiteinstellung“ (timer) Display for “timer” mode (timer)
7b Display für Modus „Temperaturstufen“ (temp) Display for “temperature level” mode (temp)
7c Display für Modus „Leistungsstufen“ (power) Display for “power level” mode (power)
8 LED für Hauptschalter „ON/OFF“ LED for main switch “ON/OFF”
Page is loading ...
Page is loading ...
Page is loading ...
Page is loading ...
Page is loading ...
Page is loading ...
Page is loading ...
Page is loading ...
Page is loading ...
Page is loading ...
Page is loading ...
Page is loading ...

16
GB
Instruction manual
Contents
Page
Product description ..................................................................................................... 2
Control panel ................................................................................................................. 3
Introduction ................................................................................................................... 17
General notes for cooking with induction
............................................................................ 17
Advantages of induction cooking
........................................................................................ 17
Selecting pots and pans
...................................................................................................... 17
Intended use ...................................................................................................................... 17
Technical data .................................................................................................................... 18
Scope of supply .................................................................................................................. 18
Packing material ................................................................................................................. 18
For your safety
............................................................................................................... 18
Important notes ............................................................................................................ 19
Prior to initial use
........................................................................................................ 19
Getting acquainted with your appliance
............................................................... 20
Touch control sensors ........................................................................................................ 20
Residual heat indicator ...................................................................................................... 20
Pot recognition
................................................................................................................... 20
Fan ...................................................................................................................................... 20
Operating time restriction ................................................................................................... 20
Priority regulation ............................................................................................................... 21
Recessed grips for a safe transport ..................................................................................... 21
Operating the appliance ........................................................................................... 21
Standby mode .................................................................................................................... 21
Switching-on ...................................................................................................................... 21
Cooking in “power level“ mode
........................................................................................... 21
Cooking in
“
temperature level“ mode ................................................................................. 22
Changeover between
“
power level“ and
“
temperature level“ mode .................................... 23
Cooking in
“booster“
mode ................................................................................................ 23
Setting the operating time (timer) – from 1 to 99 minutes .................................................. 24
Switching-off ...................................................................................................................... 25
Cleaning and maintenance
..................................................................................... 25
Error codes
...................................................................................................................... 26

17
We are pleased you decided in favour of this superior induction cooking plate and
would like to thank you for your confi dence. Its easy operation and wide range of
applications will certainly fi ll you with enthusiasm as well. To make sure you can
enjoy using this appliance for a long time, please read through the following notes carefully
and observe them. Keep this instruction manual safely. Hand out all documents to third persons
when passing on the appliance. Thank you.
General notes for cooking with induction
Cooking with induction is based upon a heating principle that is completely different from cooking
on conventional cooktops: The heat is generated straight in the pot bottom by eddy currents.
The cooktop itself is not heated, but only the bottom of the cooking vessel. Consequently, the
usual heat losses are avoided and the effi ciency of the energy expended is optimized.
Advantages of induction cooking
• As the pot bottom is heated instantaneously, induction cooking is very energy-saving (saves
up to 50 % in comparison with other cooking methods).
• The induction cooktop generates or interrupts the heat supply immediately after the acti-
vation of the control. This effi cient energy utilisation allows for an exact control of the heat
supply and is furthermore time-saving in the cooking process.
• A further amount of time is saved on account of the extreme speed by which energy is available
after switch-on. No waiting times! For instance, when heating 2 l of water you will be 60 %
quicker than you are on conventional cooktops!
• Induction cooking provides for extra safety: Even when the cooking utensils are removed
from the cooktop without having turned it off, the heating process is interrupted automatically.
In case a cloth or another combustible material should be placed on the cooktop by accident,
it cannot burn even if the cooktop has been activated. After the cooking process, nothing but
the residual heat emitted by the pot is noticeable on the glass ceramic plate.
• The cooking surface is very easy to clean. As it is not heated directly, leftovers cannot scorch.
Neither do you have to wait for it to cool before cleaning.
Selecting pots and pans
• Suitable: any fl at-bottomed (8 - 26 cm in diameter) cooking utensils made of iron, such as
enamelled pots, pots made of cast iron or of magnetic stainless steel. Thin pot bottoms are
more suitable for induction cooking than thick sandwich bottoms. The very short response
times to setting changes (short pre-heating time, quick dosable searing) are at thick pot
bottoms only possible to a limited extent.
• Unsuitable: any cooking utensils consisting of aluminium, copper, glass or ceramic, as well as
any pots having a pot diameter of less than 8 cm.
Tip: Check by means of a magnet whether the pot bottom is suitable. If the magnet clings to
the outside of the pot bottom, the vessel is qualifi ed for induction cooking.
Intended use
The appliance is designed for cooking food and is meant for domestic use only. Other uses or
modifi cations of the appliance are not intended and harbour considerable risks. For damage
arising from not intended use, the manufacturer does not assume liability. The appliance is not
designed for commercial use.
Introduction

18
Technical data
Nominal voltage: 230 V~ 50 Hz
Nominal power: 2000 W (booster 2200 W)
Number of cooking zones: 1
Size of cooking zone: ca. 80-200 mm ø
Resilience of glass plate: max. 10 kg
Scope of supply
Check the scope of supply for completeness as well as the soundness of the product immediate-
ly after unpacking.
Packing material
Do not simply throw the packing material away but recycle it.
Deliver paper, cardboard and corrugated cardboard packing to collecting facilities. Also plastic
packing material and foils should be put into the intended collecting basins.
In the examples for the plastic marking PE stands for polyethylene,
the code figure 02 for PE-HD, 04 for PE-LD, PP for polypropylene, PS for polystyrene.
For your safety
Warning: Read all safety advices and instructions. Non-observance of the safety
advices and instructions may cause electric shock, fi re and/or bad injuries.
• Never leave children unsupervised with the packing material and the product. There is the
hazard of choking by packing material and the hazard of life by burns. Children often under-
rate the risks. Always keep children away from the product.
• Do not operate the appliance in explosive environments, where infl ammable liquids or gases
are located.
• Persons (including children), not having the knowledge or experience in operating the
appliance or having handicaps of physical, sensorial or mental nature must not operate the
appliance without supervision or instruction by a person, responsible for their safety. Children
should be supervised in order to ensure that they do not play with the appliance.
• Never leave the appliance unattended during operation.
• Pull the mains plug after each use. Never let the cord hang down over the edge of the work
surface so that the appliance cannot be pulled down accidentally.
• Place the appliance on a heat resistant, stable and even surface and do not operate it in the
vicinity of other sources of heat (oven, gas fl ame etc.). The space above the appliance has to
be kept free, the distance to all walls must be at least 10 cm. Unhindered air supply has to be
ensured.
• Stay 1 m away from appliances being sensitive to electromagnetic fi elds (e. g. screens,
watches, electronic appliances and magnetic record carriers).
• Attention! Hazard of fi re! Overheated fats and oils can infl ame. Therefore, food containing
fats and oils may only be prepared under supervision.
• Attention! Hazard of fi re! Do not operate the appliance in the vicinity of or below curtains,
wall cupboards or other combustible materials.
• Place the appliance on a heat resistant surface (no varnished tables, no table cloths).
Otherwise, the appliance and/or pieces of furniture may be damaged.

19
• Do not at all operate this unit with an external timer or a separate telecontrol system.
• Check the power cord regularly for damage and deteriorations. Do not operate the appliance
when the power cord or the mains plug is damaged.
Attention! A damaged power cord presents a hazard of life by electric shock. Have appliances,
which do not work faultlessly or which are damaged, immediately and only checked and
repaired by the after-sales service.
• Do not misuse the power cord for unplugging the appliance. Keep the power cord away from
hot surfaces, sharp edges and mechanical forces. Damaged or entangled cords increase the
risk of an electric shock.
• The integrated overheating protection ensures that the cooking zone can not overheat even
if operated continuously. If cracks, fi ssures or breakage is caused and if it may be assumed
that safe operation is no longer possible, immediately turn off the appliance and disconnect
the mains plug.
• Do not store any objects on top of the appliance, do not use it as a worktop and do not trans-
port it when hot.
• Never immerse the appliance in water for cleaning. Make sure no steam or water can infi ltrate
the underside.
• This electrical appliance complies with the relevant safety standards. In case of signs of
damage to the appliance, the power cord, the sealing or the glass plate, unplug the appliance
immediately. Repairs may be effected by authorised specialist shops only. Improper repairs
may result in considerable dangers for the user.
Important notes
• Only use pots or pans suitable for induction cooking, i. e. cooking utensils that are made of
ferromagnetic material. Always keep the glass ceramic surface and the pot bottom clean and
dry.
• Do not leave any food in aluminium foil on the glass ceramic surface, nor cutlery, pot lids or
other objects made of metal as those might become hot.
• Never use oven sprays or stain-removers for cleaning! Special cleaning agents for the glass
plate are available on the market.
• Avoid scratches on the glass plate caused by pointed or sharp objects. Protect the glass plate
against breakage by falling objects.
• Any damage resulting from non-observance of these notes will not be covered by warranty.
Caution: This appliance complies with the standards for safety and electromagnetic compati-
bility. Nonetheless, persons with heart pacemakers should keep away from induction cooking
plates!
We cannot verify that every heart pacemaker available on the market complies with the current
standards for safety and electromagnetic compatibility respectively and that there is no interfe-
rence caused that might affect the correct operation of the pacemaker.
There may also be malfunctions of other appliances, such as hearing aids.
Prior to inital use
Wipe the appliance prior to the initial use with a damp cloth and dry it thoroughly. For more
detailed information please refer to “Cleaning and maintenance”.
Place the appliance on a heat resistant, stable and even surface (non-ferrous) and do not operate
it in the vicinity of other sources of heat (oven, gas fl ame, etc.). The space above the appliance
has to be kept free; the distance to all walls must be at least 10 cm. Stay 1 m away from
appliances being sensitive to electromagnetic fi elds. Unhindered air supply has to be ensured.

20
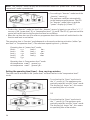
Getting acquainted with your appliance
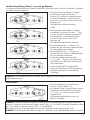
Touch control sensors
The appliance is equipped with touch control sensors which grant an easy and convenient handling.
• Touching the sensor with your fi nger activates the
relevant function and an acoustic acknowledgement
signal.
NOTE: Always keep the control panel clean and dry.
Do not touch it with fi ngers wet and do not use it as a
shelf of deposit as this might lead to malfunctions.
Residual heat indicator
The appliance is equipped with a residual heat indicator which shows whether the cooking zone
is still hot.
•
If the temperature of the cooking zone has
reached a value of more than 50 °C due to
the waste heat emitted by the pot, the
“temp” display (7b) shows “-H-“ for HOT.
• As soon as the temperature has dropped
below 50 °C the “temp” display (7b)
shows “-L-“ for LOW
• When the appliance is disconnected from the mains, the sign in the “temp” display (7b) disappears.
Pot recognition
Each cooking zone features a sensor which recognizes whether there is a vessel on the cooking zone.
• If no suitable vessel is recognized on the
cooking zone after switch-on, the “temp”
display (7b) will show “---“ and the display
“power” (7c) will show ”-“, also an alter-
nate warning signal will sound.
If no pot is recognized within 15 seconds,
the appliance will switch automatically
into the standby mode.
• If a pot is removed from the cooking zone during operation, the “temp” display (7b) will show a blin-
king “---“ and the display “power” (7c) will show “-“ and also an alternate warning signal will sound.
If a pot is re-placed within 15 seconds, the cooking process will continue with the level last set
and an operating time that might have been set before will continue to run. However, if no pot is
recognized within 15 seconds, the appliance will switch automatically into the standby mode.
Fan
After switch-on an inside fan starts working, which cools the interior parts of the appliance in
order to prevent the appliance from overheating.
It is normal for the fan to continue running in the standby mode after a long operation time.
Operating time restriction
The operating time restriction will cause the cooktop to switch automatically in the standby
mode if the settings have not been changed for a period of 2 hours. This happens independently
of the respectively set level.
After an automatic switch-off the cooking plate can be turned on once again and the maximum
operating time will be active again.

21
Operating the appliance
Standby mode
• Connect the mains plug with the power
socket.
• The “temp” display (7b) shows “-L-“ or
“-H-“, depending on the residual heat of
the cooking zone. Also an acoustic signal
is audible.
The control is in standby mode.
Switching-on
• Position suitable cookware on the middle
of the cooking zone.
• For switching-on touch the main switch
(1). The LED “ON/OFF“ (8) is fl ashing.
• Now decide on the cooking mode you
would like to work with.
NOTE: If there is no further activation within 60 seconds after switch-on, the control will switch
back to the standby mode.
Cooking in “power level“ mode
The “power level” mode is ideal for boiling water and for steaming.
• For cooking in the “power level” mode touch
the “+“ sensor (2).
The appliance automatically switches to the
power level “05“. The display (7c) shows
“05“.
NOTE: If started with sensor ”-“ (2), the
appliance switches to power level “09“
in the beginning.
• By touching the “+“ sensor (2) you can
increase the power up to level “09”.
Priority regulation
Although any other sensor is still activated, the appliance may be brought to the standby mode
at any time during operation by touching the associated main switch sensor.
Recessed grips for a safe transport
At the left and right side below the casing there are practical recessed grips with ribbing, which
ensure an easy and convenient transport of the appliance.

22
• By touching the “-“ sensor (2) you can
reduce the power down to level “01“.
• By continuously touching the “+ “ or “ - “
sensor (2) you can increase or reduce the
power levels very quickly.
Details on the power levels:
The values indicated are reference values and apply to standard steel pots featuring a diameter
of 20 cm.
level 1 70 W level 6 500 W
level 2 130 W level 7 820 W
level 3 180 W level 8 1280 W
level 4 270 W level 9 2000 W
level 5 350 W
NOTE: The temperature at the bottom of the cookware is checked by a sensor in the centre of
the cooking zone. The regulation will only function properly if the cookware covers this area.
The cookware should have a fl at and not too thick bottom to ensure a good heat transfer. The
maximum tolerable temperature for the “power level” mode is 200 °C.
Cooking in “temperature level” mode
The “temperature level” mode is ideal for roasting, grilling or frying.
• For cooking with the “temperature level”
mode touch the sensor “+“ (3).
The appliance automatically switches
to temperature level “120 °C“. The
“temp” display (7b) shows “120“.
NOTE: If started with sensor ”-“ (3), the
appliance begins at the temperature
level “260”.
• By touching the “+“ sensor (3) you can
increase the temperature in steps of ten
up to 260 °C.
• By touching the “-“ sensor (3) you can re
duce the temperature in steps of ten
down to 60 °C.
• By continuously touching the “+ “ or “ - “
sensor (3) you can increase or reduce
the temperature levels very quickly.

23
Details on the temperature levels:
The values indicated are reference values and apply to standard steel pots featuring a diameter
of 20 cm.
level 1 60 °C level 12 170 °C
level 2 70 °C level 13 180 °C
level 3 80 °C level 14 190 °C
level 4 90 °C level 15 200 °C
level 5 100 °C level 16
210
°C
level 6 110 °C level 17 220 °C
level 7 120 °C level 18 230 °C
level 8 130 °C level 19 240 °C
level 9 140 °C level 20 250 °C
level 10 150 °C level 21 260 °C
level 11 160 °C
NOTE: The temperature at the bottom of the cookware is checked by a sensor in the centre of
the cooking zone. The regulation will only function properly if the cookware covers this area.
The cookware should have a fl at and not too thick bottom to ensure a good heat transfer. The
maximum tolerable temperature for the “temperature level” mode is 260 °C.
Changeover between “power level” and “temperature level” mode
You may change at any time from the “power level” mode to the “temperature level” mode and
vice versa. The last selected setting of the respective function is saved.
• Changeover from “power level” mode to “temperature level” mode.
During operation in the “power level” mode touch the “temp” sensor “+” or “-“ (3) for chan-
ging to the “temperature level” mode. The display (7c) goes out, the power level used before
is saved and the “temp” display (7b) gets activated.
Now you are working in the “temperature level” mode and can adjust the settings according
to your requirements.
NOTE: When changing over from the „power level“ mode to the „temperature level“ mode, the
temperature is
increased by one level when touching the “+” sensor (3),
reduced by one level when touching the ”-“ sensor (3).
• Changeover from “temperature level” mode to “power level” mode.
During operation in the “temperature level” mode touch the “power” sensor “+” or “-“ (2) for
changing to the “power level” mode. The display (7b) goes out, the temperature level used
before is saved and the “power” display (7c) gets activated.
Now you are working in the “power level” mode and can adjust the settings according to your
requirements.
NOTE: When changing over from the „temperature level“ mode to the „power level“ mode, the
power levels get
increased by one when touching the “+” sensor (2),
reduced by one when touching the ”-“ sensor (2).
Cooking in “booster” mode
The “booster” mode is suitable for searing larger quantities of food, for quick-start cooking or
boiling of water. The “booster” mode can be activated in both “power level” and “temperature
level” mode. The activated “booster” mode generates an increased power output up to 2200 W
for a certain period of time.

24
NOTE: The “booster” mode can only be activated when either the “power level“ or the “tempe-
rature level“ mode is preselected.
• For cooking in “booster“ mode touch the
„booster“ sensor (5).
The appliance switches automatically
to the maximum performance. The LED
for “booster” mode lights up and the
“power” display (7c) shows “P”.
• To abort the „booster“ mode just touch the „booster“ sensor (5) again, or one of the “+“ / “-“
sensors of the “power level”(2) or “temperature level” (3) mode. The LED (6) goes out and the
control will switch back to the function and level as set before.
• When the set time has run off or after an programme abort the control will switch back to the
function and level as set before.
The operating time in “booster“ mode depends on the mode set during activation ( either ”po-
wer level“ or “temperature level“). The maximum operating time is 3 minutes.
Operating time in “power level” mode:
level 1 15 s level 6 60 s
level 2 20 s level 7 90 s
level 3 25 s level 8 120 s
level 4 30 s level 9 180 s
level 5 45 s
Operating time in “temperature level” mode:
set temperature ≤ 100°C general 15 s
set temperature > 100°C general 30 s
Setting the operating time (timer) – from 1 up to 99 minutes
The timer can be activated in the “power level” mode as well as in the “temperature level”
mode.
• For activating the “timer” mode touch
the “+” sensor (4). The appliance auto-
matically switches into the “timer” mode.
The display (7a) shows “01“, this means
an operating time of 1 minute.
OR
• For activating the “timer” mode touch
the “-” sensor (4). The appliance auto-
matically switches into the “timer” mode.
The display (7a) shows “60“, this means
an operating time of 60 minutes.

25
• By touching the “+“ sensor (4) you can
increase the operating time in minute
intervals up to 99 minutes.
• By touching the
“
-“ sensor (5) you can re-
duce the operating time in minute inter-
vals.
• By continuously pressing the “+“ sensor
(3) or “-“ sensor (5) you can increase or
reduce the operating time in 5-minute
intervals.
• Once the set time has elapsed there is an
audible signal and the control automati-
cally switches over to standby mode.
NOTE: Changing the power or temperature level will not affect the set operating time.
Switching-off
• For switching-off touch the main switch
sensor (1).
• The display “temp“ (7b) shows “-L-“ or
“-H-“, depending on the residual heat on
the cooking zone. Also an audible signal
sounds. Now the control is in standby
mode.
NOTE: If the waste heat of the pot creates a temperature on the cooking zone of more than 50 °C
the display “temp” (7b) shows “-H-“ for HOT. As soon as the temperature has sunk below 50 °C,
the display “temp” (7b) shows “-L-“ for LOW.
When the unit is disconnected from the mains the display “temp” (7b) expires.
NOTE: It is normal for the fan to continue running in the standby mode after a long operation time.
OUR ADVICE: Electrical appliances featuring a standby mode consume some power also in
non-operating state. Save energy by disconnecting your appliance from the mains during non-
use periods by pulling the mains plug.
Before cleaning always disconnect the unit from the mains!
Let the appliance cool down before cleaning!
• Remove any coarse residues from the glass ceramic plate by means of a special glass scraper,
which is available in the specialised trade and in household equipment shops.
• Following that clean the cold glass surface with a damp cloth and some dishwater and wipe it
dry with a clean cloth or kitchen tissue. On the market there are suitable cleaning agents for
glass ceramic cooktops available with which the whole glass surface is treated by means of a
kitchen tissue until there is no soiling visible anymore.
• Never immerse the appliance into water and do not use steam jet appliances.
Cleaning and maintenance

26
• Make sure no water or steam may infi ltrate the appliance from below either.
• Never use abrasives, steel wool or sharp, scratchy objects.
• If there is any dirt visible in the area of the ventilation slots, it can be removed from the out-
side by means of a vacuum cleaner.
The electronic control features several internal monitoring functions. If an error occurs, the
power supply will be quit and an error code will appear on the display.
Error code table:
E0 Overcurrent: The power consumption of the appliance exceeded the maximum allowable
15 Amps.
Self-help: Make sure the appliance is connected to the mains voltage indicated on the
rating label.
E1 Electronic control of low voltage: An error has occurred in an electronic circuit of the
appliance due to excessively low voltage (< 160 V~).
Self-help: Make sure the appliance is connected to the mains voltage indicated on the
rating label.
E2 Electronic control of excess voltage: An error has occurred in an electronic circuit of the
appliance due to excessively high voltage (> 270 V~).
Self-help: Make sure the appliance is connected to the mains voltage indicated on the
rating label.
E3 Control unit: An error has occurred on the IGBT control unit of the appliance.
Self-help: Not possible – the appliance must certainly be forwarded to the customer
service.
E4 Short circuit: A short circuit was caused in an electronic circuit of the appliance.
Self-help: Not possible – the appliance must certainly be forwarded to the customer
service.
E5 Overheating protection (“power level” mode): The temperature on the cooktop exceeds
the
maximum allowable value of 200 °C during “power level” operating mode (e. g. due
to hot oil or fat, or an empty pot or any other metal object while appliance is switched on).
Self-help: Eliminate the cause of overheating. Once the cooktop has cooled, the appli-
ance can be put into operation again. Afterwards use the “temperature level” mode for
constantly higher temperatures over 200 °C.
E6 Temperature sensor: The temperature sensor underneath the glass ceramic plate is
defective.
Self-help: Not possible – the appliance must certainly be forwarded to the customer
service.
Error codes

27
E7 Overheating protection (“temperature level” mode): The temperature on the cooktop
exceeds the maximum allowable value of 240 °C during “temperature level” mode (e. g.
due to an empty pot or any other metal object while appliance is switched on).
Self-help: Eliminate the cause of overheating. Once the cooktop has cooled, the appli-
ance can be put into operation again.
E8 Temperature sensor: The temperature sensor underneath the glass ceramic plate provi-
des an undefi ned signal.
Self-help: Make sure no metal objects or other foreign objects were placed on the cooktop.
E11 Inside temperature: The interior of the appliance has become too warm (e. g. by hin-
dered air supply, blocked or defective fan or excessive ambient temperature).
Self-help: Clean the air vents or remove any foreign objects possibly located there, impro-
ve the air supply.
NOTE: If the error cause is eliminated while error codes E1 or E2 are being displayed, the appli-
ance will automatically resume operation subject to the previous setting.
With regard to all other error code indications, you will have to reset the control manually by
pulling the mains plug.
Page is loading ...
-
 1
1
-
 2
2
-
 3
3
-
 4
4
-
 5
5
-
 6
6
-
 7
7
-
 8
8
-
 9
9
-
 10
10
-
 11
11
-
 12
12
-
 13
13
-
 14
14
-
 15
15
-
 16
16
-
 17
17
-
 18
18
-
 19
19
-
 20
20
-
 21
21
-
 22
22
-
 23
23
-
 24
24
-
 25
25
-
 26
26
-
 27
27
-
 28
28


Rommelsbacher CT 2215 Owner's manual
- Category
- Hobs
- Type
- Owner's manual
- This manual is also suitable for
Ask a question and I''ll find the answer in the document
Finding information in a document is now easier with AI
in other languages
Related papers
-
Rommelsbacher CT 2005/IN WIENEU User manual
-
-
-
-
-
-
-
-
Rommelsbacher CT 3010 User manual
-
