
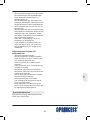
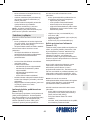
249402 Princess
Coffee Maker and Grinder DeLuxe
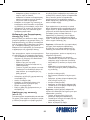
Nederlands 6
English 13
Français 20
Deutsch 27
Español 34
Italiano 41
Svenska 48
Dansk 54
Norsk 60
Suomi 66
Português 72
79
92
Page is loading ...

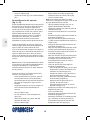
3
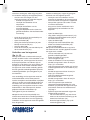
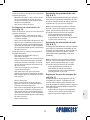
E
D
C
BA
3 4 6 5 7 2
8
1
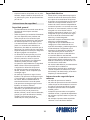
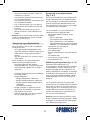
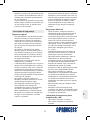
24
C
B
Page is loading ...
Page is loading ...
Page is loading ...
Page is loading ...
Page is loading ...
Page is loading ...
Page is loading ...
Page is loading ...
Page is loading ...

13
EN
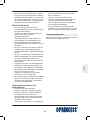
Congratulations!
You have purchased a Princess product.
Our aim is to provide quality products with
a tasteful design and at an affordable price.
We hope that you will enjoy this product for
many years.
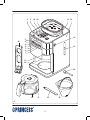
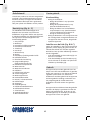
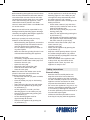
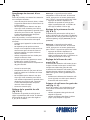
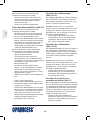
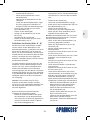
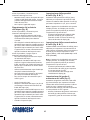
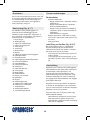
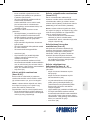
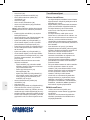
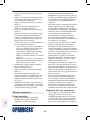
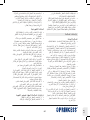
Description (fig. A - C)
Your 249402 Princess coffee maker has been
designed for making coffee with coffee beans
or ground coffee. The appliance is suitable for
indoor use only. The appliance is suitable for
domestic use only.
1. On/off button
2. Grinding button
3. Coffee quantity selector
4. Coffee strength selector
5. Timer button
6. Hour button
7. Minute button
8. Display
9. Ground coffee fineness selector
10. Coffee filter holder
11. Filter holder assembly
12. Release button (filter holder assembly)
13. Coffee bean compartment
14. Water reservoir
15. Water level indicator
16. Coffee pot
17. Coffee level indicator
18. Heating plate
19. Grinding compartment
20. Carbon filter holder
21. Brush / screwdriver
22. Coffee spoon
23. Steam hole
24. Descale button
A. Coffee quantity indicator
B. Coffee strength indicator
C. Timer indicator
D. Descaling indicator
E. Keep-warm indicator
Initial use
Preparation
Clean the accessories:•
- Clean the coffee pot in soapy water.
Rinse the coffee pot.
- Clean the coffee filter holder in soapy
water. Rinse the coffee filter holder.
- Clean the lid of the coffee bean
compartment in soapy water. Rinse the
lid of the coffee bean compartment.
- Thoroughly dry the accessories.
Clean the outside of the appliance with •
a damp cloth. Dry the outside of the
appliance with a clean, dry cloth.
Rinse the appliance.•
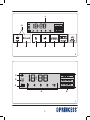
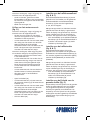
Setting the clock (fig. B & C)
If the mains plug is inserted into the wall
socket, the display (8) will light to indicate that
the clock can be set. The clock can be adjusted
at any time later on.
Repeatedly press the hour button (6) to set •
the hours.
Repeatedly press the minute button (7) to •
set the minutes. The time is shown on the
display (8).
Use
The appliance can be used for making coffee
with coffee beans or ground coffee. Before
first use, the appliance is set to make coffee with
coffee beans. After each use, the appliance
will memorise the last used setting for the
next use: making coffee with coffee beans or
making coffee with ground coffee.
The appliance can only be used when the
display is activated. If the display is not
activated, press any button to activate the
display. The appliance is ready for use.
Before you proceed, we need you to pay
attention to the following notes:
- Keep your hands, face and other body parts
away from the steam hole. The steam from
the appliance becomes very hot during use.
- Do not cover the steam hole.

14
EN
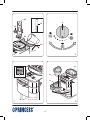
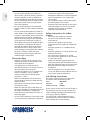
Filling the water reservoir (fig. D)
Before you proceed, we need you to pay
attention to the following notes:
- Before filling the water reservoir, switch off
the appliance and remove the mains plug
from the wall socket.
- Do not fill the water reservoir with more
water than required for making the coffee.
Only use the amount of water required for
making the coffee. The appliance
automatically stops when the water
reservoir is empty.
Before you proceed, we would like you to
focus your attention on the following notes:
- Do not use the appliance without water in
the water reservoir.
- Do not exceed the maximum mark when
you fill the water reservoir. Make sure that
the water level is always above the minimum
mark during use.
- Only use cold water to fill the water
reservoir.
- Do not use carbonated water or other
liquids to fill the water reservoir.
- Do not pour water in the coffee bean
compartment.
Open the cover (25).•
Fill the water reservoir (14) with water up •
to the required mark on the water level
indicator (15).
Do not fill the water reservoir with more •
water than required for making the coffee.
Only use the amount of water required for
making the coffee. The appliance
automatically stops when the water
reservoir is empty.
Close the cover (25).•
Setting the coffee quantity
(fig. B & C)
The coffee quantity selector (3) is used for
setting the required coffee quantity.
The coffee quantity selector (3) can be set to
2, 4, 6, 8 or 10 cups.
Note: The appliance can only be used when
the display is activated. If the display is not
activated, press any button to activate the
display. The appliance is ready for use.
Repeatedly press the coffee quantity selector •
(3) to set the coffee quantity. The number
of cups (A) is shown on the display (8).
Setting the coffee strength
(fig. B & C)
The coffee strength selector (4) is used for
setting the required coffee strength. The
coffee strength selector (4) can be set to mild
coffee (MILD), medium coffee (MEDIUM) and
strong coffee (STRONG).
Note: The appliance can only be used when
the display is activated. If the display is not
activated, press any button to activate the
display. The appliance is ready for use.
Repeatedly press the coffee strength selector •
(4) to set the coffee strength. The coffee
strength (B) is shown on the display (8).
Setting the ground coffee fineness
(fig. E)
The ground coffee fineness selector (9) is used
for setting the required fineness of the ground
coffee when using coffee beans. The ground
coffee fineness selector (9) can be set to
different positions from fine coffee grounds to
coarse coffee grounds.
Turn the ground coffee fineness selector •
(9) to the required position to set the
fineness of the ground coffee.
Making coffee with coffee beans
(fig. A - H)
Before you proceed, we would like you to
focus your attention on the following notes:
- Only use coffee beans that are suitable for
the appliance.
- Only use paper coffee filters (1x4) that are
suitable for the appliance.
If the grinding function is not activated, •
press the grinding button (2) to activate
the grinding function. The coffee quantity
and the coffee strength are shown on the
display.
Fill the water reservoir (14) with the •
required amount of water.
Do not fill the water reservoir with more •
water than required for making the coffee.

15
EN
Only use the amount of water required for
making the coffee. The appliance
automatically stops when the water
reservoir is empty.
Open the cover (26).•
Fill the coffee bean compartment (13) •
completely with coffee beans.
Close the cover (26).•
Set the ground coffee fineness. Refer to the •
section ”Setting the ground coffee fineness”.
Press the release button (12) to open the •
filter holder assembly (11).
Place a suitable coffee filter in the coffee •
filter holder (10).
Close the filter holder assembly (11) until •
the release button (12) clicks into place.
Note: The appliance can only be used when
the display is activated. If the display is not
activated, press any button to activate the
display. The appliance is ready for use.
Set the coffee quantity. Refer to the section •
”Setting the coffee quantity”.
Set the coffee strength. Refer to the section •
”Setting the coffee strength”.
Place the coffee pot (16) on the heating •
plate (18).
Switch on the appliance by pressing the •
on/off button (1). The cup-of-coffee symbol
(E) starts flashing. After a few seconds, the
appliance starts grinding the coffee beans
and making the coffee.
To interrupt the process, press the on/off •
button (1).
If the process is completed, the appliance •
will beep and switch to keep-warm mode.
The cup-of-coffee symbol (E) stops flashing.
The appliance can be switched off by pressing
the on/off button (1) or the appliance
switches off automatically after 2 hours.
Allow the appliance to cool down completely.•
Making coffee with ground coffee
(fig. A, B, C, D & G)
Before you proceed, we would like you to
focus your attention on the following notes:
- Only use ground coffee that is suitable for
the appliance.
- Only use paper coffee filters (1x4) that are
suitable for the appliance.
If the grinding function is activated, press •
the grinding button (2) to deactivate the
grinding function. The coffee quantity and
the coffee strength are not shown on the
display.
Fill the water reservoir (14) with the •
required amount of water.
Do not fill the water reservoir with more •
water than required for making the coffee.
Only use the amount of water required for
making the coffee. The appliance
automatically stops when the water
reservoir is empty.
Press the release button (12) to open the •
filter holder assembly (11).
Place a suitable coffee filter in the coffee •
filter holder (10).
Put the required amount of coffee in the •
coffee filter.
Close the filter holder assembly (11) until •
the release button (12) clicks into place.
Place the coffee pot (16) on the heating •
plate (18).
Note: The appliance can only be used when
the display is activated. If the display is not
activated, press any button to activate the
display. The appliance is ready for use.
Switch on the appliance by pressing the •
on/off button (1). The cup-of-coffee symbol
(E) starts flashing. The appliance starts
making the coffee.
To interrupt the process, press the on/off •
button (1).
If the process is completed, the appliance •
will beep and switch to keep-warm mode.
The cup-of-coffee symbol (E) stops flashing.
The appliance can be switched off by pressing
the on/off button (1) or the appliance
switches off automatically after 2 hours.
Allow the appliance to cool down completely.•
Delay start function (fig. B & C)
The appliance has a delay start function which
makes it possible to program the time for
starting the coffee-making process.
Note: The appliance can only be used when
the display is activated. If the display is not
activated, press any button to activate the
display. The appliance is ready for use.

16
EN
Set the clock. Check whether the clock has •
already been set. If the clock has not been
set, refer to the section ”Setting the clock”.
Set the coffee quantity. Refer to the section •
”Setting the coffee quantity”.
Set the coffee strength. Refer to the section •
”Setting the coffee strength”.
Keep the timer button (5) pressed until the •
timer indicator (C) flashes.
Repeatedly press the hour button (6) to set •
the hours.
Repeatedly press the minute button (7) to •
set the minutes.
Press the timer button (5) to save the •
settings. The timer indicator (C) lights
continuously.
To interrupt the process, press the timer •
button (5) again. The timer indicator (C)
goes off.
Note: If you want to make coffee with ground
coffee, switch off the grinding function before
using the delay start function.
Cleaning and maintenance
Before you proceed, we need you to pay
attention to the following notes:
- Before cleaning or maintenance, always
switch off the appliance, remove the mains
plug from the wall socket and wait until
the appliance has cooled down.
- Do not immerse the appliance in water or
any other liquids.
Before you proceed, we would like you to
focus your attention on the following notes:
- Do not use aggressive or abrasive cleaning
agents to clean the appliance.
- Do not use sharp objects to clean the
appliance.
Regularly check the appliance for possible •
damage.
Clean the accessories:•
- Clean the coffee pot in soapy water.
- Clean the coffee filter holder in soapy
water.
- Clean the lid of the coffee bean
compartment in soapy water.
- Thoroughly dry the accessories.
Clean the outside of the appliance with •
a damp cloth. Dry the outside of the
appliance with a clean, dry cloth.
Store the appliance in a dry and frost-free •
place, out of the reach of children.
Cleaning the grinding compartment
(fig. C & I)
When grinding coffee beans, coffee powder
can clog the grinding mechanism. The grinding
compartment (19) must be cleaned when the
warning symbol (E01) is shown on the display
(8). The grinding compartment (19) can be
cleaned every 2 weeks to prevent the grinding
mechanism from being clogged.
Before you proceed, we would like you to
focus your attention on the following notes:
- Before cleaning the grinding compartment,
take the following actions:
- Switch off the appliance.
- Remove the mains plug from the wall
socket.
- Remove the coffee pot from the heating
plate.
- Empty the coffee filter holder. Place a
suitable coffee filter. Close the filter holder
assembly.
Loosen the screw (27) using the screwdriver •
(21).
Open the cover (28).•
Clean the grinding compartment (19) using •
the brush (21).
Close the cover (28).•
Tighten the screw (27) using the screwdriver •
(21).
Descaling the appliance (fig. A - D)
The appliance must be descaled after each
70 brewing cycles. If you leave the mains plug
in the wall socket, the appliance will keep
track of the number of brewing cycles.
The indicator (D) will flash on the display to
indicate that the appliance must be descaled.
If the appliance must be descaled, use a
suitable descaling agent. Special descaling
agents are available from our service station.

17
EN
Before descaling the appliance, the old carbon
filter must be removed from the water reservoir.
The carbon filter removes chlorine and other
contaminants from the water for a pure coffee
taste. After descaling the appliance, a new
carbon filter must be placed in the water
reservoir. New carbon filters are available from
our service station.
Note: Princess will not be responsible for any
damage caused by descaling agents. Damage
caused by not regularly descaling the appliance
is not covered by the guarantee.
Before you proceed, we need you to pay
attention to the following notes:
- Before descaling the appliance, remove the
mains plug from the wall socket and wait
until the appliance has cooled down.
- Do not immerse the appliance in water or
any other liquids.
- Make sure that the grinding function is not
activated when descaling the appliance.
Open the cover (25).•
If necessary, empty the water reservoir (14).•
Remove the carbon filter holder (20) from •
the water reservoir (14).
Open the cover (28).•
Remove the old carbon filter (30).•
Place the new carbon filter (29).•
Close the cover (28).•
Note: The carbon filter holder must not be
placed in the water reservoir before the
appliance has been descaled.
Fill the water reservoir (14) with a suitable •
descaling agent.
Place the coffee pot (16) on the heating •
plate (18).
Insert the mains plug into the wall socket.•
Switch on the appliance by pressing the •
on/off button (1).
Let the appliance run until 1/3 of the •
descaling agent is in the coffee pot (16).
Switch off the appliance by pressing the •
on/off button (1).
Let the descaling agent work for •
approximately 30 minutes.
Switch on the appliance by pressing the •
on/off button (1).
Let the appliance run until the remaining •
descaling agent is in the coffee pot (16).
The appliance stops automatically when
the water reservoir (14) is empty.
Rinse the appliance twice according to the •
below procedure:
- Fill the water reservoir (14) with clean
water up to the maximum mark on the
water level indicator (15).
- Place the empty coffee pot (16) on the
heating plate (18).
- Switch on the appliance by pressing the
on/off button (1).
- Let all water run through the appliance.
The appliance stops automatically when
the water reservoir (14) is empty.
Place the carbon filter holder (20) in the •
water reservoir (14).
Close the cover (25).•
Switch off the appliance by pressing the •
on/off button (1).
Keep the coffee quantity selector (3) and •
the coffee strength selector (4) pressed
until the indicator (D) disappears from the
display (8) (fig. C).
Clean the outside of the appliance with •
a damp cloth. Dry the outside of the
appliance with a clean, dry cloth. The
appliance is ready for use.
Safety instructions
General safety
Read the manual carefully before use. •
Keep the manual for future reference.
Only use the appliance and the accessories •
for their intended purposes. Do not use the
appliance and the accessories for other
purposes than described in the manual.
Do not use the appliance if any part or any •
accessory is damaged or defective. If a part
or an accessory is damaged or defective,
it must be replaced by the manufacturer or
an authorised repair agent.
Children should be supervised to ensure •
that they do not play with the appliance.

18
EN
The use of this appliance by children or •
persons with a physical, sensory, mental or
motorial disability, or lack of experience
and knowledge can give cause to hazards.
Persons responsible for their safety should
give explicit instructions or supervise the
use of the appliance.
Do not use the appliance near bathtubs, •
showers, basins or other vessels containing
water.
Do not immerse the appliance in water or •
other liquids. If the appliance is immersed
in water or other liquids, do not remove the
appliance with your hands. Immediately
remove the mains plug from the wall socket.
If the appliance is immersed in water or
other liquids, do not use the appliance again.
This appliance is intended to be used in •
domestic and similar applications such as
staff kitchen areas in shops, offices and
other working environments; farm houses;
by clients in hotels, motels and other
residential type environments; bed-and-
breakfast type environments.
Electrical safety
Before use, always check that the mains •
voltage is the same as the voltage on the
rating plate of the appliance.
The appliance is not intended to be •
operated by means of an external timer or
separate remote-control system.
Connect the appliance to an earthed wall •
socket. If necessary, use an earthed
extension cable of a suitable diameter
(at least 3 x 1 mm
2
).
Make sure that water cannot enter the •
contact plugs of the mains cable and the
extension cable.
Always fully unwind the mains cable and •
the extension cable.
Make sure that the mains cable does not •
hang over the edge of a worktop and cannot
be caught accidentally or tripped over.
Keep the mains cable away from heat, oil •
and sharp edges.
Do not use the appliance if the mains cable •
or the mains plug is damaged or defective.
If the mains cable or the mains plug is
damaged or defective, it must be replaced
by the manufacturer or an authorised
repair agent.
Do not pull the mains cable to disconnect •
the mains plug from the mains.
Disconnect the mains plug from the mains •
when the appliance is not in use, before
assembly or disassembly and before
cleaning and maintenance.
Safety instructions for coffee
makers
Do not use the appliance outdoors.•
Do not use the appliance in damp •
environments.
Only use the appliance in frost-free •
environments if the appliance is filled with
water.
Place the appliance on a stable and flat •
surface.
Place the appliance on a heat-resistant and •
splash-proof surface.
Do not place the appliance on a hob.•
Do not place the appliance on hot surfaces •
or near open flames.
Make sure that the appliance does not •
come into contact with flammable material.
Keep the appliance away from heat sources.•
Be careful with hot water and steam to •
avoid burns.
Store the appliance in a dry place when •
not in use. Make sure that children do not
have access to stored appliances.
U.K. Wiring instructions
The wires in the mains lead are coloured in
accordance with the following code:
BLUE NEUTRAL
BROWN LIVE
GREEN/YELLOW EARTH
As the colours of the wire in the mains lead of
this appliance may not correspond with the
colour markings identifying the terminals on
your plug, proceed as follows:
The wire which is coloured BLUE must be
connected to the terminal which is marked
with the letter N or coloured black.

19
EN
The wire which is coloured BROWN must be
connected to the terminal which is marked
with the letter L or coloured red.
The wire which is coloured GREEN/YELLOW
must be connected to the terminal which is
marked with the letter E or ( ) and is coloured
GREEN or GREEN/YELLOW.
If a 13Amp (BS1363) plug is used, a 13Amp
(BS1362) fuse must be fitted, or if any other
type of plug is used, a 13Amp fuse must be
fitted, either in the plug or adaptor, or on the
distribution board.
Warning! This appliance must be earthed.
Disclaimer
Subject to change; specifications can be
changed without further notice.
Page is loading ...
Page is loading ...
Page is loading ...
Page is loading ...
Page is loading ...
Page is loading ...
Page is loading ...
Page is loading ...
Page is loading ...
Page is loading ...
Page is loading ...
Page is loading ...
Page is loading ...
Page is loading ...
Page is loading ...
Page is loading ...
Page is loading ...
Page is loading ...
Page is loading ...
Page is loading ...
Page is loading ...
Page is loading ...
Page is loading ...
Page is loading ...
Page is loading ...
Page is loading ...
Page is loading ...
Page is loading ...
Page is loading ...
Page is loading ...
Page is loading ...
Page is loading ...
Page is loading ...
Page is loading ...
Page is loading ...
Page is loading ...
Page is loading ...
Page is loading ...
Page is loading ...
Page is loading ...
Page is loading ...
Page is loading ...
Page is loading ...
Page is loading ...
Page is loading ...
Page is loading ...
Page is loading ...
Page is loading ...
Page is loading ...
Page is loading ...
Page is loading ...
Page is loading ...
Page is loading ...
Page is loading ...
Page is loading ...
Page is loading ...
Page is loading ...
Page is loading ...
Page is loading ...
Page is loading ...
Page is loading ...
Page is loading ...
Page is loading ...
Page is loading ...
Page is loading ...
Page is loading ...
Page is loading ...
Page is loading ...
Page is loading ...
Page is loading ...
Page is loading ...
Page is loading ...
Page is loading ...
Page is loading ...
Page is loading ...
Page is loading ...

© Princess 2011 08/11/V1
-
 1
1
-
 2
2
-
 3
3
-
 4
4
-
 5
5
-
 6
6
-
 7
7
-
 8
8
-
 9
9
-
 10
10
-
 11
11
-
 12
12
-
 13
13
-
 14
14
-
 15
15
-
 16
16
-
 17
17
-
 18
18
-
 19
19
-
 20
20
-
 21
21
-
 22
22
-
 23
23
-
 24
24
-
 25
25
-
 26
26
-
 27
27
-
 28
28
-
 29
29
-
 30
30
-
 31
31
-
 32
32
-
 33
33
-
 34
34
-
 35
35
-
 36
36
-
 37
37
-
 38
38
-
 39
39
-
 40
40
-
 41
41
-
 42
42
-
 43
43
-
 44
44
-
 45
45
-
 46
46
-
 47
47
-
 48
48
-
 49
49
-
 50
50
-
 51
51
-
 52
52
-
 53
53
-
 54
54
-
 55
55
-
 56
56
-
 57
57
-
 58
58
-
 59
59
-
 60
60
-
 61
61
-
 62
62
-
 63
63
-
 64
64
-
 65
65
-
 66
66
-
 67
67
-
 68
68
-
 69
69
-
 70
70
-
 71
71
-
 72
72
-
 73
73
-
 74
74
-
 75
75
-
 76
76
-
 77
77
-
 78
78
-
 79
79
-
 80
80
-
 81
81
-
 82
82
-
 83
83
-
 84
84
-
 85
85
-
 86
86
-
 87
87
-
 88
88
-
 89
89
-
 90
90
-
 91
91
-
 92
92
-
 93
93
-
 94
94
-
 95
95
-
 96
96


Ask a question and I''ll find the answer in the document
Finding information in a document is now easier with AI
in other languages
- italiano: Princess 249402 specificazione
- français: Princess 249402 spécification
- español: Princess 249402 Especificación
- Deutsch: Princess 249402 Spezifikation
- Nederlands: Princess 249402 Specificatie
- português: Princess 249402 Especificação
- dansk: Princess 249402 Specifikation
- svenska: Princess 249402 Specifikation
- suomi: Princess 249402 määrittely
Related papers
-
Princess 249401 Datasheet
-
Princess 242614 Specification
-
Princess 242613 Specification
-
Princess Compact-4-All Specification
-
Princess 242700 Specification
-
Princess 242650 Specification
-
-
Princess 232613 Specification
-
Yonanas 282700 Yonanas Ice Maker User manual
-
Other documents
-
Petra KM-90-07 Owner's manual
-
-
Klarstein 10032875 Aromatica II Thermo Coffee Maker Machine User manual
-
Philips HD8010/10 User manual
-
AEG KF7500 User manual
-
-
-
-
Siemens CT636LEW1 User manual
-