Page is loading ...

Owner’s Manual
XM-4437.2
Vertical Knee Raise
Dip Station

2
Table of Contents
Before You Begin 3
Important Safety Information 4
Assembly 5-6
8
7
Parts List
Exploded View

MODEL: XM-4437.2
XM-4437.2
This manual will guide you through the assembly process. If at any time you
are having trouble with the assembly or use of this product,
please contact us
When calling please have the following product information available:
Model Name :
Date Mfg.:
Serial #
Model Name Decal Location
Before You Begin
QUESTIONS?
CALL 1-800-719-4605
Monday-Friday
8:30 a.m.-5:00 p.m.
(Central Standard Time)
3
THANK YOU for making this unit a part of your exercise
program.
XMARK Fitness
assures the very best in value,
appearance, durability and biomechanics.
XMARK FITNESS SERIES
at our XMARK Fitness help line. We have trained service technicians on site to
take care of you, our valued customer.
Visit www.xmarkfitness.com for warranty information

NOTE: Hand tighten bolts and locknuts until machine is fully assembled.
Lock nuts may require additional force to tighten completely.
SAFETY PRECAUTIONS
SAFETY INFORMATION WARNING!
Prior to assembly, remove components from the box and verify that all the listed parts
were supplied.
Before using this unit or starting any exercise program, consult your physician.
This is especially important for persons over the age of 35 and/or persons with pre-
existing health problems. XMARK Fitness assumes no responsibility for personal
injury or property damage sustained by or through the use of this product.
It is the owner’s responsibility to ensure that all users of this unit have read the
Owner’s Manual and are familiar with safety information and precautions.
•This unit should only be used on a level surface and is intended for indoor use
only. XMARK Fitness recommends an equipment mat be placed under the unit to
protect the floor or carpet and for easier cleaning.
•Wear comfortable, good-quality walking or running shoes and appropriate cloth-
ing. Do not use this unit with bare feet, sandals, socks or stockings!
•Always examine your unit before using to ensure all parts are in working order.
•Do not leave children unsupervised near or on the unit.
•Service to your unit should only be performed by an authorized service represen-
tative, unless authorized and/or instructed by a XMARK Fitness technician. Failure
to follow these instructions will void the warranty.
Important Safety Information
4

Assembly
1
22
22
22
22
8
7
21
21
21
21
19
16
13
6
1
1
88
21
21
22
22 22
22
4
5
22 22
22
22
13
13
8
8
21
21
2
2
15
15
15
16
16
16
1
1
2
3
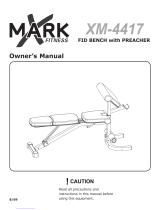
NOTE: Hand tighten bolts and locknuts until machine is fully assembled.
Lock nuts may require additional force to tighten completely.
1.
2.
3.
Attach the Upright (1) to the Base (13) with an
M10 x 70mm Bolt (21) and an M10 Locknut (22).
Attach the Lower Support (7) to the Upright (1)
with one Plate (8), two M10 x 70mm Bolts (21)
Attach the Lower Support (7) to the Base (13) with
two M10 x 70mm Bolts (21) and two M10 Locknuts
(22).
Attach the Handle Tube (6) to the Lower Support
(7) with one M10 Washer (16) and one M10 x 20mm
Bolt (19).
Repeat to complete the assembly of another
side.
Repeat to complete the assembly of another
side.
Attach the Crossbar (5) to the Uprights (1) with
four M10 x 70mm Bolts (21), two the Plates (8)
and four M10 Locknuts (22).
Attach the Upper Upright Brace (4) to the Uprights
(1) with four M10 x 70mm Bolts (21), two the plates
(8) and four M10 Locknuts (22).
Attach the Extend Arm (2) to the Upright (1)
with five M10 x 15mm Bolts (15) and five M10
Washers (16).
5
Attach the Handle Tube (6) to the Base (13) with
one M10 x 70mm Bolt (21) and one M10 Lockut (22).
and two M10 Locknuts (22).

Assembly
4
5
6
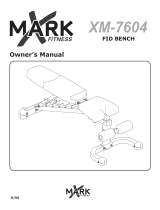
NOTE: Hand tighten bolts and locknuts until machine is fully assembled.
Lock nuts may require additional force to tighten completely.
4.
5.
6.
7.
Repeat to complete the assembly of another
side.
Repeat to complete the assembly of another
side.
22
3
3
22
21
21
1
2
2
18
17
2
2
9
9
4
18
18
17
17
10
Attach the Upper Support Bar (3) to the Upright
(1) and Extend Arm (2) with two M10 x 70mm
Bolts (21) and two M10 Locknuts (22).
Attach the Arm Pad (9) to the Extend Arm (2)
with two M8 Washers (18) and two M8 x 70mm
Bolts (17).
Attach the Backrest (10) to the Upper Upright
Bace (4) with two M8 Washers (18) and two
M8 x 70mm Bolts (17).
Make sure that all parts are properly
tightened before you use the Vertical
Knee Raise Dip Station !
Congratulations! You have completed
assembly of your XM-4437.2!
6

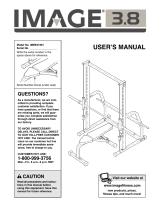
Exploded View
7
1
1
2
3
3
4
5
6
6
7
7
8
8
8
8
8
8
9
10
11
11
12
12
20
20
20
20
14
15
21
15
15
16
16
18
17
16 19
16
19
13
13
21
21
21
21
2
9
11
11
14
14
15
15
16
16
16
17
18
22
22 22
22
22 22
22
22
22
22 22
22
22
22
22
22
22
22
21
21
21
21
21
21
21
21
21
21
21
21
18
18
17
22
22

Parts List
Parts List
8
Key No. Description Qty.
1 Upright 2
2 Extend Arm 2
3 Upper Support Bar 2
4 Upper Upright Brace 1
5 Crossbar 1
6 Handle Tube 2
7 Lower Support 2
8 Plate 6
9 Arm Pad 2
10 Backrest 1
11 Plastic Handle Grip 4
12 Foam Grip 2
13 Base 2
14 Inner Cap 3
15 M10 x 15mm Bolt 10
16 M10 Washer 12
17 M8 x 70mm Bolt 6
18 M8 Washer 6
19 M10 x 20mm Bolt 2
20 End Cap 4
21 M10 x 70mm Bolt 24
22 M10 Locknut 24

Customer Service: 1-800-719-4605
/