
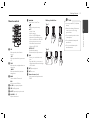
OWNER’S MANUAL
SMART CAR AUDIO
Please read this manual carefully before operating
your set and retain it for future reference.
LCS726BO1 / LCS726BO2 / LCS726BO3 / LCS726BO4
ENGLISH
FRANÇAIS

Getting Started2
Getting Started
1
Safety Information
CAUTION
RISK OF ELECTRIC SHOCK
DO NOT OPEN
CAUTION: TO REDUCE THE RISK OF
ELECTRIC SHOCK DO NOT REMOVE COVER
(OR BACK) NO USER-SERVICEABLE PARTS
INSIDE REFER SERVICING TO QUALIFIED
SERVICE PERSONNEL.
This lightning ash with
arrowhead symbol within
an equilateral triangle is
intended to alert the user to
the presence of uninsulated
dangerous voltage within the product’s
enclosure that may be of su cient
magnitude to constitute a risk of electric
shock to persons.
The exclamation point within
an equilateral triangle is
intended to alert the user to
the presence of important
operating and maintenance
(servicing) instructions in the literature
accompanying the product.
WARNING: TO PREVENT FIRE OR ELECTRIC
SHOCK HAZARD, DO NOT EXPOSE THIS
PRODUCT TO RAIN OR MOISTURE.
WARNING: Do not install this equipment
in a con ned space such as a book case or
similar unit.
Always operate the vehicle in
a safe manner. Do not become
distracted by the vehicle while
driving, and always be fully aware of all
driving condition. Do not change settings,
or any functions. Pull over in a safe and
legal manner before attempting such
operations.
Do not use for many hours
at extremely low or high
temperature. (-10 °C to 60 °C)
To reduce the risk of electric
shock, do not remove the cover
or back of this product. There
are no user-serviceable parts inside. Refer
servicing to quali ed service personnel.
To reduce the risk of re or
electric shock, do not expose this
product to dripping or splashing
water, rain, or moisture.
The temperature of unit’s outside
can be extremely high, please use
the unit after proper installation
in your vehicle.
This unit cannot play 8 cm disc
(use 12 cm disc only).
While driving, keep the sound
volume at a proper level.
Do not drop it and avoid heavy
impacts at anytime.
This unit is for vehicles with a
12-volt battery and negative
grounding. Before installing it in
a recreational vehicle, lorry or bus, check
the battery voltage. To avoid shorts in the
electrical system, be sure to disconnect
the E battery cable before beginning the
installation.
CAUTION: This product employs a Laser
System.To ensure proper use of this
product, please read this owner’s manual
carefully and retain it for future reference.
Shall the unit require maintenance,
contact an authorized service centre.
Use of controls, adjustments or the
performance of procedures other than
those speci ed herein may result in
hazardous radiation exposure.
To prevent direct exposure to laser beam,
do not try to open the enclosure.
This device is equipped with a portable
battery or accumulator.
Safe way to remove the battery or the
battery from the equipment:
Remove the old battery or battery pack,
follow the steps in reverse order than the
assembly. To prevent contamination of
the environment and bring on possible
threat to human and animal health, the
old battery or the battery put it in the
appropriate container at designated
collection points. Do not dispose of
batteries or battery together with other
waste. It is recommended that you
use local, free reimbursement systems
batteries and accumulators.
The battery shall not be exposed to
excessive heat such as sunshine, re or
the like.
Disposal of waste batteries/
accumulators
1. When this crossed-out
wheeled bin symbol is attached
to batteries/accumulators of Your
product it means they are covered by
European Directive 2006/66/EC.
2. This symbol may be combined with
chemical symbols for mercury(Hg),
cadmium(Cd) or lead(Pb) if the battery
Contains more that 0.0005% of
mercury,0.002% of cadmium or 0.004% of
lead.
3. All batteries/accumulators should be
disposed separately from the municipal
waste stream via designated collection
facilities appointed by the government or
the local authorities.
4. The correct disposal of Your old
batteries/accumulators will help to
prevent potential negative consequences
for the environment, animal and human
health.
5. For more detailed information
about disposal of Your old batteries/
accumulators, please contact Your city
o ce, waste disposal service or the shop
where You purchased the product.
Disposal of your old appliance
1.When this crossed-out wheeled
bin symbol is attached to a
product it means the product
is covered by the European
Directive 2002/96/EC.

Table of Contents 3
1
2
3
4
5
Table of Contents
1 Getting Started
2 Safety Information
4 Front panel
5 Remote control
5 – Battery Installation
2 Connecting
6 About detachable control
panel
3 Operating
7 Operation
7 – Basic operations
7 – Turning off the sound
temporarily
7 – Using EQ (Equalizer)
7 – Using 3D SOUND/ MP3
OPTM
7 – Checking the clock
7 – Turning off the display light
7 – Resetting the unit
7 – Adjusting the general
settings
8 Listening to a CD
8 – Pausing or restarting CD
playback
8 – Searching for a section
within a track / file
9 – Skipping to another track/
file
9 – Checking information
about your music
9 – Playing back tracks / files
in a way you want
10 Listening to music from an
external device
10 – Preventing radical changes
in volume as switching
sources
10 Listening to the radio
10 – Storing desired
frequencies manually
10 – Listening to a preset
station
10 – Adjusting TUNER settings
11 Using an USB device/ SD card
11 – Moving to another drive
11 – Playable USB device/ SD
card Requirement
11 Listening to music by
connecting iPod/iPhone
11 – Pausing or restarting
playback
11 – Searching for a section
within a file
11 – Skipping to another file
11 – Checking information
about your music
11 – Playing back files in a way
you want
12 – Playing back files by music
menus
12 – iPod / iPhone CONTROL
MODE
12 – Compatible iPod / iPhone
models
12 Connecting a Bluetooth
wireless technology
13 – Using the buttons for
Bluetooth wireless
technology
13 – Using a Bluetooth wireless
technology
14 – Adjusting the setting
15 – Using "LG CAR Remote"
application
16 – Phone compatibility list
4 Troubleshooting
18 Troubleshooting
5 Appendix
19 Specifications
2. All electrical and electronic products
shall be disposed of separately from the
municipal waste stream via designated
collection facilities appointed by the
government or the local authorities.
3. The correct disposal of your old
appliance will help prevent potential
negative consequences for the
environment and human health.
4. For more detailed information about
disposal of your old appliance, please
contact your city o ce, waste disposal
service or the shop where you purchased
the product.
LG Electronics hereby declares that this/
these product(s) is/are in compliance
with the essential requirements and other
relevant provisions of Directive 1999/5/
EC, 2006/95/EC and ECE Regulation 10.03
(3.2.9).
Contact o ce for compliance of this
product:
LG Electronics Inc.
EU Representative, Krijgsman 1,
1186 DM Amstelveen, The Netherlands
Please note that this is NOT a Customer
Service contact point. For Customer
Service Information, see Warranty
Card or contact the dealer that you
purchased this product.
Indoor use only.
RF Radiation Exposure Statement
This equipment should be installed and
operated with minimum distance 20 cm
between the radiator and your body.

Getting Started4
Getting Started
1
f
BAND
- Selects a band in Tuner mode.
- Moves to a next USB drive.
iPOD
Activates iPod/ iPhone CONTROL
MODE.
• TA (Optional)
Searches stations that have TA / TP
information, when it is pressed and
held.
g
DISP
- Press it, you can check the clock
time.
- Press and hold it, you can turn on/
o the display window and the
light of LED buttons.
h
Display window
i
USB port
j
Returns to the previous step.
k
BT
- Activates BT function.
- Answers a call.
l
Y/U
Skip / Search / Seek / Tune
m
FUNC
In each mode, sets playback items.
• MENU
Activates setting menu.
n
MUTE
Temporarily stops the sound.
o
Remote Sensor
p
INT
Intro scan.
q
RPT
Repeats playback.
r
SHF
Shu es playback.
s
W/S
- Moves 10 MP3 / WMA les
backward or forward if there is no
folder or one folder on a CD/ USB.
- Moves to the previous or next
folder if there are more than 2
folders on a CD/ USB.
t
Numeric buttons (1 to 6)
Selects a numbered preset station in
TUNER.
u
6
Opens the front panel.
v
AUX
If connected to other portable player,
you can enjoy music from it on the
unit.
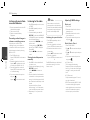
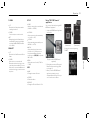
Front panel
a
SRC
When pressed, selects function
sources.
• OFF
When pressed and held, powers
unit o .
b
R
Ejects a disc.
c
T
Plays and pauses playback.
d
LIST / ENTER
(Volume knob)
- Adjusts volume level.
- Confirms the settings.
- Checks tracks, les or preset
stations.
e
EQ / • 3D
Improves sound quality.
- When pressed, selects the EQ
function.
- When pressed and held, selects the
3D SOUND/ MP3 OPTM function.

Getting Started
1
Getting Started 5
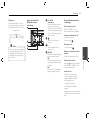
Remote control
a
SRC
When pressed, selects function
sources.
• OFF
When pressed and held, powers unit
o .
b
FUNC
When pressed, sets playback items in
each mode.
• MENU
When pressed and held, activates
setting menu.
c
BAND
Selects a band in Tuner mode.
DRV
Moves to a next USB drive.
d
d/M
Plays or pauses playback.
e
SHF Shu es playback.
f
MUTE Temporarily stops the sound.
g
VOLUME
W
/
S
Adjusts volume level.
h
c
/
v
Skip / Search / Seek / Tune
Returns to the previous step.
w
/
s
- List up / down
- Adjusts settings.
- Moves 10 MP3 / WMA tracks
backward or forward if there is no
folder or one folder on a CD/ USB.
- Moves to the previous or next
folder if there are more than 2
folders on a CD/ USB.
ENTER / LIST
- Con rms the settings.
-
Checks tracks, les or preset stations.
i
DISP
- Press it, you can check the clock
time.
- Press and hold it, you can turn on/
o the display window and the light
of LED buttons.
j
RPT Repeats playback.
k
INT Intro scan.
l
Numeric buttons (1 to 6)
Selects a numbered preset station in
TUNER.
Battery Installation
Type 1
Type 2
2
1
Use only one CR2025 (3 V) lithium
battery.
Remove the battery if the remote
control is not used for a long
period of time.
Do not leave the product in a hot
or humid place.
Do not handle the battery with
metallic tools.
Do not store the battery with
metallic materials.
,
Note

Connecting6
Connecting
2
About detachable
control panel
Attaching the control panel
1. Align the left side of the panel with the
stopper.
2. Push the right side of panel into the
unit until it clicks.
The control buttons may not work
properly if the control panel is not
attached properly. If this occurs,
gently press the display.
Do not leave the control panel
in any area exposed to high
temperatures or direct sunlight.
Do not drop the control panel
or otherwise subject it to strong
impact.
Do not allow such volatile agents
as benzine, thinner, or insecticides
to come into contact with the
surface of the control panel.
>
Caution
Detaching the control panel
1. Press the
6
to open the control
panel.
2. Lift the control panel slightly.
3. Push the control panel to right.
6
5
4. Pull the control panel out of the unit.
5. Put the detached control panel into
the protective case.
Control panel
Protective Case
Periodically wipe the contacts on
the back of the control panel with a
cotton swap moistened with alcohol.
For safety, turn o the ignition before
cleaning, and remove the key from the
ignition switch.
,
Note

Operating 7
Operating
3
Operation
Basic operations
1. Turn the unit on by pressing any key
on the unit.
2. Select a source by pressing SRC.
3. Rotate the volume knob to adjust the
volume on the unit.
Or press VOLUME
W
/
S
on the
remote control.
Turning off the sound
temporarily
1. Press MUTE to mute your unit. (When
MP3/ WMA file is played, it will be
paused.)
Or press MUTE on the remote control.
2. Press it again to cancel.
Using EQ (Equalizer)
EQ is to increase or decrease the signal
strength of audio frequencies. The
function helps you to enjoy sound more
plentifully.
Press EQ on the unit. And rotate the
volume knob to select the item and press
it. The indicator lights up in the following
order.
FLAT
/
B-BOOST (BASS BOOSTER)
/
POP
/
CLASSIC
/
ROCK
/
JAZZ
/
VOCAL
/
SALSA
/
SAMBA
/
REGGAE
/
RUSSY
/
USER EQ1
/
USER EQ2
Using 3D SOUND/ MP3
OPTM
3D SOUND: This mode delivers
outstanding surround sound.
MP3 OPTM (MP3 OPTIMIZER): This mode
enhances the quality of compressed
music le.
Press and hold EQ/ • 3D. And rotate the
volume knob to select the item and press
it. The indicator lights up in the following
order.
OFF
/
3D SOUND
/
MP3 OPTM
3D SOUND/ MP3 OPTM is only
available when you use the CD/
USB/ SD card. (Except iPod/iPhone)
,
Note
Checking the clock
1. Press DISP.
2. Press it again to cancel.
Turning off the display light
1. Press and hold DISP.
2. Press and hold it again to turn it on.
Under the light-o condition, press
any key, the light is turned on and
then o automatically if you don't
press it within a few seconds.
,
Note
Resetting the unit
You can reset the unit when it does not
operate properly.
1. Detach the control panel.
Refer to page 6 for detaching the
control panel.
2. Press the RESET hole with a sharp
object.
Adjusting the general
settings
You can adjust [SOUND], [LIGHT] and
[OTHER] settings.
On the unit
1. Press and hold • MENU.
2. Rotate the volume knob to select
[SOUND], [LIGHT], or [OTHER] and press
it.
3. Rotate the volume knob to select the
item and press it.
4. Rotate the volume knob clockwise or
counterclockwise to adjust the level.
5. Press the volume knob to confirm the
setting.
If you want to return to the previous
step, press
.
On the Remote Control
1. Press and hold FUNC / • MENU.
2. Press
w
/
s
to select [SOUND], [LIGHT],
or [OTHER] and press ENTER.
3. Press
w
/
s
to select the mode and
press ENTER.
4. Press
w
/
s
to adjust the level.
5. Press ENTER to confirm the setting.
If you want to return to the previous
step, press
.

Operating8
Operating
3
For [SOUND] setting
You can adjust sound quality by
adjusting the level BALANCE (left/right
speaker), FADER (front/rear speaker), SW
(Subwoofer), SW-F (Subwoofer frequency),
A-EQ (Auto EQ).
- When you set the EQ to USER EQ1/2
mode. : You can adjust the level of BAS
(bass), MID (middle), TRB(treble).
SW (Subwoofer)
You can adjust the volume of
subwoofer.
SW-F (Subwoofer frequency)
OFF/ SW 55 Hz/ SW 85 Hz/ SW 120 Hz
You can enable the subwoofer.
A-EQ (Auto EQ) OFF/ ON
AUTO EQ operates only in the music
le supported with genre in the device.
When you set AUTO EQ to ON, POP,
CLASSIC, ROCK, or JAZZ is automatically
selected according to the music genre.
For [LIGHT] setting
You can adjust the light e ects by
adjusting LED, DIM, or DIM LV.
LED COL1 / COL2 / AUTO : You can
change the LED window color.
DIM (Dimmer) OFF / ON : You can
change the brightness of the display
window during the power-on status.
Settings Description
DIM ON The display window
becomes dark.
DIM OFF The display window
becomes bright.
DIM LV (Dimmer Level) : When you set
DIM to ON, you can adjust the dimmer
level. (-2, -1, 0, +1, +2)
For [OTHER] setting
AUX (Auxiliary) ON / OFF
It is possible to use auxiliary equipment
with this unit. Activate the auxiliary
setting when using auxiliary equipment
connected to this unit.
DEMO OFF / ON
You can change the initial indication
on the display to information name
(function name, EQ name, etc...) while
listening to a source.
BEEP 2ND / ALL
BEEP 2ND : The beep is generated
when a key is pressed for longer than 2
seconds.
BEEP ALL : The beep is generated when
any key is pressed.
CLK (Clock)
1. Press and hold • MENU on the unit to
select [OTHER] and then select CLK
by rotating the volume knob.
2. Set the hour by rotating the volume
knob.
3. Press the volume knob to confirm
the hour.
4. Set the minute by rotating the
volume knob.
5. Press the volume knob to confirm
the minute.
Listening to a CD
1. Insert a CD.
2. Rotate the volume knob on the unit to
adjust the volume.
Or press VOLUME
W
/
S
on the
remote control.
Pausing or restarting CD
playback
1. Press
T
on the unit to pause
playback.
Or press
d/M
on the remote control.
2. Press it to resume playback.
Searching for a section
within a track / file
1. Press and hold
Y/U
on the unit
for about 1 second during playback.
Or press and hold
c
/
v
on
remote control.
2. Press
T
on the unit at the point you
want.
Or press
d/M
on the remote control.

Operating 9
Operating
3
Skipping to another track/
file
Press
Y/U
on the unit.
Or press
c
/
v
on the remote
control.
Or
1. Press the volume knob on the unit.
Or press ENTER on the remote control.
2. Rotate the volume knob on the unit
to select a desired ROOT or folder and
press it.
Or press
w
/
s
and press ENTER on the
remote control.
3. Rotate the volume knob on the unit to
select a desired track / file and press it.
Or press
w
/
s
and press ENTER on the
remote control.
To skip to previous track, press brie y
Y
within 3 seconds of playing
time.
,
Note
Checking information about
your music
MP3 / WMA les often come with tags.
The tag gives the Title, Artist or Album.
Press DISP repeatedly during MP3 / WMA
/ CD TEXT le playback. If there is no
information, "NO TEXT" will be shown in
the display window.
Playing back tracks / files in
a way you want
For using applicable buttons
1. Press INT / RPT / SHF.
2. Press it again to cancel.
Or
Using the FUNC button
On the unit
1. Press FUNC.
2. Rotate the volume knob to select an
item and press it.
3. Rotate the volume knob to select the
option.
4. Press the volume knob to set the
option.
If you want to return to the previous
step, press
.
On the Remote Control
1. Press FUNC / • MENU.
2. Press
w
/
s
to select an item and press
it.
3. Press
w
/
s
to select the option.
4. Press ENTER to set the option.
If you want to return to the previous
step, press
.
RPT (Repeat)
The current selected tracks / les (1 RPT)
or folder ( RPT) on the disc is played
repeatedly.
SHF (Shu e)
Each les in the current selected folder
(
SHF) or all of the tracks / les (SHF)
on the disc is played randomly. During
random playback, even if you press
Y
, you won't go back to the previous
track/ le.
INT (Intro Scan)
The rst 10 seconds of all tracks / les
(INT) or each les in the current selected
folder (
INT) on the disc are played.
MP3 / WMA Disc compatibility with
this unit is limited as follows:
1. Sampling Frequency / 8 kHz to
48 kHz (MP3) 22.05 kHz to 48 kHz
(WMA).
2. Bit rate / within 8 kbps to 320
kbps (include VBR) (MP3) 32 kbps
to 320 kbps (WMA).
3. CD-R / CD-RW file system should
be "ISO 9660".
4. If you record MP3 / WMA files
using software which cannot
create a FILE SYSTEM, for example
"Direct-CD" etc., it will not be
possible to playback MP3 / WMA
files. We recommend that you use
"Easy-CD Creator" which creates
an ISO 9660 file system.
You have to set the disc format
option to [Mastered] in order to
make the discs compatible with
the LG players when formatting
rewritable discs. When setting the
option to Live File System, you
cannot use it on LG players.
(Mastered / Live File System : Disc
format system for Windows Vista)
Customers should also note that
permission is required in order
to download MP3 / WMA les
and music from the Internet. Our
company has no right to grant
such permission. Permission
should always be sought from the
copyright owner.
,
Note

Operating10
Operating
3
Listening to music from
an external device
1. Connect an external device to the AUX
jack with line input cable.
2. Select a source to AUX.
3. Play the connected Auxiliary
Equipment.
Preventing radical changes in
volume as switching sources
Only when you set AUX to ON as
switching sources, you can adjust the
volume level of each source to prevent
radical changes in volume by selecting
GAIN 0/ +3/ +6.
1. Press FUNC on the unit.
Or press FUNC / • MENU on the remote
control.
2. Rotate the volume knob on the unit.
Or press
w
/
s
on the remote control
to set the option. (GAIN 0/ +3/ +6)
3. Press the volume knob on the unit.
Or press ENTER on the remote control
to confirm the setting.
4. If you want to return to the previous
step, press
.
Or press
on the remote control.
Listening to the radio
1. Press SRC repeatedly to select a source
to TUNER.
2. Press BAND repeatedly to select a
desired band.
3. For manual search, press and hold
Y/U
on the unit until “MANUAL“
is displayed. Then press it repeatedly to
select a desired frequency.
Or press and hold
c
/
v
on the
remote control.
For auto search, press
Y/U
on
the unit. Then “SEARCH” is displayed.
(Except MW)
Or press
c
/
v
on the remote
control.
Storing desired frequencies
manually
1. Press BAND to select a desired band
you want to store.
2. Select the desired frequency by using
Y/U
on the unit.
Or use
c
/
v
on the remote
control.
3. Press the volume knob and rotate the
volume knob to select a preset station
among 1 to 6 and then press and hold
the volume knob until the beep sound
is heard.
Or press and hold one of preset
buttons among 1 to 6 on the remote
control until the beep sound is heard.
4. Repeat steps 1 to 3 to preset other
stations.
When a station is stored on the
preset numbers on which another
station of the same band has already
been preset, the previously preset
station is automatically erased.
,
Note
Listening to a preset station
1. Press BAND repeatedly to select a
desired band.
2. Press the volume knob on the unit.
Or press ENTER on the remote control.
3. Rotate the volume knob to select a
preset station.
Or press
w
/
s
on the remote control.
4. Press the volume knob.
Or press ENTER on the remote control.
Or
Press BAND and then press the desired
preset button among 1 to 6 on the
remote control.
Adjusting TUNER settings
On the unit
1. Press FUNC.
2. Rotate the volume knob to select an
item and press it.
3. Rotate the volume knob to set the
option and press it.
4. If you want to return to the previous
step, press
.
On the Remote Control
1. Press FUNC / • MENU.
2. Press
w
/
s
to select an item and press
ENTER.
3. Press
w
/
s
to set the option and press
ENTER.
4. If you want to return to the previous
step, press
.
A / S (Auto Store)
The six strongest broadcasting
frequencies will be stored under preset
button 1 to 6 in the order of their signal
strength. To cancel, press the volume
knob.
P / S (Preset scan)
Each preset station appears. To cancel,
press the volume knob.
SENS (Tuner sensitivity) MID / HI / LOW
In an area in which signal reception is
weak, it helps the tuner to search more
stations. The weaker the reception is,
the lower option you should set to.

Operating 11
Operating
3
Using an USB device/
SD card
[USB]
1. Open the USB cover.
2. Connect the USB device.
3. Press SRC repeatedly to select a source
to USB.
[SD]
1. Detach the control panel. (Refer to
"About detachable control panel" on
page 6.)
2. Insert the SD card.
3. Attach the control panel.
4. Press SRC repeatedly to select a source
to SD.
Moving to another drive
When connecting this unit to multi reader,
press BAND on the unit (or DRV on remote
control) to go the next drive. Each time
you press the button, the driver modes
change.
Other functions are same with
"Listening to a CD". Refer to page 8
to 9.
,
Note
Playable USB device/ SD
card Requirement
Do not extract the USB device/ SD card
during operation (play, etc.).
An USB device/ SD card which requires
additional programme installation when
you have connected it to a computer, is
not supported.
Regular back up is recommended to
prevent data loss.
If you use a USB extension cable, USB
HUB, USB Multi-reader, or external HDD,
the USB device may not be recognized.
When you connect a partitioned USB
device into the unit, only the rst
partition is recognized on it.
Some USB device/ SD card may not
work with this unit.
Digital camera and mobile phone are
not supported.
USB Port of the unit cannot be
connected to PC. The unit cannot be
used as a storage device.
Using FAT (16 / 32) le system is
supported.
Using NTFS le system is supported to
read only.
MTP (Media Transfer Protocol) device is
not supported.
Listening to music by
connecting iPod/iPhone
You can enjoy iPod / iPhone-stored music
on the unit by connecting it to the USB
connector using the appropriate cable.
1. Open the USB cover.
2. Connect the iPod / iPhone.
3. Press SRC to select a source to USB.
Pausing or restarting
playback
1. Press
T
on the unit to pause
playback.
Or press
d/M
on the remote control.
2. Press it to resume playback.
Searching for a section
within a file
During playback, press and hold
Y/
U
and then release at a point you want.
Skipping to another file
Press
Y/U
on the unit.
Or press
c
/
v
on the remote
control.
Checking information about
your music
MP3 / WMA les often come with tags.
The tag gives the Title, Artist or Album.
Press DISP repeatedly during MP3 / WMA
le playback. If there is no information,
"NO TEXT" will be shown in the display
window.
Playing back files in a way
you want
On the Unit
1. Press FUNC.
2. Rotate the volume knob to select an
item and press it.
3. Rotate the volume knob to select the
option.
4. Press the volume knob to set the
option.
If you want to return to the previous
step, press
.
On the Remote Control
1. Press FUNC / • MENU.
2. Press
w
/
s
to select an item and press
ENTER.
3. Press
w
/
s
to select the option.
4. Press ENTER to set the option.
If you want to return to the previous
step, press
.
RPT (Repeat)
The current selected le (1 RPT) or
les on the iPod
/ iPhone is played
repeatedly.
SHF (Shu e)
All of the les (SHF) on the iPod / iPhone
are played randomly.
SPD (BOOK SPEED)
You can adjust the audiobook speed of
iPod / iPhone to NOR (Normal), SLOW or
FAST.

Operating12
Operating
3
Playing back files by music
menus
You can check les by music menus and
play it back.
The music menus are as follows.
PLAYLISTS
/
ARTISTS
/
ALBUMS
/
GENRES
/
SONGS
/
COMPOSER
/
AUDIO BOOK
/
PODCAST
/
...
1.
Press the volume knob on the unit.
Or press ENTER on the remote control.
2. Rotate the volume knob on the unit to
select a music menu and press it.
Or press
w
/
s
on the remote control.
3. Rotate the volume knob on the unit to
select a file.
Or press
w
/
s
on the remote control.
4. Press the volume knob on the unit to
confirm the setting.
Or press ENTER on the remote control.
5. If you want to return to the previous
step, press
.
Or press on the remote control.
iPod / iPhone CONTROL
MODE
You can control this unit with your iPod/
iPhone.
Press iPOD on the unit. Then playback
is paused. And you can control on the
unit and iPod / iPhone.
While using the iPod/iPhone CONTROL
MODE, some buttons on the unit are
not available.
Press iPOD again to cancel the iPod /
iPhone CONTROL MODE.
Compatible iPod / iPhone
models
iPod classic
iPod nano 6th generation
iPod touch 4th generation
iPhone 3G / 3GS / 4
We recommend that you use the
OS Version 4.2.1 or more.
“Made for iPod” and “Made for iPhone”
mean that an electronic accessory has
been designed to connect speci cally
to iPod or iPhone respectively, and has
been certi ed by the developer to meet
Apple performance standards. Apple is
not responsible for the operation of this
device or its compliance with safety and
regulatory standards.
Please note that the use of this accessory
with iPod, iPhone may a ect wireless
performance.
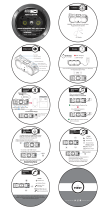
Connecting a Bluetooth
wireless technology
Before you start the pairing procedure,
make sure the Bluetooth wireless
technology is turned on in to your phone.
Refer to your phone’s user guide. Pairing
links your unit and phone with Bluetooth
wireless technology, and is required only
once for the initial setup. If the connection
is successful, the phone is registered
(Device 1 to 10). The process of pairing
may be di erent depend on the phones.
The PIN CODE is 1234.
ON PLAYER
1. Enter the menu. BT
2. Find the
"CONNECT" menu.
Rotate the
volume knob
3. Enter the
"CONNECT" menu.
Press the
volume knob
4. Select the
"SEARCH" menu.
Rotate the
volume knob
5. Search the phones
supported Bluetooth
wireless technology.
Press the
volume knob
6. Select a phone you
want to connect.
Rotate the
volume knob
7. Connect the
phone.
Press the
volume knob

Operating 13
Operating
3
Microphone
The microphone needs to be close to
and pointed toward the person speaking.
Install the microphone as shown below.
Microphone unit
If you power o the unit while talking
on the phone through the unit by
using the BT function, the function is
deactivated and you can talk on the
phone directly.
,
Note
Using the buttons for
Bluetooth wireless
technology
a
b
c
d
a
LIST / ENTER
(Volume knob)
- Press the volume knob : Go to the
next contents of the setting.
- Rotate the volume knob : Move the
contents vertically on the setting or
choose a spell when you write the
words on the unit.
b
- Returns to the previous step.
- Ends a call.
c
BT
- Press it to enter BT function.
- Answers a call.
d
Y/U
Adjusts the mic volume while talking
on the phone by BT function.
Y
Deletes a spell or go back previous
contents while writing some words
on the unit.
U
Moves next space on display while
writing some words on the unit.
Using a Bluetooth wireless
technology
Disconnecting a phone
Press BT -> CONNECT -> LIST ->
Connected device name -> DISCONN
Answering and Ending a call
To answer a call, press BT.
To end a call, press
.
Rejecting a call
To reject a call, press .
Making a call saved as a preset
number
Press BT and a preset number (1 to 6).
Checking missed calls
When the “ ? ” appears, go to the menu
(Press BT-> CALL -> LASTCALL). You can
check the list of missed call.
Audio transfer
It is possible to switch the audio
connection between your phone
equipped with Bluetooth wireless
technology and this unit.
1. Press BT to answer the call.
2. Press BT again. The “PRIVATE” is
displayed.
If the private mode is selected on the unit,
press BT to return to the call to handsfree
mode.

Operating14
Operating
3
The lists of LASTCALL are sorted
from newest to oldest entries.
When you want to make an
international call, press
U
to add
“+” and to delete it press again.
“+” can only be added when the
detail list of LASTCALL is selected.
The call waiting function is not
supported. We do not guarantee
any errors due to use of the call
waiting function.
,
Note
Listening to music of the
Bluetooth device
When your unit and the Bluetooth device
are pairing, Press SRC repeatedly to
select "BT". And play the music stored on
your Bluetooth device. Refer to the your
Bluetooth device’s user guide.
Bluetooth wireless technology
profiles information
In order to use Bluetooth wireless
technology, devices must be able to
interpret certain pro les. This unit is
compatible with following pro les.
GAP (Generic Access Pro le)
HFP (Hands Free Pro le)
GAVDP (Generic Audio / Video Distribution
Pro le)
A2DP (Advanced Audio Distribution
Pro le)
AVRCP (Audio / Video Distribution Remote
Control Pro le)
PBA / PBAP (Phone Book Access Pro le)
Adjusting the setting
1. Press BT.
2. Rotate the volume knob to select an
item and press it.
3. Rotate the volume knob to set the
option and press it.
4. If you want to return to the previous
step, press .
CALL
LASTCALL
Phone number list (Received, Dialed,
Missed). CALL -> LASTCALL -> Select
the phone number -> Press the volume
knob -> Display the information -> Press
the volume knob -> DIAL, SAVE, DELETE
menu will be displayed.
- To call the phone number, DIAL ->
Press the volume knob.
- To save the phone number, SAVE ->
Press the volume knob -> select the
preset number (1 to 6) -> Press the
volume knob.
-
To delete the selected phone number,
DELETE ->
Press the volume knob ->
NAME -> Press the volume knob.
-
To delete all phone number, DELETE ->
Press the volume knob -> ALL -> Press
the volume knob.
DIAL
Enters the number directly on the unit.
To select the 0 to 9 rotate the volume.
Press
U
to make the phone number.
To call it, Press the volume knob.
PRESET
Checks and deletes/dials the phone
number saved preset number.
CALL -> PRESET -> Select the preset
number and press the volume knob
-> Display the information -> Press the
volume knob -> DIAL, DELETE menu
will be displayed.
- To call the phone number, select DIAL
and Press the volume knob.
- To delete the selected phone number,
DELETE -> NAME -> Press the volume
knob.
- To delete all phone number, DELETE ->
ALL -> Press the volume knob.

Operating 15
Operating
3
P-BOOK
LIST
Checks the list of the phone numbers
saved by phonebook.
SEARCH
Searches the phone number in the list.
GET
Getting the phonebook from the phone
automatically. This menu is only available
on phones with PBA / PBAP (Phone Book
Access Pro le).
CONNECT
LIST
Checks the list of the Connected Device
Name.
SEARCH
When unit is not connected with
Bluetooth wireless technology, you can
search the phones available to connect.
When unit is connected with Bluetooth
wireless technology, you can disconnect
the phone.
SETUP
VISIBLE
Makes it is impossible to search this unit.
(SHOWN <-> HIDDEN)
AUTO CON
Adjusts connection with automatically
or not. (ON <-> OFF)
AUTO ANS
Adjusts answering automatically or not.
(MANUAL <-> AUTO)
MIC VOL
Adjusts microphone volume on the
phone from 1 to 5. While you are on
the phone with Bluetooth wireless
technology, use
Y/U
to adjust the
MIC volume.
REDIAL
Adjusts the counts of redial. (1 TIME <->
2 TIMES)
INFO
NAME
Changes the name of this unit.
ADDRESS
Checks the address.
PIN-CODE
Changes the PIN code. Default is 1234.
Using "LG CAR Remote"
application
You can control the unit by using the "LG
CAR Remote" application.
1. Search the “LG CAR Remote” application
and install it.
[Displays installed "LG CAR Remote"
application]
2. Pairing links your unit and iPhone with
Bluetooth wireless technology. (Refer
to the page 12.)
3. When you run the “LG CAR Remote”
application, activating source is
displayed after initial screen. Then you
can control the unit on iPhone.
[Initial screen] [Tuner screen]
You can select a source by pressing
"SOURCE".
[Source Mode screen]

Operating16
Operating
3
Phone compatibility list
Bluetooth list and manufacturing company applicable.
H : Handsfree A : Audio Streming P : Phonebook Sync
Company List H A P Company List H A P Company List H A P Company List H A P
LG
KM380
KM900 (Arena)
KP500 (Cookie)
KS500
KT520
KT610
KU990
GD900
BL40
(New Chocolate)
KM335
GD510 (POP)
GD880
GM730
GS500 (Cookie Plus)
GT505
GT540
GW305
GX500
0
0
0
0
0
0
0
0
0
0
0
0
0
0
0
0
0
0
0
0
0
0
0
0
0
0
0
0
0
0
0
0
0
0
0
0
0
0
0
0
0
0
0
0
0
0
SAMSUNG S8003 JET (8GB)
S8300 Ultra Touch
B5722
B7330 (Omnia Pro)
C3303K (Champ)
M5650U (Lindy)
M8910 (Pixon12)
S7350
S8500 (Wave)
i5503 (Galaxy 5)
i5700
(Galaxy Spica)
i7500 (Galaxy)
i9000
(Galaxy S(16G))
T959
Galaxy Tab
0
0
0
0
0
0
0
0
0
0
0
0
0
0
0
0
0
0
0
0
0
0
0
0
0
0
0
0
0
0
0
0
0
0
0
0
0
Nokia E71
E75
N86
N97
C6
E5
E52
N97-1
N900
6710 (Navigator)
0
0
0
0
0
0
0
0
0
0
0
0
0
0
0
0
0
0
0
0
0
0
0
0
0
0
0
0
SONY
ERICSSON
W595
W705
W980i
Xperia-X1
Vivaz
Xperia-X2
Xperia-X10
0
0
0
0
0
0
0
0
0
0
0
0
0
0
0
0
0
0
0
0

Operating 17
Operating
3
Bluetooth list and manufacturing company applicable.
H : Handsfree A : Audio Streming P : Phonebook Sync
Company List H A P Company List H A P
APPLE
ASUS
HTC
Rim
iPhone 3GS
(16GB)
iPhone 4
(16GB)
i-Pad
P750
Hero G3
Touch2
Legend
Desire
Storm2 9550
0
0
0
0
0
0
0
0
0
0
0
0
0
0
0
0
0
0
0
0
0
0
0
Motorola XT701
XT720
(MOTOROI)
Milestone
Droid
0
0
0
0
0
00
When the phone features <Bluetooth Power Save> function, you should make the
function turned on to maintain connection.
When you switch the call mode from handsfree to phone, the connection may be
disconnected.
Some phones don’t support Reject function.
Low battery in phone may cause the problems.
,
Note
“The Bluetooth® word mark and logos are owned by the Bluetooth® SIG, Inc. and any use of
such marks by LG Electronics is under license. Other trademarks and trade names are those
of their respective owners.”
Bluetooth® wireless technology is a system which allows radio contact between electronic
devices within a max range of 10 meters.
Connecting individual devices under Bluetooth® wireless technology does not incur any
charges. A mobile phone with Bluetooth® wireless technology can be operated via the
Cascade if the connection was made via Bluetooth® wireless technology.
Operating condition for using a Bluetooth wireless technology
function
Close windscreen.
Turn o the air conditioner / heater.
Stop the vehicle or drive at low speed.
Make the call in a quiet location.
- There may be differences in call quality depending on phone type, road conditions
weather, etc.
- Using the phone while driving may cause unexpected accidents.
- The Bluetooth wireless technology function may not operate properly with certain
types of phones equipped with Bluetooth wireless technology.

Troubleshooting18
Troubleshooting
4
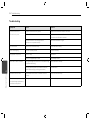
Troubleshooting
Symptoms Cause Solution
Power doesn't turned on.
The unit doesn't operate.
Leads and connectors are not properly. Con rm once more that all connections are correct.
The fuse is blown.
Rectify the problem that caused the fuse to blow, and then replace it. Be very sure
to install the correct fuse with the same rate.
Noise and other factors are causing the built in
microprocessor to operate incorrectly.
Turn the unit o and then on again.
No sound is heard. Cables are not connected correctly. Connect the cables correctly.
There's audio skipping. This unit is not rmly secured. Secure this unit rmly.
The playback is not possible. The disc is dirty. Clean the disc.
The disc of unplayable type is loaded. Check what type the disc.
Radio stations cannot be tuned in. The signal strength of the stations is too weak. (When tuning
in with automatic tuning.)
Tuned in the stations manually.
No station has been preset or preset stations have been
cleared. (When tuning by scanning preset stations.)
Preset the stations.
iPod/ iPhone does not work. Check whether iPod / iPhone is connected to the unit
correctly.
Connect it to the unit correctly.
The unit does not operate correctly
even when the appropriate remote
control buttons are pressed.
Battery power is low. Load a new battery.

Appendix 19
Appendix
5
Specifications
General
Output Power : 53 W x 4 CH (Max.)
Power Source : DC 12 V
Speaker impedance : 4 Ω
Ground System : Negative
Dimensions (W x H x D) :
(178 x 50 x168)
mm (without Control Panel)
Net Weight : 1.32 kg
TUNER
FM Tuning Range :
87.5 MHz to 108.0 MHz
S / N Ratio : 55 dB
Distortion : 0.7 %
Usable Sensitivity : 12 dBμV
AM (MW) Tuning Range :
(520 to 1720) kHz or (522 to 1620) kHz
S / N Ratio : 50 dB
Distortion : 1.0 %
Usable Sensitivity : 28 dBμV
CD
Frequency Response : 20 Hz to 20 kHz
S / N Ratio : 80 dB
Distortion : 0.12 %
Channel Separation (1 kHz) : 55 dB
AUX
Frequency Response : 20 Hz to 20 kHz
S / N Ratio : 80 dB
Distortion : 0.1 %
Channel Separation (1 kHz) : 45 dB
Max Input Level (1 kHz) : 1.1 V
USB
Version : USB 1.1 or USB 2.0 Full Speed
Bus Power Supply (USB) :
DC 5 V
1.5 A
SD
Distortion : 0.1 %
Bluetooth
TX POWER 4 dBm
Version Bluetooth Speci cation 2.1 + EDR
Line OUT
Frequency Response : 20 Hz to 20 kHz
Output Voltage : 2 V (Max.)
Subwoofer
Frequency Response : 20 Hz to 120 Hz
Output Voltage : 2 V (Max.)
Design and speci cations are subject to
change without notice.

-
 1
1
-
 2
2
-
 3
3
-
 4
4
-
 5
5
-
 6
6
-
 7
7
-
 8
8
-
 9
9
-
 10
10
-
 11
11
-
 12
12
-
 13
13
-
 14
14
-
 15
15
-
 16
16
-
 17
17
-
 18
18
-
 19
19
-
 20
20


LG LCS726BO2 Owner's manual
- Category
- Car media receivers
- Type
- Owner's manual
Ask a question and I''ll find the answer in the document
Finding information in a document is now easier with AI
Related papers
Other documents
-
 Altec Lansing IMW889L Quick start guide
-
Prestigio PEP1BR Datasheet
-
Goodmans GMC01 Quick start guide
-
 T'nB IPHHOLD21 Datasheet
-
Nokia N97 User manual
-
Samsung B5722 User manual
-
Samsung GT-I7500 User manual
-
Samsung B7330 Omnia Pro pearl black User manual
-
-

