
1
Sisältö
Mikä “ELCajon Mic Processor” on? . . . . . . . . . . . . . . . . . . . . . . 2
Ominaisuudet . . . . . . . . . . . . . . . . . . . . . . . . . . . . . . . . . . . . . . . . . 2
Paneelit . . . . . . . . . . . . . . . . . . . . . . . . . . . . . . . . . . . . . . . . . . . . . . . . . 2
Etupaneeli . . . . . . . . . . . . . . . . . . . . . . . . . . . . . . . . . . . . . . . . . . . . 2
Sivupaneeli (Oikea) . . . . . . . . . . . . . . . . . . . . . . . . . . . . . . . . . . . . 3
Sivupaneeli (Vasen) . . . . . . . . . . . . . . . . . . . . . . . . . . . . . . . . . . . 3
Alapaneeli . . . . . . . . . . . . . . . . . . . . . . . . . . . . . . . . . . . . . . . . . . . . 3
Clip-mikki . . . . . . . . . . . . . . . . . . . . . . . . . . . . . . . . . . . . . . . . . . . . 3
Käyttö . . . . . . . . . . . . . . . . . . . . . . . . . . . . . . . . . . . . . . . . . . . . . . . . 4
Loop-toiminnosta . . . . . . . . . . . . . . . . . . . . . . . . . . . . . . . . . . . . . 5
Soitto-ohjeita . . . . . . . . . . . . . . . . . . . . . . . . . . . . . . . . . . . . . . . . . 5
Soundilistaus . . . . . . . . . . . . . . . . . . . . . . . . . . . . . . . . . . . . . . . . . 5
PIKAOPAS

2
Mikä “ELCajon Mic Processor” on?
Roland EC-10M ELCajon Mic Processor on uusi konsepti perkussioäänimoduleissa; siinä käytetään Rolandin kehittämää mikrofonisensori- ja
äänenmuodostusteknologiaa, jonka avulla cajonin akustinen ääni vahvistetaan ja siihen voidaan kerrostaa elektronisia soundeja halutessa.
Ominaisuudet
5 Cajonin alkuperäisen soundin lisäksi voit kerrostaa mukaan erilaisia elektronisia soundeja.
5 Voit vaihtaa kahden elektronisen soudin välillä mikrofoniin tulevan äänenkorkeuden mukaan.
5 Voit käyttää helppokäyttöistä loop play-toimintoa ja soittaa elektronisista soundeista muodostuvan loopin mukana.
5 Korkealuokkainen klipsi-tyyppinen suoraan cajoniin asennettava kondensaattorimikrofoni mukana.
5 Voit muuttaa mikkisoundin ja elektronisten soundien välistä äänenvoimakkuubalanssia.
5 Mikkisignaalia varten suunnitellut kompressori ja enhancer, saat parannettua äänen erottuvuutta ja tasoa.
Paneelit
Etupaneeli
A
MIC
A. [COMPRESSOR] -säädin
Säätää mikin voimakkuutta. Kun käännät säädintä oikealle, voimakkuus
lisääntyy ja atakki korostuu.
Jos haluat korostaa mikkisoundin atakkia, säädä kompressoriasetusta
ylöspäin.
B. [VOLUME] -säädin
Säätää mikrofonin äänenvoimakkuutta.
C. PEAK -merkkivalo
Merkkivalo palaa, kun mikkitaso on liian luja. Säädä tasoa, kunnes PEAK
–merkkivalo ei enää pala.
ELECTRONIC
D. [THRESHOLD] –säädin
Määrittää tulevan äänen tason, jolla elektronisen kerroksen soundeja trigataan. Säädintä oikealle kääntämällä säädät kynnystasoa korkeammalle so.
Sinun pitää lyödä lujempaa, jotta elektroniset soundit soivat.
E. [VOLUME] –säädin
Säätää elektronisen kerroksen äänenvoimakkuutta.
F. [TRIGGER] –merkkivalo
Tämä palaa, kun elektroninen kerros soi.
G. [KIT No.] –merkkivalo
Näyttää valitun setin numeron (1–9, 0, A–F).
H. [POWER] –kytkin
Kytkee virran päälle/pois. Kytke virta pois painamalla pitkään.
I. [MODE SELECT] –näppäin
Vaihtaa jalkakytkimien toimintaa [A] J / [B] K .
Tila Näppäin Selite
Setinvaihto (Perusasetus) Ei pala Käytä jalkakytkimiä [A] / [B] settien vaihtoon.
Pad Palaa Soita padia [A] / padia [B].
Loop Vilkkuu
Loop-toiminto on päällä. Lisää tietoa osasta “Loop-
toiminnosta”.
B
C
D
E
F
G
H
J
K
I

3
Sivupaneeli (Oikea)
A. MIC/MIX OUTPUT -liitin
Jos ELECTRONIC –liittimeen on kytketty kaapeli, pelkkä mikin ääni
kuuluu tästä liittimestä
Jos ELECTRONIC –liittimeen ei ole kytketty kaapelia, mikin ääni ja
elektroninen soundi kuuluvat tästä liittimestä.
B. ELECTRONIC OUTPUT -liitin
Elektronisen kerroksen äänet kuuluvat tästä liittimestä.
C. DC IN -liitin
Kytke soittimen mukana tullut muuntaja tähän.
* Suosittelemme, että pidät paristot asennettuna vaikka käyttäisitkin muuntajaa. Näin
voit jatkaa soittoa vaikka muuntajan kaapeli irtoaisikin vahingossa.
* Vältyt virhetiloilta tai jopa laiterikoilta kun käännät aina äänenvoimakkuuden
minimiinsä ennenkuin kytket laitteen päälle tai pois päältä tai teet kytkentöjä.
Sivupaneeli (Vasen)
A. TRIGGER IN -liitin (PAD A/B)
Kytke erillinen kick trigger -padi (lisävaruste: KD-7, KT-9, KT-10) tähän
liittimeen. Saat soitettua kahta eri, pad [A] ja pad [B]:lle asetettua
elektronista soundia
Käyttämällä Y-kaapelia (lisävaruste: PCS-31L) saat kytkettyä kaksi
bassaritriggeriä laitteeseen.
B. MIC IN -liitin
Kytke mukana tullut clip-mikki tähän liittimeen.
C. [MIC GAIN] -säädin
Säätää mikrofonin herkkyyttä.
D. [ENHANCE ON/OFF] -kytkin
Kytkee mikkisoundiin vaikuttavan enhance-efektin päälle/pois. Jos se
on päällä (on), mikkisoundi on erottelevampi. Se on tehokas silloin,
kun haluat kirpeämmän soundin.
Alapaneeli
A. Paristokotelo
EC-10M toimii paristoilla tai mukana tulleella muuntajalla. Jos
käytät paristoja, asenna neljä AAA-kokoista paristoa, pidä huoli
napaisuuksista.
* Paristojen huolimattomasta käsittelystä saattaa seurata nestevuotoja ja jopa räjähdys.
Ole siis asiaankuuluvan varovainen.
* Kun käännät laitteen ympäri, varo säätimiä ja näppäimiä.
* Paristojen käyttöaika normaalikäytössä on noin 5 tuntia. Kun paristojen varaus alkaa
loppua, “L” vilkkuu KIT No. -näytössä. Vaihda silloin paristot mahdollisimman nopeasti.
B. Vuokaavio
Näyttää, kuinka signaali kulkee EC-10M:ssä.
Clip-mikki
A. Pidin auki/kiinni-säädin
Avaa/sulkee pitimen
B. Kaapelikoukku
Mikin kaapelin kiinnitykseen.
A
B
C
A
B
C
D
A
B

4
Käyttö
What is “ELCajon Mic Processor”
The Roland EC-10M ELCajon Mic Processor is a new concept in percussion sound modules; it uses
Roland’s proprietarily developed mic sensor and sound-generating technology to pick up and
amplify the acoustic sound of your cajon, and allows you to layer electronic sounds onto it.
Main features
5 While taking advantage of the resonance of the cajon’s original
sound, you can additionally layer a wide variety of electronic sounds.
5 You can switch between two dierent electronic sounds according
to the pitch of the sound that enters the mic.
5 You can use a simple loop play function to perform along with a
rhythm pattern played by electronic sounds.
5 A high-performance clip-type condenser mic that can be installed
directly on the cajon is included.
5 The volume balance between the mic sound and the electronic
sound can be adjusted by the performer.
5 Compressor and enhancer eects specically for the mic are
provided, improving the loudness and denition of the sound.
Panel Descriptions
Top panel
9 MIC
A
[COMPRESSOR] knob
Adjusts the loudness of the mic.
Moving the knob toward the
right increases the loudness and
strengthens the attack.
B
[VOLUME] knob
Adjusts the volume of the mic.
C
PEAK indicator
This indicator is lit when the mic input level reaches the peak. Adjust the mic gain so that the
PEAK indicator does not light.
9 ELECTRONIC
D
[THRESHOLD] knob
Speci es the input level that triggers the electronic layer sound. Turning the knob toward the
right increases the strike strength that is needed to trigger the electronic layer sound.
E
[VOLUME] knob
Adjusts the volume of the electronic layer sound.
F
[TRIGGER] indicator
This is it lit when the electronic layer sound is produced.
G
[KIT No.] indicator
Indicates the selected kit number (1–9, 0, A–F).
H
[POWER] switch
Turns the power on/o .
Long-press this switch to turn the power o .
I
[MODE SELECT] button
Switches the mode of the foot buttons [A]
J
/ [B]
K
.
Mode Button status Explanation
Kit shift mode (the
setting when you turn
on the power)
Unlit Use the foot buttons [A] / [B] to switch kits.
Pad mode Lit Play pad [A] / pad [B].
Loop mode Blinking
The loop function is used. For details, refer to “About the Loop
function”.
Side panel (Right)
A
MIC/MIX OUTPUT jack
If a cable is connected to the ELECTRONIC
jack, the sound of the mic is output by
itself from this jack
If a cable is not connected to the
ELECTRONIC jack, the sound of the mic
and the sound of the electronic layer are
output from this jack.
B
ELECTRONIC OUTPUT jack
The electronic layer sounds are output from this jack.
C
DC IN jack
Connect the included AC adaptor here.
* We recommend that you keep batteries installed in the unit even though you’ll be powering
it with the AC adaptor. That way, you’ll be able to continue a performance even if the cord of
the AC adaptor gets accidentally disconnected from the unit.
* To prevent malfunction and equipment failure, always turn down the volume, and turn o all
the units before making any connections.
Side panel (Left)
A
TRIGGER IN jack (PAD A/B)
Connect an external kick trigger pad (sold
separately: KD-7, KT-9, KT-10) to this jack.
You can play the two di erent electronic
layer sounds assigned to pad [A] and pad
[B].
* You can use a stereo split cable (sold
separately: PCS-31L) to connect up to two
kick trigger pads to this unit.
B
MIC IN jack
Connect the included clip mic to this jack.
C
[MIC GAIN] knob
Adjusts the gain of the mic.
D
[ENHANCE ON/OFF] switch
Switches the enhance e ect that is applied to the sound of the mic. If this is on, the mic sound
is given greater de nition. This is e ective when you want a crisper sound.
Bottom panel
A
Battery case
The EC-10M operates using
batteries or the included AC adaptor.
If using the unit on batteries, install
four AAA batteries, taking care to
orient the batteries correctly.
* When turning the unit over, be
careful so as to protect the buttons
and knobs from damage. Also,
handle the unit carefully; do not
drop it.
* The battery life is approximately
5 hours for typical performance
use. When the batteries run low,
“L” blinks in the KIT No. indicator.
Replace the battery as soon as
possible.
* If you handle batteries improperly, you risk explosion and uid leakage. Make sure that
you carefully observe all of the items related to batteries that are listed in “USING THE UNIT
SAFELY” and “IMPORTANT NOTES” (leaet “USING THE UNIT SAFELY”).
B
Block diagram
This diagram shows the signal ow of the EC-10M.
Clip mic
B
A
A
Clip open/close knob
Opens/closes the clip.
B
Cable hook
Secures the cable of the clip mic.
Use
1. Connect the EC-10M to your amp or PA mixer.
2. Connect the included clip mic to the MIC IN jack.
3. Attach the clip mic to your cajon.
As shown in the illustration,
clip the mic onto the bottom
(6 o’clock position) of the
sound hole located on the
back of the cajon, so that the
mic is inside (with the Roland
logo facing outward). Use the
cable hook to manage the
cable so that it does not strike
the cajon.
* Depending on the shape
of the sound hole, it might
not be possible to attach
the mic at the 6 o’clock position; if so, it is ok to attach the mic at some other position
(such as 9 o’clock).
4. Place the EC-10M by your foot.
Place the EC-10M where you can control it with one
foot.
5. Turn on the power.
* Before turning the unit on/o, always be sure to turn
the volume down. Even with the volume turned down,
you might hear some sound when switching the unit
on/o. However, this is normal and does not indicate a
malfunction.
6. Use the [MIC GAIN] knob to adjust the mic gain.
Start with the gain at the maximum setting, and
gradually lower it until the PEAK indicator does not
light when you strike the cajon strongly.
* If the sound of the mic seems to be distorted, lower the
[MIC GAIN] knob.
7. Use the [VOLUME] knobs (MIC, ELECTRONIC) to adjust the volume..
If you want to emphasize the sound of the cajon itself, it
is e ective to lower the ELECTRONIC volume and raise
the MIC volume.
8. Use the [THRESHOLD] knob to adjust the sensitivity at which the electronic layer sound is
triggered.
If this setting is low, the electronic layer sound is
triggered even by a soft strike. As this setting is raised,
the electronic layer sound is triggered only by a strong
strike.
* If the electronic sound is inadvertently triggered by
other sounds picked up by the mic when you’re not playing the cajon, raise the threshold
setting so that only the sound is triggered only when you want it to be triggered.
9. Use foot buttons [A] / [B] to switch kits.
For details on each kit, refer to “Kit List”.
About the Loop function
The EC-10M lets you record a phrase of electronic layer sounds and play it back immediately as
a loop. This lets you perform on the cajon accompanied by the playback of the electronic layer
sound loop (shaker, tambourine, bass drum, or other sound eect).
Here’s how to record and play back.
1. Select the kit containing the electronic sound that you want to record.
2. While playing the cajon or the kick trigger, adjust the volume balance of the electronic
layer sound.
3. Use the [MODE SELECT] button to select loop mode.
4. Press the foot button [A] to delete any previously recorded content.
5. Press the foot button [B] to enter the record-standby state.
The foot button [B] is lit red.
6. When you start performing, recording starts automatically.
During recording, the foot button [B] blinks red.
7. At the moment that you want recording to end, press the foot button [B].
The performance data from when you start recording until you press the foot button [B] is
automatically played back as a loop. If recorded performance data exists, the foot button [B] is
lit green.
8. To stop playback, press the foot button [B] once again.
* You can’t perform electronic layer sounds during loop playback. You can perform only using
the cajon itself and the sound of the mic.
Kit List
No. Kit name Layer (Low) Layer (High) Pad A Pad B
1 Ambient Cajon Cajon Bass Reverb Cajon Reverb Splash Cymbal Cowbell
2 Cajon & Tambourine Cajon Bass Tambourine Splash Cymbal Cowbell
3 Cajon & CrossStick Cajon Thumb Low Cross Stick Splash Cymbal Shaker
4 Cajon & Shaker Cajon Foot Shaker Splash Cymbal Cowbell
5 Cajon & Sagat Cajon Bass Sagat Splash Cymbal Vintage Kick
6 Burst Cajon Cajon Thumb Low Flamenco Clap Splash Cymbal Shaker
7 Buzzy Snare Comp Kick Buzzy Snare Splash Cymbal Comp Kick
8 Hybrid 808 Hybrid Kick TR-808 Snare Splash Cymbal Hybrid Kick
9 Steel Snare Plugged Kick Steel Snare Splash Cymbal Shaker
0 Darbuka Darabuka Don Darabuka Tec Splash Cymbal Sagat
A Dhol Dhol Dhol Stick Splash Cymbal Shaker
b Surdo Surudo Mid Surdo Hi Tambourine Shaker
C Bougrabou & Djembe Bougarabou Djembe Slap Tambourine Shaker
d Pot Drum Pot Drum Hole Pot Drum Heel Splash Cymbal Sagat
E Afro Stomp Afro Stomp Ambient Snare Splash Cymbal Afro Stomp
F Wobble Kick Jumper Kick Old School Snare Splash Cymbal Jumper Kick
Performance Advice
5 If you want to emphasize the attack of the mic sound, adjust the compressor setting upward.
5 Placing muting material inside the cajon will reduce unwanted resonance, allowing you to
produce a sharper and tighter sound.
5 The way in which the EC-10M’s electronic layer sounds (high/low) are dierentiated will
vary depending on the character of the sound that enters the mic. If you want to accurately
reproduce these distinctions, you’ll need to be aware of which area of your cajon must be
struck to produce dierent sounds.
5 You can’t perform the electronic layer sounds while using loop playback. You can only perform
using the sound of the cajon itself and the sound of the mic.
A
J K
I
B D E
G H
C
F
A B C
A
B C D
B
A
ELCajon Mic Processor
EC-10M
Copyright © 2016 ROLAND CORPORATION
English
Owner’s Manual
In order to use this device correctly, please carefully read “USING THE UNIT SAFELY” and “IMPORTANT NOTES” (the “USING THE UNIT SAFELY” leaet) before use.
After reading, keep these instructions at hand for immediate reference.
Main Specications
Roland EC-10M ELCajon Mic Processor
Power Supply
AC adaptor (DC 5.7 V)
Rechargeable Ni-MH batteriesbattery (AAA, HR03) x 4
Current Draw 150 mA
Expected battery life
under continuous
use
Approx. 5 hours
* These can vary depending on the specications of the batteries, capacity of the
batteries, and the conditions of use.
Dimensions
175 (W) x 135 (D) x 55 (H) mm
6-15/16 (W) x 5-3/8 (D) x 2-3/16 (H) inches
Weight
(including batteries)
500 g
1 lb 2 oz
Accessories Clip mic, Owner’s manual, Leaet “USING THE UNIT SAFELY,” AC adaptor
* This document explains the specications of the product at the time that the document
was issued. For the latest information, refer to the Roland website.
Was ist der Roland ELCajon Mic Processor?
Der Roland EC-10M ELCajon Mic Processor ist ein neues Konzept für Percussion-Soundmodule. Er
besitzt ein speziell von Roland hergestellten Mikrofonsensor mit Soundtechnologie für sowohl
die Abnahme des akustischen Sounds einer Cajon als auch das Hinzufügen von elektronischen
Sounds zu dem Klang einer akustischen Cajon.
Eigenschaften
5 Zusätzlich zur Nutzung der akustischen Klänge einer Cajon können
elektronische Sounds hinzugefügt werden.
5 Sie können zwischen zwei elektronischen Sounds umschalten.
Dieses wird erreicht durch das Erkennen unterschiedlicher Tonhöhen
über das Mikrofon.
5 Eine einfache Loop Play-Funktion ermöglicht das Aufzeichnen eines
Rhythmus-Patterns mithilfe der elektronischen Sounds und das
Spielen der akustischen Cajon dazu.
5 Beigefügt ist ein hochqualitatives Kondensatormikrofon im Clip-
Format, das direkt an der Cajon befestigt wird.
5 Sie können die Lautstärkebalance zwischen Mikrofonsignal und dem
elektronischen Sound einstellen.
5 Für das Mikrofonsignal stehen Eekte wie Compressor und Enhancer
zur Verfügung, welche die Lautheit und Präsenz des Sounds
optimieren.
Beschreibung der Bedienoberäche
Die Bedienoberäche
9 MIC
A
[COMPRESSOR]-Regler
Stellt den Ausgangspegel des
Mikrofonsignals ein.
Drehen des Reglers nach rechts
erhöht die Lautstärke und verstärkt
die Attack-Phase.
B
[VOLUME]-Regler
Bestimmt die Lautstärke des
Mikrofonsignals.
C
PEAK-Anzeige
Diese Anzeige leuchtet auf, wenn der Pegel des Mikrofonsignals die Verzerrgrenze erreicht.
Stellen Sie den Gain-Pegel so ein, dass diese Anzeige auch beim lautesten Signal nicht
au euchtet.
9 ELECTRONIC
D
[THRESHOLD]-Regler
Bestimmt den Pegel, ab dem der elektronische Layer-Sound getriggert wird. Drehen des
Reglers nach rechts erfordert eine höhere Anschlagstärke, um den elektronischen Layer-
Sound zu triggern.
E
[VOLUME]-Regler
Bestimmt die Lautstärke des elektronischen Layer-Sounds.
F
[TRIGGER]-Anzeige
Diese Anzeige leuchtet, wenn der elektronische Layer-Sound erzeugt wird.
G
[KIT No.]-Anzeige
Zeigt die aktuell ausgewählte Kit-Nummer an (1–9, 0, A–F).
H
[POWER]-Schalter
Schaltet das Gerät ein bzw. aus.
Zum Ausschalten des Geräts halten Sie den Taster länger gedrückt.
* Wenn Sie Batterien verwenden möchten, benutzen Sie wieder auadbare Ni-MH-Batterien.
I
[MODE SELECT]-Taster
Schaltet den Modus der Fußtaster [A]
J
/ [B]
K
um.
Mode Taster-Status Beschreibung
Kit Shift-Modus
(diese Einstellung
ist nach Einschalten
ausgewählt).
erloschen Verwenden Sie die Fußtaster [A] / [B], um die Kits umzuschalten.
Pad-Modus leuchtet Spielen Sie das Pad [A] / Pad [B].
Loop-Modus blinkt
Die Loop-Funktion wird verwendet. Weitere Details nden Sie
im Abschnitt “Die Loop-Funktion”.
Seitenteil (rechts)
A
MIC/MIX OUTPUT-Buchse
Wenn die ELECTRONIC-Buchse verkabelt
ist, wird über diese Buchse der über
das Mikrofon abgenommene Sound
ausgegeben. Wenn die ELECTRONIC-
Buchse nicht verkabelt ist, werden
über diese Buchse sowohl der über das
Mikrofon abgenommene Sound als auch der elektronische Layer-Sound ausgegeben.
B
ELECTRONIC OUTPUT-Buchse
Über diese Buchse wird der Sound der elektronischen Layer-Sounds ausgegeben.
C
DC IN-Buchse
Zum Anschluss des beigefügten AC-Adapters.
* Lassen Sie die Batterien auch dann im Gerät, wenn Sie einen AC-Adapter verwenden. In
diesem Fall wird das Gerät auch dann noch mit Strom versorgt, wenn der AC-Adapter
versehentlich abgezogen würde.
* Um Fehlfunktionen bzw. eventuellen Beschädigungen vorzubeugen, regeln Sie
immer die Lautstärke auf Minimum und lassen Sie alle Geräte ausgeschaltet, wenn Sie
Kabelverbindungen vornehmen.
Seitenteil (links)
A
TRIGGER IN-Buchse (PAD A/B)
Zum Anschluss eines externen Kick Trigger-
Pads (zusätzliches Zubehör: KD-7, KT-9, KT-
10). Sie können über die Pads [A] und [B] zwei
unterschiedliche elektronische Layer-Sounds
zuordnen und spielen.
* Mithilfe eines Stereo Split-Kabels (zusätzliches
Zubehör: PCS-31L) können Sie zwei Kick
Trigger-Pads an dieses Gerät anschließen.
B
MIC IN-Buchse
Zum Anschluss des beigefügten Clip-
Mikrofons.
C
[MIC GAIN]-Regler
Bestimmt den Grundpegel des Mikrofonsignals.
D
[ENHANCE ON/OFF]-Schalter
Schaltet den Enhance-E ekt ein, welcher dem Mikrofon-Signal hinzugefügt wird. Wenn dieser
E ekt aktiviert ist, erklingt der Sound heller und schärfer.
Unterseite
A
Batteriefach
Der EC-10M kann entweder über Batterien oder
mit dem beigefügten AC-Adapter mit Strom
versorgt werden. Wenn Sie Batterien verwenden
möchten, setzen Sie vier AAA-Batterien ein und
achten Sie auf die korrekte Polarität.
* Wenn Sie das Gerät umdrehen, legen Sie dieses
immer auf eine weiche, gepolsterte Fläche
(z.B. Kissen), damit die Bedienelemente nicht
beschädigt werden. Lassen Sie das Gerät beim
Umdrehen nicht fallen.
* Die Lebensdauer der Batterie beträgt bei
normaler Anwendung ca. 5 Stunden. Wenn die
Batteriespannung nachlässt, blinkt bei der KIT
No.-Anzeige das Symbol "L". Ersetzen Sie in diesem Fall die alten Batterien durch aufgeladene
Batterien.
* Die unsachgemäße Behandlung von Batterien kann dazu führen, dass diese explodieren
oder auslaufen. Beachten Sie daher immer alle Sicherheitshinweise bezüglich der Batterien.
Lesen Sie dazu die Abschnitte "SICHERHEITSHINWEISE” und “WICHTIGE HINWEISE” (siehe
Informationsblatt “USING THE UNIT SAFELY”).
B
Blockdiagramm
Dieses Diagramm zeigt den Signalverlauf des EC-10M.
Clip-Mikrofon
B
A
A
Clipverschluss
Ö net bzw. schließt den Clip-Verschluss.
B
Kabelsicherung
Dient als Zugentlastung für das Kabel des Clip-Mikrofons.
Praktische Anwendung
1. Schließen Sie den EC-10M an ein Verstärkersystem
bzw. an eine PA an.
2. Schließen Sie das beigefügte Clip-Mikrofon an die
MIC IN-Buchse an.
3. Befestigen Sie das Clip-Mikrofon an der Cajon.
Befestigen Sie das Mikrofon an der
Unterseite der Aussparung der Rückseite
der Cajon auf der 6 Uhr-Position (unten),
so dass sich das Mikrofon in der Cajon
be ndet (das Roland-Logo muss nach
außen zeigen - siehe Abbildung). Führen
Sie das Kabel des Mikrofons um die
Kabelsicherung und stellen Sie sicher, dass
das Kabel nicht das Gehäuse der Cajon
berührt.
* Abhängig von der Größe der Aussparung
auf der Rückseite der Cajon kann es vorkommen, dass sich das Mikrofon nicht exakt an der
6 Uhr-Position befestigen lässt. Verwenden Sie dann eine andere Position (z.B. die 9 Uhr-
Position).
4. Positionieren Sie den EC-10M so, dass Sie diesen
mit einem Fuß steuern können.
5. Schalten Sie das Gerät ein.
* Regeln Sie vor Ein- und Ausschalten immer die
Lautstärke auf Minimum. Auch bei minimaler
Lautstärke ist beim Ein- und Ausschalten ein leises
Nebengeräusch hörbar. Dieses ist normal und keine
Fehlfunktion.
6. Stellen Sie mit dem [MIC GAIN]-Regler die Empndlichkeit für das Mikrofon-
Eingangssignal ein.
Stellen Sie den GAIN-Regler auf die maximale
Lautstärke, und drehen Sie diesen dann langsam soweit
herunter, dass bei Spielen der Cajon bei lautestem
Signal die PEAK-Anzeige nicht mehr au euchtet.
* Wenn der Sound des Mikrofonsignals verzerrt, drehen
Sie den [MIC GAIN]-Regler weiter herunter.
7. Stellen Sie mit den [VOLUME]-Reglern
(MIC, ELECTRONIC) die gewünschte Lautstärke ein.
Um den akustischen Sound der Cajon hervorzuheben,
verringern Sie die Lautstärke für ELECTRONIC und
erhöhen Sie die Lautstärke für MIC.
8. Mit dem [THRESHOLD]-Regler können Sie
bestimmen, ab welcher Anschlagdynamik der elektronische Sound getriggert wird.
Bei niedrigen Werten wird der elektronische Sound
schon bei schwachem Anschlagen getriggert. Je höher
der Wert, desto stärker müssen Sie die Spiel äche
anschlagen, um den elektronischen Sound zu triggern.
* Wenn der elektronische Sound bereits getriggert
wird, wenn das Mikrofon Signale empfängt, ohne dass Sie die Cajon spielen, müssen Sie den
Threshold-Wert entsprechend erhöhen.
9. Verwenden Sie die Fußtaster [A] / [B], um die Kits umzuschalten.
Details zu den Kits nden Sie in der “Liste der Kits”.
Die Loop-Funktion
Der EC-10M ermöglicht, eine Phrase mithilfe der elektronischen Layer-Sounds aufzunehmen
und wiederholt abzuspielen (Loop-Playback). Sie können dann zu dem Loop-Playback (Shaker,
Tambourine, Bassdrum, andere Soundeekte) auf der Cajon spielen.
Gehen Sie wie folgt vor.
1. Wählen Sie das Kit mit den gewünschten elektronischen Sounds aus.
2. Spielen Sie die Cajon oder betätigen Sie den Kick Trigger und stellen Sie die
Lautstärkebalance für den elektronischen Layer-Sound ein.
3. Wählen Sie mithilfe des [MODE SELECT]-Tasters den Loop-Modus aus.
4. Drücken Sie den Fußtaster [A], um eine eventuell vorhandene vorherige Aufnahme zu
löschen.
5. Drücken Sie den Fußtaster [B], um die Aufnahmebereitschaft zu aktivieren.
Die Anzeige des Fußtasters [B] leuchtet rot.
6. Wenn Sie auf der Cajon spielen, wird die Aufnahme automatisch gestartet.
Während der Aufnahme blinkt die Anzeige des Fußtasters [B] rot.
7. Um die Aufnahme zu beenden, drücken Sie erneut den Fußtaster [B].
Die aufgenommene Passage wird automatisch wiederholt abgespielt (Loop-Playback). Die
Anzeige des Fußtasters [B] leuchtet grün und zeigt damit an, dass eine Aufnahme vorhanden
ist.
8. Um das Playback zu stoppen, drücken Sie ermeut den Fußtaster [B].
* Die elektronischen Layer-Sounds können nicht gespielt werden, während das Loop-Playback
läuft. Sie können in diesem Fall nur den akustischen Cajon-Sound und den über das Mikrofon
abgenommenen Sound erzeugen.
Liste der Kits
Nr. Kit-Name Layer (Low) Layer (High) Pad A Pad B
1 Ambient Cajon Cajon Bass Reverb Cajon Reverb Splash Cymbal Cowbell
2 Cajon & Tambourine Cajon Bass Tambourine Splash Cymbal Cowbell
3 Cajon & CrossStick Cajon Thumb Low Cross Stick Splash Cymbal Shaker
4 Cajon & Shaker Cajon Foot Shaker Splash Cymbal Cowbell
5 Cajon & Sagat Cajon Bass Sagat Splash Cymbal Vintage Kick
6 Burst Cajon Cajon Thumb Low Flamenco Clap Splash Cymbal Shaker
7 Buzzy Snare Comp Kick Buzzy Snare Splash Cymbal Comp Kick
8 Hybrid 808 Hybrid Kick TR-808 Snare Splash Cymbal Hybrid Kick
9 Steel Snare Plugged Kick Steel Snare Splash Cymbal Shaker
0 Darbuka Darabuka Don Darabuka Tec Splash Cymbal Sagat
A Dhol Dhol Dhol Stick Splash Cymbal Shaker
b Surdo Surudo Mid Surdo Hi Tambourine Shaker
C Bougrabou & Djembe Bougarabou Djembe Slap Tambourine Shaker
d Pot Drum Pot Drum Hole Pot Drum Heel Splash Cymbal Sagat
E Afro Stomp Afro Stomp Ambient Snare Splash Cymbal Afro Stomp
F Wobble Kick Jumper Kick Old School Snare Splash Cymbal Jumper Kick
Tipps für das Spielen
5 Wenn Sie den Attack-Anteil des Mikrofonsignals verstärken möchten, erhöhen Sie den Wert für
den Compressor.
5 Wenn Sie Dämmmaterial in das Gehäuse der Cajon legen, werden unerwünschte Resonanzen
geltert, was ein schärferes Klangbild und einen härteren Sound zur Folge hat.
5 Die Art und Weise, wie die elektronischen Layer-Sounds (High/Low) des EC-10M unterschieden
werden, ist abhängig vom Charakter des Sounds, der über das Mikrofon abgenommen wird.
Um die Sounds akkurat zu trennen, müssen Sie darauf achten, welche Bereiche der Spieläche
der Cajon Sie anschlagen müssen, um unterschiedliche Sounds zu erzeugen.
5 Die elektronischen Layer-Sounds können nicht gespielt werden, während das Loop-Playback
läuft. Sie können in diesem Fall nur den akustischen Cajon-Sound und den über das Mikrofon
abgenommenen Sound erzeugen.
A
J K
I
B D E
G H
C
F
A B C
A
B C D
B
A
ELCajon Mic Processor
EC-10M
Copyright © 2016 ROLAND CORPORATION
Deutsch
Bedienungsanleitung
Lesen Sie zuerst die Hinweise in den Abschnitten „SICHERHEITSHINWEISE” und „WICHTIGE HINWEISE” (im Informationsblatt "USING THE UNIT SAFELY”).
Bewahren Sie die Anleitung zu Referenzzwecken auf.
Technische Daten
Roland EC-10M ELCajon Mic Processor
Stromversorgung
AC-Adapter (DC 5.7 V)
Wieder auadbare Ni-MH Batterien (AAA, HR03) x 4
Stromverbrauch 150 mA
Lebensdauer
der Batterien bei
Dauerbetrieb
ca. 5 Stunden
* Diese Angaben variieren und sind abhängig von den technischen Daten der
verwendeten Batterien, deren Kapazität und den Umgebungsbedingungen.
Abmessungen 175 (W) x 135 (D) x 55 (H) mm
Gewicht (inklusive
Batterien)
500 g
Beigefügtes
Zubehör
Clip-Mikrofon, Bedienungsanleitung, Informationsblatt "USING THE UNIT SAFELY“,
AC-Adapter
* Dieses Dokument beschreibt die technischen Daten des Produkts bei Veröentlichung
dieses Dokuments. Ggf. aktualisierte Informationen zu diesem Produkt nden Sie auf
der Roland-Internetseite.
5
5
5
5
5
5
9
9
5
5
5
5
Présentation du « ELCajon Mic Processor »
Le produit Roland EC-10M ELCajon Mic Processor est un générateur de son de percussion avec
un nouveau concept. Il utilise une technologie de capteur et de génération de son Roland
propriétaire pour capter et amplier les sons acoustiques de votre cajon, et il vous permet de
superposer des sons électroniques sur les sons acoustiques.
Caractéristiques principales
5 Vous pouvez superposer un large éventail de sons électroniques tout
en tirant parti de la résonance distincte spécique au cajon.
5 Vous pouvez permuter entre deux sons électroniques diérents
selon la hauteur de note captée par le microphone.
5 Vous pouvez utiliser une fonction de lecture de boucle simple
pour jouer en même temps qu’un motif rythmique lu par des sons
électroniques.
5 Un microphone à condensateur de type micro-cravate (fourni) haute
performance à installer directement sur le cajon est fourni.
5 L’interprète peut régler l’équilibre du volume entre le son du
microphone et le son électronique.
5 Des eets intégrés de compresseur et d’enhancer spéciquement
conçus pour le microphone permettent d’amplier le son et
d’améliorer sa dénition.
Description des panneaux
Panneau supérieur
9 MIC
A
Commande [COMPRESSOR]
Permet de régler la puissance du
microphone.
Tournez la commande vers la droite
pour augmenter la puissance et
renforcer l’attaque.
B
Commande [VOLUME]
Permet de régler le volume du
microphone.
C
Témoin PEAK
Ce témoin est allumé lorsque le niveau d’entrée du microphone atteint le niveau maximum.
Permet de régler le gain du microphone a n que le témoin PEAK ne s’allume pas.
9 ELECTRONIC
D
Commande [THRESHOLD]
Permet de spéci er le niveau d’entrée qui déclenche le son de la couche électronique. En
tournant la commande vers la droite, vous renforcez la puissance de frappe nécessaire pour
déclencher le son de la couche électronique.
E
Commande [VOLUME]
Permet de régler le volume du son de la couche électronique.
F
Témoin [TRIGGER]
Ce témoin est allumé lors de la production du son de la couche électronique.
G
Témoin [KIT No.]
Indique le numéro de kit sélectionné (1–9, 0, A–F).
H
Commutateur [POWER]
Permet de mettre l’appareil sous tension/hors tension.
Exercez une pression prolongée sur ce commutateur pour mettre l’appareil hors tension.
* Si vous utilisez cet appareil sur piles, veuillez utiliser des piles Ni-MH rechargeables.
I
Bouton [MODE SELECT]
Permet de changer le mode des boutons actionnables au pied [A]
J
/ [B]
K
.
Mode
État du
bouton
Explication
Mode de changement
de kit (le réglage à la
mise sous tension de
l’appareil)
Éteint
Utilisez les boutons actionnables au pied [A] / [B] pour passer d’un
kit à l’autre.
Mode Pad Allumé Lecture du pad [A] / pad [B].
Mode Loop Clignote
La fonction Loop est utilisée. Pour plus de détails, voir « À propos
de la fonction Loop ».
Panneau latéral (droit)
A
Prise MIC/MIX OUTPUT
Si un câble est connecté à la prise
ELECTRONIC, le son du microphone est
envoyé de lui-même à partir de cette prise.
Si aucun câble n’est connecté à la prise
ELECTRONIC, le son du microphone et
le son de la couche électronique sont
envoyés à partir de cette prise.
B
Prise ELECTRONIC OUTPUT
Les sons de la couche électronique sont envoyés à partir de cette prise.
C
Prise DC IN
Connectez l’adaptateur secteur fourni à cette prise.
* Nous vous recommandons de laisser les piles dans l’appareil même si vous l’alimentez à
l’aide de l’adaptateur secteur. Vous pourrez ainsi continuer à jouer même si le cordon de
l’adaptateur secteur est accidentellement déconnecté de l’appareil.
* Pour éviter tout dysfonctionnement et panne de l’équipement, baissez systématiquement le
volume et éteignez tous les appareils avant d’eectuer des connexions.
Panneau latéral (gauche)
A
Prise TRIGGER IN (PAD A/B)
Connectez un pad Kick Trigger externe
(vendu séparément : KD-7, KT-9, KT-10) à
cette prise.
Vous pouvez lire deux sons de couche
électronique di érents a ectés au pad [A]
et au pad [B].
* Vous pouvez utiliser un câble stéréo
divisé (vendu séparément : PCS-31L) pour
raccorder jusqu’à deux pads Kick Trigger à
cet appareil.
B
Prise MIC IN
Branchez le micro-cravate fourni à cette
prise.
C
Commande [MIC GAIN]
Permet de régler le gain du microphone.
D
Commutateur [ENHANCE ON/OFF]
Change l
’
e et Enhance appliqué au son du microphone. S
’
il est activé, le son du microphone béné cie
d
’
une dé nition supérieure. Ce réglage est e cace lorsque vous recherchez un son plus clair.
Panneau inférieur
A
Compartiment des piles
L’EC-10M fonctionne sur piles ou
avec l’adaptateur secteur fourni.
Si vous utilisez l’appareil sur piles,
installez quatre piles AAA en veillant
à les orienter correctement.
* Lorsque vous retournez l’appareil,
veillez à protéger les boutons et les
commandes contre tout dommage.
Manipulez également l’appareil
avec soin. Ne le laissez pas tomber.
* Dans le cas d’une utilisation
standard lors d’une performance,
l’autonomie de la batterie est
d’environ 5 heures. Lorsque les
piles sont proches de s’épuiser, « L »
clignote sur le témoin de n° de KIT.
Remplacez les piles dès que possible.
* Si vous manipulez les piles incorrectement, il peut se produire une explosion ou une fuite
de liquide. Veillez à respecter toutes les instructions au sujet des piles décrites dans les
« CONSIGNES DE SÉCURITÉ » et les « REMARQUES IMPORTANTES » (dépliant « CONSIGNES DE
SÉCURITÉ »).
B
Schéma fonctionnel
Ce schéma illustre le ux de signaux de l’EC-10M.
Micro-cravate
B
A
A
Bouton d’ouverture/fermeture du clip
Permet d’ouvrir/de fermer le clip.
B
Crochet pour câble
Permet de xer le câble du micro-cravate.
Utilisation
1. Connectez l’EC-10M à votre amplicateur ou à la
console de mixage de l’amplicateur de puissance.
2. Branchez le micro-cravate fourni sur la prise MIC IN.
3. Fixez le micro-cravate sur votre cajon.
Comme montré sur
l’illustration, attachez le
microphone sur la partie
inférieure (position 6 heures)
du trou du haut-parleur au dos
du cajon de manière à ce que
le microphone soit à l’intérieur
(avec le logo Roland vers
l’extérieur). Utilisez le crochet
pour câble pour acheminer le
câble de manière à ce qu’il ne
frappe pas le cajon.
* Selon la forme du trou du
haut-parleur, il peut ne pas
être possible de xer le microphone sur la position 6 heures. Dans ce cas, vous pouvez xer le
microphone sur une autre position (par exemple 9 heures).
4. Placez l’EC-10M près de votre pied.
Placez l’EC-10M là où vous pouvez le contrôler avec un
pied.
5. Mettez l’appareil sous tension.
* Avant de mettre l’appareil sous tension/hors tension,
veillez toujours à baisser le volume. Même si vous avez
baissé le volume au minimum, il se peut que vous
entendiez des sons lors de la mise sous tension/hors
tension de l’appareil. Ce phénomène est toutefois
normal et n’indique pas un dysfonctionnement.
6. Utilisez la commande [MIC GAIN] pour régler le gain du microphone.
Commencez par régler le gain sur le niveau maximum,
puis diminuez-le progressivement jusqu’à ce que le
témoin PEAK ne s’allume pas lorsque vous tapez avec
force sur le cajon.
* Si le son du microphone semble déformé, diminuez la
commande [MIC GAIN].
7. Utilisez les commandes [VOLUME] (MIC, ELECTRONIC) pour régler le volume.
Si vous souhaitez mettre l’accent sur le son du cajon
lui-même, il est e cace de diminuer le volume
ELECTRONIC et d’augmenter le volume MIC.
8. Utilisez la commande [THRESHOLD] pour régler la sensibilité à laquelle le son de la couche
électronique est déclenché.
Si ce réglage est faible, le son de la couche électronique
est déclenché même par une frappe douce. Si ce
réglage est augmenté, le son de la couche électronique
est déclenché uniquement par une frappe forte.
* Si le son électronique est déclenché accidentellement
par d’autres sons captés par le microphone lorsque vous ne jouez pas sur le cajon, augmentez
le réglage de seuil de manière à ce que le son soit déclenché uniquement lorsque vous
souhaitez qu’il le soit.
9. Utilisez les boutons actionnables au pied [A] / [B]
pour passer d’un kit à l’autre.
Pour des détails sur chaque kit, reportez-vous à «Liste de
kits».
À propos de la fonction Loop
L’EC-10M vous permet d’enregistrer une phrase de sons de couche électronique et de la
lire immédiatement sous forme de boucle. Vous pouvez ainsi jouer sur le cajon avec, pour
accompagnement, la lecture de la boucle du son de la couche électronique (shaker, tambourin,
grosse caisse ou autre eet sonore).
La section ci-après décrit les procédures d’enregistrement et de lecture.
1. Sélectionnez le kit contenant le son électronique que vous souhaitez enregistrer.
2. Pendant que vous jouez sur le cajon ou le kick trigger, réglez l’équilibre du volume du son
de la couche électronique.
3. Utilisez le bouton [MODE SELECT] pour sélectionner le mode Loop.
4. Appuyez sur le bouton actionnable au pied [A] pour supprimer tout contenu
précédemment enregistré.
5. Appuyez sur le bouton actionnable au pied [B] pour passer à l’état d’enregistrement en
attente.
Le bouton actionnable au pied [B] est allumé en rouge.
6. Lorsque vous commencez à jouer, l’enregistrement démarre automatiquement.
Pendant l’enregistrement, le bouton actionnable au pied [B] clignote en rouge.
7. Au moment où vous souhaitez arrêter l’enregistrement, appuyez sur le bouton
actionnable au pied [B].
Les données de performance depuis le début de l’enregistrement jusqu’au moment où vous
appuyez sur le bouton actionnable au pied [B] sont automatiquement lues sous forme de
boucle. S’il y a des données de performance enregistrées, le bouton actionnable au pied [B]
est allumé en vert.
8. Pour arrêter la lecture, appuyez sur le bouton actionnable au pied [B] une nouvelle fois.
* Vous ne pouvez pas jouer des sons de couche électronique pendant la lecture des boucles.
Vous pouvez jouer uniquement en utilisant le cajon lui-même et le son du microphone.
Liste de kits
N° Nom du kit Couche (graves) Couche (aigus) Pad A Pad B
1 Ambient Cajon Cajon Bass Reverb Cajon Reverb Splash Cymbal Cowbell
2 Cajon & Tambourine Cajon Bass Tambourine Splash Cymbal Cowbell
3 Cajon & CrossStick Cajon Thumb Low Cross Stick Splash Cymbal Shaker
4 Cajon & Shaker Cajon Foot Shaker Splash Cymbal Cowbell
5 Cajon & Sagat Cajon Bass Sagat Splash Cymbal Vintage Kick
6 Burst Cajon Cajon Thumb Low Flamenco Clap Splash Cymbal Shaker
7 Buzzy Snare Comp Kick Buzzy Snare Splash Cymbal Comp Kick
8 Hybrid 808 Hybrid Kick TR-808 Snare Splash Cymbal Hybrid Kick
9 Steel Snare Plugged Kick Steel Snare Splash Cymbal Shaker
0 Darbuka Darabuka Don Darabuka Tec Splash Cymbal Sagat
A Dhol Dhol Dhol Stick Splash Cymbal Shaker
b Surdo Surudo Mid Surdo Hi Tambourine Shaker
C Bougrabou & Djembe Bougarabou Djembe Slap Tambourine Shaker
d Pot Drum Pot Drum Hole Pot Drum Heel Splash Cymbal Sagat
E Afro Stomp Afro Stomp Ambient Snare Splash Cymbal Afro Stomp
F Wobble Kick Jumper Kick Old School Snare Splash Cymbal Jumper Kick
Conseils de jeu
5 Si vous souhaitez mettre l’accent sur l’attaque du son du microphone, ajustez le réglage du
compresseur vers le haut.
5 Vous pouvez réduire la résonance indésirable en plaçant un matériau de mise en sourdine à
l’intérieur du cajon, ce qui vous permet de produire un son plus net et plus serré.
5 La manière dont les sons de couche électronique (aigus/graves) de l’EC-10M sont diérenciés
varie selon le caractère du son capté par le microphone. Si vous souhaitez reproduire ces
distinctions de manière précise, il est nécessaire de connaître la zone de votre cajon sur
laquelle vous devez frapper pour produire des sons diérents.
5 Vous ne pouvez pas jouer des sons de couche électronique pendant que la lecture des boucles
est activée. Vous pouvez jouer uniquement en utilisant le son du cajon lui-même et le son du
microphone.
A
J K
I
B D E
G H
C
F
A B C
A
B C D
B
A
ELCajon Mic Processor
EC-10M
Copyright © 2016 ROLAND CORPORATION
Français
Mode d’emploi
Pour être sûr d’utiliser l’appareil correctement, veuillez lire attentivement les sections « CONSIGNES DE SÉCURITÉ » et « REMARQUES IMPORTANTES » (le dépliant « CONSIGNES DE SÉCURITÉ ») avant utilisation.
Après lecture, conservez ces instructions à portée de main pour pouvoir vous y reporter dès que nécessaire.
Principales caractéristiques techniques
Roland EC-10M ELCajon Mic Processor
Alimentation
Adaptateur secteur (5.7 V CC)
Piles Ni-MH rechargeables (AAA, ZR03) x 4
Consommation 150 mA
Autonomie des piles
en cas d’utilisation
continue
Environ 5 heures
* Ces données peuvent varier selon les spécications des piles, la capacité des piles
et les conditions d'utilisation.
Dimensions 175 (L) x 135 (P) x 55 (H) mm
Poids
(piles comprises)
500 g
Accessoires
Micro-cravate, mode d'emploi, dépliant « CONSIGNES DE SÉCURITÉ », adaptateur
secteur
* Ce document décrit les caractéristiques techniques du produit au moment de la
publication du document. Pour les informations les plus récentes, consultez le site Web
de Roland.
* 5 1 0 0 0 5 3 3 5 7 - 0 2 *
1. Kytke EC-10M vahvistimeen tai PA-mikseriin.
2. Kytke mukana tullut clip-mikki MIC IN -liittimeen.
3. Kiinnitä clip-mikki cajoniin.
Kuten kuvasta näkyy, kiinnitä mikki cajonin takana olevan ääniaukon
alareunaan niin, että mikki on sisällä (Roland-logo näkyy ulos). Käytä
kaapelikoukkua pitämään kaapelia niin, ettei se osu cajoniin.
* Ääniaukon muodosta riippuen saattaa olla hankalaa saada mikki alareunaan, kiinnitä se silloin
muuhun kohtaan.
4. Aseta EC-10M jalkasi viereen.
Aseta EC-10M niin, että voit ohjata sitä yhdellä jalalla.
5. Kytke virta päälle.
Käännä aina äänenvoimakkuus minimiinsä ennenkuin kytket soittimen
päälle tai pois päältä. Kaiuttimista saattaa kuitenkin kuulua pientä kytkentä-
ääntä, mutta se on normaalia.
6. Säädä mikin herkkyyttä [MIC GAIN] -säädintä kääntämällä.
Aloita gain maksimiasennossan, pienennä sitä kunnes PEAK-merkkivalo ei
syty, kun lyöt cajonia voimakkaasti.
* Jos mikin ääni tuntuu säröiseltä, pienennä herkkyyttä [MIC GAIN] -säätimellä.
7. Säädä äänenvoimakkuutta [VOLUME] -säätimillä (MIC,
ELECTRONIC).
Jos haluat korostaa itse cajonin ääntä, pienennä ELECTRONIC – ja nosta MIC
- äänenvoimakkuutta.
8. [THRESHOLD] -säädintä kääntämällä saat säädettyä
herkkyyttä, jolla elektronisia soundeja trigataan.
Jos asetus on pieni, elektroniset soundit kuuluvat kevyelläkin iskulla. Mitä
suurempi asetus on, sitä lujempi lyönti vaaditaan elektronisten soundien
triggaamiseen.
* Jos elektroniset soundit kuuluvat, vaikka et soittaisikaan cajonia (ulkoiset häiriöt tms), nosta
threshold-arvoa.
9. Vaihda settejä [A] / [B] -kytkimillä.
What is “ELCajon Mic Processor”
The Roland EC-10M ELCajon Mic Processor is a new concept in percussion sound modules; it uses
Roland’s proprietarily developed mic sensor and sound-generating technology to pick up and
amplify the acoustic sound of your cajon, and allows you to layer electronic sounds onto it.
Main features
5 While taking advantage of the resonance of the cajon’s original
sound, you can additionally layer a wide variety of electronic sounds.
5 You can switch between two dierent electronic sounds according
to the pitch of the sound that enters the mic.
5 You can use a simple loop play function to perform along with a
rhythm pattern played by electronic sounds.
5 A high-performance clip-type condenser mic that can be installed
directly on the cajon is included.
5 The volume balance between the mic sound and the electronic
sound can be adjusted by the performer.
5 Compressor and enhancer eects specically for the mic are
provided, improving the loudness and denition of the sound.
Panel Descriptions
Top panel
9 MIC
A
[COMPRESSOR] knob
Adjusts the loudness of the mic.
Moving the knob toward the
right increases the loudness and
strengthens the attack.
B
[VOLUME] knob
Adjusts the volume of the mic.
C
PEAK indicator
This indicator is lit when the mic input level reaches the peak. Adjust the mic gain so that the
PEAK indicator does not light.
9 ELECTRONIC
D
[THRESHOLD] knob
Speci es the input level that triggers the electronic layer sound. Turning the knob toward the
right increases the strike strength that is needed to trigger the electronic layer sound.
E
[VOLUME] knob
Adjusts the volume of the electronic layer sound.
F
[TRIGGER] indicator
This is it lit when the electronic layer sound is produced.
G
[KIT No.] indicator
Indicates the selected kit number (1–9, 0, A–F).
H
[POWER] switch
Turns the power on/o .
Long-press this switch to turn the power o .
I
[MODE SELECT] button
Switches the mode of the foot buttons [A]
J
/ [B]
K
.
Mode Button status Explanation
Kit shift mode (the
setting when you turn
on the power)
Unlit Use the foot buttons [A] / [B] to switch kits.
Pad mode Lit Play pad [A] / pad [B].
Loop mode Blinking
The loop function is used. For details, refer to “About the Loop
function”.
Side panel (Right)
A
MIC/MIX OUTPUT jack
If a cable is connected to the ELECTRONIC
jack, the sound of the mic is output by
itself from this jack
If a cable is not connected to the
ELECTRONIC jack, the sound of the mic
and the sound of the electronic layer are
output from this jack.
B
ELECTRONIC OUTPUT jack
The electronic layer sounds are output from this jack.
C
DC IN jack
Connect the included AC adaptor here.
* We recommend that you keep batteries installed in the unit even though you’ll be powering
it with the AC adaptor. That way, you’ll be able to continue a performance even if the cord of
the AC adaptor gets accidentally disconnected from the unit.
* To prevent malfunction and equipment failure, always turn down the volume, and turn o all
the units before making any connections.
Side panel (Left)
A
TRIGGER IN jack (PAD A/B)
Connect an external kick trigger pad (sold
separately: KD-7, KT-9, KT-10) to this jack.
You can play the two di erent electronic
layer sounds assigned to pad [A] and pad
[B].
* You can use a stereo split cable (sold
separately: PCS-31L) to connect up to two
kick trigger pads to this unit.
B
MIC IN jack
Connect the included clip mic to this jack.
C
[MIC GAIN] knob
Adjusts the gain of the mic.
D
[ENHANCE ON/OFF] switch
Switches the enhance e ect that is applied to the sound of the mic. If this is on, the mic sound
is given greater de nition. This is e ective when you want a crisper sound.
Bottom panel
A
Battery case
The EC-10M operates using
batteries or the included AC adaptor.
If using the unit on batteries, install
four AAA batteries, taking care to
orient the batteries correctly.
* When turning the unit over, be
careful so as to protect the buttons
and knobs from damage. Also,
handle the unit carefully; do not
drop it.
* The battery life is approximately
5 hours for typical performance
use. When the batteries run low,
“L” blinks in the KIT No. indicator.
Replace the battery as soon as
possible.
* If you handle batteries improperly, you risk explosion and uid leakage. Make sure that
you carefully observe all of the items related to batteries that are listed in “USING THE UNIT
SAFELY” and “IMPORTANT NOTES” (leaet “USING THE UNIT SAFELY”).
B
Block diagram
This diagram shows the signal ow of the EC-10M.
Clip mic
B
A
A
Clip open/close knob
Opens/closes the clip.
B
Cable hook
Secures the cable of the clip mic.
Use
1. Connect the EC-10M to your amp or PA mixer.
2. Connect the included clip mic to the MIC IN jack.
3. Attach the clip mic to your cajon.
As shown in the illustration,
clip the mic onto the bottom
(6 o’clock position) of the
sound hole located on the
back of the cajon, so that the
mic is inside (with the Roland
logo facing outward). Use the
cable hook to manage the
cable so that it does not strike
the cajon.
* Depending on the shape
of the sound hole, it might
not be possible to attach
the mic at the 6 o’clock position; if so, it is ok to attach the mic at some other position
(such as 9 o’clock).
4. Place the EC-10M by your foot.
Place the EC-10M where you can control it with one
foot.
5. Turn on the power.
* Before turning the unit on/o, always be sure to turn
the volume down. Even with the volume turned down,
you might hear some sound when switching the unit
on/o. However, this is normal and does not indicate a
malfunction.
6. Use the [MIC GAIN] knob to adjust the mic gain.
Start with the gain at the maximum setting, and
gradually lower it until the PEAK indicator does not
light when you strike the cajon strongly.
* If the sound of the mic seems to be distorted, lower the
[MIC GAIN] knob.
7. Use the [VOLUME] knobs (MIC, ELECTRONIC) to adjust the volume..
If you want to emphasize the sound of the cajon itself, it
is e ective to lower the ELECTRONIC volume and raise
the MIC volume.
8. Use the [THRESHOLD] knob to adjust the sensitivity at which the electronic layer sound is
triggered.
If this setting is low, the electronic layer sound is
triggered even by a soft strike. As this setting is raised,
the electronic layer sound is triggered only by a strong
strike.
* If the electronic sound is inadvertently triggered by
other sounds picked up by the mic when you’re not playing the cajon, raise the threshold
setting so that only the sound is triggered only when you want it to be triggered.
9. Use foot buttons [A] / [B] to switch kits.
For details on each kit, refer to “Kit List”.
About the Loop function
The EC-10M lets you record a phrase of electronic layer sounds and play it back immediately as
a loop. This lets you perform on the cajon accompanied by the playback of the electronic layer
sound loop (shaker, tambourine, bass drum, or other sound eect).
Here’s how to record and play back.
1. Select the kit containing the electronic sound that you want to record.
2. While playing the cajon or the kick trigger, adjust the volume balance of the electronic
layer sound.
3. Use the [MODE SELECT] button to select loop mode.
4. Press the foot button [A] to delete any previously recorded content.
5. Press the foot button [B] to enter the record-standby state.
The foot button [B] is lit red.
6. When you start performing, recording starts automatically.
During recording, the foot button [B] blinks red.
7. At the moment that you want recording to end, press the foot button [B].
The performance data from when you start recording until you press the foot button [B] is
automatically played back as a loop. If recorded performance data exists, the foot button [B] is
lit green.
8. To stop playback, press the foot button [B] once again.
* You can’t perform electronic layer sounds during loop playback. You can perform only using
the cajon itself and the sound of the mic.
Kit List
No. Kit name Layer (Low) Layer (High) Pad A Pad B
1 Ambient Cajon Cajon Bass Reverb Cajon Reverb Splash Cymbal Cowbell
2 Cajon & Tambourine Cajon Bass Tambourine Splash Cymbal Cowbell
3 Cajon & CrossStick Cajon Thumb Low Cross Stick Splash Cymbal Shaker
4 Cajon & Shaker Cajon Foot Shaker Splash Cymbal Cowbell
5 Cajon & Sagat Cajon Bass Sagat Splash Cymbal Vintage Kick
6 Burst Cajon Cajon Thumb Low Flamenco Clap Splash Cymbal Shaker
7 Buzzy Snare Comp Kick Buzzy Snare Splash Cymbal Comp Kick
8 Hybrid 808 Hybrid Kick TR-808 Snare Splash Cymbal Hybrid Kick
9 Steel Snare Plugged Kick Steel Snare Splash Cymbal Shaker
0 Darbuka Darabuka Don Darabuka Tec Splash Cymbal Sagat
A Dhol Dhol Dhol Stick Splash Cymbal Shaker
b Surdo Surudo Mid Surdo Hi Tambourine Shaker
C Bougrabou & Djembe Bougarabou Djembe Slap Tambourine Shaker
d Pot Drum Pot Drum Hole Pot Drum Heel Splash Cymbal Sagat
E Afro Stomp Afro Stomp Ambient Snare Splash Cymbal Afro Stomp
F Wobble Kick Jumper Kick Old School Snare Splash Cymbal Jumper Kick
Performance Advice
5 If you want to emphasize the attack of the mic sound, adjust the compressor setting upward.
5 Placing muting material inside the cajon will reduce unwanted resonance, allowing you to
produce a sharper and tighter sound.
5 The way in which the EC-10M’s electronic layer sounds (high/low) are dierentiated will
vary depending on the character of the sound that enters the mic. If you want to accurately
reproduce these distinctions, you’ll need to be aware of which area of your cajon must be
struck to produce dierent sounds.
5 You can’t perform the electronic layer sounds while using loop playback. You can only perform
using the sound of the cajon itself and the sound of the mic.
A
J K
I
B D E
G H
C
F
A B C
A
B C D
B
A
ELCajon Mic Processor
EC-10M
Copyright © 2016 ROLAND CORPORATION
English
Owner’s Manual
In order to use this device correctly, please carefully read “USING THE UNIT SAFELY” and “IMPORTANT NOTES” (the “USING THE UNIT SAFELY” leaet) before use.
After reading, keep these instructions at hand for immediate reference.
Main Specications
Roland EC-10M ELCajon Mic Processor
Power Supply
AC adaptor (DC 5.7 V)
Rechargeable Ni-MH batteriesbattery (AAA, HR03) x 4
Current Draw 150 mA
Expected battery life
under continuous
use
Approx. 5 hours
* These can vary depending on the specications of the batteries, capacity of the
batteries, and the conditions of use.
Dimensions
175 (W) x 135 (D) x 55 (H) mm
6-15/16 (W) x 5-3/8 (D) x 2-3/16 (H) inches
Weight
(including batteries)
500 g
1 lb 2 oz
Accessories Clip mic, Owner’s manual, Leaet “USING THE UNIT SAFELY,” AC adaptor
* This document explains the specications of the product at the time that the document
was issued. For the latest information, refer to the Roland website.
Was ist der Roland ELCajon Mic Processor?
Der Roland EC-10M ELCajon Mic Processor ist ein neues Konzept für Percussion-Soundmodule. Er
besitzt ein speziell von Roland hergestellten Mikrofonsensor mit Soundtechnologie für sowohl
die Abnahme des akustischen Sounds einer Cajon als auch das Hinzufügen von elektronischen
Sounds zu dem Klang einer akustischen Cajon.
Eigenschaften
5 Zusätzlich zur Nutzung der akustischen Klänge einer Cajon können
elektronische Sounds hinzugefügt werden.
5 Sie können zwischen zwei elektronischen Sounds umschalten.
Dieses wird erreicht durch das Erkennen unterschiedlicher Tonhöhen
über das Mikrofon.
5 Eine einfache Loop Play-Funktion ermöglicht das Aufzeichnen eines
Rhythmus-Patterns mithilfe der elektronischen Sounds und das
Spielen der akustischen Cajon dazu.
5 Beigefügt ist ein hochqualitatives Kondensatormikrofon im Clip-
Format, das direkt an der Cajon befestigt wird.
5 Sie können die Lautstärkebalance zwischen Mikrofonsignal und dem
elektronischen Sound einstellen.
5 Für das Mikrofonsignal stehen Eekte wie Compressor und Enhancer
zur Verfügung, welche die Lautheit und Präsenz des Sounds
optimieren.
Beschreibung der Bedienoberäche
Die Bedienoberäche
9 MIC
A
[COMPRESSOR]-Regler
Stellt den Ausgangspegel des
Mikrofonsignals ein.
Drehen des Reglers nach rechts
erhöht die Lautstärke und verstärkt
die Attack-Phase.
B
[VOLUME]-Regler
Bestimmt die Lautstärke des
Mikrofonsignals.
C
PEAK-Anzeige
Diese Anzeige leuchtet auf, wenn der Pegel des Mikrofonsignals die Verzerrgrenze erreicht.
Stellen Sie den Gain-Pegel so ein, dass diese Anzeige auch beim lautesten Signal nicht
au euchtet.
9 ELECTRONIC
D
[THRESHOLD]-Regler
Bestimmt den Pegel, ab dem der elektronische Layer-Sound getriggert wird. Drehen des
Reglers nach rechts erfordert eine höhere Anschlagstärke, um den elektronischen Layer-
Sound zu triggern.
E
[VOLUME]-Regler
Bestimmt die Lautstärke des elektronischen Layer-Sounds.
F
[TRIGGER]-Anzeige
Diese Anzeige leuchtet, wenn der elektronische Layer-Sound erzeugt wird.
G
[KIT No.]-Anzeige
Zeigt die aktuell ausgewählte Kit-Nummer an (1–9, 0, A–F).
H
[POWER]-Schalter
Schaltet das Gerät ein bzw. aus.
Zum Ausschalten des Geräts halten Sie den Taster länger gedrückt.
* Wenn Sie Batterien verwenden möchten, benutzen Sie wieder auadbare Ni-MH-Batterien.
I
[MODE SELECT]-Taster
Schaltet den Modus der Fußtaster [A]
J
/ [B]
K
um.
Mode Taster-Status Beschreibung
Kit Shift-Modus
(diese Einstellung
ist nach Einschalten
ausgewählt).
erloschen Verwenden Sie die Fußtaster [A] / [B], um die Kits umzuschalten.
Pad-Modus leuchtet Spielen Sie das Pad [A] / Pad [B].
Loop-Modus blinkt
Die Loop-Funktion wird verwendet. Weitere Details nden Sie
im Abschnitt “Die Loop-Funktion”.
Seitenteil (rechts)
A
MIC/MIX OUTPUT-Buchse
Wenn die ELECTRONIC-Buchse verkabelt
ist, wird über diese Buchse der über
das Mikrofon abgenommene Sound
ausgegeben. Wenn die ELECTRONIC-
Buchse nicht verkabelt ist, werden
über diese Buchse sowohl der über das
Mikrofon abgenommene Sound als auch der elektronische Layer-Sound ausgegeben.
B
ELECTRONIC OUTPUT-Buchse
Über diese Buchse wird der Sound der elektronischen Layer-Sounds ausgegeben.
C
DC IN-Buchse
Zum Anschluss des beigefügten AC-Adapters.
* Lassen Sie die Batterien auch dann im Gerät, wenn Sie einen AC-Adapter verwenden. In
diesem Fall wird das Gerät auch dann noch mit Strom versorgt, wenn der AC-Adapter
versehentlich abgezogen würde.
* Um Fehlfunktionen bzw. eventuellen Beschädigungen vorzubeugen, regeln Sie
immer die Lautstärke auf Minimum und lassen Sie alle Geräte ausgeschaltet, wenn Sie
Kabelverbindungen vornehmen.
Seitenteil (links)
A
TRIGGER IN-Buchse (PAD A/B)
Zum Anschluss eines externen Kick Trigger-
Pads (zusätzliches Zubehör: KD-7, KT-9, KT-
10). Sie können über die Pads [A] und [B] zwei
unterschiedliche elektronische Layer-Sounds
zuordnen und spielen.
* Mithilfe eines Stereo Split-Kabels (zusätzliches
Zubehör: PCS-31L) können Sie zwei Kick
Trigger-Pads an dieses Gerät anschließen.
B
MIC IN-Buchse
Zum Anschluss des beigefügten Clip-
Mikrofons.
C
[MIC GAIN]-Regler
Bestimmt den Grundpegel des Mikrofonsignals.
D
[ENHANCE ON/OFF]-Schalter
Schaltet den Enhance-E ekt ein, welcher dem Mikrofon-Signal hinzugefügt wird. Wenn dieser
E ekt aktiviert ist, erklingt der Sound heller und schärfer.
Unterseite
A
Batteriefach
Der EC-10M kann entweder über Batterien oder
mit dem beigefügten AC-Adapter mit Strom
versorgt werden. Wenn Sie Batterien verwenden
möchten, setzen Sie vier AAA-Batterien ein und
achten Sie auf die korrekte Polarität.
* Wenn Sie das Gerät umdrehen, legen Sie dieses
immer auf eine weiche, gepolsterte Fläche
(z.B. Kissen), damit die Bedienelemente nicht
beschädigt werden. Lassen Sie das Gerät beim
Umdrehen nicht fallen.
* Die Lebensdauer der Batterie beträgt bei
normaler Anwendung ca. 5 Stunden. Wenn die
Batteriespannung nachlässt, blinkt bei der KIT
No.-Anzeige das Symbol "L". Ersetzen Sie in diesem Fall die alten Batterien durch aufgeladene
Batterien.
* Die unsachgemäße Behandlung von Batterien kann dazu führen, dass diese explodieren
oder auslaufen. Beachten Sie daher immer alle Sicherheitshinweise bezüglich der Batterien.
Lesen Sie dazu die Abschnitte "SICHERHEITSHINWEISE” und “WICHTIGE HINWEISE” (siehe
Informationsblatt “USING THE UNIT SAFELY”).
B
Blockdiagramm
Dieses Diagramm zeigt den Signalverlauf des EC-10M.
Clip-Mikrofon
B
A
A
Clipverschluss
Ö net bzw. schließt den Clip-Verschluss.
B
Kabelsicherung
Dient als Zugentlastung für das Kabel des Clip-Mikrofons.
Praktische Anwendung
1. Schließen Sie den EC-10M an ein Verstärkersystem
bzw. an eine PA an.
2. Schließen Sie das beigefügte Clip-Mikrofon an die
MIC IN-Buchse an.
3. Befestigen Sie das Clip-Mikrofon an der Cajon.
Befestigen Sie das Mikrofon an der
Unterseite der Aussparung der Rückseite
der Cajon auf der 6 Uhr-Position (unten),
so dass sich das Mikrofon in der Cajon
be ndet (das Roland-Logo muss nach
außen zeigen - siehe Abbildung). Führen
Sie das Kabel des Mikrofons um die
Kabelsicherung und stellen Sie sicher, dass
das Kabel nicht das Gehäuse der Cajon
berührt.
* Abhängig von der Größe der Aussparung
auf der Rückseite der Cajon kann es vorkommen, dass sich das Mikrofon nicht exakt an der
6 Uhr-Position befestigen lässt. Verwenden Sie dann eine andere Position (z.B. die 9 Uhr-
Position).
4. Positionieren Sie den EC-10M so, dass Sie diesen
mit einem Fuß steuern können.
5. Schalten Sie das Gerät ein.
* Regeln Sie vor Ein- und Ausschalten immer die
Lautstärke auf Minimum. Auch bei minimaler
Lautstärke ist beim Ein- und Ausschalten ein leises
Nebengeräusch hörbar. Dieses ist normal und keine
Fehlfunktion.
6. Stellen Sie mit dem [MIC GAIN]-Regler die Empndlichkeit für das Mikrofon-
Eingangssignal ein.
Stellen Sie den GAIN-Regler auf die maximale
Lautstärke, und drehen Sie diesen dann langsam soweit
herunter, dass bei Spielen der Cajon bei lautestem
Signal die PEAK-Anzeige nicht mehr au euchtet.
* Wenn der Sound des Mikrofonsignals verzerrt, drehen
Sie den [MIC GAIN]-Regler weiter herunter.
7. Stellen Sie mit den [VOLUME]-Reglern
(MIC, ELECTRONIC) die gewünschte Lautstärke ein.
Um den akustischen Sound der Cajon hervorzuheben,
verringern Sie die Lautstärke für ELECTRONIC und
erhöhen Sie die Lautstärke für MIC.
8. Mit dem [THRESHOLD]-Regler können Sie
bestimmen, ab welcher Anschlagdynamik der elektronische Sound getriggert wird.
Bei niedrigen Werten wird der elektronische Sound
schon bei schwachem Anschlagen getriggert. Je höher
der Wert, desto stärker müssen Sie die Spiel äche
anschlagen, um den elektronischen Sound zu triggern.
* Wenn der elektronische Sound bereits getriggert
wird, wenn das Mikrofon Signale empfängt, ohne dass Sie die Cajon spielen, müssen Sie den
Threshold-Wert entsprechend erhöhen.
9. Verwenden Sie die Fußtaster [A] / [B], um die Kits umzuschalten.
Details zu den Kits nden Sie in der “Liste der Kits”.
Die Loop-Funktion
Der EC-10M ermöglicht, eine Phrase mithilfe der elektronischen Layer-Sounds aufzunehmen
und wiederholt abzuspielen (Loop-Playback). Sie können dann zu dem Loop-Playback (Shaker,
Tambourine, Bassdrum, andere Soundeekte) auf der Cajon spielen.
Gehen Sie wie folgt vor.
1. Wählen Sie das Kit mit den gewünschten elektronischen Sounds aus.
2. Spielen Sie die Cajon oder betätigen Sie den Kick Trigger und stellen Sie die
Lautstärkebalance für den elektronischen Layer-Sound ein.
3. Wählen Sie mithilfe des [MODE SELECT]-Tasters den Loop-Modus aus.
4. Drücken Sie den Fußtaster [A], um eine eventuell vorhandene vorherige Aufnahme zu
löschen.
5. Drücken Sie den Fußtaster [B], um die Aufnahmebereitschaft zu aktivieren.
Die Anzeige des Fußtasters [B] leuchtet rot.
6. Wenn Sie auf der Cajon spielen, wird die Aufnahme automatisch gestartet.
Während der Aufnahme blinkt die Anzeige des Fußtasters [B] rot.
7. Um die Aufnahme zu beenden, drücken Sie erneut den Fußtaster [B].
Die aufgenommene Passage wird automatisch wiederholt abgespielt (Loop-Playback). Die
Anzeige des Fußtasters [B] leuchtet grün und zeigt damit an, dass eine Aufnahme vorhanden
ist.
8. Um das Playback zu stoppen, drücken Sie ermeut den Fußtaster [B].
* Die elektronischen Layer-Sounds können nicht gespielt werden, während das Loop-Playback
läuft. Sie können in diesem Fall nur den akustischen Cajon-Sound und den über das Mikrofon
abgenommenen Sound erzeugen.
Liste der Kits
Nr. Kit-Name Layer (Low) Layer (High) Pad A Pad B
1 Ambient Cajon Cajon Bass Reverb Cajon Reverb Splash Cymbal Cowbell
2 Cajon & Tambourine Cajon Bass Tambourine Splash Cymbal Cowbell
3 Cajon & CrossStick Cajon Thumb Low Cross Stick Splash Cymbal Shaker
4 Cajon & Shaker Cajon Foot Shaker Splash Cymbal Cowbell
5 Cajon & Sagat Cajon Bass Sagat Splash Cymbal Vintage Kick
6 Burst Cajon Cajon Thumb Low Flamenco Clap Splash Cymbal Shaker
7 Buzzy Snare Comp Kick Buzzy Snare Splash Cymbal Comp Kick
8 Hybrid 808 Hybrid Kick TR-808 Snare Splash Cymbal Hybrid Kick
9 Steel Snare Plugged Kick Steel Snare Splash Cymbal Shaker
0 Darbuka Darabuka Don Darabuka Tec Splash Cymbal Sagat
A Dhol Dhol Dhol Stick Splash Cymbal Shaker
b Surdo Surudo Mid Surdo Hi Tambourine Shaker
C Bougrabou & Djembe Bougarabou Djembe Slap Tambourine Shaker
d Pot Drum Pot Drum Hole Pot Drum Heel Splash Cymbal Sagat
E Afro Stomp Afro Stomp Ambient Snare Splash Cymbal Afro Stomp
F Wobble Kick Jumper Kick Old School Snare Splash Cymbal Jumper Kick
Tipps für das Spielen
5 Wenn Sie den Attack-Anteil des Mikrofonsignals verstärken möchten, erhöhen Sie den Wert für
den Compressor.
5 Wenn Sie Dämmmaterial in das Gehäuse der Cajon legen, werden unerwünschte Resonanzen
geltert, was ein schärferes Klangbild und einen härteren Sound zur Folge hat.
5 Die Art und Weise, wie die elektronischen Layer-Sounds (High/Low) des EC-10M unterschieden
werden, ist abhängig vom Charakter des Sounds, der über das Mikrofon abgenommen wird.
Um die Sounds akkurat zu trennen, müssen Sie darauf achten, welche Bereiche der Spieläche
der Cajon Sie anschlagen müssen, um unterschiedliche Sounds zu erzeugen.
5 Die elektronischen Layer-Sounds können nicht gespielt werden, während das Loop-Playback
läuft. Sie können in diesem Fall nur den akustischen Cajon-Sound und den über das Mikrofon
abgenommenen Sound erzeugen.
A
J K
I
B D E
G H
C
F
A B C
A
B C D
B
A
ELCajon Mic Processor
EC-10M
Copyright © 2016 ROLAND CORPORATION
Deutsch
Bedienungsanleitung
Lesen Sie zuerst die Hinweise in den Abschnitten „SICHERHEITSHINWEISE” und „WICHTIGE HINWEISE” (im Informationsblatt "USING THE UNIT SAFELY”).
Bewahren Sie die Anleitung zu Referenzzwecken auf.
Technische Daten
Roland EC-10M ELCajon Mic Processor
Stromversorgung
AC-Adapter (DC 5.7 V)
Wieder auadbare Ni-MH Batterien (AAA, HR03) x 4
Stromverbrauch 150 mA
Lebensdauer
der Batterien bei
Dauerbetrieb
ca. 5 Stunden
* Diese Angaben variieren und sind abhängig von den technischen Daten der
verwendeten Batterien, deren Kapazität und den Umgebungsbedingungen.
Abmessungen 175 (W) x 135 (D) x 55 (H) mm
Gewicht (inklusive
Batterien)
500 g
Beigefügtes
Zubehör
Clip-Mikrofon, Bedienungsanleitung, Informationsblatt "USING THE UNIT SAFELY“,
AC-Adapter
* Dieses Dokument beschreibt die technischen Daten des Produkts bei Veröentlichung
dieses Dokuments. Ggf. aktualisierte Informationen zu diesem Produkt nden Sie auf
der Roland-Internetseite.
5
5
5
5
5
5
9
9
5
5
5
5
Présentation du « ELCajon Mic Processor »
Le produit Roland EC-10M ELCajon Mic Processor est un générateur de son de percussion avec
un nouveau concept. Il utilise une technologie de capteur et de génération de son Roland
propriétaire pour capter et amplier les sons acoustiques de votre cajon, et il vous permet de
superposer des sons électroniques sur les sons acoustiques.
Caractéristiques principales
5 Vous pouvez superposer un large éventail de sons électroniques tout
en tirant parti de la résonance distincte spécique au cajon.
5 Vous pouvez permuter entre deux sons électroniques diérents
selon la hauteur de note captée par le microphone.
5 Vous pouvez utiliser une fonction de lecture de boucle simple
pour jouer en même temps qu’un motif rythmique lu par des sons
électroniques.
5 Un microphone à condensateur de type micro-cravate (fourni) haute
performance à installer directement sur le cajon est fourni.
5 L’interprète peut régler l’équilibre du volume entre le son du
microphone et le son électronique.
5 Des eets intégrés de compresseur et d’enhancer spéciquement
conçus pour le microphone permettent d’amplier le son et
d’améliorer sa dénition.
Description des panneaux
Panneau supérieur
9 MIC
A
Commande [COMPRESSOR]
Permet de régler la puissance du
microphone.
Tournez la commande vers la droite
pour augmenter la puissance et
renforcer l’attaque.
B
Commande [VOLUME]
Permet de régler le volume du
microphone.
C
Témoin PEAK
Ce témoin est allumé lorsque le niveau d’entrée du microphone atteint le niveau maximum.
Permet de régler le gain du microphone a n que le témoin PEAK ne s’allume pas.
9 ELECTRONIC
D
Commande [THRESHOLD]
Permet de spéci er le niveau d’entrée qui déclenche le son de la couche électronique. En
tournant la commande vers la droite, vous renforcez la puissance de frappe nécessaire pour
déclencher le son de la couche électronique.
E
Commande [VOLUME]
Permet de régler le volume du son de la couche électronique.
F
Témoin [TRIGGER]
Ce témoin est allumé lors de la production du son de la couche électronique.
G
Témoin [KIT No.]
Indique le numéro de kit sélectionné (1–9, 0, A–F).
H
Commutateur [POWER]
Permet de mettre l’appareil sous tension/hors tension.
Exercez une pression prolongée sur ce commutateur pour mettre l’appareil hors tension.
* Si vous utilisez cet appareil sur piles, veuillez utiliser des piles Ni-MH rechargeables.
I
Bouton [MODE SELECT]
Permet de changer le mode des boutons actionnables au pied [A]
J
/ [B]
K
.
Mode
État du
bouton
Explication
Mode de changement
de kit (le réglage à la
mise sous tension de
l’appareil)
Éteint
Utilisez les boutons actionnables au pied [A] / [B] pour passer d’un
kit à l’autre.
Mode Pad Allumé Lecture du pad [A] / pad [B].
Mode Loop Clignote
La fonction Loop est utilisée. Pour plus de détails, voir « À propos
de la fonction Loop ».
Panneau latéral (droit)
A
Prise MIC/MIX OUTPUT
Si un câble est connecté à la prise
ELECTRONIC, le son du microphone est
envoyé de lui-même à partir de cette prise.
Si aucun câble n’est connecté à la prise
ELECTRONIC, le son du microphone et
le son de la couche électronique sont
envoyés à partir de cette prise.
B
Prise ELECTRONIC OUTPUT
Les sons de la couche électronique sont envoyés à partir de cette prise.
C
Prise DC IN
Connectez l’adaptateur secteur fourni à cette prise.
* Nous vous recommandons de laisser les piles dans l’appareil même si vous l’alimentez à
l’aide de l’adaptateur secteur. Vous pourrez ainsi continuer à jouer même si le cordon de
l’adaptateur secteur est accidentellement déconnecté de l’appareil.
* Pour éviter tout dysfonctionnement et panne de l’équipement, baissez systématiquement le
volume et éteignez tous les appareils avant d’eectuer des connexions.
Panneau latéral (gauche)
A
Prise TRIGGER IN (PAD A/B)
Connectez un pad Kick Trigger externe
(vendu séparément : KD-7, KT-9, KT-10) à
cette prise.
Vous pouvez lire deux sons de couche
électronique di érents a ectés au pad [A]
et au pad [B].
* Vous pouvez utiliser un câble stéréo
divisé (vendu séparément : PCS-31L) pour
raccorder jusqu’à deux pads Kick Trigger à
cet appareil.
B
Prise MIC IN
Branchez le micro-cravate fourni à cette
prise.
C
Commande [MIC GAIN]
Permet de régler le gain du microphone.
D
Commutateur [ENHANCE ON/OFF]
Change l
’
e et Enhance appliqué au son du microphone. S
’
il est activé, le son du microphone béné cie
d
’
une dé nition supérieure. Ce réglage est e cace lorsque vous recherchez un son plus clair.
Panneau inférieur
A
Compartiment des piles
L’EC-10M fonctionne sur piles ou
avec l’adaptateur secteur fourni.
Si vous utilisez l’appareil sur piles,
installez quatre piles AAA en veillant
à les orienter correctement.
* Lorsque vous retournez l’appareil,
veillez à protéger les boutons et les
commandes contre tout dommage.
Manipulez également l’appareil
avec soin. Ne le laissez pas tomber.
* Dans le cas d’une utilisation
standard lors d’une performance,
l’autonomie de la batterie est
d’environ 5 heures. Lorsque les
piles sont proches de s’épuiser, « L »
clignote sur le témoin de n° de KIT.
Remplacez les piles dès que possible.
* Si vous manipulez les piles incorrectement, il peut se produire une explosion ou une fuite
de liquide. Veillez à respecter toutes les instructions au sujet des piles décrites dans les
« CONSIGNES DE SÉCURITÉ » et les « REMARQUES IMPORTANTES » (dépliant « CONSIGNES DE
SÉCURITÉ »).
B
Schéma fonctionnel
Ce schéma illustre le ux de signaux de l’EC-10M.
Micro-cravate
B
A
A
Bouton d’ouverture/fermeture du clip
Permet d’ouvrir/de fermer le clip.
B
Crochet pour câble
Permet de xer le câble du micro-cravate.
Utilisation
1. Connectez l’EC-10M à votre amplicateur ou à la
console de mixage de l’amplicateur de puissance.
2. Branchez le micro-cravate fourni sur la prise MIC IN.
3. Fixez le micro-cravate sur votre cajon.
Comme montré sur
l’illustration, attachez le
microphone sur la partie
inférieure (position 6 heures)
du trou du haut-parleur au dos
du cajon de manière à ce que
le microphone soit à l’intérieur
(avec le logo Roland vers
l’extérieur). Utilisez le crochet
pour câble pour acheminer le
câble de manière à ce qu’il ne
frappe pas le cajon.
* Selon la forme du trou du
haut-parleur, il peut ne pas
être possible de xer le microphone sur la position 6 heures. Dans ce cas, vous pouvez xer le
microphone sur une autre position (par exemple 9 heures).
4. Placez l’EC-10M près de votre pied.
Placez l’EC-10M là où vous pouvez le contrôler avec un
pied.
5. Mettez l’appareil sous tension.
* Avant de mettre l’appareil sous tension/hors tension,
veillez toujours à baisser le volume. Même si vous avez
baissé le volume au minimum, il se peut que vous
entendiez des sons lors de la mise sous tension/hors
tension de l’appareil. Ce phénomène est toutefois
normal et n’indique pas un dysfonctionnement.
6. Utilisez la commande [MIC GAIN] pour régler le gain du microphone.
Commencez par régler le gain sur le niveau maximum,
puis diminuez-le progressivement jusqu’à ce que le
témoin PEAK ne s’allume pas lorsque vous tapez avec
force sur le cajon.
* Si le son du microphone semble déformé, diminuez la
commande [MIC GAIN].
7. Utilisez les commandes [VOLUME] (MIC, ELECTRONIC) pour régler le volume.
Si vous souhaitez mettre l’accent sur le son du cajon
lui-même, il est e cace de diminuer le volume
ELECTRONIC et d’augmenter le volume MIC.
8. Utilisez la commande [THRESHOLD] pour régler la sensibilité à laquelle le son de la couche
électronique est déclenché.
Si ce réglage est faible, le son de la couche électronique
est déclenché même par une frappe douce. Si ce
réglage est augmenté, le son de la couche électronique
est déclenché uniquement par une frappe forte.
* Si le son électronique est déclenché accidentellement
par d’autres sons captés par le microphone lorsque vous ne jouez pas sur le cajon, augmentez
le réglage de seuil de manière à ce que le son soit déclenché uniquement lorsque vous
souhaitez qu’il le soit.
9. Utilisez les boutons actionnables au pied [A] / [B]
pour passer d’un kit à l’autre.
Pour des détails sur chaque kit, reportez-vous à «Liste de
kits».
À propos de la fonction Loop
L’EC-10M vous permet d’enregistrer une phrase de sons de couche électronique et de la
lire immédiatement sous forme de boucle. Vous pouvez ainsi jouer sur le cajon avec, pour
accompagnement, la lecture de la boucle du son de la couche électronique (shaker, tambourin,
grosse caisse ou autre eet sonore).
La section ci-après décrit les procédures d’enregistrement et de lecture.
1. Sélectionnez le kit contenant le son électronique que vous souhaitez enregistrer.
2. Pendant que vous jouez sur le cajon ou le kick trigger, réglez l’équilibre du volume du son
de la couche électronique.
3. Utilisez le bouton [MODE SELECT] pour sélectionner le mode Loop.
4. Appuyez sur le bouton actionnable au pied [A] pour supprimer tout contenu
précédemment enregistré.
5. Appuyez sur le bouton actionnable au pied [B] pour passer à l’état d’enregistrement en
attente.
Le bouton actionnable au pied [B] est allumé en rouge.
6. Lorsque vous commencez à jouer, l’enregistrement démarre automatiquement.
Pendant l’enregistrement, le bouton actionnable au pied [B] clignote en rouge.
7. Au moment où vous souhaitez arrêter l’enregistrement, appuyez sur le bouton
actionnable au pied [B].
Les données de performance depuis le début de l’enregistrement jusqu’au moment où vous
appuyez sur le bouton actionnable au pied [B] sont automatiquement lues sous forme de
boucle. S’il y a des données de performance enregistrées, le bouton actionnable au pied [B]
est allumé en vert.
8. Pour arrêter la lecture, appuyez sur le bouton actionnable au pied [B] une nouvelle fois.
* Vous ne pouvez pas jouer des sons de couche électronique pendant la lecture des boucles.
Vous pouvez jouer uniquement en utilisant le cajon lui-même et le son du microphone.
Liste de kits
N° Nom du kit Couche (graves) Couche (aigus) Pad A Pad B
1 Ambient Cajon Cajon Bass Reverb Cajon Reverb Splash Cymbal Cowbell
2 Cajon & Tambourine Cajon Bass Tambourine Splash Cymbal Cowbell
3 Cajon & CrossStick Cajon Thumb Low Cross Stick Splash Cymbal Shaker
4 Cajon & Shaker Cajon Foot Shaker Splash Cymbal Cowbell
5 Cajon & Sagat Cajon Bass Sagat Splash Cymbal Vintage Kick
6 Burst Cajon Cajon Thumb Low Flamenco Clap Splash Cymbal Shaker
7 Buzzy Snare Comp Kick Buzzy Snare Splash Cymbal Comp Kick
8 Hybrid 808 Hybrid Kick TR-808 Snare Splash Cymbal Hybrid Kick
9 Steel Snare Plugged Kick Steel Snare Splash Cymbal Shaker
0 Darbuka Darabuka Don Darabuka Tec Splash Cymbal Sagat
A Dhol Dhol Dhol Stick Splash Cymbal Shaker
b Surdo Surudo Mid Surdo Hi Tambourine Shaker
C Bougrabou & Djembe Bougarabou Djembe Slap Tambourine Shaker
d Pot Drum Pot Drum Hole Pot Drum Heel Splash Cymbal Sagat
E Afro Stomp Afro Stomp Ambient Snare Splash Cymbal Afro Stomp
F Wobble Kick Jumper Kick Old School Snare Splash Cymbal Jumper Kick
Conseils de jeu
5 Si vous souhaitez mettre l’accent sur l’attaque du son du microphone, ajustez le réglage du
compresseur vers le haut.
5 Vous pouvez réduire la résonance indésirable en plaçant un matériau de mise en sourdine à
l’intérieur du cajon, ce qui vous permet de produire un son plus net et plus serré.
5 La manière dont les sons de couche électronique (aigus/graves) de l’EC-10M sont diérenciés
varie selon le caractère du son capté par le microphone. Si vous souhaitez reproduire ces
distinctions de manière précise, il est nécessaire de connaître la zone de votre cajon sur
laquelle vous devez frapper pour produire des sons diérents.
5 Vous ne pouvez pas jouer des sons de couche électronique pendant que la lecture des boucles
est activée. Vous pouvez jouer uniquement en utilisant le son du cajon lui-même et le son du
microphone.
A
J K
I
B D E
G H
C
F
A B C
A
B C D
B
A
ELCajon Mic Processor
EC-10M
Copyright © 2016 ROLAND CORPORATION
Français
Mode d’emploi
Pour être sûr d’utiliser l’appareil correctement, veuillez lire attentivement les sections « CONSIGNES DE SÉCURITÉ » et « REMARQUES IMPORTANTES » (le dépliant « CONSIGNES DE SÉCURITÉ ») avant utilisation.
Après lecture, conservez ces instructions à portée de main pour pouvoir vous y reporter dès que nécessaire.
Principales caractéristiques techniques
Roland EC-10M ELCajon Mic Processor
Alimentation
Adaptateur secteur (5.7 V CC)
Piles Ni-MH rechargeables (AAA, ZR03) x 4
Consommation 150 mA
Autonomie des piles
en cas d’utilisation
continue
Environ 5 heures
* Ces données peuvent varier selon les spécications des piles, la capacité des piles
et les conditions d'utilisation.
Dimensions 175 (L) x 135 (P) x 55 (H) mm
Poids
(piles comprises)
500 g
Accessoires
Micro-cravate, mode d'emploi, dépliant « CONSIGNES DE SÉCURITÉ », adaptateur
secteur
* Ce document décrit les caractéristiques techniques du produit au moment de la
publication du document. Pour les informations les plus récentes, consultez le site Web
de Roland.
* 5 1 0 0 0 5 3 3 5 7 - 0 2 *

5
Loop-toiminnosta
Voit äänittää EC-10M:llä loopin elektronisilla soundeilla ja toistaa sen saman tein. Näin voit soittaa cajonilla elektronisten soundien (shaker,
tamburiini, bassari jne) loopin säestämänä. Seuraavassa ohje äänitykseen ja toistoon.
1. Valitse setti, jossa on haluamiasi elektronisia soundeja
2. Soita cajonia tai kick triggeriä ja säädä äänenvoimakkuuksien balanssia
3. Aseta loop-tila [MODE SELECT] –näppäimellä.
4. Poista aiempi äänitys painamalla jalkakytkintä [A].
5. Siirry äänitysvalmiuteen painamalla jalkakytkintä [B].
Kytkimen [B] merkkivalo palaa punaisena.
6. Ala soittaa, äänitys alkaa automaattisesti.
Äänityksen aikana jalkakytkimen [B] merkkivalo vilkkuu punaisena.
7. Kun haluat lopettaa äänityksen, paina jalkakytkintä [B].
Soittosi alkaa toistua looppina alusta kytkimen painallukseen. Kun soittimen muistissa on äänitys, jalkakytkimen [B] merkkivalo palaa vihreänä.
8. Pysäytä toisto painamalla uudelleen jalkakytkintä [B].
Et voi soittaa elektronisen kerroksen soundeilla kun käytät loop-toistoa. Voit soittaa cajonilla ja käyttää mikkisoundia.
Soitto-ohjeita
* Jos haluat korostaa mikkisoundin atakkia, säädä kompressoriasetusta ylöspäin.
* Vaimentavan materiaalin asettaminen cajonin sisään vähentää häiritseviä resonansseja, näin saat aikaan terävämmän ja kiinteämmän soundin.
* Se, miten EC-10M:n elektronisen kerroksen soundit (korkea/matala) erotellaan, riippuu siitä, minkälainen mikrofonin kuuleman äänen luonne on.
Jos haluat toisintaa nämä erot selkeinä, on tarkkaa, mihin kohtaan cajonia lyöt.
* Et voi soittaa elektronisen kerroksen soundeilla kun käytät loop-toistoa. Voit soittaa cajonilla ja käyttää mikkisoundia.
Soundilistaus
Numero Setti Kerros (Matala) Kerros (Korkea) Pad A Pad B
1 Ambient Cajon Cajon Bass Reverb Cajon Reverb Splash Cymbal Cowbell
2 Cajon & Tambourine Cajon Bass Tambourine Splash Cymbal Cowbell
3 Cajon & CrossStick Cajon Thumb Low Cross Stick Splash Cymbal Shaker
4 Cajon & Shaker Cajon Foot Shaker Splash Cymbal Cowbell
5 Cajon & Sagat Cajon Bass Sagat Splash Cymbal Vintage Kick
6 Burst Cajon Cajon Thumb Low Flamenco Clap Splash Cymbal Shaker
7 Buzzy Snare Comp Kick Buzzy Snare Splash Cymbal Comp Kick
8 Hybrid 808 Hybrid Kick TR-808 Snare Splash Cymbal Hybrid Kick
9 Steel Snare Plugged Kick Steel Snare Splash Cymbal Shaker
0 Darbuka Darabuka Don Darabuka Tec Splash Cymbal Sagat
A Dhol Dhol Dhol Stick Splash Cymbal Shaker
b Surdo Surudo Mid Surdo Hi Tambourine Shaker
C Bougrabou & Djembe Bougarabou Djembe Slap Tambourine Shaker
d Pot Drum Pot Drum Hole Pot Drum Heel Splash Cymbal Sagat
E Afro Stomp Afro Stomp Ambient Snare Splash Cymbal Afro Stomp
F Wobble Kick Jumper Kick Old School Snare Splash Cymbal Jumper Kick
-
 1
1
-
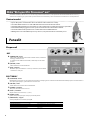 2
2
-
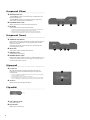 3
3
-
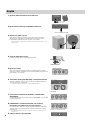 4
4
-
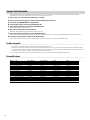 5
5


Ask a question and I''ll find the answer in the document
Finding information in a document is now easier with AI
in other languages
Related papers
-
Roland EL Cajon EC-10 Owner's manual
-
-
Roland EC-10M ELCajon Mic Processor User manual
-
-
-
Roland E-09 User manual
-
-
Roland HPD-20 Owner's manual
-
Roland GW-7 User manual
-
Other documents
-
Millenium CP-777 Cajon Pedal Assembly Instructions
-
thomann Cajon Construction Kit User manual
-
-
Pyle PCJD50 Owner's manual
-
 Enabling Devices 872 User manual
-
Simmons SD2000 User manual
-
Korg WAVEDRUM Global Edition Quick start guide
-
Teka 40484851 Datasheet
-
 WIZOO DARBUKA Owner's manual
-
Outdoor Distinctions PB-072B08P9 Installation guide

