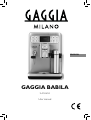
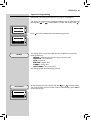
Gaggia Babila RI9700 SUP046DG Owner's manual
- Category
- Coffee makers
- Type
- Owner's manual
This manual is also suitable for

User manual
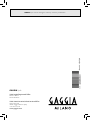
ENGLISH
SUP046DG
GAGGIA BABILA

IMPORTANT SAFEGUARDS
When using electrical appliances, basic safety precautions should always be
followed, including the following:
1. Read all instructions.
2. Do not touch hot surfaces. Use handles or knobs.
3. To protect against fire, electric shock and injury to persons do not immerse
cord, plugs, or appliance in water or other liquid.
4. Close supervision is necessary when the appliance is used by or near
children.
5. Unplug from outlet when not in use and before cleaning. Allow to cool
before putting on or taking off parts, and before cleaning the appliance.
6. Do not operate any appliance with a damaged cord or plug or after the
appliance malfunctions, or has been damaged in any manner. Return
appliance to the nearest authorized service facility for examination, repair
or adjustment.
7. The use of accessory attachments not recommended by the appliance
manufacturer may result in fire, electric shock or injury to persons.
8. Do not use outdoors.
9. Do not let cord hang over edge of table or counter, or touch hot surfaces.
10. Do not place on or near a hot gas or electric burner, or in a heated oven.
11. Always attach plug to appliance first, then plug cord into wall outlet. To
disconnect, turn any control to “off”, then remove plug from wall outlet.
12. Do not use appliance for other than intended use.
13. Save these instructions.
SAVE THESE INSTRUCTIONS

CAUTION
This appliance is for household use only. Any servicing, other than cleaning
and user maintenance, should be performed by an authorized service center.
Do not immerse machine in water. To reduce the risk of fire or electric shock,
do not disassemble the machine. There are no parts inside the machine
serviceable by the user. Repair should be done by authorized service personnel
only.
1. Check voltage to be sure that the voltage indicated on the nameplate
corresponds with your voltage.
2. Never use warm or hot water to fill the water tank. Use cold water only.
3. Keep your hands and the cord away from hot parts of the appliance during
operation.
4. Never clean with scrubbing powders or harsh cleaners. Simply use a soft
cloth dampened with water.
5. For optimal taste of your coffee, use purified or bottled water. Periodic
descaling is still recommended every 2-3 months.
6. Do not use caramelized or flavored coffee beans.
INSTRUCTIONS FOR THE POWER
SUPPLY CORD
A. A short power-supply cord (or detachable power-supply cord) is to be
provided to reduce risks resulting from becoming entangled in or tripping
over a longer cord.
B. Longer detachable power-supply cords or extension cords are available
and may used if care is exercised in their use.
C. If a long detachable power-supply cord or extension cord is used,
1. The marked electrical rating of the detachable power-supply cord or
extension cord should be at least as great as the electrical rating of the
appliance
2. If the appliance is of the grounded type, the extension cord should be a
grounding-type 3-wire cord, and
3. The longer cord should be arranged so that it will not drape over the
counter top or table top where it can be pulled on by children or tripped
over.

2
ENGLISH
Congratulations on your purchase of a fully automatic co ee
machine!
This user manual applies to SUP046DG.
The machine is suitable for preparing espresso co ee using
whole co ee beans, and it is supplied with a milk carafe
to prepare a perfect Cappuccino or Latte Macchiato in a
quick and easy way. In this user manual you will nd all the
information you need to install, use, clean and descale your
machine.
CONTENTS
IMPORTANT SAFETY INFORMATION ................................................................... 4
Warning ...............................................................................................................................................4
Caution ................................................................................................................................................5
Machines with milk carafe ...................................................................................................................7
Electromagnetic fi elds (EMF) ...............................................................................................................9
Recycling .............................................................................................................................................9
Warranty and support .........................................................................................................................9
INSTALLATION ................................................................................................10
Product Overview ..............................................................................................................................10
General Description ...........................................................................................................................11
PREPARING FOR USE .......................................................................................12
Machine Packaging............................................................................................................................12
Machine Installation ..........................................................................................................................12
USING THE MACHINE FOR THE FIRST TIME ........................................................15
Automatic Rinse/Self-Cleaning Cycle .................................................................................................15
Manual Rinse Cycle ............................................................................................................................16
MEASURING AND PROGRAMMING WATER HARDNESS........................................18
AQUACLEAN WATER FILTER ..............................................................................20
Preparing and Installing the AquaClean Filter ...................................................................................20
Activating the AquaClean Filter .........................................................................................................21
Replacing the AquaClean Filter ..........................................................................................................23
Information on Filter Capacity ...........................................................................................................23
How to Replace the Filter ...................................................................................................................24
Replacing the Filter after Using 8 Filters ............................................................................................25
ADJUSTMENTS ................................................................................................26
Gaggia Adapting System ...................................................................................................................26
Adjusting the Ceramic Co ee Grinder ................................................................................................26
Adjusting the Crema and Co ee Strength (Gaggia Brewing System) .................................................27
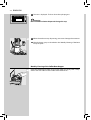
Machines with classic milk frother ...................................................................................................7
Machines with classic milk frother ...................................................................................................7
Machines with automatic milk frother............................................................................................8

3
ENGLISH
Adjusting the Aroma (Co ee Strength) ..............................................................................................28
Adjusting the Dispensing Spout .........................................................................................................28
Adjusting the Co ee Length .............................................................................................................30
BREWING ESPRESSO, COFFEE AND LONG COFFEE ...............................................31
Brewing Espresso, Co ee and Long Co ee Using Co ee Beans ..........................................................31
Brewing Espresso, Co ee and Long Co ee Using Pre-Ground Co ee..................................................32
MILK CARAFE..................................................................................................34
Filling the Milk Carafe ........................................................................................................................34
Inserting the Milk Carafe ...................................................................................................................35
Removing the Milk Carafe ..................................................................................................................36
Emptying the Milk Carafe ..................................................................................................................37
BREWING A CAPPUCCINO ................................................................................38
Adjusting the Cappuccino Length ......................................................................................................40
BREWING LATTE MACCHIATO ...........................................................................41
Adjusting the Latte Macchiato Length ...............................................................................................43
SPECIAL BEVERAGES .......................................................................................44
Hot Milk .............................................................................................................................................45
Hot Water Dispensing ........................................................................................................................46
Brewing a Strong Co ee ....................................................................................................................47
Espresso Macchiato ............................................................................................................................48
Flat White ..........................................................................................................................................49
BEVERAGE PROGRAMMING .............................................................................50
Cappuccino Programming .................................................................................................................51
Hot Water Programming ....................................................................................................................53
MACHINE PROGRAMMING ...............................................................................54
AquaClean Filter ................................................................................................................................54
Settings Menu ...................................................................................................................................55
Maintenance Menu ............................................................................................................................56
Statistics Menu ..................................................................................................................................56
CLEANING AND MAINTENANCE ........................................................................57
Daily Cleaning of the Machine ...........................................................................................................57
Daily Cleaning of the Water Tank........................................................................................................58
Daily Cleaning of the Milk Carafe: "CLEAN" Self-cleaning Cycle (After Each Use) ................................59
Weekly Cleaning of the Machine .......................................................................................................59
Weekly Cleaning of the Milk Carafe ...................................................................................................61
Weekly Cleaning of the Brew Group ...................................................................................................63
Monthly Cleaning of the Milk Carafe ..................................................................................................66
Monthly Lubrication of the Brew Group .............................................................................................69
Monthly Cleaning of the Brew Group with “Co ee Oil Remover” ........................................................70
Monthly Cleaning of the Co ee Bean Hopper ....................................................................................72
DESCALING .....................................................................................................73
Interruption of the Descaling Cycle ....................................................................................................78
MEANING OF THE DISPLAY ...............................................................................79
TROUBLESHOOTING ........................................................................................81
ENERGY SAVING ..............................................................................................84
Stand-by ............................................................................................................................................84
Screen Saver ......................................................................................................................................84
TECHNICAL SPECIFICATIONS ............................................................................85
WARRANTY AND SERVICE ................................................................................85
Warranty ...........................................................................................................................................85
Ser vice ...............................................................................................................................................85
MAINTENANCE PRODUCTS ...............................................................................86

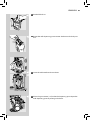
IMPORTANT SAFETY INFORMATION
This machine is equipped with safety features. Nevertheless, read and follow the safety instructions carefully and only use the machine as
described in these instructions, to avoid accidental injury or damage due to improper use of the machine. Keep this safety booklet for future
reference.
Warning
General
- Check if the voltage indicated on the machine corresponds to the local mains
voltage before you connect the appliance.
- Connect the machine to an earthed wall socket.
- Do not let the power cord hang over the edge of a table or worktop and do
not let it touch hot surfaces.
- To avoid the danger of electric shock, never immerse the machine, mains
plug or power cord in water or any other liquid.
- Do not pour liquids on the power cord connector.
- To avoid the danger of burns, keep body parts away from hot water jets pro-
duced by the machine.
- Do not touch hot surfaces. Use handles and knobs.
- Switch o the machine with the main switch located on the back (if present)
and remove the mains plug from the wall socket:
• If a malfunction occurs.
• If you are not going to use the appliance for a long time.
• Before you clean the machine.
- Pull at the plug, not at the power cord.
- Do not touch the mains plug with wet hands.
- Do not use the machine if the mains plug, the power cord or the machine
itself is damaged.
- Do not make any modi cations to the machine or its power cord.
- Only have repairs carried out by a service center authorized by Gaggia to
avoid a hazard.
- The machine should not be used by children younger than 8 years old.
4 ENGLISH

- This machine can be used by children aged from 8 years and above and by
persons with reduced physical, sensory or mental capabilities or lack of ex-
perience and knowledge if they have been given supervision or instruction
concerning use of the machine in a safe way and if they understand the haz-
ards involved.
- Cleaning and user maintenance shall not be made by children unless they are
older than 8 and supervised.
- Keep the machine and its cord out of the reach of children aged less than 8
years.
- Children should be supervised to ensure that they do not play with the ma-
chine.
- Never insert ngers or other objects into the co ee grinder.
- Be careful when you dispense hot water.
Dispensing may be preceded by small jets of hot water. Wait until the end of
the dispensing cycle before you remove the hot water dispensing spout.
Caution
General
- This machine is intended for normal household use only. It is not intended
for use in environments such as sta kitchens of shops, o ces, farms or other
work environments.
- Always put the machine on a at and stable surface. Keep it in upright posi-
tion, also during transport.
- Do not place the machine on a hotplate or directly next to a hot oven, heater
or similar source of heat.
- Only put roasted co ee beans in the bean hopper. Putting ground co ee,
instant co ee, raw co ee beans or any other substance in the co ee bean
hopper may cause damage to the machine.
- Let the machine cool down before you insert or remove any parts. The heat-
ing surfaces may retain residual heat after use.
ENGLISH
5

- Never ll the water tank with warm, hot or sparkling water, as this may cause
damage to the water tank and the machine.
- Never use souring pads, abrasive cleaning agents or aggressive liquids such
as petrol or acetone to clean the machine. Simply use a soft cloth dampened
with water.
- Descale your machine regularly. The machine indicates when descaling is
needed. Not doing this will make your appliance stop working properly. In
this case repair is not covered by your warranty.
- Do not keep the machine at temperatures below 0°C/32°F. Water left in the
heating system may freeze and cause damage.
- Do not leave water in the water tank when you are not going to use the
machine for a long period of time. The water can become contaminated. Use
fresh water every time you use the machine.
- Never use any accessories or parts from other manufacturers or that Gaggia
does not speci cally recommend. If you use such accessories or parts, your
warranty becomes invalid.
- Regular cleaning and maintenance prolongs the lifetime of your machine
and ensures optimum quality and taste of your co ee.
- The machine is exposed continuously to moisture, co ee and scale. Therefore
it is very important to regularly clean and maintain the machine as described
in the user manual and shown on the website. If you do not perform these
cleaning and maintenance procedures, your machine eventually may stop
working. In this case repair is not covered by warranty.
- Do not clean the brew group in the dishwasher and do not use washing-up
liquid or a cleaning agent to clean it. This may cause the brew group to mal-
function and may have a negative e ect on the co ee taste.
- Do not dry the brew group with a cloth to prevent bers from collecting in-
side the brew group.
- Never drink the solution dispensed during the descaling process.
- Only put preground co ee into the preground co ee compartment. Other
6 ENGLISH

substances and objects may cause severe damage to the machine. In this
case, repair is not covered by your warranty.
- The machine shall not be placed in a cabinet when in use.
Machines with milk carafe
Warning
- To avoid the danger of burns, be aware that dispensing may be preceded by
jets of milk and steam. Wait until the end of the cycle before you remove the
milk carafe.
Caution
- Make sure that the milk carafe is installed and the milk dispensing spout is
open before you select a milk-based co ee beverage or milk froth.
- Do not put any other liquids in the milk jug/carafe than water (for cleaning)
or milk.
- Do not clean the milk carafe in the dishwasher.
Machines with classic milk frother
Warning
- To avoid the danger of burns, be aware that dispensing may be preceded by
small jets of hot water.
- Never touch the classic milk frother with bare hands, as it may become very
hot. Use the appropriate protective handle only.
Caution
- After frothing milk, quickly clean the classic milk frother by dispensing a
small quantity of hot water into a container. Then remove the external part
of the classic milk frother and wash it with lukewarm water.
ENGLISH
7

Machines with automatic milk frother
Warning
- To avoid the danger of burns, be aware that dispensing steam or hot water
may be preceded by small jets of hot water. Never touch the hot water/steam
dispensing spout with bare hands, as it may become very hot. Use the ap-
propriate protective handle only.
- Never drink the solution dispensed during the monthly cleaning procedure
of the automatic milk frother.
Caution
- For hygienic reasons, make sure that the outer surface of the hot water/
steam dispensing spout is clean.
- After frothing milk, quickly clean the automatic milk frother by dispensing
a small quantity of hot water. Follow the cleaning instructions in the user
manual.
- Be careful, the hot water/steam dispensing spout could be hot if the machine
has recently been used.
- Do not push the rubber tting too far on the hot water/steam dispensing
spout when you insert it. In this case, the automatic milk frother would not
work correctly as it would not be able to suck up milk.
8 ENGLISH

Warranty and support
For service or support, contact your local dealer or an authorized service center.
Contact details are included in the warranty booklet supplied separately or visit www.gaggia.com or www.gaggia.it.
ENGLISH
99
Electromagnetic elds (EMF)
This machine complies with all applicable standards and regulations regarding exposure to electromagnetic elds.
Recycling
- This symbol means that this product shall not be disposed of with normal household waste (2012/19/EU).
- Follow your country’s rules for the separate collection of electrical and electronic products. Correct disposal helps
prevent negative consequences for the environment and human health.

10
INSTALLATION
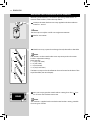
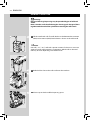
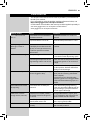
Product Overview
22
23
26
24
25
37363130
27 28 29 3832
35
33
34
1
2
3
6
7
8
9
10
4
5
11
12
13 14 15
16
17
18
19
20
21

11
ENGLISH
11
General Description
1. Water tank
2. Pre-ground co ee compartment
3. Service door
4. Co ee dispensing spout
5. Steam/hot water wand
6. Full drip tray indicator
7. Co ee bean hopper with lid
8. Co ee grinder adjustment
9. Control panel
10. Carafe coupling cap
11. Drip tray (external)
12. Brew group
13. Co ee grounds drawer
14. Drip tray (internal)
15. Service door button
16. Power cord socket
17. Power button
18. Milk carafe
19. Co ee Oil Remover (to be purchased separately)
20. Descaling solution (optional)
21. AquaClean lter (optional)
22. Pre-ground co ee measuring scoop
23. Grease for the brew group
24. Water hardness test strip
25. Cleaning brush
26. Power cord
27. "Espresso" button
28. "Espresso Lungo" button
29. "Cappuccino" button
30. "Co ee" button
31. "Special Drinks" button
32. "Aroma" - Pre-ground co ee button
33. "OK" button
34. "ESC" button
35. "MENU" button
36. "Clean" button - To carry out a carafe cleaning cycle
37. "Stand-by" button
38. "Latte Macchiato" button

12
ENGLISH
PREPARING FOR USE
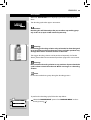
Machine Packaging
The original packaging has been designed and constructed to protect the
machine during transport. We recommend keeping the packaging material
for possible future transport.
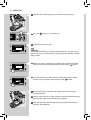
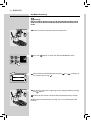
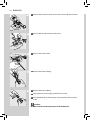
Machine Installation
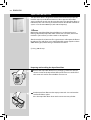
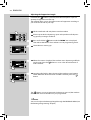
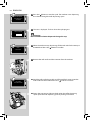
1
Remove the drip tray with grill from the packaging.
2
Remove the machine from the packaging.
3
For best use, it is recommended to:
• Choose a safe, level surface, where there will be no danger of over-
turning the machine or being injured.
• Choose a location that is su ciently well-lit, clean and near an eas-
ily reachable socket.
• Allow for a minimum distance from the sides of the machine as
shown in the gure.
4
Insert the (external) drip tray with grill into the machine. Make sure it is
correctly placed.
Note:
The drip tray collects the water that comes out of the dispensing spout
during each rinse/self-cleaning cycle, as well as co ee that might be spilled
during beverage preparation. Empty and wash the drip tray daily and each
time the full drip tray indicator is raised.
Caution:
NEVER remove the drip tray when the machine has just been turned
on. Wait a couple of minutes for the machine to carry out a rinse/self-
cleaning cycle.

13
ENGLISH
13
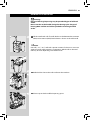
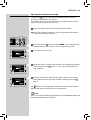
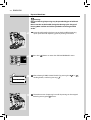
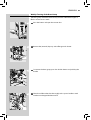
5
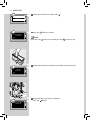
Lift the lid and remove the water tank using the handle.
6
Rinse the water tank with fresh water.
7
Fill the water tank with fresh water up to the MAX level and put it back
into the machine. Make sure it is fully inserted.
Caution:
Never ll the water tank with warm, hot, sparkling water or any other
liquid, as this may cause damage to the water tank and the machine.
8
Lift the co ee bean hopper lid and remove the inner lid.
9
Slowly pour the co ee beans into the hopper. Re t the inner lid and
close the outer one.
Note:
Do not pour too many co ee beans into the co ee bean hopper as this will
reduce the grinding performance of the machine.
Caution:
Only co ee beans must be put into the co ee bean hopper. If ground
co ee, instant co ee, caramelized co ee, raw co ee beans or any
other substance is put in the co ee bean hopper, it may damage the
machine.

14
ENGLISH
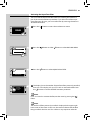
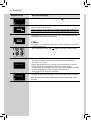
LANGUAGE
ITALIANO
ENGLISH
DEUTSCH
LANGUAGE
ITALIANO
ENGLISH
DEUTSCH
HEATING UP…
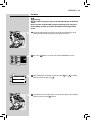
10
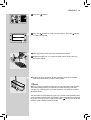
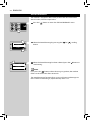
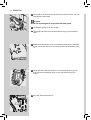
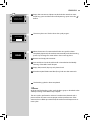
Insert the plug into the socket located on the back of the machine.
11
Insert the plug on the other end of the power cord into a wall socket
with suitable power voltage.
12
Switch the power button to “I” to turn on the machine.
13
This screen is displayed. Select the desired language by pressing the “ ”
or “
” scrolling button.
14
Press the “ ” button to con rm.
Note:
If no language is selected, you will be requested to select it the next time
the machine is started.
15
The machine is warming up.

15
ENGLISH
15
RINSING
STOP
ACTIVATE
AQUACLEAN
FILTER?
ESC
OK 0/8
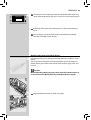
USING THE MACHINE FOR THE FIRST TIME
Automatic Rinse/Self-Cleaning Cycle
When warm-up has been completed, the machine automatically performs
a rinse/self-cleaning cycle of the internal circuits with fresh water. This
takes less than a minute.
16
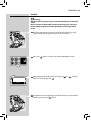
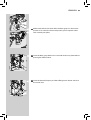
Place a container under the dispensing spout to catch the small
amount of water which will be dispensed.
17
This screen is displayed. Wait for the cycle to nish automatically.
Note:
You can stop dispensing by pressing the “
” button.
18
When the operations described above have been completed, the
machine shows this display.

16
ENGLISH
INSERT
GROUND COFFEE
AND PRESS OK
ESC
OK
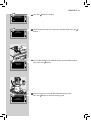
2
Select the pre-ground co ee brewing function by pressing the “ ”
button until the “
” icon is displayed.
3
Press the “ ” button.
4
Press the “ ” button. The machine starts dispensing water.
Note:
Do not add pre-ground co ee into the compartment.
5
When dispensing has been completed, empty the container and place
it back under the steam/hot water wand.
Manual Rinse Cycle
You need to perform a rinse cycle when using the machine for the rst time.
During this process, the co ee brewing cycle is activated and fresh water
ows through the dispensing spout. This takes a few minutes.
1
Place a container under the dispensing spout.

17
ENGLISH
17
SPECIAL BEVERAGES
MILK FROTH
HOT WATER
STEAM
6
Press the “ ” button.
7
Press the “ ” button to scroll down the options. Press the “ ” button
to select HOT WATER.
8
After dispensing water, remove and empty the container.
9
Repeat the steps from 5 to 8 until the water tank is empty, then con-
tinue with step 10.
10
At the end of this operation, ll the water tank again up to the MAX
level. Now the machine is ready to brew co ee.
Note:
When you have not used the machine for two or more weeks, the machine
will automatically perform an automatic rinse/self-cleaning cycle after
you turn it on. Following this, you need to perform a manual rinse cycle as
described above.
The automatic rinse/self-cleaning cycle is also initiated automatically when
starting up the machine (with a cold boiler), when the machine is preparing
to go into stand-by mode or after pressing the “
” button to turn o the
machine (after a co ee has been brewed).

18
ENGLISH
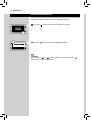
3
Check how many squares have changed to red, then refer to the table.
Note:
The numbers on the water hardness test strip correspond to the water
hardness adjustment settings.
More precisely:
1 = 1 (very soft water)
2 = 2 (soft water)
3 = 3 (hard water)
4 = 4 (very hard water)
The letters correspond to the references that are located at the base of the
AquaClean lter (see next chapter).
23 4
A
B
C
Intenza Aroma System
Machine Water Hardness Setting
1
4
Now you can program the water hardness setting. Press the “ ” but-
ton to access the machine main menu.
Note:
The machine is supplied with a standard water hardness setting, suitable
for most types of water.
MEASURING AND PROGRAMMING WATER HARDNESS
Measuring water hardness is essential for preserving co ee avour. To
measure water hardness, follow the steps below.
1
Immerse the water hardness test strip supplied with the machine in
water for 1 second.
Note:
The test strip can only be used for one single measurement.
2
Wait for one minute.
Page is loading ...
Page is loading ...
Page is loading ...
Page is loading ...
Page is loading ...
Page is loading ...
Page is loading ...
Page is loading ...
Page is loading ...
Page is loading ...
Page is loading ...
Page is loading ...
Page is loading ...
Page is loading ...
Page is loading ...
Page is loading ...
Page is loading ...
Page is loading ...
Page is loading ...
Page is loading ...
Page is loading ...
Page is loading ...
Page is loading ...
Page is loading ...
Page is loading ...
Page is loading ...
Page is loading ...
Page is loading ...
Page is loading ...
Page is loading ...
Page is loading ...
Page is loading ...
Page is loading ...
Page is loading ...
Page is loading ...
Page is loading ...
Page is loading ...
Page is loading ...
Page is loading ...
Page is loading ...
Page is loading ...
Page is loading ...
Page is loading ...
Page is loading ...
Page is loading ...
Page is loading ...
Page is loading ...
Page is loading ...
Page is loading ...
Page is loading ...
Page is loading ...
Page is loading ...
Page is loading ...
Page is loading ...
Page is loading ...
Page is loading ...
Page is loading ...
Page is loading ...
Page is loading ...
Page is loading ...
Page is loading ...
Page is loading ...
Page is loading ...
Page is loading ...
Page is loading ...
Page is loading ...
Page is loading ...
Page is loading ...
Page is loading ...
Page is loading ...
Page is loading ...
Page is loading ...
-
 1
1
-
 2
2
-
 3
3
-
 4
4
-
 5
5
-
 6
6
-
 7
7
-
 8
8
-
 9
9
-
 10
10
-
 11
11
-
 12
12
-
 13
13
-
 14
14
-
 15
15
-
 16
16
-
 17
17
-
 18
18
-
 19
19
-
 20
20
-
 21
21
-
 22
22
-
 23
23
-
 24
24
-
 25
25
-
 26
26
-
 27
27
-
 28
28
-
 29
29
-
 30
30
-
 31
31
-
 32
32
-
 33
33
-
 34
34
-
 35
35
-
 36
36
-
 37
37
-
 38
38
-
 39
39
-
 40
40
-
 41
41
-
 42
42
-
 43
43
-
 44
44
-
 45
45
-
 46
46
-
 47
47
-
 48
48
-
 49
49
-
 50
50
-
 51
51
-
 52
52
-
 53
53
-
 54
54
-
 55
55
-
 56
56
-
 57
57
-
 58
58
-
 59
59
-
 60
60
-
 61
61
-
 62
62
-
 63
63
-
 64
64
-
 65
65
-
 66
66
-
 67
67
-
 68
68
-
 69
69
-
 70
70
-
 71
71
-
 72
72
-
 73
73
-
 74
74
-
 75
75
-
 76
76
-
 77
77
-
 78
78
-
 79
79
-
 80
80
-
 81
81
-
 82
82
-
 83
83
-
 84
84
-
 85
85
-
 86
86
-
 87
87
-
 88
88
-
 89
89
-
 90
90
-
 91
91
-
 92
92


Gaggia Babila RI9700 SUP046DG Owner's manual
- Category
- Coffee makers
- Type
- Owner's manual
- This manual is also suitable for
Ask a question and I''ll find the answer in the document
Finding information in a document is now easier with AI
Related papers
-
Gaggia RI9700/64 User manual
-
Gaggia Brera Owner's manual
-
Gaggia RI8762 Owner's manual
-
Gaggia Anima Deluxe Owner's manual
-
-
Gaggia Anima User manual
-
Philips RI9702/02 User manual
-
Gaggia Accademia User manual
-
Gaggia Naviglio Deluxe Owner's manual
-
Other documents
-
-
Saeco Intelia Deluxe HD8906 User manual
-
-
-
Siemens TQ507R03/01 User manual
-
Philips HD8921/01 User manual
-
Saeco HD8915/07 User manual
-
-
Saeco HD8859/01 User manual
-
Thermador TCM24TS Owner's manual