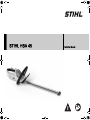
STIHL HSA 45 Owner's manual
- Category
- Power hedge trimmers
- Type
- Owner's manual

{
STIHL HSA 45
Instruction Manual


Translation of Original Instruction
Manual
Printed on chlorine-free paper
Printing inks contain vegetable oils, paper can be recycled.
© ANDREAS STIHL AG & Co. KG 2017
0458-717-0121-A. VA3.E17.
0000007360_009_GB
0458-717-0121-A
English
1
{
This instruction manual is protected by copyright. All rights reserved, especially the rights to reproduce, translate and process
with electronic systems.
Contents
1 Introduction
. . . . . . . . . . . . . . . . . . . . . . . . . . . . . . . . . . . . . . . . .
2
2 Guide to Using this Manual
. . . . . . . . . . . . . . . . . . . . . . . . . .
2
2.1 Applicable Documentation
. . . . . . . . . . . . . . . . . . . . . . . . . . .
2
2.2 Symbols used with warnings in the text
. . . . . . . . . . . . . .
3
2.3 Symbols in Text
. . . . . . . . . . . . . . . . . . . . . . . . . . . . . . . . . . . . .
3
3 Overview
. . . . . . . . . . . . . . . . . . . . . . . . . . . . . . . . . . . . . . . . . . . .
3
3.1 Hedge Trimmer and Charging Cable
. . . . . . . . . . . . . . . . .
3
3.2 Symbols
. . . . . . . . . . . . . . . . . . . . . . . . . . . . . . . . . . . . . . . . . . . .
4
4 Safety Precautions
. . . . . . . . . . . . . . . . . . . . . . . . . . . . . . . . . .
4
4.1 Warning Signs
. . . . . . . . . . . . . . . . . . . . . . . . . . . . . . . . . . . . . .
4
4.2 Intended Use
. . . . . . . . . . . . . . . . . . . . . . . . . . . . . . . . . . . . . . . .
5
4.3 The Operator
. . . . . . . . . . . . . . . . . . . . . . . . . . . . . . . . . . . . . . . .
5
4.4 Clothing and Equipment
. . . . . . . . . . . . . . . . . . . . . . . . . . . . .
6
4.5 Work Area and Surroundings
. . . . . . . . . . . . . . . . . . . . . . . .
6
4.6 Safe Condition
. . . . . . . . . . . . . . . . . . . . . . . . . . . . . . . . . . . . . .
7
4.7 Built-in Battery
. . . . . . . . . . . . . . . . . . . . . . . . . . . . . . . . . . . . . .
8
4.8 Operation
. . . . . . . . . . . . . . . . . . . . . . . . . . . . . . . . . . . . . . . . . . .
9
4.9 Charging
. . . . . . . . . . . . . . . . . . . . . . . . . . . . . . . . . . . . . . . . . . . .
9
4.10 Transporting
. . . . . . . . . . . . . . . . . . . . . . . . . . . . . . . . . . . . . . .
10
4.11 Storing
. . . . . . . . . . . . . . . . . . . . . . . . . . . . . . . . . . . . . . . . . . . . .
10
4.12 Cleaning, Maintenance and Repairs
. . . . . . . . . . . . . . . .
11
5 Preparing Hedge Trimmer for Operation
. . . . . . . . . . . .
11
5.1 Preparing Hedge Trimmer for Operation
. . . . . . . . . . . .
11
6 Charging the Hedge Trimmer, LEDs
. . . . . . . . . . . . . . . .
12
6.1 Charging the Hedge Trimmer
. . . . . . . . . . . . . . . . . . . . . . .
12
6.2 State of Charge
. . . . . . . . . . . . . . . . . . . . . . . . . . . . . . . . . . . .
12
6.3 LEDs
. . . . . . . . . . . . . . . . . . . . . . . . . . . . . . . . . . . . . . . . . . . . . . .
12
7 Inserting and Removing Activation Key
. . . . . . . . . . . . .
13
7.1 Inserting the Activation Key
. . . . . . . . . . . . . . . . . . . . . . . .
13
7.2 Removing the activation key
. . . . . . . . . . . . . . . . . . . . . . . .
13
8 Switching the Hedge Trimmer On/Off
. . . . . . . . . . . . . . .
13
8.1 Switching On
. . . . . . . . . . . . . . . . . . . . . . . . . . . . . . . . . . . . . . .
13
8.2 Switching Off
. . . . . . . . . . . . . . . . . . . . . . . . . . . . . . . . . . . . . . .
13
9 Checking the Hedge Trimmer
. . . . . . . . . . . . . . . . . . . . . .
13
9.1 Checking the Controls
. . . . . . . . . . . . . . . . . . . . . . . . . . . . . .
13
9.2 Checking the Built-In Battery
. . . . . . . . . . . . . . . . . . . . . . .
14
10 Operating the Hedge Trimmer
. . . . . . . . . . . . . . . . . . . . . .
14
10.1 Holding and Controlling the Hedge Trimmer
. . . . . . . .
14
10.2 Cutting
. . . . . . . . . . . . . . . . . . . . . . . . . . . . . . . . . . . . . . . . . . . . .
15
11 After Finishing Work
. . . . . . . . . . . . . . . . . . . . . . . . . . . . . . .
15
11.1 After Finishing Work
. . . . . . . . . . . . . . . . . . . . . . . . . . . . . . .
15
12 Transporting
. . . . . . . . . . . . . . . . . . . . . . . . . . . . . . . . . . . . . . .
15
12.1 Transporting the Hedge Trimmer
. . . . . . . . . . . . . . . . . . .
15
13 Storing
. . . . . . . . . . . . . . . . . . . . . . . . . . . . . . . . . . . . . . . . . . . . .
15
13.1 Storing the Hedge Trimmer
. . . . . . . . . . . . . . . . . . . . . . . .
15
13.2 Storing the Charging Cable
. . . . . . . . . . . . . . . . . . . . . . . .
16
14 Cleaning
. . . . . . . . . . . . . . . . . . . . . . . . . . . . . . . . . . . . . . . . . . .
16
14.1 Cleaning the Hedge Trimmer
. . . . . . . . . . . . . . . . . . . . . . .
16
14.2 Cleaning the Cutting Blades
. . . . . . . . . . . . . . . . . . . . . . .
16
14.3 Cleaning the charging cable
. . . . . . . . . . . . . . . . . . . . . . .
16
15 Maintenance
. . . . . . . . . . . . . . . . . . . . . . . . . . . . . . . . . . . . . . .
16
15.1 Sharpening the Cutting Blades
. . . . . . . . . . . . . . . . . . . . .
16
16 Repairing
. . . . . . . . . . . . . . . . . . . . . . . . . . . . . . . . . . . . . . . . . .
17
16.1 Repairing Hedge Trimmer and Charging Cable
. . . . .
17
17 Troubleshooting
. . . . . . . . . . . . . . . . . . . . . . . . . . . . . . . . . . . .
18
17.1 Troubleshooting Hedge Trimmer and Charging
Cable
. . . . . . . . . . . . . . . . . . . . . . . . . . . . . . . . . . . . . . . . . . . . . .
18
18 Specifications
. . . . . . . . . . . . . . . . . . . . . . . . . . . . . . . . . . . . . .
19
18.1 STIHL HSA 45 Hedge Trimmer
. . . . . . . . . . . . . . . . . . . .
19
18.2 Cutting Blades
. . . . . . . . . . . . . . . . . . . . . . . . . . . . . . . . . . . . .
19
18.3 STIHL LK 45 Charging Cable
. . . . . . . . . . . . . . . . . . . . . .
19
18.4 Noise and Vibration Data
. . . . . . . . . . . . . . . . . . . . . . . . . .
19
18.5 REACH
. . . . . . . . . . . . . . . . . . . . . . . . . . . . . . . . . . . . . . . . . . . .
19
19 Spare Parts and Accessories
. . . . . . . . . . . . . . . . . . . . . . .
20
19.1 Spare Parts and Accessories
. . . . . . . . . . . . . . . . . . . . . .
20

0458-717-0121-A
2
English
1 Introduction
Dear Customer,
Thank you for choosing STIHL. We develop and
manufacture our quality products to meet our customers’
requirements. The products are designed for reliability even
under extreme conditions.
STIHL also stands for premium service quality. Our
specialist dealers guarantee competent advice and
instruction as well as comprehensive service support.
We thank you for your confidence in us and hope you will
enjoy working with your STIHL product.
Dr. Nikolas Stihl
IMPORTANT: READ BEFORE USE AND KEEP IN A SAFE
PLACE.
2.1 Applicable Documentation
Local safety regulations apply.
► Read, understand and save the following documents in
addition to this instruction manual:
– Safety information for STIHL batteries and products
with built in batteries: www.stihl.com/safety-data-sheets
20 Disposal
. . . . . . . . . . . . . . . . . . . . . . . . . . . . . . . . . . . . . . . . . . .
20
20.1 Disposing of Hedge Trimmer and Charging Cable
. . .
20
21 EC Declaration of Conformity
. . . . . . . . . . . . . . . . . . . . . . .
20
21.1 STIHL HSA 45 Hedge Trimmer
. . . . . . . . . . . . . . . . . . . . .
20
21.2 STIHL LK 45 Charging Cable
. . . . . . . . . . . . . . . . . . . . . .
20
22 General Power Tool Safety Warnings
. . . . . . . . . . . . . . .
21
22.1 Introduction
. . . . . . . . . . . . . . . . . . . . . . . . . . . . . . . . . . . . . . . .
21
22.2 Work area safety
. . . . . . . . . . . . . . . . . . . . . . . . . . . . . . . . . . .
21
22.3 Electrical safety
. . . . . . . . . . . . . . . . . . . . . . . . . . . . . . . . . . . .
21
22.4 Personal safety
. . . . . . . . . . . . . . . . . . . . . . . . . . . . . . . . . . . .
21
22.5 Power tool use and care
. . . . . . . . . . . . . . . . . . . . . . . . . . .
22
22.6 Battery tool use and care
. . . . . . . . . . . . . . . . . . . . . . . . . .
22
22.7 Service
. . . . . . . . . . . . . . . . . . . . . . . . . . . . . . . . . . . . . . . . . . . .
23
22.8 Hedge Trimmer Safety Warnings
. . . . . . . . . . . . . . . . . . .
23
1 Introduction
2 Guide to Using this Manual

0458-717-0121-A
3
English
3 Overview
2.2 Symbols used with warnings in the text
WARNING
This symbol indicates dangers that can cause serious
injuries or death.
► The measures indicated can avoid serious injuries or
death.
NOTICE
This symbol indicates dangers that can cause damage to
property.
► The measures indicated can avoid damage to property.
2.3 Symbols in Text
3.1 Hedge Trimmer and Charging Cable
The rechargeable battery is built into the hedge trimmer.
1 Switch Lever
Operated together with the trigger to switch the hedge
trimmer on and off.
2 Release Slide
Operated together with the trigger lockout to unlock the
trigger.
3 Trigger Lockout
Locks trigger in position.
4 Control Handle
For operating, holding and controlling the hedge trimmer.
This symbol refers to a chapter in this instruction
manual.
3Overview
11
13
12
9
10
4
3
2
5
6
#
1
7
8
15
16
17
18
#
14
0000-GXX-1444-A2

0458-717-0121-A
4
English
4 Safety Precautions
5 Button
Activates the LEDs on the hedge trimmer.
6LEDs
Indicate hedge trimmer’s state of charge and
malfunctions.
7 Trigger
Operated together with the switch lever to switch the
hedge trimmer on and off.
8 Charging Socket
Accommodates the charger plug.
9Activation Key
Activates the hedge trimmer.
10 Key Socket
Accommodates the activation key.
11 Loop Handle
For holding, controlling and carrying the hedge trimmer.
12 Hand Guard
Helps protect hand on loop handle from contact with the
cutting blades.
13 Cutting Blades
Perform the cutting action.
14 Charger Plug
Connects charging cable to charger socket.
15 Connecting Cable
Connects charger plug to appliance plug.
16 Appliance Plug
Connects charging cable to wall outlet.
17 Charging Cable
Serves to charge the hedge trimmer.
18 Blade guard (scabbard)
Helps protect user from contact with the cutting blades.
# Rating label with serial number
3.2 Symbols
Meanings of symbols that may be on the hedge trimmer and
charging cable:
4.1 Warning Signs
Meanings of warning signs and labels on the hedge trimmer
and charging cable:
This symbol indicates in what direction the
release slide has to be pushed.
Guaranteed sound power level according to
directive 2000/14/EC in dB(A) in order to make
sound emissions of products comparable.
This symbol shows that an LK 45 charging cable
must be used.
The data next to this symbol indicates the energy
content of the battery according to the cell
manufacturer’s specification. The energy content
available during operation is lower.
Operate the electric appliance in a dry place, indoors
only.
Do not dispose of the product with your household
waste.
4 Safety Precautions
Observe safety notices and take the necessary
precautions.
Read, understand and save the instruction
manual.
L
W
A
LK 45

0458-717-0121-A
5
English
4 Safety Precautions
4.2 Intended Use
The STIHL HSA 45 hedge trimmer is designed for cutting
hedges, shrubs, bushes and scrub.
The hedge trimmer must not be used in the rain.
A built-in battery supplies the hedge trimmer with power.
The STIHL LK 45 charging cable recharges the STIHL
HSA 45 hedge trimmer.
WARNING
■ Charging cables or power supply units not explicitly
approved for the hedge trimmer by STIHL may cause a
fire or explosion. This can result in serious or fatal injuries
and damage to property.
► Always recharge STIHL HSA 45 hedge
trimmers with a STIHL LK 45 charging
cable.
■ Using the hedge trimmer or the charging cable for
purposes for which they were not designed may result in
serious or fatal injuries and damage to property.
► Use the hedge trimmer and charging cable as described
in this instruction manual.
4.3 The Operator
WARNING
■ Users without adequate training or instruction cannot
recognize or assess the risks involved in using the hedge
trimmer and charging cable. The operator or other
persons may sustain serious or fatal injuries.
► If you pass the hedge trimmer and charging cable on to
another user: Always give them the instruction manual.
► Make sure the user meets the following requirements:
– The user must be in good physical
condition and mental health to operate
and work with the hedge trimmer and
the charging cable. If the user’s
physical, sensory or mental ability is
Wear safety glasses.
Do not touch moving cutting blades.
Always remove the activation key during work
breaks, transport, charging, storage,
maintenance or repairs.
Protect the hedge trimmer from rain and damp –
do not immerse it in fluids.
Protect hedge trimmer from heat and fire.
Observe hedge trimmer’s specified temperature
range.
► Read, understand and save the instruction
manual.

0458-717-0121-A
6
English
4 Safety Precautions
restricted, he or she may work only
under the supervision of or as instructed
by a responsible person.
– The user must be legally recognized as
an adult.
– The user has received instruction from a
STIHL servicing dealer or other
experienced user before working with
the hedge trimmer for the first time.
– The user must not be under the influence of alcohol,
medication or drugs.
► If you have any queries: Contact your STIHL servicing
dealer.
4.4 Clothing and Equipment
WARNING
■ Long hair can be sucked into the hedge trimmer during
operation. This can result in serious injuries.
► Tie up and confine long hair so that it cannot be sucked
into the hedge trimmer.
■ Objects can be thrown through the air at high speed
during operation. This can result in personal injury.
► Wear a long-sleeved, snug-fitting upper garment and
long trousers.
■ Dust can be whipped up during operation: Whipped up
dust can damage the respiratory passages and cause
allergic reactions.
► Wear a respirator.
■ Inappropriate clothing can snag on wood, brush or the
hedge trimmer. Not wearing personal protective
equipment may result in serious injury.
► Wear snug-fitting clothing.
► Do not wear a scarf or jewelry.
■ The user can come into contact with the cutting blades
during operation. This can result in serious injuries.
► Wear footwear made of durable material.
► Wear long trousers made of durable material.
■ The user can come into contact with the cutting blades
during cleaning and maintenance work. This can result in
personal injury.
► Wear work gloves made of durable material.
■ Wearing unsuitable footwear may cause you to slip or
stumble. This can result in personal injury.
► Wear sturdy footwear with non-slip soles.
4.5 Work Area and Surroundings
4.5.1 Hedge Trimmer
WARNING
■ Bystanders, children and animals are not aware of the
dangers of the hedge trimmer or flying debris. Innocent
bystanders, children and animals may be seriously
injured.
► Keep bystanders, children and animals away from the
work area.
■ The hedge trimmer is not waterproof. Working in the rain
or a damp location may result in an electric shock. This
can result in injuries to the user and may damage the
hedge trimmer.
► Wear safety glasses. Suitable glasses that
have been tested and labeled in accordance
with EN 166 or national standards are
available from retailers.

0458-717-0121-A
7
English
4 Safety Precautions
■ The hedge trimmer’s electric motor may produce sparks.
Sparks may cause a fire or an explosion in an easily
combustible or explosive environment. This can result in
serious or fatal injuries and damage to property.
► Do not work in an easily combustible or explosive
environment.
4.5.2 Charging Cable
WARNING
■ Children are not aware of and cannot assess the dangers
of a charging cable or electric current. Children may
sustain serious or fatal injuries.
► Keep children away from the work area.
■ The charging cable is not protected against all ambient
conditions. If the charging cable is exposed to certain
ambient conditions, it may catch fire or explode. This can
result in serious injuries and damage to property.
► Protect the charging cable from rain and dampness.
► Operate the charging cable in a dry place, indoors only.
► Do not operate the charging cable in an easily
combustible or explosive environment.
► Use and store the charging cable at a temperature
between 0°C and +40 °C.
■ Persons may trip over the connecting cable. This can
result in injuries and may damage the charging cable.
► Lay the connecting cable flat on the floor.
4.6 Safe Condition
4.6.1 Hedge Trimmer
The hedge trimmer is in a safe condition if the following
points are observed:
– The hedge trimmer is undamaged.
– Hedge trimmer is clean and dry.
– The controls function properly and have not been
modified.
– Cutting blades are properly mounted.
– Only original STIHL accessories designed for this hedge
trimmer are fitted.
– Accessories are properly mounted.
WARNING
■ If the product does not comply with safety requirements,
components will no longer function properly or safety
devices may be rendered inoperative. This can result in
serious or fatal injuries.
► Work only with an undamaged hedge trimmer.
► Never recharge a damaged hedge trimmer.
► If the hedge trimmer is dirty or wet: Clean the hedge
trimmer and allow it to dry.
► Never attempt to modify the hedge trimmer.
► If the controls do not function properly: Do not use your
hedge trimmer.
► Only fit original STIHL accessories designed for this
hedge trimmer model.
► Mount accessories as described in this instruction
manual or the instruction manual supplied with the
accessory.
► Never insert objects in the hedge trimmer’s openings.
► Never bridge the contacts in the activation key socket
with metallic objects (short circuit).
► Do not open the hedge trimmer.
4.6.2 Cutting Blades
The cutting blades are in a safe condition if the following
points are observed:
– Cutting blades are undamaged.
– Cutting blades are not deformed.
► Do not work in the rain or a damp location.

0458-717-0121-A
8
English
4 Safety Precautions
– Cutting blades move freely.
– Cutting blades are properly sharpened.
– Cutting blades have no burrs.
WARNING
■ If they are in an unsafe condition, parts of the cutting
blades may come off and be thrown at high speed. This
can result in serious injuries.
► Work only with undamaged cutting blades.
► Make sure the cutting blades are properly sharpened
and deburred.
► If you have any queries: Contact your STIHL servicing
dealer.
4.6.3 Charging Cable
The charging cable is in a safe condition if the following
points are observed:
– Charging cable is undamaged.
– Charging cable is clean and dry.
WARNING
■ If the product does not comply with safety requirements,
components will no longer function properly or safety
devices may be rendered inoperative. This can result in
serious or fatal injuries.
► Do not use a damaged charging cable.
► If the charging cable is dirty or wet: Clean the charging
cable and allow it to dry.
► Do not modify the charging cable.
► Never bridge the charging cable's
contacts with metallic objects (short
circuit).
► Do not open the charging cable.
4.7 Built-in Battery
WARNING
■ The built-in battery is not protected against all ambient
conditions. If the built-in battery is exposed to certain
ambient conditions, it may catch fire or explode. This can
result in serious or fatal injuries and damage to property.
► Keep hedge trimmer away from metallic objects.
► Protect the hedge trimmer from rain and damp – do not
immerse it in fluids.
► Do not expose hedge trimmer to high pressure.
► Do not expose hedge trimmer to microwaves.
► Protect hedge trimmer from chemicals and salts.
► Do not transport a damaged hedge trimmer.
■ Fluid may escape from a damaged battery. The fluid can
cause irritation if it contacts the skin or eyes.
► Avoid contact with the fluid.
► In case of contact with the skin: Wash affected areas
with plenty of water and soap.
► In case of contact with the eyes: Rinse eyes with plenty
of water for at least 15 minutes and seek medical
advice.
► Protect hedge trimmer from heat and fire.
► Do not throw the hedge trimmer into a fire.
► Use and store your hedge trimmer at
temperatures between 0°C and +50°C.

0458-717-0121-A
9
English
4 Safety Precautions
■ A damaged or defective battery may smell unusual, emit
smoke or burn. This can result in serious or fatal injuries
and damage to property.
► If the hedge trimmer smells unusual or emits smoke: Do
not use the hedge trimmer and keep it away from
combustible substances.
► If the hedge trimmer catches fire: Extinguish the hedge
trimmer with a fire extinguisher or water.
4.8 Operation
WARNING
■ The user cannot concentrate on the work in certain
situations. The user may trip, fall and be seriously injured.
► Work calmly and carefully.
► If light and visibility are poor: Do not use your hedge
trimmer.
► Operate the hedge trimmer alone.
► Watch out for obstacles.
► Stand on the ground while working and keep a good
balance. If it is necessary to work at heights: Use a lift
bucket or a safe platform.
■ Working above shoulder height can cause you to tire
quickly. This can result in serious injuries.
► Work above shoulder height only for short periods.
► Take regular breaks.
■ If the moving cutting blades make contact with a hard
object they can be brought to a sudden stop. The reactive
forces that occur can cause the user to lose control of the
hedge trimmer and be seriously injured.
► Hold the hedge trimmer firmly with both hands.
► Before starting work, check hedge for hard objects and
remove any such objects.
■ The moving cutting blades can cut the user. This can
result in serious injuries.
■ If the behavior of the hedge trimmer changes during
operation or feels unusual, it may no longer be in a safe
condition. This can result in serious injuries and damage
to property.
► Stop work, remove the activation key and contact your
STIHL servicing dealer.
■ Hedge trimmer vibrations may occur during operation.
► Wear gloves.
► Take regular breaks.
► If signs of circulation problems occur: Seek medical
advice.
■ Note that the cutting blades continue to run for about 1
second after you release the trigger. The moving cutting
blades can cut the user. This can result in serious injuries.
► Hold the hedge trimmer firmly by the control handle and
loop handle and wait until the cutting blades come to a
complete standstill.
DANGER
■ Working near live electric cables can result in accidental
contact with the cutting blades. This can result in serious
or fatal injuries.
► Do not perform cutting work near electric cables.
4.9 Charging
WARNING
Contact with live components may occur for the following
reasons:
– Connecting cable is damaged.
– Plug is damaged.
– Wall outlet is not properly installed.
► Do not touch moving cutting blades.
► If the cutting blades are blocked by an
object: Switch off the hedge trimmer and
remove the activation key. Then remove the
object causing the blockage.

0458-717-0121-A
10
English
4 Safety Precautions
■ Contact with live components can result in an electric
shock. This may result in serious or fatal injuries.
► Check that the connecting cable and plug are not
damaged.
► Insert the plug in a properly installed wall outlet.
■ Overvoltage can occur in the charging cable if the line
voltage or frequency are incorrect during charging. The
charging cable may be damaged.
► Make sure the line voltage and frequency agree with the
data on the charging cable’s rating label.
■ A damaged or defective charging cable may produce an
unusual smell or emit smoke during the charging process.
This may result in personal injuries and damage to
property.
► Disconnect the plug from the wall outlet.
■ The charging cable can overheat and cause a fire if heat
dissipation is inadequate. This can result in serious or
fatal injuries and damage to property.
► Do not cover the charging cable.
■ If several charging cables are connected to one wall
outlet, electric cables may be overloaded during the
charging process. The cables can overheat and cause a
fire. This can result in serious or fatal injuries and damage
to property.
► Connect the charging cable to a single wall outlet.
► Do not connect the charging cable to multiple sockets.
4.10 Transporting
WARNING
■ The hedge trimmer may turn over or shift during transport.
This may result in personal injuries and damage to
property.
► Fit the blade scabbard so that it completely covers the
cutting blades.
► Pack the hedge trimmer in packaging or a transport box
in such a way that it cannot move.
► Secure the packaging or transport box so that the
packaging or transport box cannot move.
4.11 Storing
4.11.1 Hedge Trimmer
WARNING
■ Children are not aware of and cannot assess the dangers
of a hedge trimmer and can be seriously injured.
► Fit the blade scabbard so that it completely covers the
cutting blades.
► Store the hedge trimmer out of the reach of children.
■ Dampness can corrode the electrical contacts in the
activation key socket and metal components. This can
damage the hedge trimmer.
► Store the hedge trimmer in a clean and dry condition.
► Remove the activation key.
► Remove the activation key.
► Remove the activation key.

0458-717-0121-A
11
English
5 Preparing Hedge Trimmer for Operation
■ The hedge trimmer is not protected against all ambient
conditions. The hedge trimmer may be damaged if it is
exposed to certain ambient conditions.
► Store the hedge trimmer in a clean and dry condition.
► Store the hedge trimmer in a confined space.
► Store the activation key separately from the hedge
trimmer.
4.11.2 Charging Cable
WARNING
■ Children are not aware of and cannot assess the dangers
of a charging cable. Children may sustain serious or fatal
injuries.
► Keep the charging cable out of the reach of children.
■ The charging cable is not protected against all ambient
conditions. The charging cable may be damaged if it is
exposed to certain ambient conditions.
► If the charging cable is hot: Allow the charging cable to
cool down.
► Store the charging cable in a clean and
dry condition.
► Store the charging cable in a confined
space.
► Store the charging cable within temperature range of
0°C to +40°C.
4.12 Cleaning, Maintenance and Repairs
WARNING
■ The hedge trimmer may start unintentionally if the
activation key remains inserted during cleaning,
maintenance or repair operations. This can result in
serious injuries and damage to property.
■ Aggressive cleaning agents, high pressure cleaners or
pointed objects can damage the hedge trimmer, cutting
blades and charging cable. If the hedge trimmer, cutting
blades or charging cable are not cleaned correctly,
components may no longer function properly or safety
devices may be rendered inoperative. This can result in
serious injuries.
► Clean the hedge trimmer, cutting blades and charging
cable as described in this instruction manual.
■ If the hedge trimmer, cutting blades or charging cable are
not serviced or repaired correctly, components may no
longer function properly or safety devices may be
rendered inoperative. This can result in serious or fatal
injuries.
► Do not attempt to service or repair the hedge trimmer or
charging cable.
► If the hedge trimmer or the charging cable require
servicing or repairs: Contact your STIHL servicing
dealer.
► Maintain the cutting blades as described in this
instruction manual.
■ The user can be cut while cleaning or servicing the sharp
cutting blades. This can result in personal injury.
► Wear work gloves made of durable material.
5.1 Preparing Hedge Trimmer for Operation
Perform the following steps before starting work:
► Make sure the following components are in a safe
condition:
– Hedge trimmer, @ 4.6.1.
– Cutting blades, @ 4.6.2.
– Charging cable, @ 4.6.3.
► Check the built-in battery, @ 9.2.
► Fully charge the hedge trimmer, @ 6.1.
► Remove the activation key.
5 Preparing Hedge Trimmer for
Operation

0458-717-0121-A
12
English
6 Charging the Hedge Trimmer, LEDs
► Clean the hedge trimmer, @ 14.1.
► Check the controls, @ 9.1.
► If 3 LEDs flash red while you are checking the controls:
Remove the activation key and contact your STIHL
servicing dealer.
Malfunction in hedge trimmer.
► If you cannot carry out this work: Do not use your hedge
trimmer and contact your STIHL servicing dealer.
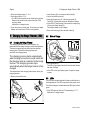
6.1 Charging the Hedge Trimmer
The charging time depends on several factors, e.g.
temperature of the hedge trimmer or ambient temperature.
The actual charging time may differ from the specified
charging time. For specified charging times see
www.stihl.com/charging-times.
The charging process starts automatically
when the plug is inserted in a wall outlet and
the charging cable is connected to the hedge
trimmer. The charging process stops
automatically when the hedge trimmer is fully
charged.
The hedge trimmer and charging cable heat up during the
charging process.
► Remove the activation key.
► Insert the plug (5) in a convenient wall outlet (6).
► Lay the connecting cable (4).
► Insert the charger plug (3) in the charge socket (2).
The LEDs (1) glow green and show the state of charge.
► If the LEDs (1) stop glowing: Disconnect the charger plug
(3) from the charge socket (2).
The hedge trimmer is fully charged.
► Disconnect the plug (5) from the wall outlet (6).
6.2 State of Charge
► Press the button (1).
The LEDs (5) glow green for about 5 seconds and indicate
the state of charge.
► If the LED on the right flashes green: Charge the hedge
trimmer.
6.3 LEDs
The LEDs can indicate the state of charge or malfunctions in
the hedge trimmer. The LEDs can glow or flash green or red.
The state of charge is indicated when the LEDs glow or flash
green.
► If the LEDs glow or flash red: Troubleshooting, @ 17.
Malfunction in hedge trimmer.
6 Charging the Hedge Trimmer, LEDs
5
4
6
1 2
3
0000-GXX-1468-A1
20-40%
40-60%
60-80%
80-100%
0-20%
1
0000-GXX-1422-A0

0458-717-0121-A
13
English
7 Inserting and Removing Activation Key
7.1 Inserting the Activation Key
► Insert the activation key (1) in the socket (2).
7.2 Removing the activation key
► Stand the hedge trimmer on a level surface.
► Remove the activation key.
► Keep the activation key out of the reach of children.
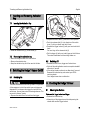
8.1 Switching On
WARNING
The motor accelerates and the cutting blades run regardless
of the sequence in which the switch lever and trigger are
depressed. If you depress the trigger first and then the
switch lever, you may lose control of the hedge trimmer. This
can result in serious injuries.
► Depress the switch lever first and then the trigger.
► Depress the switch lever (1) and hold it in that position.
► Push the release slide (2) in the direction of the switch
lever (1) with your thumb and hold it there.
► Depress the trigger lockout (3) with your hand and hold it
there.
You can let go of the release slide (2).
► Pull the trigger (4) with your index finger and hold it there.
The motor accelerates and the cutting blades run.
8.2 Switching Off
► Release the switch lever, trigger and lockout lever.
► Wait until the cutting blades come to a complete standstill
after about 1 second.
► If the cutting blades continue to run after about 1 second:
Remove the activation key and contact your STIHL
servicing dealer.
Your hedge trimmer has a malfunction.
9.1 Checking the Controls
Release slide, trigger lockout and trigger
► Remove the activation key.
► Attempt to pull the trigger lever without depressing the
release slide and the trigger lockout.
7 Inserting and Removing Activation
Key
8 Switching the Hedge Trimmer On/Off
1
2
0000-GXX-1423-A0
9 Checking the Hedge Trimmer
4
3
1
2
0000-GXX-1424-A0

0458-717-0121-A
14
English
10 Operating the Hedge Trimmer
► If the trigger can be pulled: Do not use your hedge trimmer
and contact your STIHL servicing dealer.
Release slide or trigger lockout is faulty.
► Push the release slide (1) in the direction of the switch
lever with your thumb and hold it there.
► Depress the trigger lockout lever and hold it in that
position.
► Pull the trigger.
► Let go of the trigger, trigger lockout and release slide.
► If the trigger, trigger lockout or release slide is stiff or does
not spring back to the idle position: Do not use your hedge
trimmer and contact your STIHL servicing dealer.
The trigger, trigger lockout or release slide has a
malfunction.
Switch Lever
► Remove the activation key.
► Depress the switch lever and release it again.
► If the switch lever is stiff or does not spring back to its idle
position: Do not use your hedge trimmer and contact your
STIHL servicing dealer.
The switch lever has a malfunction.
Switch on the hedge trimmer
► Insert the activation key.
► Depress the switch lever and release it again.
► If the cutting blades have run or are running: Do not use
your hedge trimmer and contact your STIHL servicing
dealer.
The trigger has a malfunction.
► Push the release slide (1) in the direction of the switch
lever with your thumb and hold it there.
► Depress the trigger lockout lever and hold it in that
position.
► Pull the trigger and hold it there.
► If the cutting blades run: Do not use your hedge trimmer
and contact your STIHL servicing dealer.
The switch lever has a malfunction.
► Depress the switch lever and hold it in that position.
The cutting blades run.
► If 3 LEDs flash red: Remove the activation key and contact
your STIHL servicing dealer.
There is a malfunction in the hedge trimmer.
► Release the switch lever.
The cutting blades stop running after about 1 second.
► If the cutting blades continue to run after 1 second:
Remove the activation key and contact your STIHL
servicing dealer.
Your hedge trimmer has a malfunction.
9.2 Checking the Built-In Battery
► Press the button.
The LEDs glow or flash.
► If the LEDs do not glow or flash: Do not use your hedge
trimmer and contact your STIHL servicing dealer.
There is a malfunction in the built-in battery.
10.1 Holding and Controlling the Hedge Trimmer
► Hold the hedge trimmer with one hand on the control
handle – wrap your thumb around the control handle.
► Hold the hedge trimmer with the other hand on the loop
handle – wrap your thumb around the loop handle.
10 Operating the Hedge Trimmer
0000-GXX-1420-A0

0458-717-0121-A
15
English
11 After Finishing Work
10.2 Cutting
► Use lopping shears or a chainsaw to cut out thick
branches first.
► Swing the hedge trimmer from the bottom upwards in an
arc while making the cut.
► Lower the nose of the hedge trimmer without cutting.
► Walk slowly and steadily forwards.
► Swing the hedge trimmer from the bottom upwards in an
arc while making the cut.
► Cut the other side of the hedge in the same way.
► Hold the cutting blades at an angle of 0° to 10° to the top
of the hedge.
► Swing the hedge trimmer horizontally and in an arc while
making the cut.
► If cutting performance deteriorates: Sharpen the cutting
blades.
11.1 After Finishing Work
► Switch off the hedge trimmer and remove the activation
key.
► Clean the hedge trimmer.
► Clean the cutting blades.
► Fit the blade scabbard so that it completely covers the
cutting blades.
12.1 Transporting the Hedge Trimmer
► Switch off the hedge trimmer and remove the activation
key.
► Fit the blade scabbard so that it completely covers the
cutting blades.
► Carry the hedge trimmer by the loop handle with the
cutting blades behind you.
► Transporting the hedge trimmer in a vehicle: Secure the
hedge trimmer to prevent it turning over or shifting.
► If the hedge trimmer has to be packed: Observe the
following points when packing the hedge trimmer:
– Packaging or transport box must be non-conductive.
– Make sure the hedge trimmer cannot shift inside the
packaging or transport box.
– Secure the packaging or transport box so that the
packaging or transport box cannot move.
Owing to the built-in battery the hedge trimmer is subject to
the requirements for transporting dangerous goods. The
hedge trimmer is classified as UN 3481 (lithium-ion batteries
in equipment) and has been tested in accordance with UN
Manual of Tests and Criteria, Part III, sub-section 38.3.
For transport regulations see www.stihl.com/safety-data-
sheets
13.1 Storing the Hedge Trimmer
STIHL recommends that you store the hedge trimmer with a
charge between 40% and 60% (2 LEDs glow green).
► Switch off the hedge trimmer and remove the activation
key.
► Fit the blade scabbard so that it completely covers the
cutting blades.
11 After Finishing Work
0000-GXX-1425-A0
12 Transporting
13 Storing

0458-717-0121-A
16
English
14 Cleaning
► Observe the following points when storing the hedge
trimmer:
– Hedge trimmer is out of the reach of children.
– Hedge trimmer is clean and dry.
– Hedge trimmer is in an enclosed space.
– Hedge trimmer is stored separately from the charging
cable.
– Hedge trimmer is in a temperature range between 0°C
and +50°C.
13.2 Storing the Charging Cable
► Disconnect the plug from the wall outlet.
► Observe the following points when storing the charging
cable:
– Charging cable is out of the reach of children.
– Charging cable is clean and dry.
– Charging cable is in an enclosed space.
– Charging cable is stored separately from the hedge
trimmer.
– Charging cable is in a temperature range between 0°C
and +40 °C.
14.1 Cleaning the Hedge Trimmer
► Switch off the hedge trimmer and remove the activation
key.
► Clean the hedge trimmer with a damp cloth or STIHL resin
solvent.
14.2 Cleaning the Cutting Blades
► Switch off the hedge trimmer and remove the activation
key.
► Spray both sides of blades with STIHL resin solvent.
► Insert the activation key.
► Run the hedge trimmer for 5 seconds.
The cutting blades run. STIHL resin solvent is distributed
evenly.
14.3 Cleaning the charging cable
► Disconnect the plug from the wall outlet.
► Disconnect the charger plug from the charge socket.
► Clean the charging cable with a damp cloth.
15.1 Sharpening the Cutting Blades
STIHL recommends you have the cutting blades
resharpened by a STIHL servicing dealer.
► Use a STIHL flat crosscut file to sharpen each cutting
edge on the upper blade. The file only sharpens on the
forward stroke. Maintain the prescribed sharpening angle,
@ 18.2.
► Turn the hedge trimmer over.
► Sharpen the remaining cutting edges.
► Deburr each cutting edge from below.
► Turn the hedge trimmer over.
► Deburr the remaining cutting edges.
► Use a damp cloth to remove the filing dust.
► Spray both sides of blades with STIHL resin solvent.
14 Cleaning
15 Maintenance
0000-GXX-1426-A0

0458-717-0121-A
17
English
16 Repairing
► Run the hedge trimmer for 5 seconds, .
The cutting blades run. STIHL resin solvent is distributed
evenly.
► If you have any queries: Contact your STIHL servicing
dealer.
16.1 Repairing Hedge Trimmer and Charging Cable
The hedge trimmer, cutting blades or charging cable cannot
be repaired by the user.
► If the hedge trimmer or cutting blades are damaged: Do
not use your hedge trimmer and contact your STIHL
servicing dealer.
► If the charging cable is defective or damaged: Replace the
charging cable.
16 Repairing

0458-717-0121-A
18
English
17 Troubleshooting
17.1 Troubleshooting Hedge Trimmer and Charging Cable
17 Troubleshooting
Condition LEDs on hedge
trimmer
Cause Remedy
Hedge trimmer does
not start when
switched on.
1 LED flashes
green
Hedge trimmer has low
charge.
► Charge the hedge trimmer.
3 LEDs glow red Hedge trimmer is too hot. ► Remove the activation key.
► Allow the hedge trimmer to cool down.
3 LEDs flash red. There is a electrical
malfunction.
► Remove the activation key.
► Do not use your hedge trimmer and contact your
STIHL servicing dealer.
Cutting blades do not move
freely.
► Spray both sides of blades with STIHL resin
solvent.
► If 3 LEDs continue to flash red: Do not use your
hedge trimmer and contact your STIHL servicing
dealer.
The hedge trimmer is
damp.
► Allow the hedge trimmer to dry.
Hedge trimmer cuts
out during operation.
3 LEDs glow red Hedge trimmer is too hot. ► Remove the activation key.
► Allow the hedge trimmer to cool down.
There is a electrical
malfunction.
► Switch off the hedge trimmer, wait 5 seconds and
then switch it on again.
Cutting blades do not move
freely.
► Spray both sides of blades with STIHL resin
solvent.
Hedge trimmer
runtime is too short.
The hedge trimmer is not
fully charged.
► Fully charge the hedge trimmer.
Normal hedge trimmer life
has been exceeded.
► Replace the hedge trimmer.
Hedge trimmer is not
being charged.
3 LEDs glow red Hedge trimmer is too hot. ► Remove the activation key.
► Allow the hedge trimmer to cool down.
Malfunction in hedge
trimmer or charging cable.
► Remove the activation key.
► Contact your STIHL servicing dealer.
Page is loading ...
Page is loading ...
Page is loading ...
Page is loading ...
Page is loading ...
Page is loading ...
Page is loading ...
Page is loading ...
-
 1
1
-
 2
2
-
 3
3
-
 4
4
-
 5
5
-
 6
6
-
 7
7
-
 8
8
-
 9
9
-
 10
10
-
 11
11
-
 12
12
-
 13
13
-
 14
14
-
 15
15
-
 16
16
-
 17
17
-
 18
18
-
 19
19
-
 20
20
-
 21
21
-
 22
22
-
 23
23
-
 24
24
-
 25
25
-
 26
26
-
 27
27
-
 28
28


STIHL HSA 45 Owner's manual
- Category
- Power hedge trimmers
- Type
- Owner's manual
Ask a question and I''ll find the answer in the document
Finding information in a document is now easier with AI