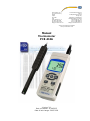
PCE Health and Fitness PCE-313A Owner's manual
- Category
- Measuring, testing & control
- Type
- Owner's manual
This manual is also suitable for

PCE Americas Inc.
711 Commerce Way
Suite 8
Jupiter
FL-33458
USA
From outside US: +1
Tel: (561) 320-9162
Fax: (561) 320-9176
info@pce-americas.com
PCE Instruments UK Ltd.
Unit 11
Southpoint Business Park
Ensign way
Hampshire / Southampton
United Kingdom, SO31 4RF
From outside UK: +44
Tel: (0) 2380 98703 0
Fax: (0) 2380 98703 9
info@pce-instruments.co.uk
www.pce-instruments.com/english
www.pce-instruments.com
Manual
Thermometer
PCE-313A
Version 3.1
Date of creation: 15.04.2015
Date of last change: 20.05.2019

Contents
1 Introduction ............................................................................................................. 3
2 Safety notes ............................................................................................................. 3
3 Specifications .......................................................................................................... 4
4 System description ................................................................................................. 5
5 Instructions .............................................................................................................. 6
5.1 How to select the function .......................................................................................................... 6
5.2 Data Hold function ...................................................................................................................... 6
5.3 Max / Min function ...................................................................................................................... 7
5.4 Backlight ..................................................................................................................................... 7
5.5 Memory ....................................................................................................................................... 7
5.5.1 Preparation ..................................................................................................................................... 7
5.5.2 Automatic data logger function ...................................................................................................... 7
5.5.3 Manual data logger function ........................................................................................................... 8
5.5.4 Time information ............................................................................................................................ 8
5.5.5 Data information ............................................................................................................................. 8
5.5.6 SD memory card ............................................................................................................................ 8
5.6 How to transfer data to a PC ...................................................................................................... 9
5.7 Settings ....................................................................................................................................... 9
5.7.1 How to set the date and time ....................................................................................................... 10
5.7.2 How to set the decimal point ........................................................................................................ 10
5.7.3 Auto Power Off function ............................................................................................................... 10
5.7.4 How to set the beeper .................................................................................................................. 10
5.7.5 How to select the thermocouple (K- or J-type) ............................................................................ 10
5.7.6 How to select the unit (°C or °F) .................................................................................................. 10
5.7.7 How to set the sampling rate ....................................................................................................... 10
5.7.8 How to format the SD card ........................................................................................................... 10
5.8 Mains adaptor ........................................................................................................................... 11
5.9 System reset ............................................................................................................................. 11
6 RS-232 interface .................................................................................................... 11
7 Patents ................................................................................................................... 11
8 Batteries ................................................................................................................. 12
9 Contact ................................................................................................................... 12
9.1 PCE Instruments UK ................................................................................................................ 12
9.2 PCE Americas .......................................................................................................................... 12

Manual
3
1 Introduction
Thank you for purchasing a PCE-313A from PCE Instruments.
The PCE-313A humidity and temperature data logger has been designed for professional use, for
instance in the air conditioning sector. It can measure the relative humidity as well as the ambient
temperature. This device can be connected to K-type thermocouples. The sampling rate for real-time
measurements can be adjusted and you can save your readings either to the internal memory of this
instrument to an SD memory card with a capacity of 1 … 16 GB. The values saved on the SD card as an
xls file can be transferred to a PC for further analysis. The PCE-313A can work independently, without the
user being present during the measurement as it can be programmed via the keypad in advance. For
long-term measurements we recommend you to use the PCE-313A with the optional mains adaptor.
2 Safety notes
Please read this manual carefully and completely before you use the device for the first time. The device
may only be used by qualified personnel and repaired by PCE Instruments personnel. There is no
warranty of damages or injuries caused by non-observance of the manual.
- The device may only be used within the approved temperature range.
- The case should only be opened by qualified personnel of PCE Instruments.
- The instrument should never be placed with the user interface facing an object (e.g. keyboard side on a
table).
- You must not make any technical changes to the device.
- The appliance should only be cleaned with a damp cloth / use only pH-neutral cleaner, no abrasives or
solvents.
This manual is published by PCE Instruments without any guarantee.
We expressly point to our general guarantee terms which can be found in our general terms of business.
If you have any questions please contact PCE Instruments.

Manual
4
3 Specifications
Measurement ranges
- temperature
- relative humidity
- K-type
- calculated dew point
- calculated wet bulb temperature
5 ... 95 % RH
0 ... + 50 °C
-50 ... +1300 °C
-25.3 ... +48.9 °C
-21.6 ... +50 °C
Resolution
- temperature
- relative humidity
- K-type
- calculated dew point
- calculated wet bulb temperature
0.1 % RH
0.1 °C
0.1 °C
0.1 °C
0.1 °C
Accuracy
- temperature
- relative humidity
- K-type
±0.8 °C
≥70 % RH ±3 % of reading ±1 % RH
<70 % RH ±3 % RH
±(0.4 % +0.5 °C)
Memory
SD card (1 ... 16 GB) 2 GB included
Sampling rate
adjustable, 1 ... 3600 seconds
Thermocouples
K-type and J-type compatible
Display
LC display 52 x 38 mm, with backlight
Interface
RS-232 and USB
Power supply
6 x 1.5 V AA batteries / 9 V mains adaptor
(optional)
Operating conditions
0 ... + 50 °C
<85 % RH
Dimensions
177 x 68 x 45 mm
Weight
490 g

Manual
5
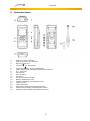
4 System description
1 Display
2 Power key (ESC, backlight)
3 Hold key (function key, next key)
4 REC key (enter key)
5 SET key ( key, check time)
6 Logger key ( key, check sampling rate)
7 Sensor input socket (humidity and temperature sensor)
8 K- / J-type input
9 SD card slot
10 RS-232 output
11 Reset key
12 9 V input (for mains adaptor)
13 Battery compartment cover
14 Screws of the battery compartment cover
15 Table-top stand
16 Tripod connection
17 Plug of the humidity and temperature sensor
18 Handle of the humidity and temperature sensor
19 Probe tip of the humidity and temperature sensor

Manual
6
5 Instructions
5.1 How to select the function
1. Switch on the device by pressing the power key (2). If you hold the power key for more than 2 seconds,
this will switch off the instrument.
2. The device has 4 functions:
a) humidity and temperature
b) dew point
c) wet bulb
d) temperature via thermocouple input (K- or J-type)
If you hold the Hold key (3), you will see the following abbreviations in the display:
rH
humidity and temperature measurement
dP
dew point measurement
_Et
wet bulb temperature measurement
tP
K / J-type temperature measurement
If you release the Hold key (3) at the time the relevant abbreviation appears in the display, the desired
function will be set as the standard measurement.
3. Humidity and temperature measurement
a) Switch on the device by means of the power key (2).
b) Insert the plug (17) of the humidity sensor into the sensor input socket (7).
c) Select humidity and temperature measurement by means of the Hold key (3) if you have not done so
yet.
d) The display will now show you the humidity value in % RH (upper line) and the temperature in °C
(lower line).
Note: You can switch between °C and °F as the temperature unit. For more information about this, see
below (settings).
4. Dew point measurement
a) Switch on the device by means of the power key (2).
b) Insert the plug (17) of the humidity sensor into the sensor input socket (7).
c) Select dew point measurement by means of the Hold key (3).
d) You can now read the dew point from the upper line of the display. The lower line of the display
shows “dP” for “dew point”.
5. Wet bulb temperature measurement
a) Switch on the device by means of the power key (2).
b) Insert the plug (17) of the humidity sensor into the sensor input socket (7).
c) Select wet bulb temperature measurement by means of the Hold key (3).
d) Now you can see the wet bulb temperature in the upper line of the display. The lower line of the
display will show “_Et”.
6. Temperature measurement by means of the thermocouple input
a) Disconnect the humidity / temperature sensor by removing the plug (17) from the socket (7).
b) Insert a K-type or J-type thermocouple into the K- / J-type input (8).
c) Switch on the device by means of the power key (2).
d) Select K- / J-type temperature measurement by means of the Hold key (3).
e) You can now see the temperature on the display. Moreover, either “K” or “J” will appear in the display.
Note: K-type sensors are used as standard. If you wish to change from a K-type to a J-type
thermocouple, see below (settings).
5.2 Data Hold function
By pressing the Hold key (3), you can hold the measurement values in the display during the
measurement. The display will indicate “HOLD”. If you press the Hold key (3) again, you leave the Hold
function.

Manual
7
5.3 Max / Min function
1. This function saves the maximum and minimum values of a series of measurements. You can activate
this function by pressing the REC key (4). “REC” is displayed.
2. When the “REC” icon appears in the display, you can retrieve the maximum value by means of the
REC key (4). The display will additionally show “REC: MAX”. If you wish, you can now delete this value
by means of the Hold key (3). The “REC” icon will be displayed again.
3. If you press the REC key (4) again, you will see the minimum value. The display will additionally
indicate “REC: MIN”. If you wish, you can now delete this value by means of the Hold key (3). The
“REC” icon will be displayed again.
4. To leave this function, press and hold the REC key (4) for more than 2 seconds.
5.4 Backlight
If you have switched on the device by means of the power key (2), the backlight will light up automatically.
You can switch the backlight on and off by means of the power key (2) during the measurement.
5.5 Memory
5.5.1 Preparation
a) How to insert the SD memory card
Insert the SD card into the slot (9). Please make sure that you insert the SD card in the right direction
and carefully. The memory card should snap into place without using much force.
b) How to format the SD card
If you use the SD card for the first time, it is necessary to format it. To do so, please refer to the
settings chapter below.
c) How to set the clock
If you use the device for the first time, you must set the time. To do so, please refer to the settings
chapter below.
d) How to set the decimal point
In the factory setting, the decimal point is a point, e. g. “20.6.” or “1000.53”. However, in some
countries it is more common to use a comma as the decimal point, e. g. “20,6” or “1000,53”. Therefore,
it might make sense to change the format of the decimal point. For information about this, check the
settings chapter below.
5.5.2 Automatic data logger function
a) How to start the data logger
Press the REC key (4) once. The REC icon will be displayed. Press the logger key (6). The REC icon
will start flashing and the device saves the data to the SD card.
Note: To find out how to set the sampling rate and switch the beeper on and off, check the settings
chapter below.
b) How to halt the data logger
While the data logger is recording data, you can halt it by means of the logger key (6). In this case, the
REC icon will stop flashing.
Note: If you press the logger key (6) again, recording will start again.
c) How to stop the data logger permanently
While the data logger is recording data, you can end data logging by means of the REC key (4). To do
so, press and hold the REC key (4) for 2 seconds. The REC icon in the display will disappear.

Manual
8
5.5.3 Manual data logger function
a) Set the sampling rate to 0 seconds (see settings chapter). Press the REC key (4) once so that the
REC symbol appears in the display. After that, press the logger key (6). The REC symbol will start
flashing and you hear the beeper. At the same time, the data will be saved to the SD card memory. In
the lower line of the display, the memory location number of your set of data will be indicated.
Note: In manual data logger mode, you can select the individual memory locations (1 … 99) by means
of the (5) and the keys (6). The memory locations are shown in the lower line of the display as
Px (x = 1 … 99). After selecting the memory location, you can confirm it with the REC key (4) and save
the measurement values at the same time.
b) How to stop the data logger permanently
To stop this function, press and hold the REC key (4) for 2 seconds. The REC icon will disappear from
the display.
5.5.4 Time information
In normal measurement mode (without data logger function), you can check the time information via the
SET key (5) which is also labelled “time check”. You will then see the date and time in the display.
5.5.5 Data information
In normal measurement mode (without data logger function), you can check the sampling rate via the
logger key (5) which is also labelled “sampling check”. The lower line of the display will indicate the
sampling rate you have set.
5.5.6 SD memory card
1. When you insert the SD card into the device for the first time, the device will generate a folder on the
SD card called HTA01.
2. When you start the data logger function for the first time, the device will generate a file in the folder
HTA01\ called HTA01001.xls. The data will then be saved in this file. As soon as there are 30000 sets of
data in this file, a new file is created. This will be called HTA01002.xls.
3. When the folder HTA01 contains 99 files, the device will create a new folder called HTA02\...
4. The following structure results:
HTA01\
HTA01001.xls
HTA01002.xls
…
…
HTA01099.xls
HTA02\
HTA02001.xls
HTA02002.xls
…
…
HTA02099.xls
HTAXX\
…
Note: XX cannot be higher than 10.

Manual
9
5.6 How to transfer data to a PC
1. After saving data to the SD card by means of the meter, remove the SD card from its slot (9).
2. Insert the SD memory card into the card reader of your computer.
3. Switch on the computer and start the Windows programme Excel. You can now open the files saved on
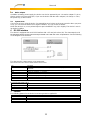
the SD card. Then you can process the data via Excel, e. g. create graphs.
Examples:
5.7 Settings
When the data logger function is deactivated, press and hold the SET key (5) for more than 2 seconds.
This will take you to the setup menu. You can navigate through the menu by pressing the hold key (3):
dAtE… set date and time (year / month / day, hour / minute / second)
dEC… set decimal point format (point or comma)
PoFF.. Auto Power Off function on / off
bEEP.. set beeper (on or off)
tYPE.. set thermocouple (K- or J-type)
t-CF… set temperature unit (°C or °F)
SP-t…. set sampling rate (hours / minutes / seconds)
Sd F…. format SD card
You can leave the setup menu by means of the power key (2).

Manual
10
5.7.1 How to set the date and time
1. When “dAtE” is displayed, confirm your selection by means of the enter key (4). You can now set the
value by means of the (5) and the keys (6). The year comes first. After setting the value, press
the enter key (4) to get to the next value. The order will then be as follows: month, day, hour, minute and
second.
2. When you have set all values and confirmed with the enter key (4), all settings will be saved. Now you
automatically get to the menu “dEC” where you can set the decimal point.
Note: The date and time always always runs with the device. Hence, you only need to make the setting
once, unless you change the batteries.
5.7.2 How to set the decimal point
The decimal point can be set as a point or comma. As in many countries in the world the decimal point is
a point (e. g. 523.25) and in Europe, the decimal point normally is a comma (e. g. 523,25), you can
choose “bASIC” if you wish to set a point and “Euro” if you want a comma.
1. When the display shows “dEC”, you can use the (5) and the keys (6) to select “bASIC” (for the
point) or “Euro” (for the comma).
2. Confirm and save by means of the enter key (4).
5.7.3 Auto Power Off function
1. When the display indicates “PoFF”, you can select “yES” or “no” by means of the (5) and the
keys (6). By selecting “yES”, you activate the Automatic Power Off function and by selecting “no”, you
deactivate this function.
2. Confirm and save by means of the enter key (4).
5.7.4 How to set the beeper
1. When the display indicates “bEEP”, you can select “yES” or “no” by means of the (5) and the
keys (6). By selecting “yES”, you activate the beeper which means that an acoustic signal sounds
everytime a value is saved. “no” means that the beeper is off.
2. Confirm and save by means of the enter key (4).
5.7.5 How to select the thermocouple (K- or J-type)
1. When the display shows “tYPE”, you can select “K” or “J” by means of the (5) and the
keys (6). “K” stands for a K-type thermocouple and “J” means that you select a J-type thermocouple.
2. Confirm and save by means of the enter key (4).
5.7.6 How to select the unit (°C or °F)
1. When the display indicates “t-CF”, you can use the (5) and the keys (6) to select “C” or “F”. “C”
means degrees Centigrade and “F” means degrees Fahrenheit.
2. Confirm and save by means of the enter key (4).
5.7.7 How to set the sampling rate
1. When the display shows “SP-t”, use the (5) and the keys (6) to set the sampling rate in steps of
0, 1, 2, 5, 10, 30, 60, 120, 300, 600, 1800 and 3600 seconds. The “0” is set for manual data logging, see
chapter 5.5.3.
2. Confirm and save by means of the enter key (4).
5.7.8 How to format the SD card
1. When the display indicates “Sd F”, you can select “yES” or “no” by means of the (5) and the
keys (6). “yES” means that you would like to format the SD card.
2. Confirm and save by means of the enter key (4). If you confirm “yES” by means of the enter key (4),
there will be another question where you can select “yES Enter”. Confirm this entry with the enter key (4)
again. The SD memory card will be formatted.
Note: When you format the SD card, all data saved on it will be deleted irrevocably.

Manual
11
5.8 Mains adaptor
In addition to battery power supply, the device can also be powered by a 9 V dc mains adaptor. To do so,
please use the 9 V input socket (12). If you use the device with the mains adaptor, it is always on. Thus,
the power key (2) will not work.
5.9 System reset
If you have an issue using the device, for example because it does not show any reaction when you press
a key, you can reset the device to its original condition. You can do this as follows:
When the device is on, use a pointed object to push the RESET key (11) in slightly. The device is now in
its original condition.
6 RS-232 interface
The device is equipped with an RS-232 interface with a 3.5 mm jack socket (10). The data output is a 16
bit data string which can be read out and processed in line with the users’ requirements. See the following
circuit diagram of the interface:
The data result in a data stream of 16 components.
D15 D14 D13 D12 D11 D10 D9 D8 D7 D6 D5 D4 D3 D2 D0
D0
end word
D1 & D8
display, D1 = LSD, D8 = MSD example: when 1234 is displayed, D8 to D1 is:
00001234
D9
decimal point (DP), position from right to left 0 = no DP, 1 = 1 DP, 2 = 2 DP, 3 = 3 DP
D10
polarity 0 = positive, 1 = negative
D11 & D12
displayed unit °C = 01, °F = 02, % RH = 04
D13
Selection of display line 1 = upper line 2 = lower line
D14
4
D15
start word
RS-232 format, 9600, N8, 1
Baud rate
9600
Parity
No
Start bit
8
Stop bit
1
7 Patents
The following patents for the device have been granted or applied for:
Germany
No. 20 2008 016 337.4
Japan
3151214
Taiwan
M 358970 M 359043
China
ZL 2008 2 0189918.5 ZL 2008 2 0189917.0
USA
applied for

Manual
12
8 Batteries
When the battery level indicator appears in the left corner of the display, the batteries must be replaced.
1. Loose the screws (14) of the battery compartment cover (13) on the rear side of the device.
2. Remove the batteries and replace them by 6 new AA batteries. Make sure that the polarity is correct
when you insert the batteries.
3. Fix the battery compartment cover by means of the screws (14).
For the disposal of batteries, the 2006/66/EC directive of the European Parliament applies. Due to the
contained pollutants, batteries must not be disposed of as household waste. They must be given to
collection points designed for that purpose.
In order to comply with the EU directive 2012/19/EU we take our devices back. We either re-use them or
give them to a recycling company which disposes of the devices in line with law.
If you have any questions, please contact PCE Instruments.
9 Contact
If you have any questions about our range of products or measuring instruments please contact PCE
Instruments.
9.1 PCE Instruments UK
By post:
PCE Instruments UK Ltd.
Unit 11 Southpoint Business Park
Ensign Way, Southampton
Hampshire
United Kingdom, SO31 4RF
By phone:
02380 987 035
9.2 PCE Americas
By post:
PCE Americas Inc.
711 Commerce Way
Suite 8
Jupiter
33458 FL
USA
By phone:
561 320 9162
-
 1
1
-
 2
2
-
 3
3
-
 4
4
-
 5
5
-
 6
6
-
 7
7
-
 8
8
-
 9
9
-
 10
10
-
 11
11
-
 12
12


PCE Health and Fitness PCE-313A Owner's manual
- Category
- Measuring, testing & control
- Type
- Owner's manual
- This manual is also suitable for
Ask a question and I''ll find the answer in the document
Finding information in a document is now easier with AI
Related papers


Other documents
-
PCE instruments PCE-FM 1000 User manual
-
-
Traceable 4189 Owner's manual
-
-
-
PCE -VE 100N4 Industrial Borescope User manual
-
-
PCE instruments PCE-PDR 10 User manual
-
PCE RCM-16-Air-Quality-Meter User manual
-