Page is loading ...

Lit. No. 68820
April 1, 2000
Regular and High Capacity
HOPPER SPREADER
Owner’s Manual
CAUTION
Read this manual and engine owner’s manual
before installing or operating the spreader.
This manual is for WESTERN® Regular and High Capacity Spreaders with serial
numbers
(4714 - )
®


April 1, 2000 22 Lit. No. 68820
TABLE OF CONTENTS
PREFACE................................................................................................................................................................ 1
SAFETY INFORMATION......................................................................................................................................... 2
Before You Begin .............................................................................................................................................. 2
Torque Chart ..................................................................................................................................................... 3
Gasoline Warning Label .................................................................................................................................... 4
Warning/Caution Label...................................................................................................................................... 4
LOADING ................................................................................................................................................................ 5
Regular Capacity Load Weight.......................................................................................................................... 5
High Capacity Load Weight ............................................................................................................................... 5
Certification ....................................................................................................................................................... 5
Material Weights ............................................................................................................................................... 5
Spreader Specifications..................................................................................................................................... 6
Determining Vehicle Payload............................................................................................................................. 7
Determining Vehicle Payload............................................................................................................................. 8
OPERATING THE SPREADER - STANDARD CAB CONTROL 9
Engine Operation .............................................................................................................................................. 9
Starting the Engine ............................................................................................................................................ 9
Stopping the Engine .......................................................................................................................................... 9
OPERATING THE SPREADER - PREMIUM CAB CONTROL 10
Engine Operation ............................................................................................................................................ 10
Starting the Engine .......................................................................................................................................... 10
Stopping the Engine ........................................................................................................................................ 10
OPERATING THE SPREADER ............................................................................................................................. 11
Choke Adjustment Procedure ......................................................................................................................... 11
Clutch Operation ............................................................................................................................................. 11
Baffle Adjustment ............................................................................................................................................ 11
Spread Patterns .............................................................................................................................................. 12
MAINTENANCE .................................................................................................................................................... 13
Grease ............................................................................................................................................................ 13
Chains............................................................................................................................................................. 13
Electric Clutch ................................................................................................................................................. 14
Fuel Filter Replacement .................................................................................................................................. 14
Engine Service and Repair.............................................................................................................................. 14
HYDRAULIC HOPPER SPREADER MAINTENANCE 15
After each use:................................................................................................................................................ 15
At the end of each season:.............................................................................................................................. 15
WIRING DIAGRAM (SPREADER BATTERY KIT)................................................................................................. 16
WIRING DIAGRAM (VEHICLE BATTERY KIT) ..................................................................................................... 17
ELECTRIC THROTTLE MOTOR REPLACEMENT............................................................................................... 18
Removal Instructions....................................................................................................................................... 18
Installation Instructions.................................................................................................................................... 18


Lit. No. 68820 1 April 1, 2000
PREFACE
This manual has been prepared to acquaint you with
the safety information, operation and maintenance of
your new hopper spreader. Please read this manual
carefully and follow all recommendations. This will
help ensure profitable and trouble-free operation of
your hopper spreader. Keep this manual accessible. It
is a handy reference in case minor service is required.
When service is necessary, bring your hopper spreader
to your local outlet. They know your spreader best and
are interested in your complete satisfaction.
NOTE: This spreader is designed to spread snow
and ice control materials only. Do not use it for
purposes other than those specified in this
manual.

April 1, 2000 2 Lit. No. 68820
SAFETY INFORMATION
WARNING
Overloading could result in an accident or
damage. Do not exceed GVWR or GAWR
ratings as found on the driver-side door
cornerpost of the vehicle. See Loading Section
to determine maximum volumes of spreading
material.
Before You Begin
• Park the vehicle on a level surface, place shift
lever in PARK or NEUTRAL and set the parking
brake.
NOTE: Identifies tips, helpful hints and
maintenance information the owner/operator
should know.
WARNING
• Driver to keep bystanders minimum of 25 feet
away from operating spreader.
• Before working with the spreader, secure all
loose-fitting clothing and unrestrained hair.
• Before operating the spreader, verify all safety
guards are in place.
• Before servicing the spreader, wait for
conveyor or spinner to stop.
• Do not climb into or ride on spreader.
CAUTION
Indicates a potentially hazardous situation that,
if not avoided, could result in minor personal
injury and/or damage to product or property.
CAUTION
If rear directional, CHMSL light or brake
stoplights are obstructed by the spreader, the
lights shall be relocated, or auxiliary directional
or brake stoplights shall be installed
CAUTION
Disconnect electric power before servicing or
performing maintenance.
WARNING
Indicates a potentially hazardous situation that,
if not avoided, could result in death or personal
injury.
NOTE: Lubricate grease fittings after each use.
Use a low temperature synthetic grease.
CAUTION
DO NOT leave unused material in hopper.
Material can freeze or solidify, causing unit to
not work properly. Empty and clean after each
use.
• Do not operate a spreader in need of
maintenance.
• Before operating the spreader, reassemble any
parts or hardware removed for cleaning or
adjusting.
• Before operating the spreader, remove
materials such as cleaning rags, brushes, and
hand tools from the spreader.
• Before operating the spreader, read the engine
owner’s manual.
• While operating the spreader, use auxiliary
warning lights, except when prohibited by law.
• Tighten all fasteners according to the Torque
Chart. Refer to Torque Chart for the
recommended torque values.
CAUTION
CAUTION
During the hopper spreader installation we
recommend the addition of an OSHA compliant
Backup Alarm. This alarm is required for OSHA
governed employers.

Lit. No. 68820 3 April 1, 2000
SAFETY INFORMATION
When tightening fasteners, refer to Torque Chart for
the recommended fastener values.
Torque Chart
1 - 8 220 583 893
PER INCH
FASTENER TORQUE
7/8 - 9
3/4 - 10
5/8 - 11
9/16 - 12
1/2 - 13
7/16 - 14
3/8 - 16
5/16 - 18
1/4 - 20
DIAMETER-
THREADS
591
370
225
165
115
75
46
28
13
150
150
93
66
378
250
150
110
19
30
45
11
6
31
50
75
18
9
G8
GRADE
(FT-LB)
G2 G5
NC
M 10
M 8
M 6
35
17
7
M 16
M 14
M 12
155
95
60
METRIC GRADE 8.8
CAUTION
Batteries normally produce explosive gases
that can cause personal injury. Therefore, do
not allow flames, sparks, or lit tobacco to come
near battery. When charging or working near a
battery, always cover your face and protect
your eyes, and also provide ventilation.
• Batteries contain sulfuric acid that burns skin,
eyes, and clothing.
• Disconnect the battery before removing or
replacing any electrical components.
WARNING
Gasoline is highly flammable and gasoline
vapor is explosive. Never smoke while working
on vehicle. Keep all open flames away from
gasoline tanks and lines. Wipe up any spilled
gasoline immediately.

April 1, 2000 4 Lit. No. 68820
WARNING CAUTION
WARNINGCAUTION
Gasoline
Warning Label
Warning/Caution Label
WARNINGCAUTION
Warning/Caution Label
SAFETY INFORMATION
Please become familiar with the Warning
and Caution labels on the spreader!
Warning/Caution Label
68595
WARNING CAUTION
DO NOT EXCEED GVWR OR GAWR WITH SPREADER AND LOAD.
TURN OFF SPREADER BEFORE FILLING, ADJUSTING, OR CLEANING.
BYSTANDERS TO STAY A MINIMUM OF 25 FEET AWAY FROM
OPERATING SPREADER.
DO NOT CLIMB INTO OR RIDE ON SPREADER.
KEEP HANDS, FEET, CLOTHING AWAY FROM MOVING CONVEYOR
AND SPINNER.
READ OWNER'S MANUAL AND ENGINE MANUAL BEFORE
OPERATING OR SERVICING SPREADER.
EMPTY AND CLEAN SPREADER AFTER EACH USE.
Gasoline Warning Label
W65097/F9131
WARNING
Gasoline is flammable.
Turn off engine and allow it to cool before filling gas tank.
DO NOT smoke or use open flame within 25 feet of spreader.
Allow spilled gas to evaporate completely before starting engine.
Gasoline engine produces poisonous gases while running.
DO NOT operate in an enclosed area.
Gasoline engine has hot and moving parts that can cause injury. Use care
when working with or near the gasoline engine and its parts.
Shut off engine when not in use, even for short periods of time, to avoid
damage to equipment or property.

Lit. No. 68820 5 April 1, 2000
LOADING
This Manual covers vehicles which have been
recommended for carrying the hopper spreader.
Please see your local dealer for proper vehicle
applications.
Regular Capacity Load Weight
High Capacity Load Weight
32.5
24
12
0.7
Cu. Yd.
2.0
Cu. Yd.
3.3
Cu. Yd.
10 Spreader
8 Spreader
0.5
Cu. Yd.
1.6
Cu. Yd.
2.6
Cu. Yd.
Material Weight
(lb. per cubic yd.)
Fine Salt - Dry 2,025
Coarse Salt – Dry 1,431
Coarse Sand – Dry 2,700
Coarse Sand – Wet 3,240
Cinders 1,080
Material Weights
Certification
NOTE: All new untitled vehicle installations
require National Highway Traffic Safety
Administration (NHTSA) Altered Vehicle
Certification Labeling. Installer to verify struck
load of snow or ice control material does not
exceed vehicle GVWR or GAWR ratings.
WARNING
Overloading could result in an accident or
damage. Do not exceed GVWR or GAWR as
found on the driver-side cornerpost of vehicle.
0.5
Cu. Yd.
1.0
Cu. Yd.
1.8
Cu. Yd.
12
27
19
0.44
Cu. Yd.
.88
Cu. Yd.
1.6
Cu. Yd.
8 Spreader
7 Spreader

April 1, 2000 6 Lit. No. 68820
LOADING
Spreader
Description Overall
Spreader
Length
(inches)
Empty
Weight (lb.)
(No screen
or battery)
Capacity
Struck
(cu. yd.)
Capacity
Rounded
(cu. yd.)
Overall
Width
(inches)
Overall
Height
(inches)
Recom-
mended
Use
Regular Capacity
7’ Hopper Body
16 Gauge Stainless Steel 101 560 1.6 2.1 50-3/4 32-1/2
Regular Capacity
7’ Hopper Body
12 Gauge Mild Steel 101 651 1.6 2.1 50-3/4 32-1/2
3/4 or 1 Ton
Pick-up
Trucks
above 8500
lb. GVWR
Regular Capacity
8’ Hopper Body
16 Gauge Stainless Steel 113 600 1.8 2.3 50-3/4 32-1/2
Regular Capacity
8’ Hopper Body
12 Gauge Mild Steel 113 764 1.8 2.3 50-3/4 32-1/2
3/4 or 1 Ton
Pick-up
Trucks
above 8500
lb. GVWR
High Capacity
8’ Hopper Body
12 Gauge Stainless Steel 113 720 2.6 3.2 58 41
High Capacity
10’ Hopper Body
12 Gauge Stainless Steel 137 984 3.3 4.1 58 41
Dump or
Flat Bed
Trucks
Above
15,000 lb.
GVWR
High Capacity
8’ Hopper Body
12 Gauge Mild Steel 113 786 2.6 3.2 58 41
High Capacity
10’ Hopper Body
12 Gauge Mild Steel 137 870 3.3 4.1 58 41
Dump or
Flat Bed
Trucks
Above
15,000 lb.
GVWR
Regular Capacity - Hyd
8’ Hopper Body
16 Gauge Stainless Steel 113 455 1.8 2.3 50-3/4 32-1/2
Regular Capacity - Hyd
8’ Hopper Body
12 Gauge Mild Steel 113 610 1.8 2.3 50-3/4 32-1/2
3/4 or 1 Ton
Pick-up
Trucks
Above 8500
lb. GVWR
High Capacity – Hyd
8’ Hopper Body
12 Gauge Stainless Steel 113 620 2.6 3.2 58 41
High Capacity – Hyd
10’ Hopper Body
12 Gauge Stainless Steel 137 878 3.3 4.1 58 41
Dump or
Flat Bed
Trucks
Above
15,000 lb.
GVWR
High Capacity - Hyd
8’ Hopper Body
12 Gauge Mild Steel 113 656 2.6 3.2 58 41
High Capacity - Hyd
10’ Hopper Body
12 Gauge Mild Steel 137 734 3.3 4.1 58 41
Dump or
Flat Bed
Trucks
Above
15,000 lb.
GVWR
Spreader Specifications

Lit. No. 68820 7 April 1, 2000
LOADING
1. Install hopper spreader and optional equipment
according to the instructions.
2. Install or attach any other equipment that will be on
the vehicle while the hopper spreader will be in use
(step bumper, trailer hitch, snowplows, etc.). Fill
gas tanks.
3. Obtain the Gross Vehicle Weight Rating (GVWR),
Front Gross Axle Weight Rating (FGAWR), and
Rear Gross Axle Weight Rating (RGAWR) from
the certification label located inside the driver-side
door jam.
4. With the occupants in the truck for normal hopper
spreader operation, weigh the vehicle to obtain
gross vehicle weight (GVW).
WARNING
Overloading could result in an accident or
damage. Do not exceed GVWR or GAWR
ratings as found on the driver-side door
cornerpost of the vehicle. See Loading Section
to determine maximum volumes of spreading
material.
5. Subtract the GVW from the GVWR to determine
the available material payload.
6. Obtain the weight per cubic yard (lb./cu. yd.) of the
desired material. Divide the weight into the
payload to determine the maximum volume of
material that can be carried.
7. Compare the maximum volume to determine the
maximum height of the material in the hopper
spreader.
8. Fill hopper with the material to the calculated
height. Re-weigh vehicle with occupants and verify
the GVW, Front Gross Axle Weight, and Rear
Gross Axle Weight are less than the vehicle’s
ratings.
9. Repeat steps 7 and 8 for each type of material.
Refer to “Determining Vehicle Payload” worksheet for
an example and worksheet.
Determining Vehicle Payload

April 1, 2000 8 Lit. No. 68820
Material Type Example:
Coarse Salt - Dry
Equipment installed when vehicle
was weighed RC Mild Steel 8’
Hopper Spreader
Front Gross Axle Weight Rating
(FGAWR)
Rear Gross Axle Weight Rating
(RGAWR)
Gross Vehicle Weight Rating
(GVWR) (lb.) 8600
Gross Vehicle Weight Rating (lb.)
(empty) - 6500
Payload Available (lb.) = 2100
Material Weight (lb./cu. yd.) + 1431
Maximum Volume
(cu. yd.) = 1.47
Maximum Height (approximate)
(in.) 24”
Loaded Front Gross Axle Weight
(FGAW) (lb.)
Loaded Rear Gross Axle Weight
(RGAW) (lb.)
Loaded Gross Vehicle Weight
(GVW)
Determining Vehicle Payload
LOADING

Lit. No. 68820 9 April 1, 2000
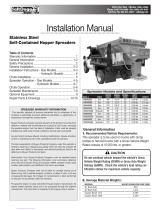
OPERATING THE SPREADER - STANDARD CAB CONTROL
Cab Control Identification
NOTE: The conveyor and spinner will operate
when the clutch switch is in the ON or BLAST
position.
Engine Operation
Refer to above drawing as a reference for starting and
stopping the engine.
Starting the Engine
1. Verify the clutch switch is OFF.
2. Turn the vehicle ignition switch to ON.
3. Turn the spreader ignition switch (labeled “Engine”
on the cab control) to ON.
4. Move the throttle switch to IDLE and hold for two
seconds; release.
5. Move the spreader ignition switch to START.
6. While the engine is cranking, move the throttle
switch to CHOKE/FAST.
7. When the engine starts to fire, move the throttle
switch towards the idle position. The engine will
then start.
NOTE: If the engine does not start after 10
seconds of cranking, turn both vehicle and
spreader ignition switches to OFF and refer to the
engine manual that is shipped with the spreader.
NOTE: Maximum engine speed is obtained just
prior to choking the engine.
8. When the engine starts, release the ignition switch.
9. After the engine starts, move the throttle switch
toward FAST to bring the engine up to maximum
speed. Allow the engine to warm up to proper
operating temperature before attempting to spread.
Stopping the Engine
1. Move the throttle to IDLE and hold for two
seconds.
2. Turn the spreader ignition switch to OFF.
CAUTION
Do not attempt to free the chain by using a pipe
wrench or any other tool on the output shaft of
the gear case. The gear case is designed to
accept torque from the input shaft only.
Attempts to turn the output shaft will strip the
gears and void any warranty.
OFF
ON
START
ON
OFF
BLAST
Clutch Engine Throttle
CHOKE
FAST
IDLE
FUSE
10 A
3-Position
Electric
Clutch
Switch
Spreader
Ignition
Switch
Electric
Throttle
Switch
CAUTION
DO NOT leave unused material in hopper.
Material can freeze or solidify, causing unit to
not work properly. Empty and clean after each
use.
CAUTION
Read Owner’s and Engine Manual before
operating or servicing spreader.
10. To control the engine speed:
•Increase: hold the throttle switch at CHOKE/
FAST.
•Decrease: hold the throttle switch at SLOW.
NOTE: DO NOT hold the throttle switch in the
FAST position until the choke re-engages. The
engine will not run with the choke 100% engaged.
See Choke Adjustment Procedure for instructions
for tuning the maximum choke point.

April 1, 2000 10 Lit. No. 68820
Cab Control Identification
NOTE: The conveyor and spinner will operate
when the spinner switch is in the ON or BLAST
position.
Engine Operation
Refer to above drawing as a reference for starting and
stopping the engine.
Starting the Engine
1. Turn the vehicle ignition switch to ON.
2. Verify the spinner switch is OFF.
3. Move the spreader ignition switch to START.
4. While the engine is cranking, move the throttle
switch to CHOKE/FAST. (Choke light will come on
when the choke begins to close. Hold in FAST for
1/2 second after light comes on.)
5. When the engine starts to fire, move the throttle
switch towards the SLOW position. The engine
will then start.
NOTE: If the engine does not start after 10
seconds of cranking, turn both vehicle and
spreader ignition switches to OFF and see the
engine manual that is shipped with the spreader.
NOTE: Maximum engine speed is obtained just
prior to choking the engine.
6. When the engine starts, release the ignition switch.
7. After the engine starts, move the throttle switch
toward FAST to bring the engine up to maximum
speed. Allow the engine to warm up to proper
operating temperature before attempting to spread.
Stopping the Engine
1. Move the throttle to SLOW and hold for two
seconds.
2. Turn the spreader ignition switch to OFF.
CAUTION
Do not attempt to free the chain by using a pipe
wrench or any other tool on the output shaft of
the gear case. The gear case is designed to
accept torque from the input shaft only.
Attempts to turn the output shaft will strip the
gears and void any warranty.
OPERATING THE SPREADER - PREMIUM CAB CONTROL
SPINNER START CHOKE
ON
OFF
BLAST
ON
OFF
E
N
G
I
N
E
F
S
Electric
Clutch
Switch
Spreader
Ignition
Switch
Electric
Throttle
Switch
Choke
Light
CAUTION
DO NOT leave unused material in hopper.
Material can freeze or solidify, causing unit to
not work properly. Empty and clean after each
use.
CAUTION
Read Owner’s and Engine Manual before
operating or servicing spreader.
NOTE: DO NOT hold the throttle switch in the
FAST position until the choke re-engages. The
engine will not run with the choke 100% engaged.
See Choke Adjustment Procedure for instructions
for tuning the maximum choke point.
8. To control the engine speed:
•Increase: hold the throttle switch at CHOKE/
FAST. Do not operate engine with choke light on.
•Decrease: hold the throttle switch at SLOW.

Lit. No. 68820 11 April 1, 2000
OPERATING THE SPREADER
Clutch Operation
1. Start the engine.
2. Adjust the speed to slightly above idle.
3. Move the clutch switch to ON.
4. Increase the engine speed to the desired RPM.
Baffle Adjustment
Spread pattern and the amount of material dispensed
depends on engine RPM, gate position, and baffle
settings.
•Decreasing RPM and/or gate-opening will
decrease the amount of material coming to the
spinner.
•Increasing RPM and/or gate-opening will increase
the amount of material coming to the spinner.
CAUTION
To prevent premature spinner chain failure and
chain tension loss, engage the electric clutch
at the lowest possible RPM without stopping
the engine.
Choke Adjustment Procedure
1. The choke linkage and choke adjustment screw is
shipped from the factory with the choke butterfly
set to 75% fully closed choke.
2. With the choke set at 100% the engine will not stay
running in the choked position. This position is for
extremely cold conditions. Throttle linkage travel
from 0% to 100% choke is 3/16”. Four and one-half
turns of the Choke Adjustment Screw (clockwise
when viewed from above the engine) will take the
maximum choke setting from fully closed to fully
open (no choking at all).
3. To adjust your choke setting loosen the adjustment
retainer screw and rotate the Choke Adjustment
Screw clockwise one full turn (scratch a mark on
the knob to indicate postion). This will generally
allow the engine to run very roughly with the
throttle linkage at maximum choke. This is
approximately the equivalent of 75% fully closed
choke. (This is the factory setting.)
4. Additional adjustments can be made by 1/4 turn
increments until you reach the desired start/run in
choke setting of your preference/need.
Driver-side
Internal Baffle
and Control
Driver-side
External Baffle Rear External
Baffle
Choke Butterfly
Choke Adjustment
Screw
Retainer Screw
100%
0%
3/16" Max.
Adjustment

April 1, 2000 12 Lit. No. 68820
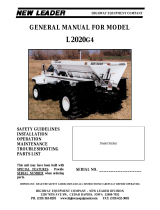
OPERATING THE SPREADER
Both internal baffles out
Driver-side baffle in, curb-side baffle out
Driver-side baffle out, curb-side baffle in
All baffles adjusted down for a confined
spread pattern
Curb-side baffle deflects material down;
heavy on curb side
Driver-side baffle deflects material down;
heavy on driver side
These figures are as viewed from the top of the
spinner looking down.
Spread Patterns
Internal Baffles External Baffles

Lit. No. 68820 13 April 1, 2000
MAINTENANCE
Grease
CAUTION
Over-greasing may cause seal damage. The
gear case must be filled to the oil-level plug
with SAE 90 gear-type lubricant. Keep the
breather plug clean.
CAUTION
Over-tightening the roller chains may damage
the bearings on the gear case, the engine, and/
or the spinner shaft. Over-tightening will also
shorten the life of the roller chain and of the
sprockets.
•Use dielectric grease on all electrical connections
at the beginning and end of each season, and as
required during the season.
•After every 10 hours of operation, grease the idler
bearings on the idler shaft, flanged bearings on the
drive shaft and the input shaft above the gearcase,
and the spinner shaft bearings.
•After every 50 hours of operation, grease the input
shaft bearing on the gear case and verify the oil
level of the gear case is level with the fill hole.
•Change gear case oil once a year. Drain oil by
removing the side cover of the gear case. Refill
with SAE 90 weight gear oil. Oil level should be
even with the bottom of the fill hole.
Chains
•At the beginning of each season, and once a
month during the season, verify the drive sprocket
and spinner sprocket set screws are tight.
•Maintain spinner shaft-to-gear case roller chain
tension. Correct chain tension allows 5/16”
deflection midway between the sprockets.
To increase chain tension: loosen the bearing
mounting hardware and pull the spinner shaft away
from the gear case. Make sure the spinner shaft is
vertical and the sprockets are lined up before re-
tightening the fasteners. Oil this chain after each
use and at the end of each season.
•Maintain engine-to-electric clutch roller chain
tension. Correct tension allows 5/16” deflection
midway between the sprockets.
To increase chain tension: loosen the four
engine mount-to-engine base bolts and pull the
engine away from the electric clutch. Re-tighten
bolts. Oil this chain after each use and at the end
of each season.
5/16
Deflection
5/16
Deflection

April 1, 2000 14 Lit. No. 68820
MAINTENANCE
Engine Service and Repair
Maintain the spreader engine according to the engine
Owner’s Manual that is shipped with the spreader.
Engine warranty is covered by the engine manufacturer
and is described in the engine manual.
If service or repair is needed, contact an authorized
engine manufacturer service center. To serve you
promptly, the service center will need the make, model,
type, and code number for your engine.
Your nearest service center is listed in the “Yellow
Pages” under “Engines, Gasoline” or “Gasoline
Engines.”
•Periodically check the conveyor chain tension.
To check the tension, measure in 20”-24” from the
rear edge of the sills. Push up on the chain with
your hand. The conveyor chain should lift up 1”-3”
off the conveyor chain guide or cross angles.
Conveyor
Chain Rear Edge
of Sill
1 - 3
20 - 24
•Use the two 5/8” x 6” take-up bolts at the front of
the spreader to adjust the conveyor chain tension.
Turn both sides equal amounts to ensure the
tension is equally distributed across both sides of
the conveyor chain.
•Always empty the spreader when it is not in use to
prevent a frozen conveyor chain.
Electric Clutch
To minimize problems and extend the life of the electric
clutch, do the following:
•At the end of each snow season, remove and
clean the clutch.
•After cleaning the clutch, coat both mating
surfaces of the clutch with oil or light grease.
•Remove oil and grease prior to using the clutch
again.
Fuel Filter Replacement
Replace the fuel filter before each season.
1. Remove clamps from existing fuel filter.
2. Remove existing fuel filter.
3. Install new filter with arrow pointing toward
carburetor.
4. Replace and tighten clamps
5. Check for fuel leaks.
NOTE: The maximum choke point of the
Tecumseh Engine is adjustable. The unit is
shipped with the choke adjusted to be 75%
closed. See Choke Adjustment Procedure for
adjustment instructions.

Lit. No. 68820 15 April 1, 2000
HYDRAULIC HOPPER SPREADER MAINTENANCE
Hydraulic Hopper Spreaders
1. Check hydraulic fluid level before every use. Add
fluid as required.
2. Periodically inspect the hoses and fittings for
damage and possible leaks.
3. Change the hydraulic fluid after the first 50 hours
of operation of a new unit.
4. Reservoir should be drained through the drain
plug only, NOT through the suction outlet.
•Flush and refill reservoir annually, or sooner if fluid
shows signs of break-down or contamination.
•The use of proper hydraulic fluid in the system is
critical to satisfactory performance. Only clean,
new hydraulic fluid, of the proper type and
viscosity, should be used.
•Keep all hydraulic fluids in original containers.
Use only clean measuring containers and funnels
when pouring fluids. Keep all containers closed
when not in use.
To keep your spreader functioning properly, observe
the following recommendations:
After each use:
•Wash out hopper and rinse off all external
surfaces.
•Apply dielectric grease to all electrical connections
to prevent corrosion.
•Lubricate all grease fittings.
At the end of each season:
•Wash out hopper and all external surfaces.
•Apply dielectric grease to all electrical connections
to prevent corrosion.
•Lubricate all grease fittings.
•Oil or paint all bare metal surfaces.
PROBLEM CORRECTION
1. Unit speed does not increase with the dial
setting.
2. Unit stalls under load.
3. Unit speed fluctuates momentarily when control
is first turned on.
4. Pump blows seals at start up.
A. Increase the truck engine speed.
B. Check condition of pump.
C. Check for adequate PTO percent.
Check circuit pressure. 900-1200 PSI maximum
with relief valve lifting at 1500 PSI.
A. Oil is cold. Wait until oil has warmed up.
B. Change to lighter weight oil.
Pump installed backwards. Replace seals and
reverse pump in driveline. (Note arrow on pump.)
CAUTION
Always disconnect electric power before
servicing or performing any maintenance.

April 1, 2000 16 Lit. No. 68820
WIRING DIAGRAM (SPREADER BATTERY KIT)
Vehicle Side Wiring Harness
Spreader Side Wiring Harness
Spreader
Control
Spreader
Battery
+_
Clutch
Throttle
Starter
Solenoid
Stoplight
(Optional)
Red
To
Switched
Accessory
Circuit
Green (Standard Cab Control)
Orange
To
Brake
Light
Circuit
Engine
Red
Brown
Green
Orange
Gray
Black
White
Red
Choke
Switch
(if equipped)
Green
Green
Black (Premium Cab Control)
Not
Used
/