
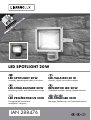
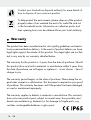
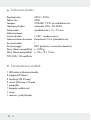
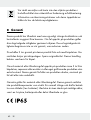
IAN 288476
LED SPOTLIGHT 20 W
LED-STRAHLER 20 W
Montage-, Bedienungs- und Sicherheitshinweise
LED SPOTLIGHT 20 W
Assembly, operating and safety instructions
REFLEKTOR LED 20 W
Wskazówki montażu, obsługi i bezpieczeństwa
LED-VALAISIN 20 W
Asennus-, käyttö- ja turvallisuusohjeet
LED-STRÅLKASTARE 20 W
Monterings-, bruks- och säkerhetsanvisningar
LED PROŽEKTORIUS 20 W
Nurodymai dėl montavimo,
naudojimo ir saugumo

GB Assembly, operating and safety instructions Page 5
FI Asennus-, käyttö- ja turvallisuusohjeet Sivu 17
SE Monterings-, bruks- och säkerhetsanvisningar Sidan 29
PL Wskazówki montażu, obsługi i bezpieczeństwa Strona 41
LT Nurodymai dėl montavimo, naudojimo ir saugumo Puslapis 54
DE / AT / CH Montage-, Bedienungs- und Sicherheitshinweise Seite 67

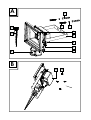
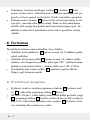
A
5
6
11
10
8
4
23
1
B
6
9
7
12

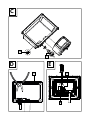
E
15
C
D
14
13
16
17

5 GB
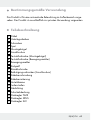
List of pictograms used .................................................. Page 6
Introduction ............................................................................. Page 6
Intended use ..................................................................................Page 7
Parts description ............................................................................Page 7
Technical data ............................................................................... Page 8
Scope of delivery ..........................................................................Page 8
General safety instructions ........................................Page 9
Before installation .............................................................Page 10
Installation ...............................................................................Page 11
Connecting the product ................................................................Page 11
Wall Mounting ..............................................................................Page 12
Mounting with ground stake ........................................................Page 12
Start-up .......................................................................................Page 13
Adjusting the motion detector.......................................................Page 13
Setting the lighting duration ..........................................................Page 13
Adjusting the sensitivity of the sensor ........................................... Page 14
Setting the daylight level ..............................................................Page 14
Aligning the motion detector ........................................................Page 14
Cleaning and Care .............................................................Page 15
Disposal ......................................................................................Page 15
Warranty ................................................................................... Page 16

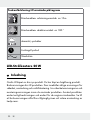
6 GB
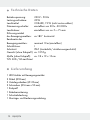
List of pictograms used
Motion detector detection range: approx.10 m
Detection angle of motion detector: approx. 180 °
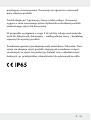
dust / splash-proof
LED lifespan
Alternating current
LED spotlight 20 W
Introduction
We congratulate you on the purchase of your new product. You have
chosen a high quality product. The instructions for use are part of the
product. They contain important information concerning safety, use and dis-
posal. Before using the product, please familiarise yourself with all of the
safety information and instructions for use. Only use the product as described
and for the specified applications. If you pass the product on to anyone
else, please ensure that you also pass on all the documentation with it.

7 GB
Intended use
The product is intended for automatic lighting in outdoor areas. This product
is solely intended for private use.
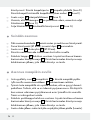
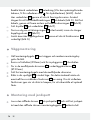
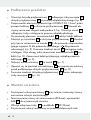
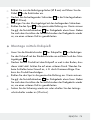
Parts description
1 Wall plug
2 Washers
3 Screws
4 Spotlight
5 Mounting bracket
6 Connection box
7 Locking screw (mounting bracket)
8 Locking screw (motion detector)
9 Motion detector
10 Ground stake
11 Knurled screw
12 Fixing screws (connection box)
13 Cable gland
14 Cord anchorage
15 Terminal block
16 Insulation strip
17 Seal ring
18 Protection plastic cover
19 TIME rotary control
20 SENS rotary control
21 LUX rotary control

8 GB
Technical data
Operating voltage: 230 V∼ 50 Hz
Total power consumption: 20 W
Illuminant: COB-LED, 19 W (non-replaceable)
Twilight-switch: adjustable between 20 lx – 20,000 lx
Lighting duration: adjustable between approx. 5 s–7½ min
Coverage angle
of motion detector: approx.180° horizontal
Reach of the motion detector: maximum 10 m (adjustable)
Protection class: I
Protection type: IP65 (dust / splash-proof)
Weight (without ground stake): approx. 1055 g
Dimension (without
ground stake): approx. 18 x 19 x 10 cm
TÜV SÜD / GS certified.
Scope of delivery
1 LED spotlight with motion detector
2 Wall plugs (Ø 8 mm)
2 Washers (Ø 20 mm)
2 Screws (Ø 6 mm x 50 mm)
1 Ground stake
1 Cord anchorage
1 Protection plastic cover
1 Set of mounting and operating instructions

9 GB
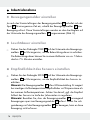
General safety instructions
Before using the product, please familiarise yourself with all of the safety
information and instructions for use! When passing this product on to others,
please also include all the documents!
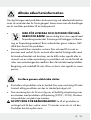
DANGER TO LIFE AND ACCIDENT HAZARD FOR
TODDLERS AND SMALL CHILDREN! Never leave
children unattended with the packaging material. The
packaging material represents a danger of suffocation. Children fre-
quently underestimate the dangers. Please keep the product out of the
reach of children at all times.
This product may be used by children age 8 years and up, as well as
by persons with reduced physical, sensory or mental capacities, or
lacking experience and / or knowledge, so long as they are supervised
or instructed in the safe use of the product and understand the associ-
ated risks. Children should not be allowed to play with the product.
Cleaning and user maintenance should not be performed by children
without supervision.
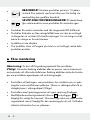
Danger to life by electric shock
Always check the product for damage before connecting it to the
mains. Never use the product if it shows any signs of damage.
Prior to installation, verify that the mains voltage on site corresponds
with the operating voltage required for the product (230 V∼ 50 Hz).
Otherwise do not install the product.
CAUTION! DANGER OF BURN INJURIES! To prevent burns,
verify the product is switched off and has cooled down for at least
15 min before touching it. The product can become very hot.

10 GB
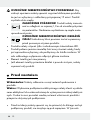
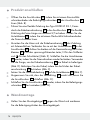
1 .0 m
FIRE HAZARD! Fit the product so that it is at least 1.0 m
away from the material to be illuminated. Excessive heat
can result in a fire.
CAUTION! RISK OF INJURY! Broken lamp glass must
be replaced before any further use of the product.
The product is only suited for use with the built-in LED control gear.
The product continues to draw a small amount of power even if the
lamp is off as long as product is connected to supply mains. To switch
the product off completely, the mains switch should be switched off.
The illuminant is not replaceable.
If the illuminant fails at the end of its life, the entire product must be
replaced.
Before installation
Note: Remove all packaging materials from the product.
Important: The electrical connection must be established by a qualified
electrician or a person trained to perform electrical installations. This person
must be familiar with the properties of the product and the connection
regulations.
Before installation, make sure that no voltage is present on the supply
line to which the product will be connected. To do so, remove the fuse
or switch off the circuit breaker in the fuse box (0 position).
Use the voltage tester to verify the de-energised status.
The included mounting material (screws 3 and wall plugs 1) is suit-
able for ordinary solid concrete or masonry construction. Check which
mounting material is suitable for your chosen mounting surface. If nec-
essary, seek expert advice.

11 GB
The included ground stake 10 is suitable for mounting in soil (e.g. lawn
or flower bed). The soil must be soft enough to push the ground stake
in without applying force (e.g. hammer strike), but must be firm enough
at the same time to ensure the product is securely fixed.
Installation
When selecting the mounting location, pay attention to the following:
Make sure that the spotlight 4 illuminates the desired area. You can
move the spotlight vertically.
Make sure the motion detector 9 covers the desired area. The motion
detector has a maximum coverage range of 10 m, with a coverage
angle of about 180 ° (depending on the mounting height – a height
of 1.80–2.50 m is ideal).
Make sure the motion detector 9 is not illuminated at night by street
lighting. This can influence its functioning.
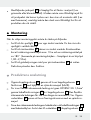
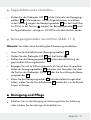
Connecting the product
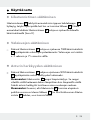
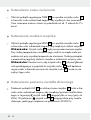
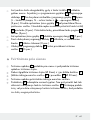
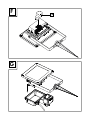
Open the connection box 6 by using a crosshead screw driver to
loosen the fixing screws 12 of the connection box 6 (Fig. B).
Run the flexible cord, type H05RN-F 3G 1.0 mm2 , through the cable
gland 13 and into the connection box 6. The length for the flexible
cord should not exceed 2.5 m. Open the terminal block 15 by using a
slot head screw driver to loosen the fixing screws.
Attach ferrules and cord anchorage 14 to the wires of the cord. Connect
them with the terminal block 15 in the connection box 6. Pay attention
to the markings on the terminal block 15 (L for live, N for neutral and
for the earth wire) (Fig. E). Close the terminal block 15 again by

12 GB
fastening the fixing screws. Use the pliers to tighten the cord anchorage
14 on the cord (Fig. D). Fix the cord by turning the nut of the cable
gland 13 (Fig. E).
Place the protection plastic cover 18 on the terminal block 15 (Fig. F).
Make sure the seal ring 17 is correctly fit on the connection box 6
before close (Fig. D).
Close the connection box 6 again by fastening the fixing screws 12
(Fig. G).
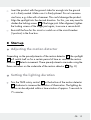
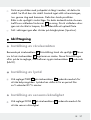
Wall Mounting
Place the mounting bracket 5 on the wall and mark the fastening holes
for the mounting bracket.
Now drill the fastening holes (Ø 8 mm) and push the wall plugs 1 into
the drill holes.
Insert the included screws 3 into the washers 2 (Ø 20 mm).
Fix the mounting bracket on the wall using the screws provided.
Align the spotlight 4 into the desired direction. For this, you may need
to slacken the locking screws 7 of the hinge joint. After alignment,
tighten the locking screws of the hinge joint again, to ensure a secure
hold.
Mounting with ground stake
Loosen the knurled screws 11 of the ground stake 10 and secure the
ground stake, using the knurled screw, onto the middle hole of the
mounting bracket 5.

13 GB
Insert the product with the ground stake far enough into the ground
so it is firmly seated. Make sure it is firmly placed. Do not use exces-
sive force, e.g. strike with a hammer. This could damage the product.
Align the spotlight into the desired direction. For this, you may need to
slacken the locking screws 7 of the hinge joint. After alignment, tighten
the locking screws of the hinge joint again, to ensure a secure hold.
Re-install the fuse for this circuit or switch on at the circuit breaker
(I position) in the fuse box.
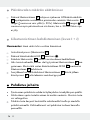
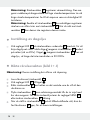
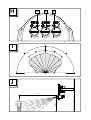
Start-up
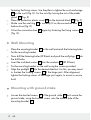
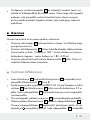
Adjusting the motion detector
Depending on the pre-adjustments of the motion detector 9, the spotlight
4 will switch itself on for a certain period of time as soon as the motion
detector 9 detects movement. These pre-adjustments are made using the
three controllers on the underside of the motion detector 9 (Fig. H).
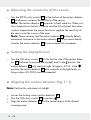
Setting the lighting duration
Turn the TIME rotary control 19 on the bottom of the motion detector
9 clockwise to increase the duration of illumination. The lighting du-
ration can be adjusted within a time window of approx. 5 seconds to
7½ minutes.

14 GB
Adjusting the sensitivity of the sensor
Turn the SENS rotary control 20 on the bottom of the motion detector
9 clockwise to increase the sensitivity of the sensor.
Note: The motion detector 9 responds to heat radiation. When out-
door temperatures are low, it is more sensitive to body heat than when
outdoor temperatures are warm. Be sure to regulate the sensitivity of
the sensor over the course of the year.
Note: Please observe that the motion detector 9 primarily detects
movements transverse to the motion detector 9. If you move directly
towards the motion detector 9, it cannot detect this movement.
Setting the daylight level
Turn the LUX rotary control 21 on the bottom side of the motion detec-
tor 9 clockwise to increase the daylight level: In the position, the
motion detector 9 only reacts at night (at approx. 20 lx). In the
position, the motion detector 9 also responds at daylight levels, as
long as about 20,000lx are not exceeded.
Aligning the motion detector (Fig. I + J)
Note: Perform this adjustment at twilight.
Loosen the locking screw (motion detector) 8.
Turn the LUX rotary control 21 to position .
Align the motion detector 9 into the central region of the desired
coverage area.

15 GB
Move about through the coverage area until you are satisfied with the
response characteristics of the motion detector 9. To find the proper
orientation, change the position of the SENS rotary control 20 or the
orientation of the motion detector 9.
When you have aligned the motion detector 9 satisfactorily, re-tighten
the locking screws 8 to fix the adjustment.
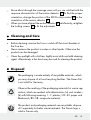
Cleaning and Care
Before cleaning, remove the fuse or switch off the circuit breaker at
the fuse box.
Never immerse the product in water or other liquids. Otherwise the
product can be damaged.
Clean the spotlight with a lint-free, slightly moist cloth and mild cleaning
agent. Alternatively, a thin brush may be used for cleaning the product.
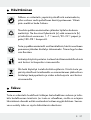
Disposal
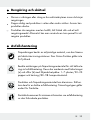
The packaging is made entirely of recyclable materials, which
you may dispose of at local recycling facilities. The Green Dot
is not valid for Germany.
b
a
Observe the marking of the packaging materials for waste sep-
aration, which are marked with abbreviations (a) and numbers
(b) with following meaning: 1–7: plastics / 20–22: paper and
fibreboard / 80–98: composite materials.
The product and packaging materials are recyclable, dispose
of it separately for better waste treatment. The Triman logo is
valid in France only.

16 GB
Contact your local refuse disposal authority for more details of
how to dispose of your worn-out product.
To help protect the environment, please dispose of the product
properly when it has reached the end of its useful life and not
in the household waste. Information on collection points and
their opening hours can be obtained from your local authority.
Warranty
The product has been manufactured to strict quality guidelines and meticu-
lously examined before delivery. In the event of product defects you have
legal rights against the retailer of this product. Your legal rights are not limi-
ted in any way by our warranty detailed below.
The warranty for this product is 3 years from the date of purchase. Should
this product show any fault in materials or manufacture within 3 years from
the date of purchase, we will repair or replace it – at our choice – free of
charge to you.
The warranty period begins on the date of purchase. Please keep the ori-
ginal sales receipt in a safe location. This document is required as your proof
of purchase. This warranty becomes void if the product has been damaged,
or used or maintained improperly.
The warranty applies to defects in material or manufacture. This warranty
does not cover product parts subject to normal wear, thus possibly consi-
dered consumables (e.g. batteries) or for damage to fragile parts, e.g.
switches, rechargeable batteries or glass parts.

17 FI
Merkkien selitykset ........................................................... Sivu 18
Yleistä ............................................................................................Sivu 18
Määräystenmukainen käyttö .........................................................Sivu 19
Osien kuvaus ..................................................................................Sivu 19
Tekniset tiedot .................................................................................Sivu 20
Toimituksen sisältö ..........................................................................Sivu 20
Yleiset turvallisuusohjeet .............................................Sivu 21
Ennen asennusta .................................................................. Sivu 22
Asennus .......................................................................................Sivu 23
Tuotteen liittäminen ........................................................................Sivu 23
Seinään asennus ............................................................................ Sivu 24
Asennus maapiikin avulla ..............................................................Sivu 24
Käyttöönotto ........................................................................... Sivu 25
Liiketunnistimen säätäminen...........................................................Sivu 25
Valaisuajan säätäminen ................................................................Sivu 25
Anturin herkkyyden säätäminen ....................................................Sivu 25
Päivänvalon määrän säätäminen..................................................Sivu 26
Liiketunnistimen kohdistaminen ......................................................Sivu 26
Puhdistus ja hoito ................................................................Sivu 26
Hävittäminen .......................................................................... Sivu 27
Takuu .............................................................................................Sivu 27

18 FI
Merkkien selitykset
Liiketunnistimen tunnistusalue: n. 10 m
Liiketunnistimen tunnistuskulma: 180 °
pölytiivis / vesisuihkun kestävä
Ledin käyttöikä
Vaihtovirta
LED-Valaisin 20 W
Yleistä
Onnittelemme sinua uuden tuotteen hankinnasta. Valitsit erittäin korkea-
laatuisen tuotteen. Käyttöohje on osa tätä tuotetta. Se sisältää tärkeitä tur-
vallisuusohjeita sekä käyttöä ja hävitystä koskevia ohjeita. Tutustu ennen
tuotteen käyttöä huolellisesti kaikkiin käyttöja turvallisuusohjeisiin. Käytä
tuotetta ainoastaan ohjeen mukaan ja siinä mainittuihin tarkoituksiin. Anna
kaikki ohjeet mukaan, jos luovutat tuotteen edelleen.

19 FI
Määräystenmukainen käyttö
Tuote on tarkoitettu ulkotilojen automaattiseen valaisuun. Tuote on tarkoi-
tettu ainoastaan yksityiskäyttöön.
Osien kuvaus
1 Tulppa
2 Aluslevyt
3 Ruuvit
4 Kohdelamppu
5 Asennuskannake
6 Liitäntärasia
7 Kiinnitysruuvi (asennuskannake)
8 Kiinnitysruuvi (liiketunnistin)
9 Liiketunnistin
10 Maapiikki
11 Pyälletty ruuvi
12 Kiinnitysruuvit (liitäntärasia)
13 Kaapelin ruuvikiinnitys
14 Kaapelin ankkurointi
15 Sokeripalaliitin
16 Eristysliuska
17 Tiivisterengas
18 Suojus
19 TIME-kääntösäädin
20 SENS-kääntösäädin
21 LUX-kääntösäädin

20 FI
Tekniset tiedot
Käyttöjännite: 230 V∼ 50 Hz
Tehon otto: 20 W
Lamppu: COB-LED, 19 W (ei vaihdettavissa)
Himmennyskytkin: säätöalue 20 lx –20.000 lx
Valaisuaika: säädettävissä n. 5 s–7½ min
Liiketunnistimen
tunnistuskulma: n.180 ° vaakasuorassa
Liiketunnistimen kantama: korkeintaan 10 m (säädettävissä)
Suojausluokka: I
Suojaustyyppi: IP65 (pölytiivis / vesiruiskun kestävä)
Paino (ilman maapiikkiä): n. 1055 g
Mitat (ilman maapiikkiä): n. 18 x 19 x 10 cm
TÜV SÜD- / GS-sertifioitu
Toimituksen sisältö
1 LED-valaisin liiketunnistimella
2 tulppaa (Ø 8 mm)
2 aluslevyä (Ø 20 mm)
2 ruuvia (Ø 6 mm x 50 mm)
1 maapiikki
1 kaapelin ankkurointi
1 suojus
1 asennus- ja käyttöohje
Page is loading ...
Page is loading ...
Page is loading ...
Page is loading ...
Page is loading ...
Page is loading ...
Page is loading ...
Page is loading ...
Page is loading ...
Page is loading ...
Page is loading ...
Page is loading ...
Page is loading ...
Page is loading ...
Page is loading ...
Page is loading ...
Page is loading ...
Page is loading ...
Page is loading ...
Page is loading ...
Page is loading ...
Page is loading ...
Page is loading ...
Page is loading ...
Page is loading ...
Page is loading ...
Page is loading ...
Page is loading ...
Page is loading ...
Page is loading ...
Page is loading ...
Page is loading ...
Page is loading ...
Page is loading ...
Page is loading ...
Page is loading ...
Page is loading ...
Page is loading ...
Page is loading ...
Page is loading ...
Page is loading ...
Page is loading ...
Page is loading ...
Page is loading ...
Page is loading ...
Page is loading ...
Page is loading ...
Page is loading ...
Page is loading ...
Page is loading ...
Page is loading ...
Page is loading ...
Page is loading ...
Page is loading ...
Page is loading ...
Page is loading ...
Page is loading ...
Page is loading ...
Page is loading ...
Page is loading ...
Page is loading ...
Page is loading ...
-
 1
1
-
 2
2
-
 3
3
-
 4
4
-
 5
5
-
 6
6
-
 7
7
-
 8
8
-
 9
9
-
 10
10
-
 11
11
-
 12
12
-
 13
13
-
 14
14
-
 15
15
-
 16
16
-
 17
17
-
 18
18
-
 19
19
-
 20
20
-
 21
21
-
 22
22
-
 23
23
-
 24
24
-
 25
25
-
 26
26
-
 27
27
-
 28
28
-
 29
29
-
 30
30
-
 31
31
-
 32
32
-
 33
33
-
 34
34
-
 35
35
-
 36
36
-
 37
37
-
 38
38
-
 39
39
-
 40
40
-
 41
41
-
 42
42
-
 43
43
-
 44
44
-
 45
45
-
 46
46
-
 47
47
-
 48
48
-
 49
49
-
 50
50
-
 51
51
-
 52
52
-
 53
53
-
 54
54
-
 55
55
-
 56
56
-
 57
57
-
 58
58
-
 59
59
-
 60
60
-
 61
61
-
 62
62
-
 63
63
-
 64
64
-
 65
65
-
 66
66
-
 67
67
-
 68
68
-
 69
69
-
 70
70
-
 71
71
-
 72
72
-
 73
73
-
 74
74
-
 75
75
-
 76
76
-
 77
77
-
 78
78
-
 79
79
-
 80
80
-
 81
81
-
 82
82


Ask a question and I''ll find the answer in the document
Finding information in a document is now easier with AI
in other languages
- Deutsch: LIVARNO 288476 Bedienungsanleitung
- polski: LIVARNO 288476 Instrukcja obsługi
- eesti: LIVARNO 288476 Omaniku manuaal
- svenska: LIVARNO 288476 Bruksanvisning
Related papers
Other documents
-
NOCH Batterie-Anschluss für beleuchtete Weihnachtsbäume Operating instructions
-
Nexa ZMD-107 Owner's manual
-
North Light Väggbelysning solcell Owner's manual
-
 CRX CRX3325 User manual
-
 NITEforce EZmail 20MP User manual
-
Nexa MIMST-1703 User manual
-
Brennenstuhl SV5405 Operating instructions
-
 CRX CRX3312 User manual
-
NITEforce Mini User manual
-
Melissa 677-002 User manual


