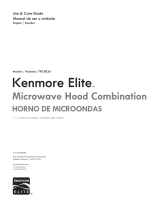
Control panel features
1. Display. Thisdisplay includesa clockand
indicatorsto tell you the timeofday, cooking
time settings,and cooking functions youchose.
2. POPCORN. Touchthis pad when poppingpop.
corn in yourmicrowaveoven. The ovenwill
automatically heat for a preset timeat a preset
cook power.See page 31 for more information.
3. BEVERAGE. Touchthispad to heat t or 2 cups
of a beverage.The oven willautomaticallyheat
for a presettime at a presetcook power. See
page 32 for more information.
4. BAKED POTATO. Touchthis pad tocook 1 to 4
potatoes. The oven willautomatically cookfor a
preset timeat a preset cook power.See page 33
for more information.
5. FROZEN VEGETABLE. Touchthis pad tocook
1 to4 cups ofa frozenvegetable. The oven will
automaticallycookfor a preset timeat a preset
cook power. See page 34 for more information.
6. FROZEN ENTREE. Touchthis padto cook a
10- or 20-ouncefrozen entree.The oven will
automaticallycookfor a preset timeat a preset
cook power. See page 35 for more information.
7. HOLD WARM. Touchthispad to keephot,
cooked foods safelywarm in yourmicrowave
ovenfor up to 99 minutes,99 seconds. HOLD
WARM can be used byitself, or itcan auto-
matically follow a cooking cycle. See page 36
for more information.
8. AUTO COOK. Touchthis pad to cook
mierowavable foods withoutentering timesand
cook powers. See page 26 for more information.
9. AUTO DEFROST. Touchthis padto defrost
frozen foods withoutenteringtimesand cook
powers. See page 28 for more information.
10. AUTO REHEAT. Touchthis pad to reheat
microwavable foods withoutenteringtimesand
cook powers. See page 27 for more information.
11. ADD ONE MINUTE. Touchthis pad tocookfor
1 minute, at 100% cook power, or toadd an
extra minutetoyourcookingcycleat theset
cook power. See page 20 for more information.
12. CLOCK. Touchthis pad to enterthe correct
time ofday. See page 18 for more information.
13. KITCHEN TIMER. Touchthispad to set the
Kitchen"13mer.See page 19 for more information.
14. Number pads. TouchNumberpads to enter
cooking times, cook powers, quantities,
weights,or food categories.
15. COOK TIME. Touchthis pad followed by Number
pads toset a cookingtime. See pages 21, 22,
and 24 for more information.
®
16. POWER. Touchthispad afterthe cooking time
has been set, followed bya Number pad toset
the amount of microwaveenergyreleased to
cook the food. Alsotouchthis padto lengthen
or shortena presetcooking time. See pages 20
and 22 for more information.
17. TURNTABLE ON/OFF. Touchthispad toturn
yourturntableon and off. See page 15 for more
information.
18. START/ENTER. Touchthis pad tostarta
function.See page 14 for more information.
19. OFF/CANCEL Touchthispad to erase an
incorrectcommand, cancel a programduring
cooking, or toclear the display.See page 14 for
more information.
20. EXHAUST FAN HIGN/LOWIOFF. Touchthis pad
totum on the fan at highor low speed.Alsouse
itto turnthe fanoff. See page 17 for more
information.
21. UGHT ON/NIGHTIOFR Touchthis pad to tum
the lightor nightlighton or off.See page 17 for
more information.
€onUnued on next page
13