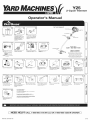
ACE 7219363 Owner's manual
- Category
- Grass trimmers
- Type
- Owner's manual
This manual is also suitable for

®
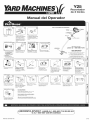
Y25
2-Cycle Trimmer
Operator'
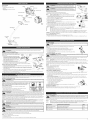
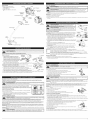
RemovingUnitFromCarton
Remove all contents from
carton.
AssembleThe Unit
Bracket
]
L
]
No Tools Required!
Starter Rope
On/Off Switch
Slide shield's slot onto
mounting bracket. Rotate
shield onto shaft. Push
square bolt through shield
and bracket. Tighten
washer and wing nut
onto bolt.
Put D-handle on shaft. Move
handle a minimum 6 inches
away from shaft grip. Insert
clamp bolt and tighten the
wing nut.
D-Handle
Throttle Control
AssembleThe Unit
f
1 Gallon 3.2 oz
1 J
E]
Mix thoroughly in separate
fuel can:
- 3.2 ft. oz. of 2-cycle
engine oil
- 1 galmon of unleaded
gasoline
NOTE: Do not mix directly in
fuel tank.
Place unit on a level
surface. Fill fuel tank.
]
Starting The Unit
_rimer '=fr ACL" L
Bu_ ......
]
10X
Press primer bulb 10 times,
or until fuel is visible
1--
ChokeLever i
Move choke lever to
Position 1.
]
Need Help?
Call 1-800-800-7310
DIDN'T START?
Repeat these instructions.
IF engine fails to start after2 attempts,
move choke lever to position 3 and pull
the starter rope until engine starts
IF unit still fails to start, refer to the
operator's manual for additional starting
and troubleshooting information
Starting The Unit
[--1
Crouch in starting position.
SQUEEZE and HOLD
throttle for ALL further
steps.
Pull rope 5 times.
]
j
Move choke lever to
Position 2 and squeeze
throttle.
]
: 35xj
F]
Pull rope 34 times to start
engine. Run unit for 30-60
seconds to warm up.
r E
Choke Lever
Continue to squeeze
throttle. Move choke lever
to Position 3.
]
Continue to squeeze
throttle. Run unit for an
additional 60 seconds to
complete warm-up. Unit
may be used during this
time.
n
I
,,C
_m
C
uJ
m
m
LO
n
I
C
U,
m
Reloading The Line*
Bend short end and push it
into the other hole. Pull tight.
E]
insert 10' of 0,080"
SplitLine ® through hole in top
of reel. Pull most of line
through hole until 3"-4"
remains.
Replacement SplitLine c_:
Part #49U0134K953
For single line installation, refer to Line Installation
section of this manual
j ) J
Wind line tightly in direction Push 6"-7" ends into 0.080" Insert or slide lines into the Pull lines firmly to release
of arrow. Split other end of holding slots, eyelets in spool. Insert spring from holding slots.
®
SplitLine back 6"-7". and reel into spool.
F]
O
n
I
m
O
_C
o_
¢0
uJ
f _ SP oolE
Spring
_ nner
Reem
Unscrew bump knob
counterclockwise. Remove
inner reel and spring.
Reloading The Line
Hold the inner reel in place.
Tighten Bump Knob
clockwise.
f
For replacement spool installation, refer to
Installing a Prewound Reel section of this manual.
*This is to assist in the reloading of Splitline® only. These instructions
are NOT part of the fast assembly instructions. Line does not need to
be installed on the initial assembly and start-up.
NEED HELP? CALL 1-800-800-7310 iN U.S. OR 1-800-668-1238 iN CANADA
PART NO. 769=06169 P00 (6/10}

TABLE OF CONTENTS
Serv;cP. Info_mafFo_ ....................................................... 2
Rules for Sa_e Operatio£ ........................................................... 2
Know Your Unit .................................................. 3
AsseTnbly tfl_[r[_cUc[Is ............................................................. 3
O[_ _ld F[Je] !fflormabcn ............................................... 3
ttort i¢_g.'Stopping Instruct;arts ........................................... 3
Operating Inslruc_ions ......................................................... 3
f,,,laintefl?.nr_e & Repair Instruc[}_ms ................................................. 3
C[eaniP.g aP.d Storage .............................................................. 4
Tro_blesiloot_P.g Chad ............................................................. 4
Specific_t Jot_s ......................................................... 4
Warl_nty Intorm£-tlo r_ ............................................................ 16
All informaf[om iiluslra_ion s. a_d spe¢it_ca lion s in this ma;mal are based o.q the latest pR>duc_ information
avaiI_hie at the lime. or prk_ting We _s_ g_e right to make tha_ge._ at airy time _ithebl notice.
Copyrig!t_© 2010 MTD SOUTHW£ST _NC, All Rights Resel_ed.
Per se_Aee call I _80£--80_3W31a in the [Jniled _etee or 14_00-66_ 12,38 inC.31lr_dato obtain a li_ Ofauth0 rLzerJ
se_,ice dealers ne.3t _!ou Pot m_ det_i!s abo_ your uniL v%it o_Jrwebt_'le at _.mtdproduc_.com or
www.mldp_oduc_s.ca.
ir you h_ve diffict_lty assembli_g this p_duCl 01¸Iiave any questions reg_din_ the cGnh_s, ope_tio_ o_
m_ nth.rlance ot thit_ _lnR,p!ea ._e_tll the C_l_ome_ Support Deparlrnent.
DO NOT R£'_RN THE UNIT TO THE RETAILER. PROOP OF PURCHASE WII_ BE REQUIRED FOR
WARRANTY 8ZRVICiZ.
S(_vioe o_}this _A;t _3U1 within an(} r_tter bhewarranty Feq-iud should be perfomled o_y by ar_ m_if_nzed afld
Before D_z31hhq #. [GCO_eth_ _nifs modei p_ate, it I_ststhe model al_d serm_ number_ ot your uP._t[_efer to
IRe sample p_ate below and ¢-opy _h÷ i_llo__l_etiot_ Ior ft_t_l>__4@_nge.
Model N_mber
Serial Number
IIIHII HII' ,.o,............,....I I _ sAvET.ESE,NS_UC_,D_S
,IIIH{[I]II
• SAFETY AND NT_RNAT ONAL SYMBOLS *
TIiS0Z4r31sr's ma_;ua_<l_,.cr_L_ safety and _ltematic_lal sylnlao_ a_d F-ictogra_s {hal may aRsear on Itlis grOduct.
Copy the model and parenl part numbers here: R e."_Ithe operator's m_uaJ for c_mplet e safe_. _ss_mbly, operating, m_nteear,.ce, and repak _fc_malien.
COpy il_e ssriaI humped' here," SYMBOL MF,AN_NG
SPARK ARRESTOR NOTE
NOTE: For users or_ U.S, Foreel La_,d arid in the states of Colgorrfla, Maine, Oregon and Wa_lllngto_.
All U.S. Forest Land and the _;tate ot Calitorni_ (Public Resoulees Codes 4442 and 4443}. Oregon and
1_,%_3_hingtorz re_ulre, by ]_w 1_3t Cert_h illtem_] COr_bustioll _llgiP_ee operated on toilet brg £11and/or gr a£.s-
COnSttU¢l_d_ equi_p_d altd nl._il_ta illt-d _or {lie [srd_'eotJsq OIfire. alack Withyour state Or_ee_!lfa_thorit le_ for
mg_lalion s perk_bing to th_se r(_qukem _-rlls. Failure to fol!ow lh_ _ quir_Rt_ZI_SCould s_b_ec[ yo_ to liability
o_ a line TI_is unit is factory equipped with a _pa_k arrestor. 11it_'4uiree _eplacement. ask ym=_ LOCAL
SERVICE DD\LER toibstal_ tile Acces._oty Part #753436418 Muffler As,notably
I R_e p_._rMoS,:'0t SaKW _ymbui_ is _o al_ract y_.a_ralt_nii:_ll Io possible dangers. Tile safely symbols,
a_d [heir explanations, deserve you. _ carolal a_ten{iorl and underatandirlg. The safely' warning_ do
I
for p=ope_ _ccideni prevention nleasure_, t
SYMBOL M'_ANING
t WARNING; _ellu_e Io ob_.,ya s;_f_,, _,,,am_g ca.._result ininjt_i =oyourself a,qd oth_._. Always [
toltow the safety p_cau_ions 1o_educe the risk of fire, electric shOCk and paschal [njtw'.
,_ CAUTION: Fa!k:_e to obey a s_.lety worrying moy result in property damage or persona! i_juty
tO y_hl_ell or to othe_.. Ab:¢ays fallow the SafeIy pre_LMons to red_._ce the dsk af fire, eleclr_c
I ! sho_:k and p..... I injury, t
1_ SAFETY ALER Tf lr_dlcates danger, warning or cautio n, Altelnien is required in o_JeHoavoid sedous pe_'son aHnjury. May be used in co_ju r.ction with othe_'symbols ol' piclogr aphs. I
othe.%. Always tallcev me safety precautions to rodlike el_lris_ o_ _ire, e_ectMo shock and
persoP.a_ inlury.
NOTE: iVJ,Jises you ot iulom_._tiol5 or in_l_uctio!% _11.%1_oti_eope_alio_l or rnail-4_tance of _ll@_q_iplll_/l.
]qead the Operator% Manual and follow atl Warntn_]s and safety _nst_'ucti0ns. ?aEl_re _0 do so
can result tn seriou_ Injury to the operator and/or bystanders.
FOR QUESTIONS, CALL 1-800-800-73t0 IN U.S, OR 1-80@-558-1238 IN CANADA
* IMPORTANT SAFELY INSTRUCTIONS *
READ ALL _NOTRUCTIOHS_ £_ORE OPIZRA3"a_G
_ ARNING: _#hel_ usil/g me urtil! you must fotlow _he safety rules. Please read th_se ]
i:_structions b_./ore cpe_aliqgthe u_!itin Order _oerasure the satet_j of the operator at_d _ny
1bystande_-s Please keep t_ese Jnstructlon_ tot _ater use,
• _ad1hek_`_1r_c_s_aretu_f8ef?_r_i_i:_r_`_b_e`_r_s_ndp_Fe_`_t_he_:t_
. _r_ono[ul_te_hi_Hn#w_t_t_r_J, al {*ur_Jer_he_fl*_e_c_ol_lc_I_l 4_3s _zm_di4mn_
* `Ch_d_en_:_teenc_*je_@_e_[L5_3_s;_1t_eu``1t,ex_:ep[_';_teer_£ukjedb73r_adu_
• Aj_gu_duar_satc4yat_hmc_tsmustt`_nsta_d_r_P_t_``t_;_£_P_:_i_th_`_n_t_
• _re|#l_ in_4>ec[_hem_eabe{ore sta,tNg _beu_li_Remo_eall dehd_ al_db2rd _ sharp ebjec_ _h asgla_s, wir_.e[c
. Ee awareot tP,#_mkr_tmj_y _othe head. honesan,J_em,
tl 5m@faders, there stZ ma_"bea r_s__ob_'sta_d_s _rumt_o':_ a_c_. ]_t_de_ £.h_JIdbe _zo_a#_ lo wea_eye
_i_n_ tf _pp_oacbed._tc,__heun,Lm_medtatetf
• 8q._ze_ethe _P.fcttk,c_e_{ciand ch_k _ at_ _etums_a_r_i_ly t_ the _# _@_c_ M_kea]__dfJstment_ _r repa_
_Lc_t WARN}NGS FORGAS UNITS
WARNING: Gasotine is highly flarr, mable. 4rod it s vapors _;an explode il [gnilsd. Take Ihe
o owng preca_ ann: I
. _ret_1yin¢_t_s_s_pe_i_¢_yd_s_nedandap_ved_rthes[_age_su_mate5ajs_
• Avoid c_e_st_tx-_._._c_r¢.eof ion_ti_nIo_ ._pilledh[¢1._.3r_ _1atl lhe er..3if,eun_iift_elva_s d_nte.
Ahva}_ step t_k_8neil_ andal_w il t__o_q [_.fuw¢.t,]_._ lJ..eluel _aqk._¢ev(.t._qI_Qe_hecapot me -_e} tal_k,or ade 9ok
_h_ LI_eeagb_eis hsl b..X__ r-pelage_bet_t.i_w_L_-_ulthe.filel cap _ur_y imp_aueO_¢,_ ]od_en _he tooli_¢I_c_p
s_dy torel:eveany _zes_u_e],Ilhe I_k
. Mixand ado lull _ _ dea_, w_Jl.venli_.t_ _.atm;_x3rar_l where _h_ze:ere_.__par_ _ l]m_e& D_ :_ _moke Mfile [ue_o£
_- m&i_] t,._llWr#e up_r_y_[,4_le_if,._ f_n 1he_r_i_i_d_lei2 Alway_ wipe ur_i!eP_before _sing
• Movetheu_atbas;3Otee;@,_r4).f_m1_;_n_sou_eand@_bd¢_estz_t[r, Othee_9_e Do_at_raokeerd,]ew
sl'_r ks e_.t o_en flam_ _lea:_hearea'A'l_i_eadding iue;orol_m_Jng _he ,_.

APPLICATIONS
As a trimmer: Muffler Spark PJug
• Cutting grass and light weeds.
Edging _' Choke Lever
Decorative trimming around trees,
fences, etc.
On/Off Control Fuel Cap
Throttle Control
D-Handle
Primer
Bulb
Shaft Housin_
\
Line Cutting
Blade
Cutting Head Shield
m
_ WARNING: Operate this unit in a well-ventilated outdoor area.
Carbon monoxide exhaust fumes can be lethal in a confined area.
_L_ ARNING; Avoid accidental starting. Make sure you are in the
starting position when pulling the starter rope (Fig. 6). To avoid serious
injury, the operator and unit must be in a stable position while starting.
STARTING INSTRUCTIONS
1. Mix fuel with oil. See Oil and Fuel Mixing Instructions.
2. Fill the fuel tank with fresh fuel mix. Refer to Fueling the Unit.
NOTE: There is no need to turn the unit on. The On/Off Control is in the ON ( I )
position at all times (Fig. 4).
3. Fully press and release the primer bulb 10 times, slowly. Some amount of fuel
should be visible in the primer bulb (Fig. 5). If fuel can not be seen in the bulb,
press and release the bulb until fuel is visible.
4. Place the choke lever in Position 1 (Fig. 5).
5. Crouch in the starting position (Fig. 6). Squeeze the throttle control lever. Pull the
starter rope 5 times.
6. Place the choke lever in Position 2 (Fig. 5)
7. Squeeze the throttle control, pull the starter rope in a controlled motion 3 to 5
times to start the engine.
8. Keep the throttle squeezed and allow the engine to warm up for 30 to 60 seconds.
9. Continue squeezing the throttle control, move the choke lever to Position 3 (Fig. 5)
and continue warming the engine for an additional 60 seconds. The unit may be
used during this time.
NOTE: The unit is properly warmed up when the engine accelerates without
hesitation. Fig.6
IF... the engine hesitates, return the choke lever to Position 2 (Fig. 5) and continue the warm-up.
IF... the engine does not start, go back to step 3.
IF... the engine fails to start after a few attempts, place the choke lever in Position 3 and squeeze the throttle
control. Pull the starter rope in a controlled motion 3 to 8 times. The engine should start. If not, repeat.
IF WARM... If the engine is already warm, start the unit with the choke lever in Position 2. After the unit starts, move
the choke lever to Position 3.
STOPPING INSTRUCTIONS
1. Release the throttle control and allow the engine to cool down by idling.
2. Press and hold the On/Off Control switch in the OFF (O} position until the unit comes to a complete stop (Fig. 4).
"_.Throttle
ControJ
Fig.4
Choke Lever Primer Bulb
Fig. 5
m Starting Position
Starter _] _%,
Cutting Head
m
_1_ ARNING: To prevent serious personal injury, never operate the trimmer without the cutting
attachment shield in place,
INSTALL CUTTING ATTACHMENT SHIELD
Use the following instructions if the cutting attachment shield on the unit is not installed. Use only the instructions that
apply to the type of shaft and shield that the unit is Cutting \ / Mount
equipped with. _eket
1. Place the cutting attachment shield onto the shaft
housing. Be sure the guard mounting bracket slides
into the slot on the edge of the cutting shield. Rotate
the shield into place, counterclockwise (Fig.1).The
holes in the guard mounting bracket and cutting
attachment shield will line up.
2. From inside the cutting attachment shield, push
the square bolt through the hole until the Fig. 1
threaded end protrudes through the guard mounting bracket (Fig. 2).
i
/_ Washer
Fig. 2
Wing Nut Grip _
3. Put the washer on the bolt, then screw the wing nut onto the bolt and tighten. Washer
INSTALL AND ADJUST THE D-HANDLE _. _
1. Push the D-handle down onto the shaft housing (Fig. 3). The hex bolt hole in the
handle should be on the left side.
2. Insert the bolt into the hex hole in the handle and push through. Place the washer
on the bolt, then screw the wing nut onto the bolt. Do not tighten until making the _ Handle
handle adjustment. J "_-'_---- Bolt
3. Rotate the D-handle to place the grip above the top of the shaft housing. Place it Fig. 3
a minimum of 6 inches (15.24 cm) from the end of the shaft grip.
4. While holding the unit in the operating position (Fig. 7), move the D-handle to the location that provides the best grip.
5. Tighten the wing nut until the D-handle is secure.
OIL AND FUEL MIXING INSTRUCTIONS
Old and/or improperly mixed fuel are the main reasons for the unit not running properly. Be sure to use fresh, clean
unleaded fuel. Follow the instructions carefully for the proper fuel/oil mixture.
DEFINITION OF BLENDED FUELS
_L_ ARN ING, It has been proven that fuel containing greater than 15% ethanol will likely damage this engine
and void the warranty.
Today's fuels are often a blend of gasoline and oxygenates such as ethanol,
methanol, or MTBE (ether). Alcohol-blended fuel absorbs water. As little as 1% _
water in the fuel can make fuel and oil separate. It forms acids when stored.
When using alcohol-blended fuel, use fresh fuel (less than 60 days old).
USING BLENDED FUELS °
If choosing to use a blended fuel, or its use is unavoidable, follow
recommended precautions: UNLEADED GAS 2 CYCLE OIL
Always use the fresh fuel mix explained in the operator's manual 1 GALLON US 3.2 FL OZ.
Always agitate the fuel mix before fueling the unit (3.8 LITERS) (95 ml)
Drain the tank and run the engine dry before storing the unit 1 LITER 25 ml
USING FUEL ADDITIVES MIXING RATIO - 40:1
_L_ CAUTION: For proper engine operation and maximum reliability, pay strict attention to the oil and fuel
mixing instructions on the 2-cycle oil container. Using improperly mixed fuel can severely damage the engine.
The bottle of 2-cycle oil contains a fuel additive which will help inhibit corrosion and minimize the formation of gum
deposits. It is recommended to use our 2-cycle oil with this unit.
If unavailable, use a good 2-cycle oil designed for air-cooled engines along with a fuel additive, such as STA-BIL® Gas
Stabilizer or an equivalent. Add 0.8 oz. (23 ml.) of fuel additive per gallon of fuel according to the instructions on the
container. NEVER add fuel additives directly to the unit's fuel tank.
Thoroughly mix the proper ratio of 2-cycle engine oil with unleaded fuel in a separate fuel can. Use a 40:1 fuel/oil ratio.
Do not mix them directly in the engine fuel tank. See the table for specific gas and oil mixing ratios.
NOTE: One gallon (3.8 liters) of unleaded fuel mixed with one 3.2 oz. (95 ml.) bottle of 2-cycle oil makes a 40:1 fueVoil ratio.
NOTE: Dispose of the old fuel/oil mix in accordance to Federal, State and Local regulations.
-- i
_[_ ARNING: Gasoline is extremely flammable. Ignited vapors may explode. Always stop the engine
and allow it to cool before filling the fuel tank. Do not smoke while filling the tank. Keep sparks and open
flames at a distance from the area.
FUELING THE UNIT
_[_ ARNING: Remove fuel cap slowly to avoid injury from fuel spray. Never operate the unit without the
fuel cap securely in place.
_[_ WARNING: Add fuel in a clean, level and well ventilated outdoor area. Wipe up any spilled fuel immediately.
Avoid creating a source of ignition for spilled fuel. Do not start the engine until fuel vapors dissipate.
1. Turn unit on its side, with the fuel cap facing up, and remove the fuel cap.
2. Place the gas container's spout into the fill hole on the fuel tank and fill the tank.
NOTE: Do not overfill the tank.
3. Wipe up any gasoline that may have spilled.
4. Reinstall the fuel cap.
5. Move the unit at least 30 ft. (9.1 m) from the fueling source and site before starting the engine.
HOLDING THE UNIT
-- i_L_ ARNING: Always wear eye, hearing, foot and body protection to reduce the risk of injury when operating
this unit.
Before operating the unit, stand in the operating position (Fig. 7). Check for the
following:
The operator is wearing eye protection and proper clothing
With a slightly-bent right arm, the operator's hand is holding the shaft grip
The operator's left arm is straight, the left hand holding the D-handle
The unit is at waist level
The cutting head is parallel to the ground and easily contacts the grass without
the need to bend over
ADJUSTING TRIMMING LINE LENGTH Fig, 7
_ ARNING: Do not remove or alter the line cutting blade assembly. Excessive line length will cause /
premature engine failure and / or unit damage.
J
The Bump Head TM cutting head allows the release of trimming line without stopping the engine. To release more line,
lightly tap the cutting head on the ground (Fig. 8) while operating the unit at high speed.
NOTE: Always keep the trimming line fully extended. Line release becomes more difficult when the cutting line
gets shorter.
Each time the head is bumped, about 1 inch (25.4 mm) of trimming line releases. A blade in the cutting head shield will
cut the line to the proper length if any excess line is released.
For best results, tap the bump knob on bare ground or hard soil. If attempting a line release in tall grass, the engine
may stall. Always keep the trimming line fully extended. Line release becomes more difficult when the cutting line gets
shorter.
TM
NOTE: Do not rest the Bump Head on the ground while the unit is running.
Some line breakage will occur from:
Entanglement with foreign matter
Normal line fatigue
Attempting to cut thick, stalky weeds
Forcing the line into objects such as walls or fence posts
TIPS FOR BEST TRIMMING RESULTS
Keep the cutting head parallel to the ground. Fig. 8
Do not force the cutting head. Allow the tip of the line to do the cutting, especially along walls. Cutting with more
than the tip will reduce cutting efficiency and may overload the engine.
Cut grass over 8 inches (200 mm) by working from top to bottom in small increments to avoid premature line wear
or engine drag.
Cut from right to left whenever possible. Cutting to the left improves the unit's cutting efficiency. Clippings are
thrown away from the operator.
Slowly move the unit into and out of the cutting area at the desired height. Move either in a forward-backward or
side-to-side motion. Cutting shorter lengths produces the best results.
What vegetation is being cut
Where vegetation is cut
For example, the line will wear faster when trimming against a foundation wall as
opposed to trimming around a tree.
DECORATIVE TRIMMING
Trim only when grass and weeds are dry. _X
The life of the cutting line is dependent upon:
Following the trimming techniques
30°
Fig. g
Decorative trimming is accomplished by removing all vegetation around trees, posts, fences, etc.
Rotate the whole unit so that the cutting head is at a 30 ° angle to the ground (Fig. 9).
MAINTENANCE SCHEDULE
_[_ WARNING: To prevent serious injury, never perform maintenance or repairs with unit running. Always
service and repair a cool unit. Disconnect the spark plug wire to ensure that the unit cannot start, j
Perform these required maintenance procedures at the frequency stated in the table. These procedures should also be
a part of any seasonal tune-up.
NOTE: Some maintenance procedures may require special tools or skills. If you are unsure about these procedures
take your unit to any non-road engine repair establishment, individual or authorized service dealer.
NOTE: Maintenance, replacement, or repair of the emission control devices and system may be performed by any
non-road engine repair establishment, individual or authorized service dealer.
FREQUENCY MAINTENANCE REQUIRED SEE
Before starting engine Fill fuel tank with fresh fuel p. 3
Every 10 hours Clean and re-oil air filter p. 4
Every 25 hours Check spark plug condition and gap p. 4

R_PLACfNG THE SPARK PLUG
b_e _pla_ement _,753-0_1 e3, a Champion RDJ7J spall, ¸ p_ug. o: eq_valent. The ¢+o_+cl air g_p is O.O25 i_ch {O,635
i_:_) _emcv_ _he plug after every 25 hour_ el operation1 and ci_c_k Its con di;_l_.
1 St_.p u_ _n_n_ a_,d allo_ it to cool. G_sp the plug wire !_mly _d p_lH_ _om the spa_k p!ug
2 Clean a_e:und d_e _pa_k i_l_. Rem,_ve g_e _p_,rk pk,_ from _he ,;ginde_ he_ _. by
fuming a 5i_-iuch _>L v,el_._u_ eret_+_kwis e.
S Repkv:eac_a.cke_.fotf, e_d._y_x{r_pklg_tm_ak,4:,#atO.O25m.(O.635mm}
cF_ina _ feeler [_a,J_ e. _ig. 22_,
4 D_Sl#ll¢_ccl_dy.g,_ppe_parkphlgin_he¢_lJndethead. T_gt1_e_bytom_ngt_:e --#19_# ........
5/8-mob +_o_ket clockwise urdii s_ug
fl u_g .1 Iorque ,vl#l_¢ h torque _o: 'f_0-120 i_..tb, (t2.3-13,5 N*m}
De li_l aver li#hles.
CLEAktlNG
Use _ 5matl b_lJsh lo ¢1e3_ otf lhe outside of _h_ _nit+ DO nol tee strong de_rgenl#, Noussho_d cle_er_ _hat _znntmn
s_on",atic oils su¢_ _s #l_e m_d lem_n. _nd so0.,ents ouch as kerose_,e. {_ d_l_,age plastic housing e_ _a_le Wipe off
ar:_ mo_swre w;b>_ a _3N cloth,
STORAGE
$p(illJntO I_lltl ilion
inper _eel (Fig, 15}, P_I_ lt_e Iin_ lh(o_gh the inn_ _eel until o_ly _bout 4 __,c1_e_ is _eff m_t.
.... po&_ible (fig 151,
_0. Before windin 9 lplll Ihe gne ba_k _bout 6 incha_
11. Wind the lee i_ tighl e,,,e_ layel_ i# the dir_ctla_ i_d k'_te_ on _he mitre _eel,
NOT_ Faifure Io wind tt_e hne _rHhe d r_tio# mdicat_d w_ll c_use rh# cudil_g heed t_ e+pa,_+ mcm_ecibi
12. Insert Ihe end_ of lbe llne illlo lhe lwo holdi,_g slo_ (Fk 3 18)
13, laded or _lide the ends of the Ii_e Q,tough o_ i_tlo _lle eyelets in lhe outer _t_oo_ end ;;lace impel f_ei wiU_ spring
ins_e lbe ou_e_ _p_l _FI#. t _). P#_h _he inn_ reel _nd outer _=_o_ _ogeth_
NOT_; ?he Sp_P4_ m_t be _ssem bled on the i<nn_ reef betore re,_ssemblin# the cul:ia9 h_o
14. WM_ I_o[dlag _h _ _n er m_l and out_l _+po_l. g_p _ha and_ m_d ?Ult t:rmly V_ relesse lh_ tin÷ l r.'_ l_e h¢_Idi_g NOts
_# me spool.
15. Held Ib8 in nor T_el i_ #lace and _nstml _he bump kaoh by _urAlrR! clockwig÷ T_Jl_lt_ _e< ure_y
tNBTAU=ING A PREWOUND REEL
I. Hotdtheo_ters_iwitboneh#_ar, duns¢_ewlhebumpk_cl_counterclockv+i_e(F_g, lO_ Ir,spect,_he#ehin_ide
tt_e bump hob to m_Re ._ute il l_lr'.v_S freet# R epl_lce lhe bump knob iI d_m_ged
2. Remov_ lhe okt ina_ reel fto,_, the ouler _p_J (Fig. 1 t),
_. Rem_vethe_#,iagl_on_[he_ldi_m,_rr_Fi 0 It)
4. Placethespringmihenewlanerreel.
NOTE: The 5pdng mull b8 assembled on d!_ inner zeeF before reassembling _he cldli_g he_d.
5. Inse_t _r _Jide _he ends el the lint !hrotx3h or into the e_,el_ in me ouler spo_l (fig. 1 _}
6. Place the t_e_ M_et ,eel il_id ÷ th÷ o,aer sp¢,,;4,Push lhe i_rl_r re_l end outer _poo[ Iog_tl_e_ £%¢hlie hslding ihe ial_er
zenl and otlto_ 8p_#l, grasp t_e e_r[_ _l_d p_lll firmly to, releaDe !h÷ lie e _r_m the h_ld[t_g _o!_ [it lhe s13ool
_. Hold the _nnel re#t i1_£1_¢e _ in&lall ;he bump knob by tut_h_,# e_kwi_e, Tight er_ _8#t_,efy.
AIR FILTER MAINT£NA_C_
I_!
Glean the a_rfillerever), I0 bouts O! op_rsllo_ It_s L_=_ _AirFi_l ,Co_ /._+ ._./I,/ --
_n [mpodant item to m_iBl_in, F_Ibu_e to mainloi_ _'_ ti /._. i_t/f
_h_ oir flll_f _rO_#ll 7 o_1_ leou_ in poor __ '_
r_r [O¢l_61_ice ILl' can cause _il_tll l _t11_ f to {
1he o_ine.
1. Open It,.e ak filter cc+_er b7 poe_._ng ,be Ioct_ ta_b
in and pu:t_g out on tha alr fit_ cover (_g. 1B)
2. R_move the mr filt_ _Fig 18) ai, FII*_ _ /
,_. WOSN lhe lilI_ in _eIeNe,_t _ad roarer t'_g. ig',,. _,_. m r_<i 1_
£in_._ ti;_ 5fief lho_Oklghly 3tld allow h Io ctry, I_--,---...
4. Apply enough cle_n SAE 30 m,tot oil to lighlly _---_.
¢o_1 tile filter (Fig. 20).
E Squ0eze lhe flit er io nplead _ld remove e_e_n_
,all IFig. 21)
8. ReN0¢e lh _.a_ f_et _nt* ;_'4 ak li!gL*r ¢0¢_: I'FN. _8i. _ v
NOTI_ Opo_at_ng the unhw_thout the _ l_;tor
"g_ [L L VOID the _ar rarity.
2. CNse the aiH3ter cover by _'e,<mglr._ _ to th_ F_ .... Fi_. 2_
le_ alld tllt-,ll pr_asiag it down ul_lil lhe _ocR tnh
s _.aps inl_ place [lzlg. 1m.
_;ARBLiRETOR AD.JUSTNE NT
_=hu idle speed o{ lhe er:_[ll_ i_ adj_lgt_ble. A=; kin ed;uslmen_ ucrew is b_t a'ee_ ltle air [liter eo'w.r and tie engine
mane_ h_us_ng fFi 9. 22)
NOTE; C_eles 5 adjllslment_ earl _ed_u_ly rJam_ge lile u_iI. At: amh_dzed _er_ice deale_ sr_c_/_,.I make c a,_u_e_c_
adiu_lme_t_
Check Fuel MixltlTe
O_d and/e_ Improperly mixed £1el _s Ll_ually titl_ r_<'Isorlfor _mprope_ imil _el forn;_ce _ t._11__nd le_i[I ?ha tol_ w{lh
fresh, pToI_¢y mixed £,e_ p_ior lo m_kin_ _ny adiu_lmenls. Refer tc Oil an_ Feel InfNmallon
Cl_ai_ Air Filt_r
_he don dillon el the air f_iler i_ }n_pOrI_nt IO In* opat_[iOrl Of lhe Ullll, A dkr[ :, ai_ 5ke, w;ll reslde_ _ik [l_w .?;_d_'11[tr't{_* th÷
_]:g[tl_l mixture, lMs is ofte_, mistaken re, an _t of _*ju _tment c;_rbtlr_lo, Check the i]ol_d_l_ol_ _f I_le a{r ill[el bete_ e
adjustlng Ihe idb _peed _¢_ev+, Refe_ to Ak Fi_ler M,_inlerlance,
ANu_I I_le S_,ee_l Screw
l_i WARNING: The cuIlhg almchmen_ will spin d_dng Idl* _ adiusm_enl*. W<,m proleCtlve *!olhi_ 1
and obsea,a a1 sa etV nsl_ucllons to p_e_ent so{io_ p_rs_M _j_:_y t
t
If. alter cl_ecki ng the lull mixture and €leading Ihe o ir fitter, lh e engTne s_llfwill not *dl e.
adjus_ lhe _d_ cp_ad sc_co,_a_ Ioltow_: faie aiti_lln_nt £_ Ie'_"
1. Start lhe engine and Tu_f_ one minule [o ',v,_m up.R_lerteNtad_ngiSfcp#_Lq "\ _
fr,_tructmr_, ,"2"4'_ " ..... _.,_t T_,.."
Phil_]p'_ tx_e.vdd_<er hltr_ the idle a@u51m_l _x_re,,v{Fig 22) TL_t_llle _dta _f_d -_
3. If the engine 0ppear_ Io be _dlTng too fa_l. ILff_l the i01e spe.sd ._c_ew _::
co_rll_clock_dse IY8 of a t_m al e lie e ias needed]. Io reduc# iGle r_£_d, l_ ' . / .p_u,
Gheckiaglheluolmi_¢Lure._leani_g_heal_tiller_r_dadj_stmgth£bdlesp_ed_ho_ld ...... Fig. 22 .............
5o_.,e _3st er_ige pmhlcn_s. It _ot an# ell of the t ollo_='ir_g are l{tio:
• t he engine will r.o_ _81e
• lheoag_ehesil_te_o[5_allsoaacceleratie#
- lhere {S _ I_e el e_lgit_e p_wer
Have lhe carb_reto_ odiusted by a# a_tho_ized semite dea_er.
OAUSE
Rlimel b,_lb WaSl_'¢ press_'J enough
' ;;;::_+;_ 'G,,_g<i;t_':<_:=!7"_4 ) {G<g;rt 'c _:/,:_Tftff,7;!,_ :: #:i
Old or improperly ml_ed tuof
CAUSE
Old or impsopelly mixed fuel
CAUS_
C_iti#g head bound _i[h 9_ss
! t_ [_t: I=I IL=T_ ;_:t _,t,t JI; [,);_it f:% II"
CAUS£
Fo_le_ spark plvg
CAUSE
Cuttiq 9 head _ul ol line
Culling tlead dlr{y
ACTIOI_
Ples_ pdmc_ bulb luHy and stowly 10 timss
D{aln tue_ ta_R and odd ba_h t_=el mixtoTe
7
'llfl'l_ll_l_li i I '"
Draln I_e: tank m_d add fresh t_l m_xtu_e
ACTION
Stop the el_gii_e _nd cte_n the outli{_g head
AClqON
Replace c_ clean the _p_rk p_ug
AOTIOf_I
Nef¢ll wi;h new I_ne
_.1_ irl_ 11 t@#l a_fl outer 1 7}
D;_a sselt_ble a_d _ewiqd the ling
!: ,: [:
CAUSE ACG[ION
IF FURTHER ASSISTANCE I$ REQt.JlRED, CONTAGT AN AUTHORIZKD SERVICE DI_ALER.
E_gh_e I}'pe ................................................................... A r-Ceoled, 2 -Cycle
Dlsplac_me _[ ......................................................................... 25¢c
Operating RPM .............................. 6,30g÷ rpm
ldle 8gee_ RP}_ .................................................................. .3,2f_B. 4,400 rpm
ig_ll:61_ Sv,'l!¢ h ...................................................................... Recke f S'._itcl/
Spmk Pk_g Gap .......................................................... 0 02S ,n (I)635 ilm_)
t u h_l_2_i,Dl_ ................... 7ufl,'Oit k4f_tofl
f uel/TJit R,lim ........................................................................ 4011
C_rbul e[of ................... i_lJ_'lphr _Tm, All Podt r3_
_lorler ................................................................................. _Z -p ill1{_D
KLlel T_nk Ca p_ity .................................... fD fh _;. (296 _ldi
I*);tl,i!llf_lmI!_t:t=lltlJillfl411_i!l|l !11',"'""'""' ,
Ddve 5ha(l tto0f_n*.3 ..................................................................... stal Tube
7hfoltle I._ontlol ........................................................... Pir, ge:-TipTRgg(_
"R.'tal Appro<imate UM W_ighI _Aqlh oul Pt,efl ........................................ 1g - 11 Ibm. (-I,5 - 5 kg)
Cultlng M._hamsm ..................................................... Bump Head"
_,heulder St:ap ...................................... Optio_ al
tll!e S.OO01Diameler ................................................................. 3 _a (',6,2 m_)
Trim m{_!g Une Diaale[er ........................................... 0,080 in. €2 03 mini
Cmlln_PalhDiameler .............................................................. 7 6 N3 8€n_
'All 5pec;£cal{_r,_ are baseel on ihe I_est _educt i_dot mat_l_ aw_il:_b4e al the lln_ of pH nlh,_, We Tet_,rve lh_ ,k]hl I_
Page is loading ...
Page is loading ...
Page is loading ...
Page is loading ...
Page is loading ...
Page is loading ...
Page is loading ...
Page is loading ...
Page is loading ...
Page is loading ...
Page is loading ...

MANUFACTURER'S LiMiTED WARRANTY FOR:
GARANTIE LIMiTEE DU FABRICANT POUR:
GARANTJA LIMITADA DEL FABRlCANTE PARA:
The limited warranty set forth below is given by MTD LLC ("MTD') with respect with new merchandise purchased and used in the United States, its possessions and territories.
MTD warrants this product against defects in material and workmanship for a period of two (2)years commencing on the date of original purchase and will, at its option, repair or replace, free of charge, any part found to be defective in material or workmanship. This limited warranty shall only
apply if this product has been operated and maintained in accordance with the Operator's Manual furnished with the product, and has not been subject to misuse, abuse, commercial use, neglect, accident, improper maintenance, alteration, vandalism, theft, fire, water, or damage because
of other peril or natural disaster. Damage resulting from the installation or use of any accessory or attachment not approved by MTD for use with the product(s) covered by this manual will void your warranty as to any resulting damage.
This warranty is limited to ninety (90) days from the date of original retail purchase for any MTD product that is used for rental or commercial purposes, or any other income-producing purpose.
HOW TO OBTAIN SERVICE: Warranty service is available, WITH PROOF OF PURCHASE THROUGH YOUR LOCAL AUTHORIZED SERVICE DEALER. To locate the dealer in your area, please check for a listing in the Yellow Pages or contact the Customer Service Department of MTD by
calling 1-800-800-7310 or writing to P. O. Box 361131, Cleveland, OH 44136-0019 or if in Canada call 1-800-668-1238. No product returned directly to the factory will be accepted unless prior written permission has been extended by the Customer Service Department of MTD.
This limited warranty does not provide coverage in the following cases:
A. Wear items - Bump Knobs, Outer Spools, Cutting Line, Inner Reels, Starter Pulley, Starter Ropes, Drive Belts
B. MTD does not extend any warranty for products sold or exported outside of the United States of America, its possessions and territories, except those sold through MTD's authorized channels of export distribution
MTD reserves the right to change or improve the design of any MTD Product without assuming any obligation to modify any product previously manufactured.
No implied warranty, including any implied warranty of merchantability or fitness for a particular purpose, applies after the applicable period of express written warranty above as to the parts as identified. No other express warranty or guaranty, whether written or oral, except
as mentioned above, given by any person or entity, including a dealer or retailer, with respect to any product shall bind MTD. During the period of the Warranty, the exclusive remedy is repair or replacement of the product as set forth above. (Some states do not allow limitations
on how long an implied warranty lasts, so the above limitation may not apply to you.)
The provisions as set forth in this Warranty provide the sole and exclusive remedy arising from the sales. MTD shall not be liable for incidental or consequential loss or damages including, without limitation, expenses incurred for substitute or replacement lawn care services,
for transportation or for related expenses, or for rental expenses to temporarily replace a warranted product. (Some states do not allow limitations on how long an implied warranty lasts, so the above limitation may not apply to you.)
In no event shall recovery of any kind be greater than the amount of the purchase price of the product sold. Alteration of the safety features of the product shall void this Warranty. You assume the risk and liability for loss, damage, or injury to you and your property and/or to others and their
property arising out of the use or misuse or inability to use the product.
This limited warranty shall not extend to anyone other than the original purchaser, original lessee or the person for whom it was purchased as a gift.
How State Law Relates to this Warranty: This warranty gives you specific legal rights, and you may also have other rights which vary from state to state.
To locate your nearest service dealer dial 1-800-800-7310 in the United States or 1-800-668-1238 in Canada.
La garantie limitee enoncee ci-apres est accordee par MTD LLC et concerne les marchandises neuves achetees et utilisees aux Etats-Unis, ses possessions et territoires.
MTD LLC garantit ce produit contre tout vice de matiere ou de facon pendant une p@iode de deux (2) ans Acompter de la date d'achat initiale et elle se reserve le choix de reparer ou de remplacer, a titre gratuit, toute piece presentant un vice de matiere ou de facon. Cette garantie limitee
ne s'appliquera que dans la mesure ot_ le produit aura ete utilise et entretenu conformement au Manuel de I'utilisateur fourni avec le produit et n'aura pas fait I'objet d'un usage inadequat, abusif, commercial ou negligent, d'un accident, d'un entretien inadequat, d'une modification, de
vandalisme, d'un vol, d'un incendie, de deg&ts d'eau ou d'un endommagement resultant d'un autre p@il ou d'un desastre naturel. Les dommages resultats de I'installation ou de I'utilisation de tout accessoire ou equipement non approuve par MTD pour une utilisation avec le(s) produit(s)
couvert(s) par le present manuel annuleront la garantie en ce qui concerne les dommages qui en resulteraient eventuellement. La presente garantie est limitee a quatre-vingt-dix (90) jours a compter de la date d'achat au detail initiale pour tout produit MTD utilise A des fins locatives ou
commerciales, ou toute utilisation produisant des revenus.
POUR L'OBTENTION DU SERVICE DE GARANTIE: le service au titre de la garantie est disponible, SUR PRESENTATION D'UNE PREUVE D'ACHAT, AUPRES DU DISTRIBUTEUR AGRI2E LOCAL. Pour trouver un distributeur dans votre region, consultez les Pages Jaunes, appelez le 1-800-800-7310
aux 12tats-Unis ou le 1-800-668-1238 au Canada, ou ecrivez a I'adresse MTD LLC, PC Box 361131, Cleveland, OH 44136-0019.
La garantie limit_e n'offre aucune couverturs dabs les cas suivants:
A. Mises au point : bougies, reglages de carburateur, filtres
B. EI6ments pouvant s'user : boutons de butee, bobines exterieures, fil de coupe, moulinets interieurs, poulie du demarreur, cordons de demarrage, courroies d'entrainement
C. MTD LLC n'accorde aucune garantie pour les produits vendus ou exportes des Etats-Unis d'Am@ique, de leurs possessions et territoires, exception faite en ce qui concerne les produits vendus par I'intermediaire de ses canaux agre6s de distribution a I'exportation.
MTD LLC se reserve le droit de modifier ou d'ameliorer la conception de ses produits sans pour autant assumer I'obligation de modifier tout produit d'une fabrication plus ancienne.
Aucune garantie implicite, y compris toute garantie de valeur marchande ou d'adaptation a une fin particuliem, ne s'applique apres ia p_dode applicable de garantie expresse _crite ci-dessus concernant les pieces qui sont identifi_es. Aucune autrs garantie ou caution
expresse, _crite ou orale, a I'exception de ceHe mentionn_e ci-dessus, accord_e par toute personne ou entitY, y compris tout distdbuteur ou d_taillant, concernant tout produit n'engagera la responsabiiit_ de MTD LLC. Pendant la p_dode de garantie, le recours exclusif est
la r_paration ou le remplacement du produit dabs les conditions _nonc_.es ci-dessus. (Certains etats ne permettent pas la limitation de la garantie implicite, il est donc possible que la limitation ci-dessus ne s'applique pas & vous.)
Les clauses _nonc_es dabs la pr_sente Garantie constituent le recours unique et exclusif inh_rsnt aux ventes. MTD LLC ne sera en aucun cas tenue pour responsable de tout dommage indirect ou cons_cutif ou de dommages comprenant, entre autrss, les d_penses
encourues du fait du recours a des services de remplacement ou de substitution pour I'entrstien des pelouses, le transport ou des frais connexes, ou les frais entrain_s par une location destin_e & remplacer provisoirement un produit sous garantie. (Certains etats ne permettent
pas la limitation de la garantie implicite, il est donc possible que la limitation ci-dessus ne s'applique pas a vous.)
Aucun recouvrement, quel qu'il soit, ne sera d'un montant sup@ieur au prix du produit vendu. Toute modification des dispositifs de securite du produit annulera la presente Garantie. Vous assumez tout risque et toute responsabilite resultant de la perte, de I'endommagement ou du prejudice
que vous et votre propriete et/ou d'autres et leur propriete pourront encourir d'un fait de I'utilisation normale, de la mauvaise utilisation ou de I'incapacite d'utiliser le produit.
La presente garantie limitee n'est accordee qu'a I'acheteur initial, au preneur initial ou a la personne a laquelle le produit a ete offert.
Le Droit des €:tats vis & vis de la pr_sente garantie: la pr6sente garantie vous confere certains droits juridiques et vous pouvez ben6ficier d'autres droits lesquels varient d'un etat a I'autre.
Pour obtenir I'adresse du distributeur reparateur le plus proche, composez le : 1-800-800-7310 aux Etats-Unis ou le 1-800-668-1238 au Canada.
MTD LLC concede la garantia limitada establecida debajo para mercancias nuevas que sean compradas y usadas en los Estados Unidos, sus posesiones y territorios.
MTD LLC garantiza este producto contra defectos en el material y la mano de obra durante un periodo de dos (2) aSos, a partir de la fecha de compra original y a su entera discreci6n, arreglara o substituira sin costo alguno cualquier pieza cuyo material o mano de obra se considere
defectuoso. Esta garantia limitada se debera aplicar t_nicamente si este producto ha sido manejado y mantenido de acuerdo al Manual del Operario incluido con el producto y, si no ha sido sometido a real uso, abuso, uso comercial, negligencia, accidente, mantenimiento inapropiado,
alteraci6n, vandalismo, hurto, fuego, agua o daSos debidos a otros riesgos o desastre natural. Los daSos ocasionados por la instalaci6n o el uso de cualquier accesorio o aditamento que no este aprobado por MTD y que sea usado con el (los) producto(s) contemplados en este manual,
anular&n la garantia con respecto a cualquier daSo resultante. Esta garantia esta limitada a noventa (90) dias a partir de la fecha de compra original al detalle de cualquier producto MTD que se use para alquiler, para prop6sitos comerciales o cualquier otro prop6sito que genere ingresos.
COMO OBTENER SERVICIO: El servicio de garantia esta disponible A TRAVES DE SU DISTRiBUIDOR DE SERVICIO LOCAL AUTORiZADO, AL PRESENTAR EL COMPROBANTE DE COMPRA. Para Iocalizar al distribuidor en su Area, busque el aviso clasificado en las P&ginas Amarillas,
Ilame al 1-800-800-7310 en EE.UU. o al 1-800-668-1238 en Canada, o escriba a MTD LLC, PO Box 361131, Cleveland, OH 44136-0019.
Esta garantia limitada no ofrece cobertura en los siguientes casos:
A. Sincronizaciones - bujias, ajustes de carburadores, filtros.
B. Articulos de desgaste, perillas pereusivas, carretes externos, linea de corte, carretes internos, polea de arranque, euerdas de arranque, correas motoras.
C. MTD no le ofrece ninguna garantia a los produetos que sean vendidos o exportados fuera de los Estados Unidos de Am@ica, sus posesiones y territorios, excepto aquellos que se vendan atraves de los canales de distribuei6n para exportaei6n autorizados por MTD.
MTD se reserva el derecho a cambiar o mejorar el diseSo de cualquier produeto MTD, sin adoptar ninguna obligaci6n para modificar cualquier produeto fabricado con anterioridad.
Ninguna garantia implicita es aplicable despu_s del periodo de aplicabilidad de la garantia expresa escrita con anterioddad, incluyendo cualquier garantia implicita de comersiabilidad o idoneidad para un prop6sito particular con respecto a las piezas identificadas. Exceptuando Io
mencionado anteriormente, ninguna otra garantia exprssa bien sea escrita o verbal con respecto a cualquier producto que sea concedida per cualquier persona o entidad, incluyendo al distribuidor o minorista, deber;_ comprometer a MTD LLC durante el periodo de la Garantia, el
remedio exclusivo es el arrsgio o la sustituci6n del producto segL_n Io establecido anteriormente. (Algunos estados no permiten limitaciones en euanto al periodo de duraci6n de una garantia implicita, de manera que puede que la limitaci6n anterior no sea aplicable en su caso.)
Las estipulaciones estabiecidas en esta Garantia ofrscen la soluci6n unica y exclusiva que resulte de las ventas. MTD no deber;_ set responsable de p_rdidas o daSos incidentales o conseeuentes que incluyan, sin limitaci6n, gastos incurddos debido a la sustituci6n de
servicios de mantenimiento de prados, transporte o gastos relacionados, o gastos de alquiler para reemplazar temporalmente un producto bajo garantia. (Algunos estados no permiten limitaciones en cuanto al periodo de duraei6n de una garantia implicita, de manera que puede
que la limitaci6n anterior no sea aplicable en su caso.)
Ning_n tipo de recuperaci6n deber& ser superior al precio de compra del producto vendido, en ning_n caso. La alteraci6n de las caracteristieas de seguridad del producto deber& anular esta Garantia. Usted adopta el riesgo y la obligaci6n de la p@dida, daSo o lesi6n en su persona o a su
propiedad y/o la de otras personas y sus propiedades, que se origine a raiz del uso o real uso, o la ineompetencia para usar el producto.
Esta garantia limitada no debera cubrir a ninguna otra persona distinta al comprador original, arrendatario original, o la persona para la cual se compr6 en calidad de regalo.
Relaci6n de las leyes estatales con esta Garantia: Esta garantia le confiere derechos legales especffieos, y puede que usted tambien tenga otros dereehos, los cuales varian en eada estado.
Para Ioealizar al distribuidor de servicio local mas cercano, marque el nL_mero 1-800-800-7310 en EE.UU. o al 1-800-668-1238 en Canada.
MTD LLC
R O. Box 361131
Cleveland, OH 44136-0019
-
 1
1
-
 2
2
-
 3
3
-
 4
4
-
 5
5
-
 6
6
-
 7
7
-
 8
8
-
 9
9
-
 10
10
-
 11
11
-
 12
12
-
 13
13
-
 14
14
-
 15
15
-
 16
16


ACE 7219363 Owner's manual
- Category
- Grass trimmers
- Type
- Owner's manual
- This manual is also suitable for
Ask a question and I''ll find the answer in the document
Finding information in a document is now easier with AI
in other languages
- français: ACE 7219363 Le manuel du propriétaire
- español: ACE 7219363 El manual del propietario
Related papers
Other documents
-
Yard-Man YM70SS User manual
-
-
Ryobi 41BD765G034 Owner's manual
-
Craftsman 316791190 Owner's manual
-
MTD 41BD380C799 Owner's manual
-
Bolens 41BD100G163 Owner's manual
-
-
-
-