Page is loading ...

BLOWER VAC iNSTRUCTiON MANUAL
Model Number BV3100
PLEASE READ BEFORE RETURNING
THiS PRODUCT FOR ANY REASON:
If you have a question or experience a problem with your
Black & Decker purchase, go to
WWW.BLACKANDDECKER.COM/INSTANTANSWERS
for instant answers 24 hours a day.
If you can't find the answer or do not have access to the intemet,
call 1-800-544-6986 from 8 a.m. to 5 p.m. EST Mort. - Fri
to speak with an agent.
Please have the catalog number available when you call.
SAVE THiS MANUAL FOR FUTURE REFERENCE.
VEA EL ESPA=OL EN LA CONTRAPORTADA.
POUR LE FRAN(_,AIS, VOIR LA COUVERTURE ARRIERE.
DE OPE.RACION, CENTROS DE SERVICIOINSTRUCTIVO
Y POLIZA DE GARANTIA. ADVERTENCIA: LEASE ESTE
INSTRUCTIVO ANTES DE USAR EL PRODUCTO.

SafetyGuidelines-Definitions.................................................2
GeneralSafetyWarnings&InstructionsforallTools..............2
Components.............................................................................4
BlowerModeAssembly...........................................................5
VacuumModeAssembly.........................................................5
Operation.................................................................................6
BlowerOperation.....................................................................7
VacuumOperation...................................................................7
Maintenance............................................................................8
Accessories..............................................................................8
Troubleshooting.......................................................................8
ServiceInformation..................................................................9
FullTwo-YearHomeUseWarranty.........................................9
SAFETY GUIDELINES - DEFINITIONS
It is important for you to read and understand this manual. The
information it contains relates to protecting YOUR SAFETY and
PREVENTING PROBLEMS. The symbols below are used to help
you recognize this information.
Z_DANGER: Indicates an imminently hazardous situation which,
if not avoided, will result in death or serious injury.
/_WARNING: Indicates a potentially hazardous situation which,
if not avoided, could result in death or serious injury.
/_CAUTION: Indicates a potentially hazardous situation which if
not avo ded, may resu t n m nor or moderate njury.
NOTICE: Used without the safety alert symbol indicates a potentially
hazardous situation which, if not avoided, may result in property damage.
zLWARNING: TO REDUCE RISK OF INJURY:
• Before any use be sure everyone using this unit reads and
understands a safety nstruct ons and other nformat on conta ned
in this manual.
• Save these instructions and review frequently prior to use and in
instructing others.
• Do not point unit discharge at self or bystanders.
• Keep long hairand loose clothing away from openings and moving parts.
ZLWARNING: When using an electric tool, basic safety
precautions should always be followed to reduce risk of fire,
electric shock, and personal injury, including the following.
ZLWARNING: Some dust created bythis product contains chemicals
known to the State of California to cause cancer, birth defects or other
reproductive harm. Some examples of these chemicals are:
• compounds in fertilizers
• compounds in insecticides, herbicides and pesticides
arsenic and chromium from chemically treated lumber
To reduce your exposure to these chemicals, wear approved
safety equipment such as dust masks that are specially designed
to filter out microscopic particles.
READ ALL AND UNDERSTAND ALL
INSTRUCTIONS BEFORE USING.
ZLWARNING: Read all safety warnings and all instructions.
Failure to follow the warnings and instructions may result in electric
shock; fire and/or serious injury.
• READ and follow all instructions.
. DO NOT place inletoroutletofvacuum neareyes orearswhen operating.
THIS APPLIANCE IS PROVIDEDWITH DOUBLE INSULATION, Use
onlyidenticalreplacement parts. See instructionsfor servicingof double
insulated appliances.

=
=
=
=
=
=
=
=
=
=
=
=
=
=
=
=
=
=
STORE IDLE TOOLS. When not inuse, theunit shouldbe storedin adry,
high or locked-up place- out of reachof children.
DON'T OVERREACH. Keep properfooting andbalance at alltimes.
DO NOT pickup anythingthat is burningor smoking, suchas cigarettes,
matches orhot ashes.
MAINTAIN TOOL WITH CARE. Keepfan area cleanfor best andsafest
performance. Follow instructionsfor proper maintenance.
DO NOT attemptto repairthe blower/vac.Toassure productsafety and
reliability,repairs,maintenance, andadjustments shouldbe performedby
Black & Deckerservice centers or authorizedservicestations,always using
Black & Deckerreplacement parts.
DO NOT operate blower/vacin agaseousor explosiveatmosphere. Motors
in thesetools normally spark, andthe sparksmight ignitefumes.
DO NOT use to pickupflammable or combustibleliquidssuch asgasoline
or use inareas wherethey may bepresent.
USE EXTRA CARE when cleaning onstairs.
DO NOT leave appliancewhen pluggedin. Unplugfrom outletwhen not in
use andbeforeservicing.
DO NOT allowto beused as a toy. Closeattention isnecessarywhen used
byor nearchildren. Not recommendedfor useby children.
DO NOTattemptto clear clogsfrom tool withoutfirst unplugging it.
USE ONLYas described inthis manual. Useonly manufacturer's
recommended attachments.
DO NOT use withdamagedcordor plug.If appliance isnot workingas it
should, hasbeen dropped,damaged, leftoutdoors,or droppedinto water,
return itto aservice center.
DO NOT pullor carry bycord, usecord as a handle,or pullcordaround
sharp edgesor corners. Keep cordawayfrom heatedsurfaces.
DO NOT unplug bypulling on cord.To unplug,grasp theplug, notthe cord.
DO NOT put anyobjects intoopenings. Do not use with any opening
blocked; keepfree of dust, lint,hairand everything that may reduceair flow.
KEEP hair,loose clothing,fingers, and all partsof body awayfrom
openingsand movingparts.
TURN OFF all controls beforeunplugging.
, DO NOTvacuum water, otherliquids,or wetobjects.Never immerse any
partof the tool inliquid.
, DO NOT handleplug or appliancewith wet hands.
. KEEP CHILDREN, BYSTANDERS AND ANIMALS AWAY from the work
area aminimumof 30feet (10meters) whenstarting or operatingthe tool.
Do notblow debris in directions ofbystanders.
. INSPECTTHE AREA beforeusing the tool. Remove all debrisand hard
objectssuch asrocks, glass, wire,etc. that can ricochet,bethrown, or
otherwise causeinjury ordamageduringoperation. As avacuum, the tool is
designedto pick updry materialsuch as leaves, grass,smalltwigs, and bits
of paper.Do not vacuum stones,gravel, metal, brokenglass,etc.
WARNING: Shock Hazard. To reducethe riskofelectricalshock; do not
exposeto rain,do not useonwet surfaces. Store indoors.
z_ WARNING: Cut Hazard. Turn off and unplug unit, then wait until
fan stops or at least 10 seconds before remowng the blower or
vacuum tube assemblies.
SAVETHESEINSTRUCTIONS
Servicing of Double insulated Appliances
Your BlowerNac is double-insulated to give you added safety. In a
double insulated appliance, two systems of insulation are provided
instead of grounding. No grounding means is provided on a double
insulated appliance, nor should a means for grounding be added
to the appliance. Servicing a double insulated appliance requires
extreme care and knowledge of the system and should be done
only by qualified service personnel. Replacement parts for a double
insulated appliance must be identical to the parts they replace. A
double insulated appliance is marked with the words double insulated
or "double insulation". The symbol (square within a square) may also
be marked on the appliance.
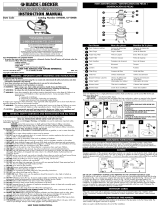
z_Safety Rules and instructions: Extension Cords
Doublernsulatedtools have 2-wire cordsand can be usedwith 2-wire
or 3-wireextension cords. Onlyroundjacketedextensioncordsshould be
used,andwe recommendthat they be listedby UnderwritersLaboratories
(U.L.) (C.S.A.inCanada). Iftheextension will be usedoutside,the cord
mustbe suitableforoutdoor use.Any cordmarked as outdoor can also
be usedfor indoorwork. An extensioncordmust have adequatewire size
(AWG orAmerican Wire Gauge)for safety,and toprevent lossofpower
andoverheating. Thesmaller the gaugenumber ofthe wire, thegreater the
capacityofthe cable,that is16gauge hasmorecapacity than 18gauge.
When using morethan one extensionto make upthe total length,be sure
eachindividual extensioncontains atleastthe minimumwiresize. Before
using an extensioncord,inspect it forloose or exposedwires, damaged
insulation, anddefectivefittings. Makeany neededrepairsor replacethe cord
if necessary.
Minimum Gauge for Cord Sets
Volts Total Length of Cord in Feet
Todetermine the
minimum wire size
required, refer to
the chart:
120V 0-25
240V 0-50
Ampere Rating
More Not more
Than Than
0 6 18
6 10 18
10 - 12 16
12 - 16 14
26-50 51-100 101-150
51-100 101-200 201-300
American Wire Gauge
16 16 14
16 14 12
16 14 12
12 Not Recommended
z_Safety Rules and instructions: Polarized Pluq
To reduce the risk of electric shock, this equipment has a polarized-plug
(one blade is wider than the other). This equipment must be usedwith a
suitable polarized 2 wire or 3 wire extension cord. Polarizedconnections will
fit together only oneway. Makesure thatthe receptacle endof the extension
cord has large and small bladeslot widths. Ifthe plug doesnot fit fully into
the extension cord, reversethe plug. Ifit stilldoes not fit, obtain a suitable
extension cord. Ifthe extension cord doesnot fit fully intothe outlet, contact
a qualifiedelectrician to installthe proper outlet. Donot changethe tool plug
or extension cord inany way.
The label on your tool may include the following symbols.
V............... volts A .................... amperes
Hz ............. hertz W ................... watts
min ............ minutes ,x, .................. alternatingcurrent
- - -. ......... direct current no................... no load speed
[] .............. double insulated _ .................... earthing terminal
z_ ............ safety alert symbol .../min ............. strokes per minute
1. Blower Tube Release Button
2. On / Off Switch
3. Blower Opening
4. Fan Cover
5. Blower Tube (2 pieces)
6. Vacuum Tube (2 pieces)
7. Collection Bag
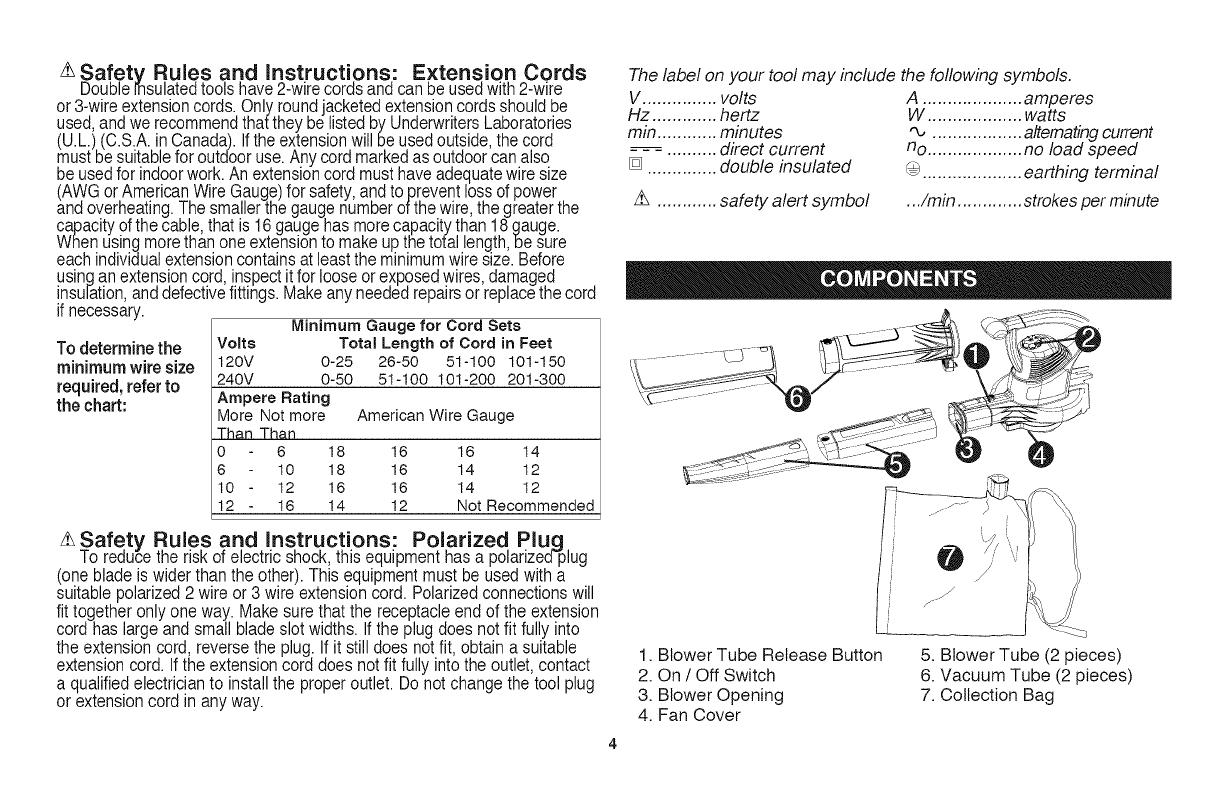
NOTE:Ensuretheblowerisswitchedoffanddisconnectedfrom
thepowersupplybeforeattachingorremovingtheblowertubes.
Thetubeassemblymustbeassembledtothehousingbeforeuse.
TUBEASSEMBLY(FIGUREA)
• Toattachthetwopieceblowertubestotheblower,lineupthetube
withtheblowerhousingasshowninfigureA.Pushthetubeintothe
blowerhousinguntilthelockleverengagesthelockholeinthetube.
• Toremovethetubedepressthelockbuttonandslidethetubeoff
thehousingneck.
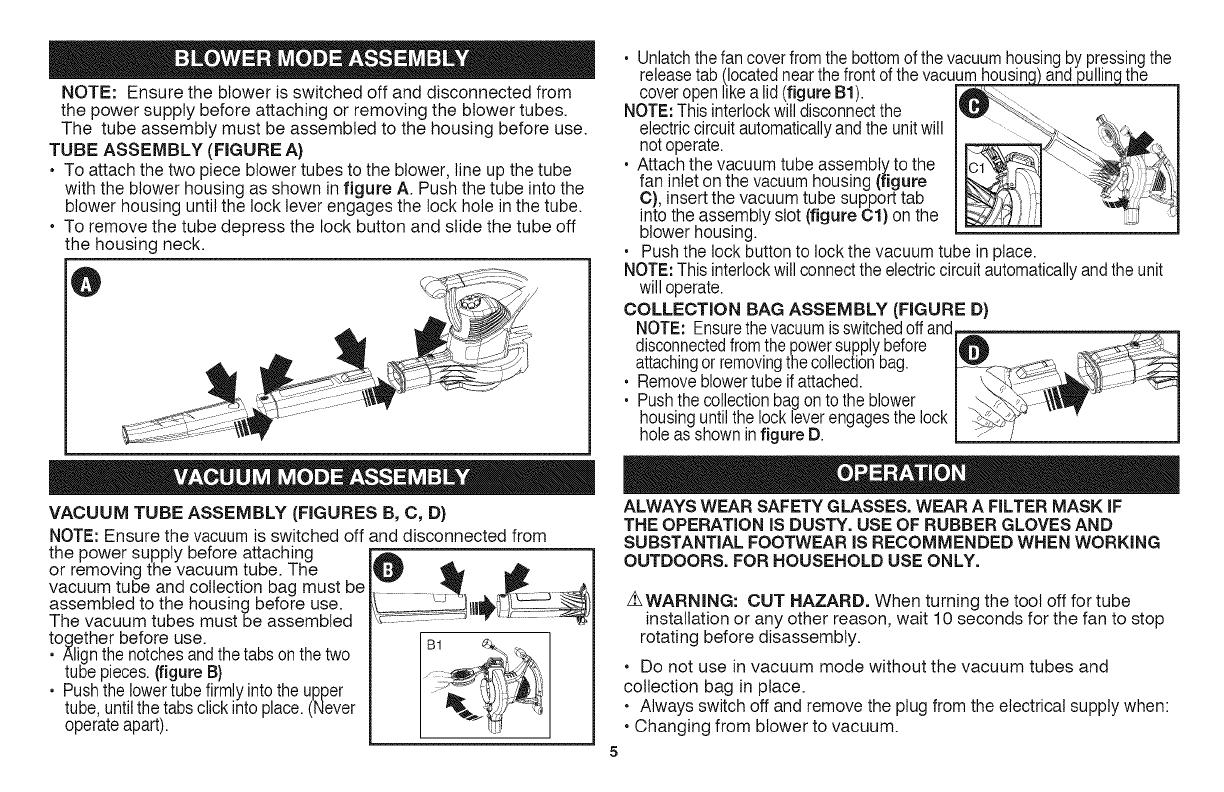
VACUUM TUBE ASSEMBLY (FIGURES B, C, D)
NOTE: Ensure the vacuum is switched off and disconnected from
the power supply before attaching
or removing the vacuum tube. The
vacuum tube and collection bag must be
assembled to the housing before use.
The vacuum tubes must be assembled
together before use.
, Alignthe notchesand the tabs on the two
tube pieces. (figure B)
, Push the lower tubefirmly intothe upper
tube, untilthetabs click intoplace. (Never
operate apart).
. Unlatch the fan coverfrom the bottom of the vacuumhousin( ;Ingthe
release tab.(locatednear the front ofthe vacuum housinc the
cover openhkea lid(figure B1).
NOTE:This interlockwill disconnectthe
electriccircuit automaticallyandthe unit will
not operate. ....
. Attach the vacuum tube assembly to the
fan inlet on the vacuum housing (figure
C), insert the vacuum tube support tab
into the assembly slot (figure Cl) on the
blower housing.
. Push the lock button to lock the vacuum tube in place.
NOTE:This interlockwill connect theelectric circuit automaticallyandthe unit
will operate.
COLLECTION BAG ASSEMBLY (FIGURE D}
NOTE: Ensurethevacuum isswitchedoff and--
disconnectedfromthe powersupplybefore I0 __ ....
attachingor removingthe collectionbag. [___7_<:_.__-_ T__::_
. Remove blowertube ifattached. | \ _"'_.'
Push thecollection bagon tothe blower | ,_
housing untilthe lock leverengagesthe lock | _">_
hole as shown infigure D.
ALWAYS WEAR SAFETY GLASSES. WEAR A FILTER MASK IF
THE OPERATION IS DUSTY. USE OF RUBBER GLOVES AND
SUBSTANTIAL FOOTWEAR iS RECOMMENDED WHEN WORKING
OUTDOORS. FOR HOUSEHOLD USE ONLY.
z_WARNING: CUT HAZARD. When turning the tool off for tube
installation or any other reason, wait 10 seconds for the fan to stop
rotating before disassembly.
• Do not use in vacuum mode without the vacuum tubes and
collection bag in place.
• Always switch off and remove the plug from the electrical supply when:
• Changing from blower to vacuum.
•Thepowersupplycordhasbecomedamagedorentangled.
•Youleavebtower/vacunattended.
•Clearingablockage.
•Checking,adjusting,cleaningorworkingonblower/vac.
Use blower/vac only in daylight or good artificial light.
SWITCHING ON AND OFF (FIGURE E}
Z_WARNING: USE BOTH HANDS TO GRiP THE PRODUCT
FIRMLY WHEN SWITCHING ON.
ZLWARNING: The tool will continueto run for approximately 5
seconds after it has been switched off. Use bothhandsto grip thetool
and letthe motorcometo acomplete stop beforesettingthe tool down.
Your blower vac is fitted with a two
speed switch located on the top of
the power head below the handle.
. To use in low speed, rotate on/off
switch (2) clockwise to Position "r'.
To use in high speed, rotate on/off
switch (2) clockwise to Position "ll".
. To turn tool OFF, rotate on/off switch
(2) counterclockwise to the off
position "0".
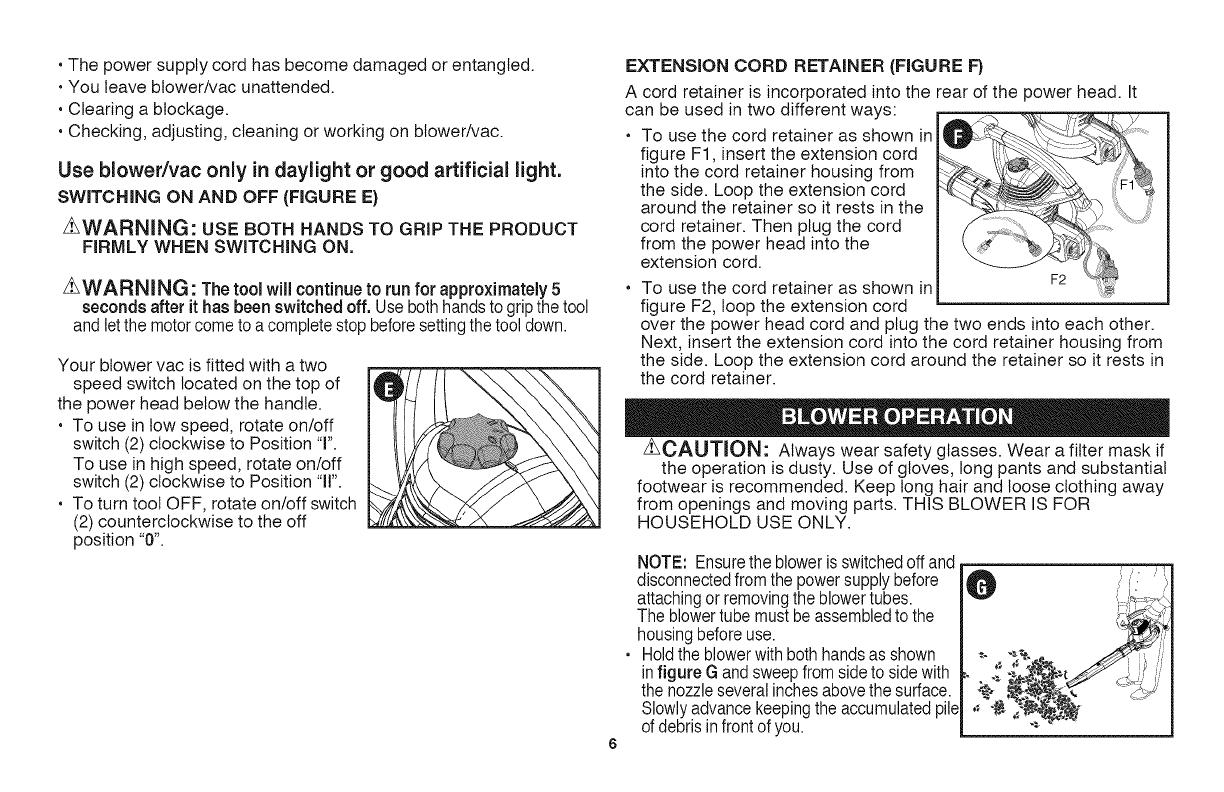
EXTENSION CORD RETAINER (FIGURE F}
A cord retainer is incorporated into the rear of the power head. It
can be used in two different ways:
• To use the cord retainer as shown in
figure F1, insert the extension cord
into the cord retainer housing from
the side. Loop the extension cord
around the retainer so it rests in the
cord retainer. Then plug the cord
from the power head into the
extension cord.
To use the cord retainer as shown in
figure F2, loop the extension cord
__ F _
over the power head cord and plug the two ends into each other.
Next, insert the extension cord into the cord retainer housing from
the side. Loop the extension cord around the retainer so it rests in
the cord retainer.
z_CAUTION: Always wear safety glasses. Wear a filter mask if
the operation is dusty. Use of gloves, long pants and substantial
footwear is recommended. Keep tong hair and loose clothing away
from openings and moving parts. THIS BLOWER IS FOR
HOUSEHOLD USE ONLY.
NOTE: Ensure the blower isswitched offand
disconnectedfrom the powersupply before
attachingor removing theblowertubes.
The blowertube must be assembledtothe
housing beforeuse.
, Holdthe blowerwith bothhands asshown
in figure G and sweepfrom side to sidewith
the nozzle several inchesabove the surface.
Slowly advancekeeping the accumulatedpile
of debrisinfront of you.
O
d'
NOTE: Ensurethe vacuum isswitchedoff anddisconnectedfromthe power
supplybeforeattachingor removingthe vacuumtube.Thevacuumtube and
collectionbag mustbeassembledto the housingbeforeuseinvacuum mode.
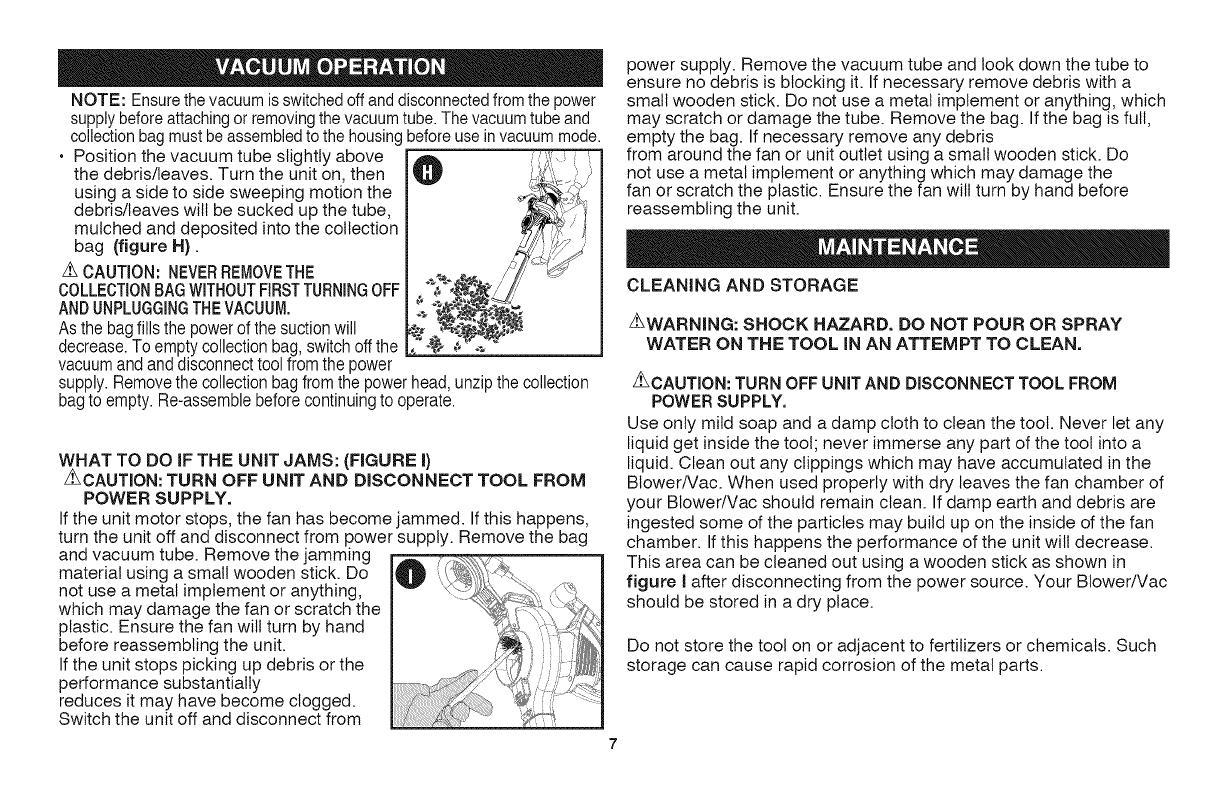
• Position the vacuum tube slightly above
the debris/leaves. Turn the unit on, then
using a side to side sweeping motion the
debris/leaves wilt be sucked up the tube,
mulched and deposited into the collection
bag (figure N).
z_ CAUTION: NEVERREMOVETHE
COLLECTIONBAGWITHOUTFIRSTTURNINGOFF
ANDUNPLUGGINGTHEVACUUM.
Asthe bagfillsthe powerofthe suction will
decrease. Toempty collectionbag,switch offthe
vacuumandand disconnecttool from the power
m
_L_Z
\/ r
jr
",,.%_;_ / /'
supply.Removethe collection bagfrom the powerhead, unzip thecollection
bagto empty. Re-assemblebefore continuingto operate.
WHAT TO DO iF THE UNiT JAMS: (FIGURE I)
Z_CAUTION: TURN OFF UNIT AND DISCONNECT TOOL FROM
POWER SUPPLY.
Ifthe unit motor stops, the fan has become jammed. Ifthis happens,
turn the unit off and disconnect from power supply. Remove the bag
and vacuum tube. Remove the jamming
material using a small wooden stick. Do
not use a metal implement or anything,
which may damage the fan or scratch the
plastic. Ensure the fan will turn by hand
before reassembling the unit.
Ifthe unit stops picking up debris or the
performance substantially
reduces it may have become clogged.
Switch the unit off and disconnect from
power supply. Remove the vacuum tube and look down the tube to
ensure no debris is blocking it. If necessary remove debris with a
small wooden stick. Do not use a metal implement or anything, which
may scratch or damage the tube. Remove the bag. If the bag is full,
empty the bag. If necessary remove any debris
from around the fan or unit outlet using a small wooden stick. Do
not use a metal implement or anything which may damage the
fan or scratch the plastic. Ensure the fan will turn by hand before
reassembling the unit.
CLEANING AND STORAGE
Z_WARNING: SHOCK HAZARD. DO NOT POUR OR SPRAY
WATER ON THE TOOL IN AN ATTEMPT TO CLEAN.
Z_CAUTION: TURN OFF UNiT AND DISCONNECT TOOL FROM
POWER SUPPLY.
Use only mild soap and a damp cloth to clean the tool. Never let any
liquid get inside the tool; never immerse any part of the toot into a
liquid. Clean out any clippings which may have accumulated in the
BtowerNac. When used properly with dry leaves the fan chamber of
your Blower/Vac should remain clean. If damp earth and debris are
ingested some of the particles may build up on the inside of the fan
chamber. If this happens the performance of the unit wilt decrease.
This area can be cleaned out using a wooden stick as shown in
figure I after disconnecting from the power source. Your Blower/Vac
should be stored in a dry place.
Do not store the tool on or adjacent to fertilizers or chemicals. Such
storage can cause rapid corrosion of the metal parts.

z_WARNING: DO NOT use this product with any type of
accessory or attachment. Such usage might be hazardous.
This device complies with part 15 of the FCC rules. Operation
is subject to the following two conditions: (1) This dewce may
not cause harmful interference, and (2) this device must accept
any interference received, including interference that may cause
undesired operation.
NOTE: This equipment has been tested and found to comply
with the limits for a Class B digital device, pursuant to Part
15 of the FCC Rules. These limits are designed to provide
reasonable protection against harmful interference in a residential
installation. This equipment generates, uses and can radiate radio
frequency energy and, if notinstatted and used in accordance
with the instructions, may cause harmful interference to radio
communications. However, there is no guarantee that interference
wilt not occur in a particular installation.
Ifthis equipment does cause harmful interference to radio or
television reception, which can be determined by turning the
equipment off and on, the user is encouraged to try to correct the
interference by one or more of the following measures:
• Reorient or relocate the receiving antenna.
• Increase the separation between the equipment and receiver.
• Connect the equipment into an outlet on a circuit different from that
to which the recewer is connected.
• Consult the dealer or an experienced radio/TV technician for help.
Changes or modifications to this unit not expressly approved by
the party responsible for compliance could void the user's authority
to operate the equipment. This Class B digital apparatus complies
with Canadian ICES-003.
Problem
• Unit will
not start.
Possible Cause
• Fan cover or vac tube
not installed properly
• Cord not plugged in.
• Circuit fuse is blown.
• Circuit breaker is tripped.
• Cord or switch
is damaged.
• Debris blocking fan.• Unit jammed
Possible Solution
• Install fan cover for
blower mode or vac
tube for vac mode.
• Plug tool into a
working outlet.
• Replace circuit fuse.
(If the product
repeatedly causes
the circuit fuse to blow,
discontinue use
immediately and
have it serviced at a
Black & Decker
service center or
authorized servicer.
• Replacecircuit breaker.
(If the product
repeatedly causes
the circuit Breakertotrip,
discontinue use
immediately and
have it serviced at a
Black & Decker
service center or
authorized servicer.
• Have cord or switch
replaced at a
Black & Decker
service center or
authorized servicer.
• Remove vac tube and
inspect inlet/outlet for
clogs. Refer to
"Cleaning and Storage
Section - Maintenance"
Forassistancewithyourproductvisitourwebsitewww.blackanddecker.
cornfortheocatonoftheservcecenternearestyouorcatheBLACK&
DECKERhelplineat1-800--544-6986.
AllBlack&DeckerServiceCentersarestaffedwithtrained
personneltoprovidecustomerswithefficientandreliablepower
toolservice.Whetheryouneedtechnicaladvice,repair,orgenuine
factoryreplacementparts,contacttheBlack&Deckerlocation
nearestyou.Tofindyourlocalservicelocation,refertotheyellow
pagedirectoryunder"Tools--Electric"orcall:1-800-544-6986or
visitwww.blackanddecker.corn.
Black&Decker(U.S.)Inc.warrantsthisproductfortwoyearsagainst
anydefectsinmaterialorworkmanship.Thedefectiveproductwillbe
replacedorrepairedatnochargeineitheroftwoways.
Thefirstistoreturntheproducttotheretailerfromwhomitwas
purchased(providedthatthestoreisaparticipatingretailer).Returns
shouldbemadewithinthetimeperiodoftheretailer'spolicyfor
exchanges(usually30to90daysafterthesate).Proofofpurchase
mayberequired.Pleasecheckwiththeretailerfortheirspecific
returnpolicyregardingreturnsthatarebeyondthetimesetfor
exchanges.
Thesecondoptionistotakeorsendtheproduct(prepaid)toa
Black&DeckerownedorauthorizedServiceCenterforrepairor
replacementatouroption.Proofofpurchasemayberequired.
Black&DeckerownedandauthorizedServiceCentersarelisted
under"Toots-Electric"intheyellowpagesofthephonedirectory.
Thiswarrantydoesnotapplytoaccessories.Thiswarrantygives
youspecificlegalrightsandyoumayhaveotherrightswhichvary
fromstatetostateorprovincetoprovince.Shouldyouhaveany
_uestions,contactthemanagerofyournearestBlack&Decker
erviceCenter.Thisproductisnotintendedforcommercialuse.
LATINAMERICA:Thiswarrantydoesnotapplytoproductssold
inLatinAmerica.ForproductssoldinLatinAmerica,checkcountry
specificwarrantyinformationcontainedinthepackaging,callthe
localcompanyorseethewebsiteforwarrantyinformation.
FREEWARNINGLABELREPLACEMENT:Ifyourwarninglabels
becomeillegibleoraremissing,call1-800-544-6986forafree
replacement.
ImpoSedby
Black&Decker(U.S.)lnc.,
701E.JoppaRd.
Towson,MD21286U.S.A.
See'Tools-Electric'
- YellowPages-
forService& Sales
- GARANTiA BLACK & DECKER - BLACK & DECKER WARRANTY
. SOLAMENTE PARA PROPOSITOS DE MEXICO
Distributor Name • Seflo firma del distribuidor
Date of purchase • Fecha de compra Invoice No. •No. de factura
PRODUCT INFOIVlATION - IDENTIFICACION DEL PRODUCTO
Cat. No. • Catalogo 6 Modelo
Serial Number. No. de serie
Name • Nombre
LastName •Apeflt_
Address. Direcci6n
City • Ciudad State •Estado
Postal Code • Codigo Postal Country. Pais
Telephone. No. Tel6fono
3O
/