Page is loading ...
GEAppliances.corn
Safety Instructions .............. 2,s
Operating Instructions
Controls ............................ 4-9
Features .......................... i0-ii
Quick Start ........................... 5
Loading and Using the Washer .... 12-13
Care and Cleaning ............ 14-17
Installation Instructions
Preparing to Install Your Washer ...... 18
Location of Your Washer ............. 19
Rough-In Dimensions ................. 19
Unpacking Your Washer .............. 20
Electrical Requirements .............. 21
Grounding Requirements ............. 21
Drain Requirements .................. 22
Water Supply Requirements .......... 22
Installing the Washer .............. 23-24
Replacement Ports ................... 24
Troubleshooting Tips ......... 25-29
Consumer Support
Warranty (U.S.)....................... 30
Warranty (Canada) ................... 31
Consumer Support .......... Back Cover
GFWS1705
GFWS1700
GFWS1605
GFWS1600
GFWH1200
GFWN11 O0
Laveuses
La section fran_ais commence la page 33
Lavadoras
La secci6n en espafiol empieza en la p6gina 65
Printed in China
I
ENERGYSTAR
As an ENERGYSTAR@partner,
GEhas determined that this
product meets the ENERGYSTAR@
guidelines for energy efficiency.
Write the model and serial
numbers here:
Model #
Serial #
Youcan find them on a label on the
side of the washer.
49-90521-I 0¢-i¢ GE
IMPORTANT SAFETY INFORMATION.
READ ALL INSTRUCTIONS BEFORE USING.
m
Thisisthe safety alert symbol. Thissymbol alerts to potential hazardsthat can kill or hurt and others.Allsafety
you you you
messageswill follow the safety alert symbol and the word "DANGER","WARNING",or "CAUTION".Thesewords aredefined as:
Indicates a hazardous situation which, if not avoided, will result in death or serious inJury.
Indicates a hazardous situation which, if not avoided, could result in death or serious inJury.
_ Indicates hazardous situation which, if not avoided, could result in minor moderate
a or
inJury.
IMPORTANT SAFETYINSTRUCTIONS
To reduce the risk of death, fire, explosion,electric shock,or injury to persons when usingyour appliance,
follow basic precautions, including the following:
[] Readall instructionsbeforeusingtheappliance.
[] DONOTwash or dry articles that have been previously cleaned in,washed in,soaked in or spotted with gasoline,
dry-cleaning solvents, or other flammable or explosive substances, asthey give off vapors that could ignite or explode.
[] DONOTadd gasoline, dry-cleaning solvents, or other flammable or explosive substances to the wash water. These
substances give off vapors that could ignite or explode.
[] Under certain conditions, hydrogen gas may be produced in a hot-water system that has not been used for 2 weeks
or more. HYDROGENGAS ISEXPLOSIVE.If the hot water system has not been used for such a period, before using a
washing machine, turn on all hot-water faucets and let the water flow from each for several minutes. This will release
any accumulated hydrogen gas. As the gas is flammable, DO NOTsmoke or use an open flame during this time.
[] DONOTallow children to play on or in this appliance. Close supervision of children is necessary when this appliance is
used near children. Before the washer is removed from service or discarded, remove the door or lid. Failure to follow
these instructions may result in death or injury to persons.
[] DONOTreach into the appliance if the tub or agitator is moving to prevent accidental entanglement.
[] DONOTinstall or store this appliance where it will be exposed to the weather.
[] DONOTtamper with controls, repair or replace any part of this appliance or attempt any servicing unless specifically
recommended in the user maintenance instructions or in published user repair instructions that you understand and
have the skills to carry out.
[] Keepthe area around your appliance clean and dry to reducethe possibility of slipping.
[] DONOToperate this appliance if it isdamaged, malfunctioning, partially disassembled, or hasmissing or broken parts
including a damaged cord or plug.
[] Unplug the appliance or turn off the circuit breaker before servicing. Pressingthe Power button DOESNOTdisconnect power.
[] See "Electrical Requirements" located in the Installation Instructions for grounding instructions.
SAVETHESE INSTRUCTIONS

GEAppliances.com
PROPERINSTALLATION
_b This washer must be properly installed and located in accordance with the Installation Instructions before it is used.
If you did not receive an Installation Instructions, you can receive one by visiting GEAppliences.com or by calling
800.GE.CARES(800.452.2757). In Canada, visit www.geeppliences.ce or call 800.561.3344.
[]
[]
[]
Ensurethat the hot water hose isconnected to the "H"
(internalred screened)valve and the cold water hose is
connected to the "C"(internal blue screened)valve.
Installor store where it will not be exposed to
temperatures below freezing or exposedto the weather,
which could cause permanent damage and invalidate the
warranty.
Properlyground washer to conform with all
governing codes and ordinances. Follow details
in Installation Instructions.
[] Thiswasher doesnot include water supply hoses.
GEstrongly recommends the use offactory specified
parts.A list of factory hoses availablefor purchase are
listed below.These hosesare manufactured and tested to
meet GEspecifications.
Partsand Accessories
Order on-line at GEApplianceparts.com today, 24 hoursa
day or by phone at 800.626.2002during normal business
hours. InCanada, call 800.661.16!6.
Part Number
PM!4X!O002
Or
PM!4X!O005
WXlOXlO011
PM7X!
Accessory
4 ft RubberWater Supply Hoses
/4ft Braided Metal Water Supply Hoses
Tide®Washing Machine Cleaner*
Washer FloorTray
GEstrongly recommends the useof new water supply
hoses.Hosesdegrade over time and need to be replaced
every 5 years to reducethe risk of hosefailures and water
damage.
WHEN NOT IN USE
[] Turn off water faucets to minimize leakage ifa break or
rupture should occur.Checkthe condition ofthe fill hoses;
GErecommends changing the hoses every 5 years.
SAVETHESE INSTRUCTIONS
* Tide® is a registered trademark of Procter & Gamble 3

About the washer control panel.
Throughout this manual, features and appearance may vary from your model.
Youcan locateyour model number on a label on the sideof thewasher or insidethe washerdoor.
Models: GFWS1.700end GFWS1.705- Steam Washer with Time Saver
Models: GFWS1500 and GFWS1605- Steam Washer with Time Saver
f ........................ Towels
Whites _1_.... Shee s
, i._ _Y/ P
/ / '_,
'i L., /Bu ky
Basket (:lean _ Steam
Power
Start / Pause
®
Hodel: GFWH1200
_o,o_=,.;_ii _Power
.......i,)-,--- ......................................--t\v_=] /
Basket Clean 1_i, _, i_C:::i _ _i
@
Hodel: GFWN:DO0
Droin+Spi
Start
@

Control settings. GEApUiances.com
Quick Start
NOTE:Features and appearance vary by model.
r_ Pressthe Power button. P....
If the screen is dark, a press
of the Power button will
"wake up" the display.
r_ Selecta wash cycle.(Defaults are
set for each cycle.Thesedefault
settings can be changed. See
Control settings for more
information.)
r31 Press the Start/Pause button.
Start/Pause
Power
Press to "wake up" the display. Ifthe display is active, press to put the washer into standby mode.
NOTE: Pressing Power does not disconnect the appliance from the power supply.
Wash Cycles
The wash cycles are optimized for specific types of wash loads. The chart below will help you match the wash setting
with the loads.
Colors/Normals* Forheavily to lightly soiled colorfast cottons, household linens, work and play clothes.
Whites* Forheavily to lightly soiled white laundry, work and play clothes.
Bulky/Bedding* Forlarge items such as comforters, blankets, small rugs and similar bulky items.
Active Wear* Foractive sports, exercise and some casual wear clothes. Fabrics include modern
(on some models) technology finishes and fibers such as spandex, stretch and micro-fibers.
Power Clean*
Forheavily soiled items which require extra cleaning power.
(on some models)
i
iForincreased water temperature which will sanitizeand kill more than 99.9%of many common
ibacteria found in home laundry. Forbest results,selectthe extra heavy soil setting when using
lthe Sanitize cycle.
_ S_ sanitization PNeSrfForPr_°tn°C°loP172,dential and
® Commercial, Family-Sized Clothes Washers
Sanitize*
(on some models)
Towels/Sheets*
(on some models)
Foritems such as towels, sheets, pillowcases and dish rags.
Delicates/ Foritems labeled hand-washable with light soils. Provides gentle tumbling and soak during
Hand Wash wash and rinse.
Speed Wash or Forlightly soiled items that are needed in a hurry. Cycletime isapproximately 30 minutes,
Quick Wash depending on selected options.
Rinse & Spin Toquickly rinse and spin out any items at any time. To achieve a Drain + Spin, deselect the
(on some models) Extra Rinse option.
Drain + Spin
(on some models)
Basket Clean
Toquickly drain and spin out any items at any time. Toachieve a Rinse+ Spin,select the
Extra Rinse option.
Usefor cleaning the basket of residue and odor. Recommended use of at least once per
month.
NOTE:Never load laundry while using Basket Clean. The laundry may become damaged.
See the Care and Cleaning section.
* The Add Steam option (on some models) can be used with these cycles.
Control settings.
Add q:)
Steam
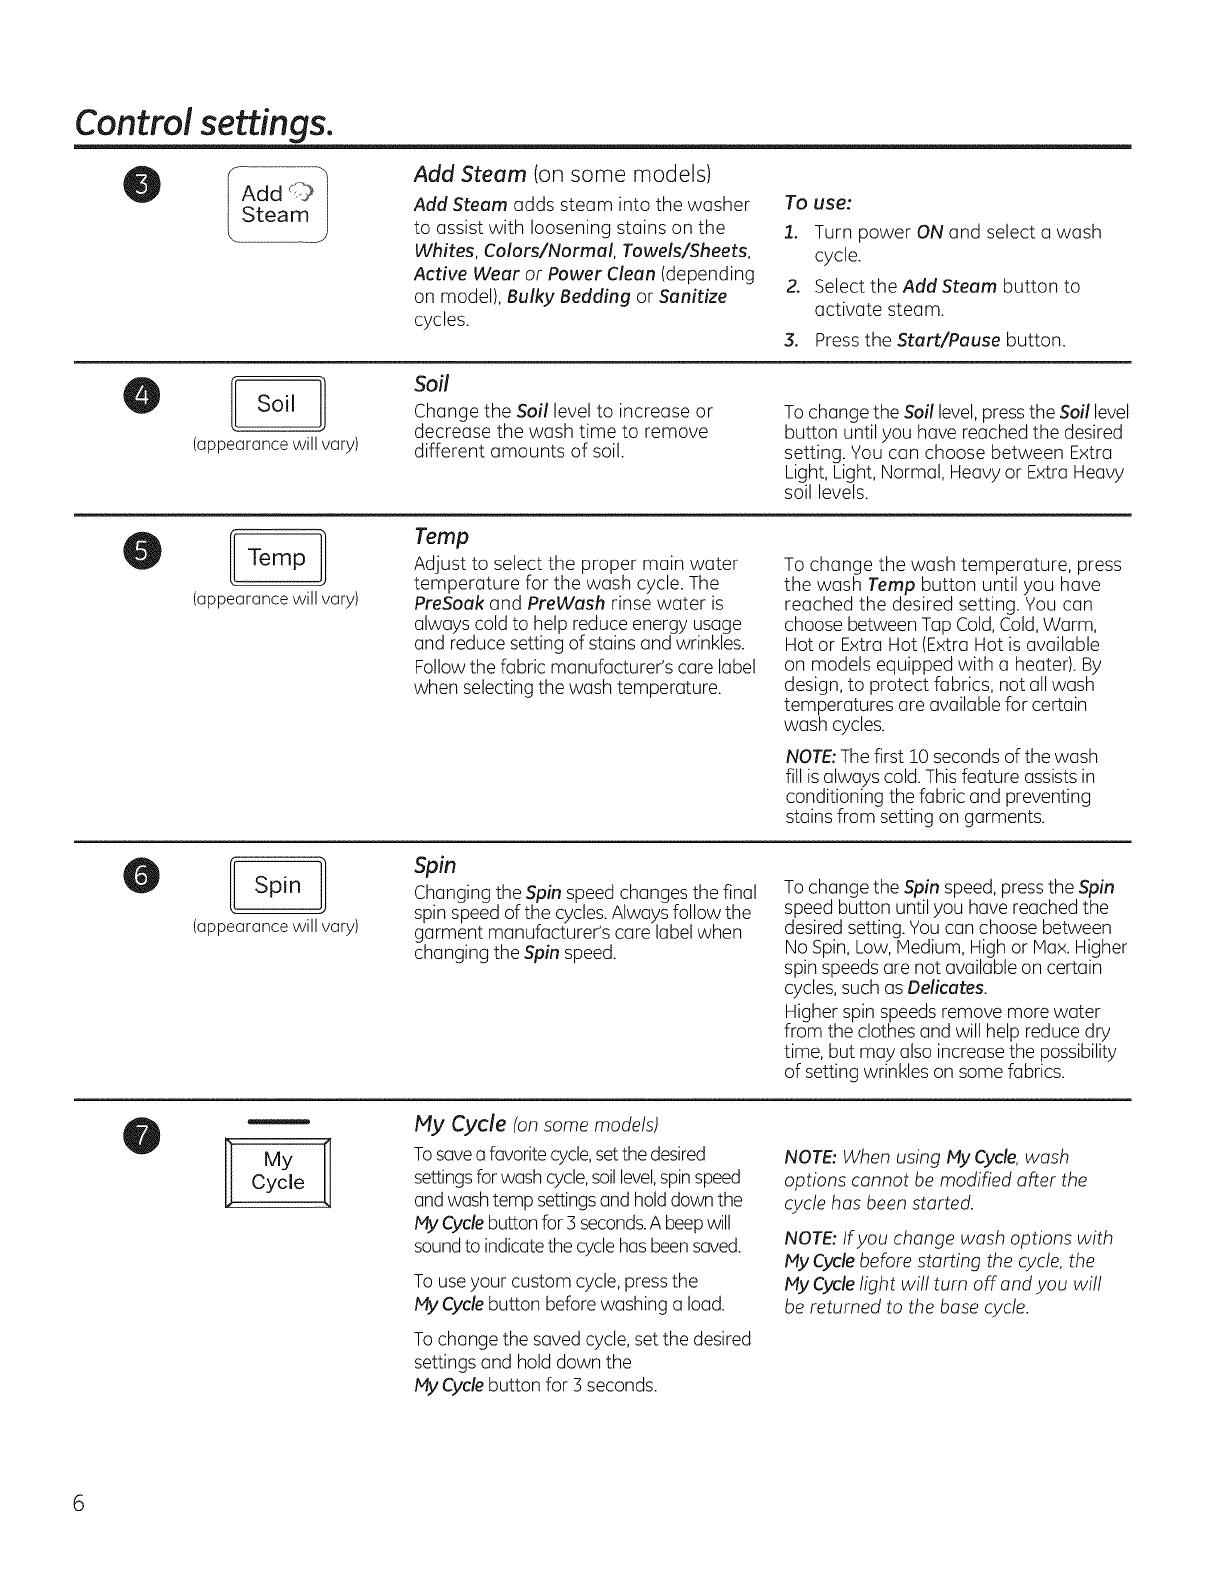
Add Steam (on some models)
Add Steam adds steam into the washer
to assist with loosening stains on the
Whites, Colors/Normal, Towels/Sheets,
Active Wear or Power Clean (depending
on model), Bulky Bedding or Sanitize
cycles.
To use:
1. Turn power ON and select a wash
cycle.
2. Select the Add Steam button to
activate steam.
3. Press the Start/Pause button.
Soil
(appearancewillvary)
Soil
Change the Soil level to increase or
decrease the wash time to remove
different amounts of soil.
To change the Soil level,pressthe Soil level
button until you have reached the desired
setting. You can choose between Extra
Light, Light, Normal, Heavy or Extra Heavy
soil levels.
l Temp
(appearancewillvary)
Tamp
Adjust to select the proper main water
temperature for the wash cycle. The
PreSoak and PreWash rinse water is
always cold to help reduce energy usage
and reduce setting of stains and wrinkles.
Followthe fabric manufacturer's care label
when selecting the wash temperature.
To change the wash temperature, press
the wash Tamp button until you have
reached the desired setting. You can
choose between Tap Cold,Cold,Warm,
Hot or Extra Hot (Extra Hot isavailable
on models equipped with a heater). By
design, to protect fabrics, not all wash
temperatures are available for certain
wash cycles.
NOTE:Thefirst !0 seconds ofthe wash
fill isalways cold. Thisfeature assistsin
conditioning the fabric and preventing
stains from setting on garments.
[ Spin
(appearancewillvary)
Spin
Changingthe Spin speedchanges the final
spinspeed of the cycles.Always follow the
garment manufacturer's care label when
changing the Spin speed.
To change the Spin speed,pressthe Spin
speed button until you have reachedthe
desiredsetting. You can choose between
No Spin,Low, Medium, Highor Max.Higher
spinspeeds are not available on certain
cycles,such asDelicates.
Higher spinspeeds remove more water
from the clothes and will help reduce dry
time, but may also increase the possibility
of setting wrinkles on some fabrics.
My
Cycle
My Cycle (on some models)
Tosavea favoritecycle,setthe desired
settingsforwash cycle,soillevel,spinspeed
andwash temp settingsand holddownthe
My Cyclebuttonfor 3 seconds.Abeepwill
soundto indicatethe cyclehasbeensaved.
To useyour custom cycle,pressthe
MYCyclebutton before washing a load.
Tochange the saved cycle, set the desired
settings and hold down the
My Cyclebutton for 3 seconds.
NOTE:When using MyCycle,wash
options cannot be modified after the
cycle has been started.
NOTE:Ifyou change wash options with
MYCyclebefore starting the cycle, the
My Cyclelight will turn off and you will
be returned to the base cycle.
GEAppliances.com
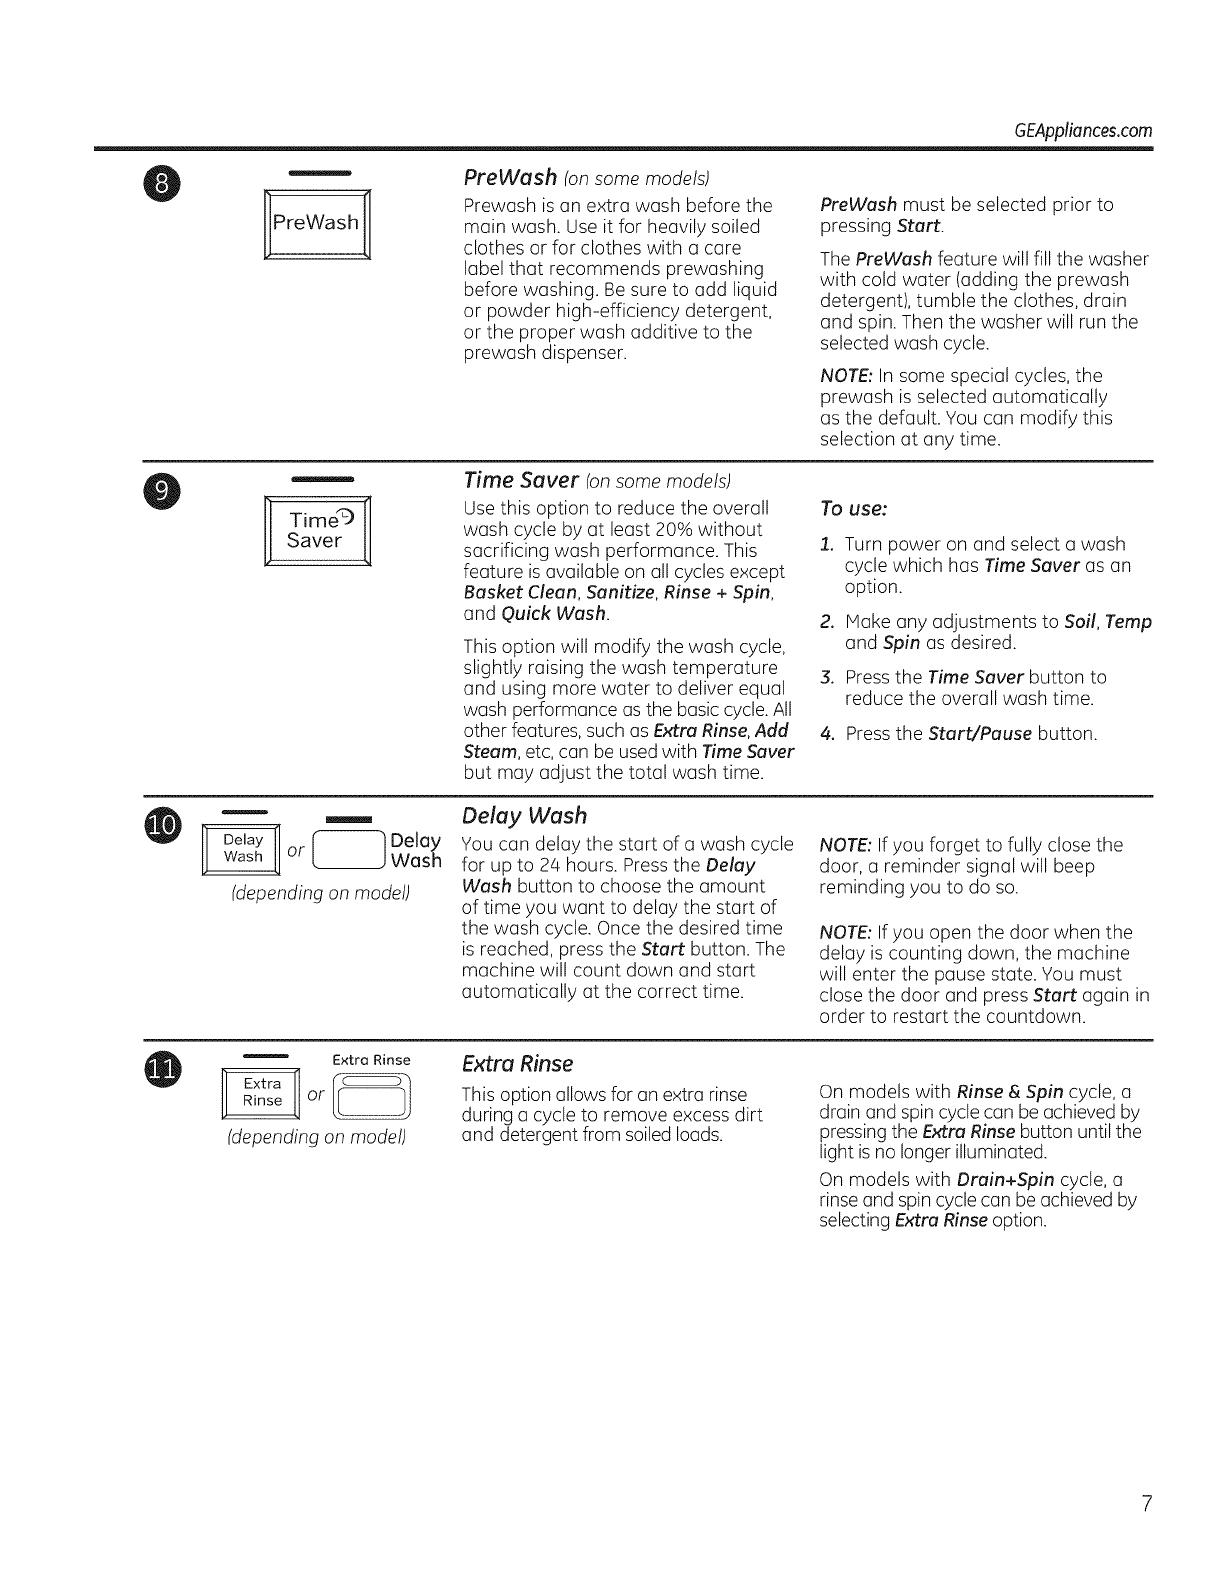
PreWash
PreWash (on some models)
Prewash isan extra wash before the
main wash. Use it for heavily soiled
clothes or for clothes with a care
label that recommends prewashing
before washing. Be sure to add liquid
or powder high-efficiency detergent,
or the proper wash additive to the
prewash dispenser.
PreWash must be selected prior to
pressing Start.
The PreWash feature will fill the washer
with cold water (adding the prewash
detergent), tumble the clothes, drain
and spin. Then the washer will run the
selected wash cycle.
NOTE:In some special cycles, the
prewash is selected automatically
as the default. You can modify this
selection at any time.
Time9
Saver
Time Saver (onsome models)
Use this option to reduce the overall
wash cycle by at least 20% without
sacrificing wash performance. This
feature isavailable on all cycles except
Basket Clean, Sanitize, Rinse + Spin,
and Quick Wash.
This option will modify the wash cycle,
slightly raising the wash temperature
and using more water to deliver equal
wash performance asthe basic cycle. All
other features, such as Extra Rinse,Add
Steam, etc, can be usedwith Time Saver
but may adjust the total wash time.
To use:
1. Turn power on and select a wash
cycle which has Time Saver as an
option.
.
.
Hake any adjustments to Soil, Temp
and Spin as desired.
Pressthe Time Saver button to
reduce the overall wash time.
4. Press the Start/Pause button.
_ Delayor L_J Wash
(depending on model)
Delay Wash
You can delay the start of a wash cycle
for up to 24 hours. Pressthe Delay
Wash button to choose the amount
of time you want to delay the start of
the wash cycle. Once the desired time
is reached, press the Start button. The
machine will count down and start
automatically at the correct time.
NOTE:If you forget to fully close the
door, a reminder signal will beep
reminding you to do so.
NOTE:If you open the door when the
delay is counting down, the machine
will enter the pause state. You must
close the door and press Start again in
order to restart the countdown.
Extra Rinse
(depending on model)
Extra Rinse
This option allows for an extra rinse
during a cycle to remove excess dirt
and detergent from soiled loads.
On models with Rinse & Spin cycle, a
drain and spin cyclecan be achieved by
pressing the Extra Rinse button until the
light isno longer illuminated.
On models with Drain+Spin cycle, a
rinse and spincycle can be achieved by
selecting Extra Rinse option.
Control settings.
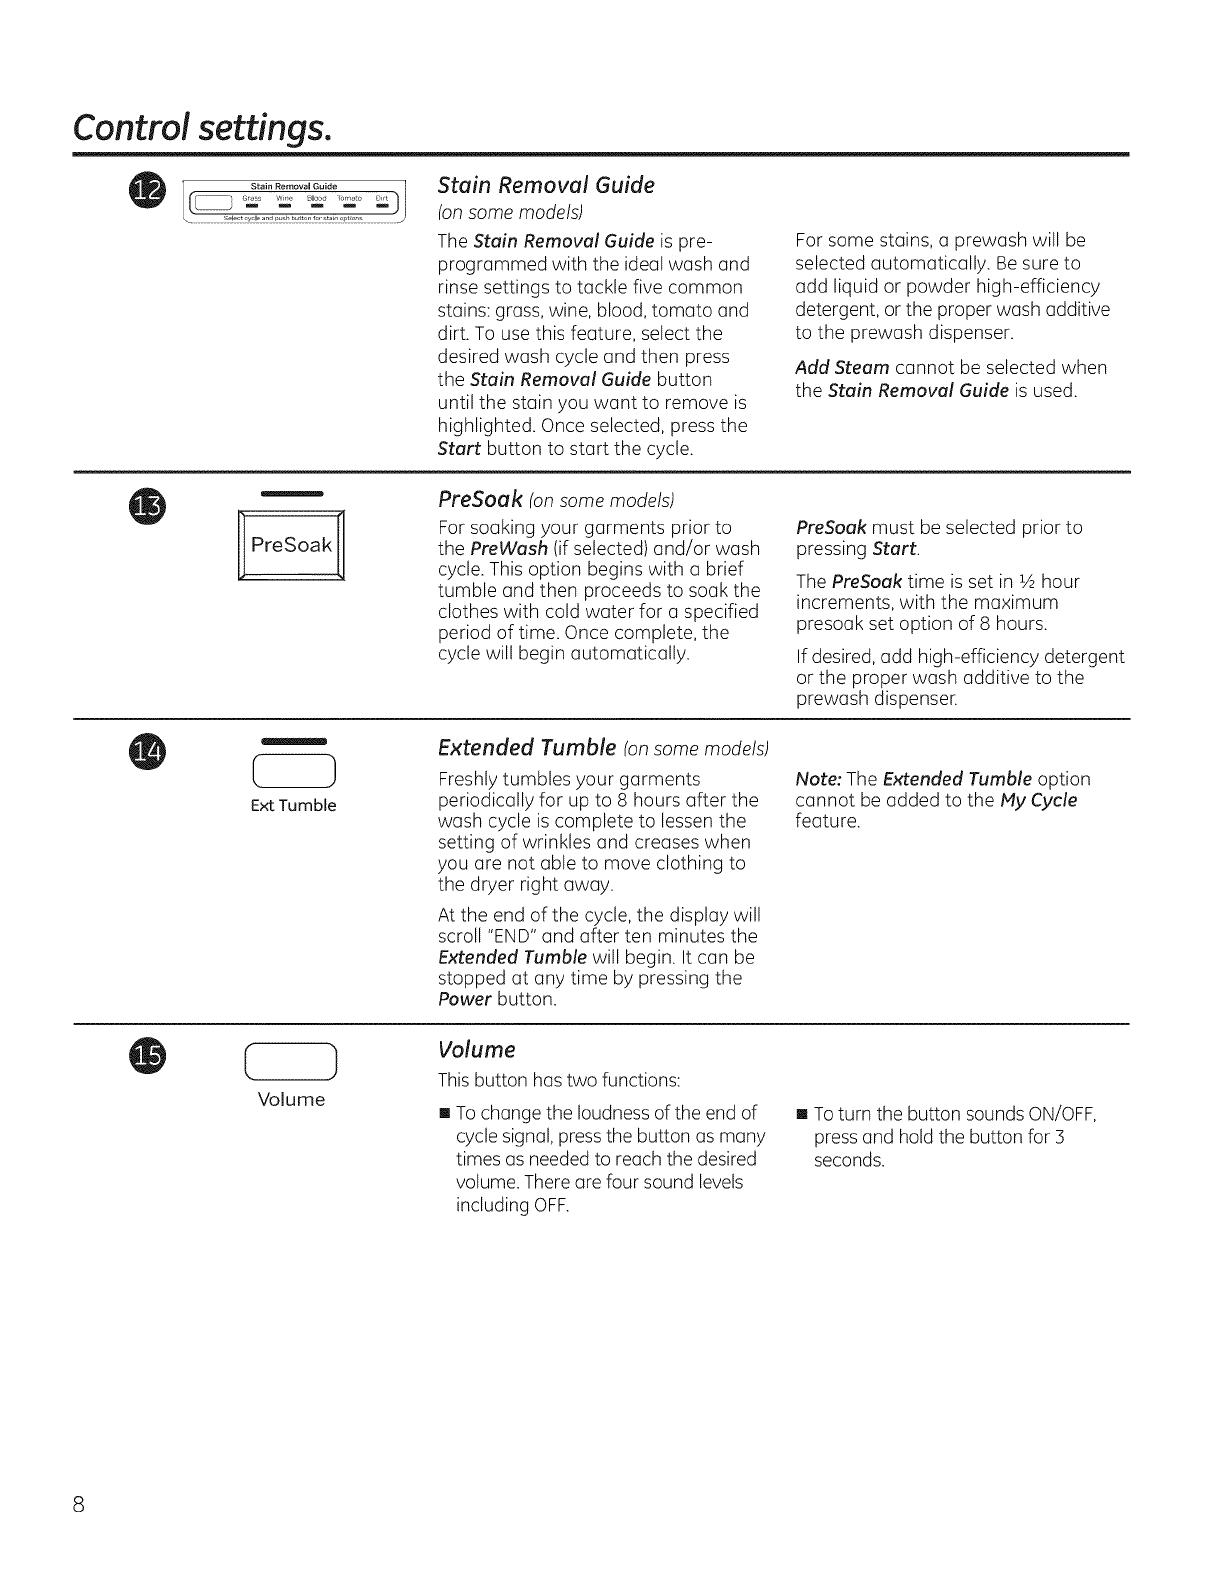
Stain Removal Guide
(on some models)
The Stain Removal Guide is pre-
programmed with the ideal wash and
rinse settings to tackle five common
stains: grass, wine, blood, tomato and
dirt. To use this feature, select the
desired wash cycle and then press
the Stain Removal Guide button
until the stain you want to remove is
highlighted. Once selected, press the
Start button to start the cycle.
For some stains, a prewash will be
selected automatically. Besure to
add liquid or powder high-efficiency
detergent, or the proper wash additive
to the prewash dispenser.
Add Steam cannot be selected when
the Stain Removal Guide is used.
PreSoak
PreSoak (on some models)
For soaking your garments prior to
the PreWash (if selected) and/or wash
cycle. This option begins with a brief
tumble and then proceeds to soak the
clothes with cold water for a specified
period of time. Once complete, the
cycle will begin automatically.
PreSoak must be selected prior to
pressing Start.
The PreSoak time is set in 1/2hour
increments, with the maximum
presoak set option of 8 hours.
If desired, add high-efficiency detergent
or the proper wash additive to the
prewash dispenser.
Ext Tumble
Extended Tumble (onsome models)
Freshly tumbles your garments
periodically for up to 8 hours after the
wash cycle is complete to lessen the
setting of wrinkles and creases when
you are not able to move clothing to
the dryer right away.
At the end of the cycle, the display will
scroll "END"and after ten minutes the
Extended Tumble will begin. It can be
stopped at any time by pressing the
Power button.
Note: The Extended Tumble option
cannot be added to the My Cycle
feature.
(
Volume
Volume
This button has two functions:
[] Tochange the loudness of the end of
cycle signal, pressthe button as many
times as needed to reach the desired
volume.There are four sound levels
including OFF.
[] Toturn the button sounds ON/OFF,
press and hold the button for 3
seconds.

GEAppliances.com
Signal._]) Cycle Signal
Usethe Signal pad to change
the volume of the end of cycle signal.
Pressthe pad untilyou reach
the desiredvolume.
or
Lock Controls Hold 3 Seconds To
Hold 3 Sec Lock/Unlock Controls
(depending on model)
Lock Controls or Lock
(depending on model)
You can lock the controls to prevent
any selections from being made. Or
you can lock or unlock the controls
after you have started a cycle.
Children cannot accidentally start the
washer by touching buttons with this
option selected.
To lock the washer, press and hold the
Lock Controls or Lock button for 3
seconds.
To unlock the washer controls, press
and hold the Lock Controls or Lock
button for 3 seconds.
A sound is made to indicate the lock/
unlock status.
The indicator light above the button
will illuminate when the controls are
locked.
NOTE:The Power button can still be
used when the machine is locked.
Start / Pause
Sta rt
Pause/Add o Garment
Add a Garment
®
(depending on model)
Start/Pause-Add A Garment
Press to start a wash cycle. Ifthe
washer is running, pressing it once will
pause the washer and unlock the door.
Itwilltake a few seconds for the door
to unlock after pressing Pause. Press
again to restart the wash cycle.
NOTE:Ifthe washer is paused and
the cycle is not restarted within 15
minutes, the current wash cycle willbe
cancelled.
NOTE:In some cycles the washer will
drain first, then unlock the door when it
ispaused.
NOTE:The washer performs automatic
system checks after pressingthe Start
button. Water will flow in 45 seconds
or less.You may hear the door lock
and unlock before water flows;thisis
normal.
(appearance will vary
and not all features
on all models)
Display
Displays the approximate time
remaining until the end of the cycle.
NOTE:The cycle time isaffected by
the water pressure in your home and
the balance of the load in the washer.
You may see the time remaining on
the display increase to accommodate
a slower spin speed to handle
unbalanced loads.
On some models,cycle status is also
displayed and certain features such
as Delay Wash or Steam are shown
indicating they havebeen selected.
About the washer features.
The Dispenser Drawer
Slowlyopen the dispenser drawer by pulling
it out until it stops.
After adding laundryproducts,slowlyclose
the dispenserdrawer.Closingthe drawer too
quicklycouldresult inearlydispensingofthe
bleach,fabric softeneror detergent.
Youmay seewater inthe dispenserdrawer
at the end ofthe cycle.Thisisa result ofthe
flushing/siphoningaction and ispart of the
normal operationofthe washer.
The Prewash Compartment (onsomemodels)
[] Only use the Prewash Compartment if
you are selecting the Prewash or Presoak
cycle for heavily soiled clothes. Add
measured detergent or prewash additive
to the back left prewash compartment of
the dispenser drawer.
[] Detergent or prewash additive isflushed
from the dispenser in the prewash or
Presoak cycle (if selected).
NOTE: Liquid detergent will drain into the
washer drum as it is added.
[] Detergent usage may need to be adjusted
for water temperature, water hardness,size
and soil level of the load. Avoid using too
much detergent in your washer as it can
leadto over sudsing and detergent residue
being left on the clothes.
The Detergent Compartment
[] High-efficiency detergent is required for this
washer.Usethe detergent manufacturer's
recommendedamount.
[] Addmeasureddetergentto the front left
detergentcompartment of thedispenser
drawer.
[] Detergentisflushedfrom the dispenser
at the beginningofthe wash cycle.Either
powderedor liquid detergentcan beused.
Detergentusagemayneedto beadjustedfor
water temperature,water hardness,
sizeand soillevelof the load.Avoidusingtoo
muchdetergent inyour washeras it canlead
to oversudsingand detergentresiduebeing
left onthe clothes.
Usingmoredetergentthan the recommended
quantity cancause residuebuildupon your
washer.
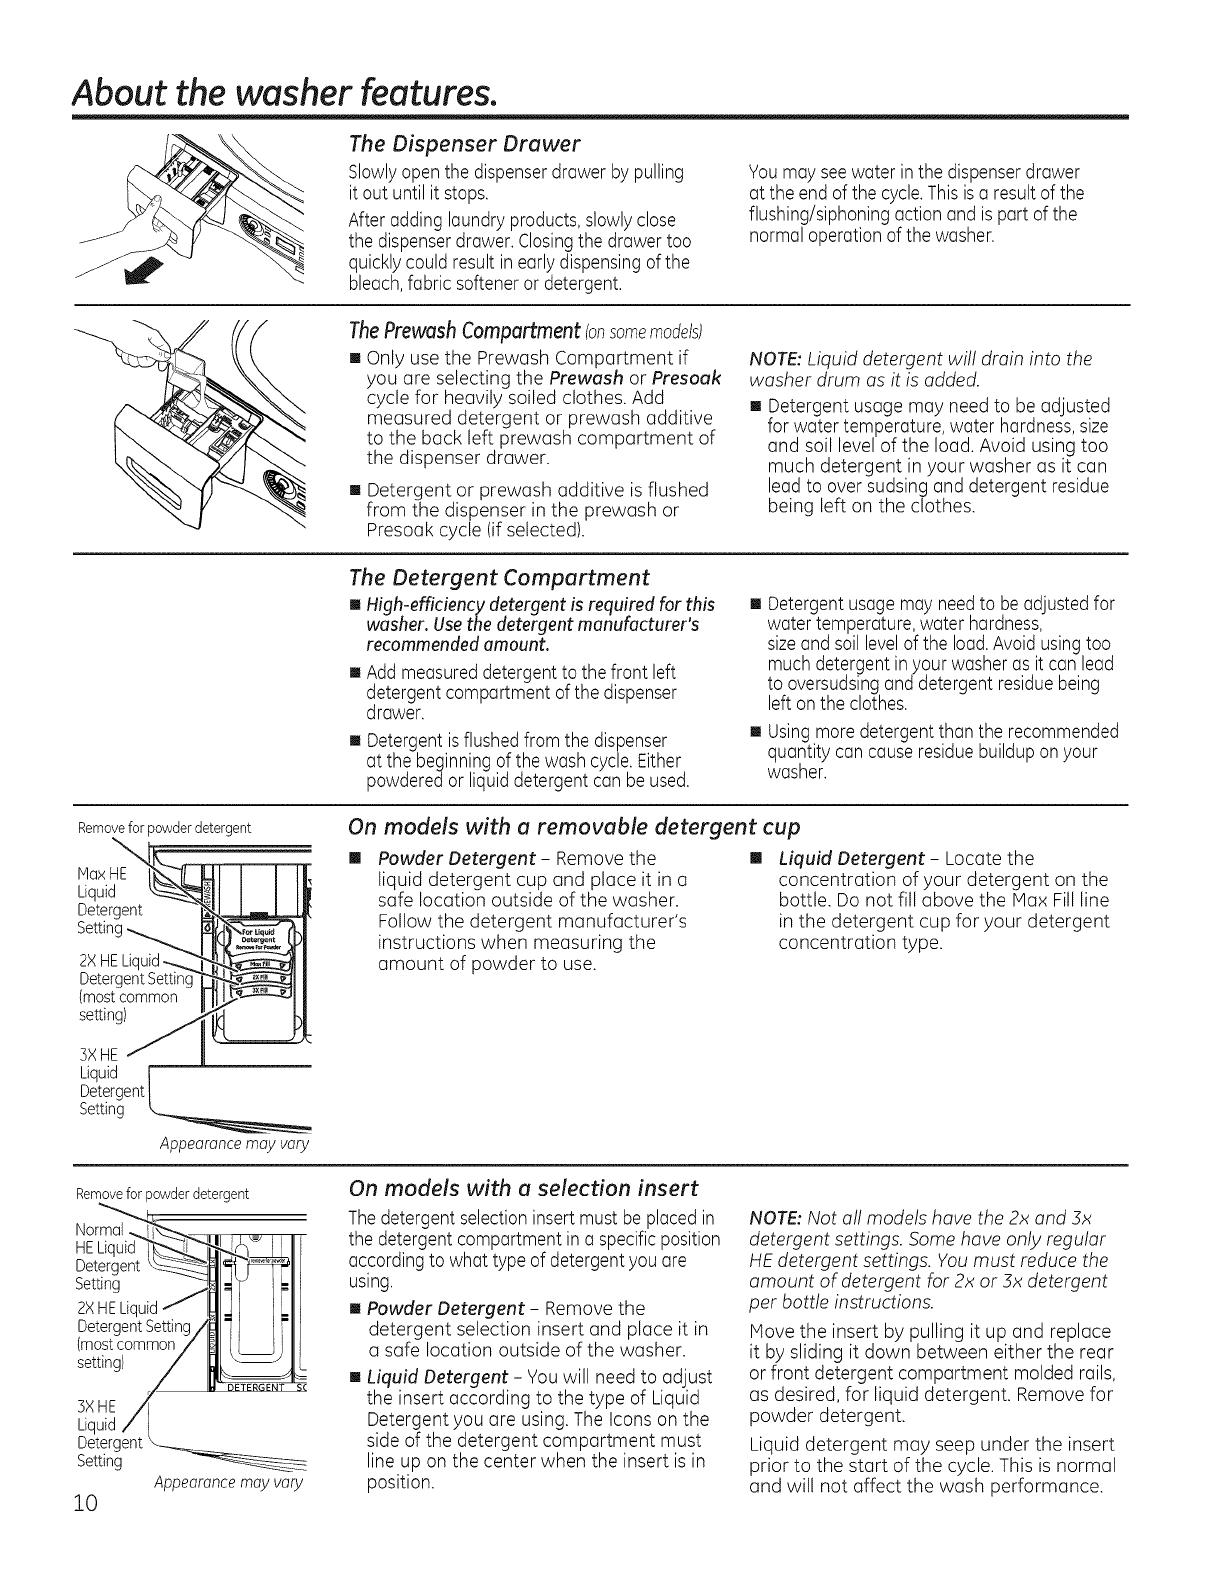
Removeforpowderdetergent
MaxHE
Liquid
Detergent
Setting
2XHELk
Deter(
(mostcommon
setting)
On models with a removable detergent cup
[] Powder Detergent- Remove the []
liquid detergent cup and place it in a
safe location outside of the washer.
Follow the detergent manufacturer's
instructions when measuring the
amount of powder to use.
Liquid Detergent - Locate the
concentration of your detergent on the
bottle. Do not fill above the Max Fill line
in the detergent cup for your detergent
concentration type.
5×HE
Liquid I
Detergent|
Setting _
Appearancemay vary
Removeforpowderdetergent
Norma III _
HE_ I,l,_x I I Ill
Detergentt' lll
Setting _ _'S IL-III
2XHELiquid_f
tmostcommon7 /' 31
3×HE
Liquid/ I
Detergent
Setting
Appearancemayvary
10
On models with a selection insert
Thedetergent selectioninsertmust be placedin
the detergentcompartment in a specificposition
accordingto what type of detergentyouare
using.
[] Powder Detergent - Remove the
detergent selection insert and place it in
a safe location outside of the washer.
Liquid Detergent - You will need to adjust
the insert according to the type of Liquid
Detergent you are using. The Icons on the
side of the detergent compartment must
line up on the center when the insert isin
position.
NOTE:Not all models have the 2x and 3x
detergent settings. Some have only regular
HEdetergent settings. You must reduce the
amount of detergent for 2x or 3x detergent
per bottle instructions.
Move the insert by pulling it up and replace
it by sliding it down between either the rear
or front detergent compartment molded rails,
as desired, for liquid detergent. Remove for
powder detergent.
Liquid detergent may seep under the insert
prior to the start of the cycle. This is normal
and will not affect the wash performance.

Onsomemodels:
GEAppliances.com
The Liquid Bleach Compartment
IMPORTANT:Thebleachcompartment position
varies bymodel. Besureto identify thecorrect
compartment for bleachbefore using.
tf desired,measureout the recommended
amount of liquid bleach,notto exceed
1/3cup (80ml),and pour intothe right
compartment labeled"LIQUIDBLEACH".
Donot exceedthemaximumfill line.Overfilling
cancauseearlydispensingofthe bleachwhich
couldresultin damagedclothes.
NOTE:Donot usepowderedbleachinthe
dispenser.
Onsomemodels:
Onsomemodels:
Onsomemodels:
The Fabric Softener Compartment
IMPORTANT:Thefabric softener compartment
position varies by model. Besureto identify the
correct compartment for fabric softener before
using.
tf desired,pour the recommendedamount
of liquidfabric softenerinto thecompartment
labeled"FABRICSOFTENER."
Useonlyliquid fabricsoftenerin thedispenser.
Dilutewith water to themaximumfill line.
Donot exceedthemaximum fillline.Overfillingcan
causeearlydispensingofthefabric softenerwhich
couldstainclothes.
NOTE:Donotpour fabric softenerdirectly
on thewash load.
11
Loadingand usingthewasher.
Always follow fabric manufacturer's care label when laundering.
Preparing Clothes
[] Toavoid snags during washing.
Follow these steps to maximize garment care.
Closegarment zippers, snaps, buttons and hooks.
Hend seams, hems, tears.
Empty oll items from pockets.
• Remove nonwoshoble garment accessories such asornaments and nonwoshoble trim materials.
[] To avoid tangling, tie strings, draw ties and belt-like materials.
[] Brush away surface dirt and lint; treat spots and stains.
[] Promptly wash wet or stained garments to maximize results.
[] Mix garments using recommended maximum load sizes on page !J.
[] Use nylon mesh garment bags to wash small items.
[] Wash multiple garments at one time for best results.
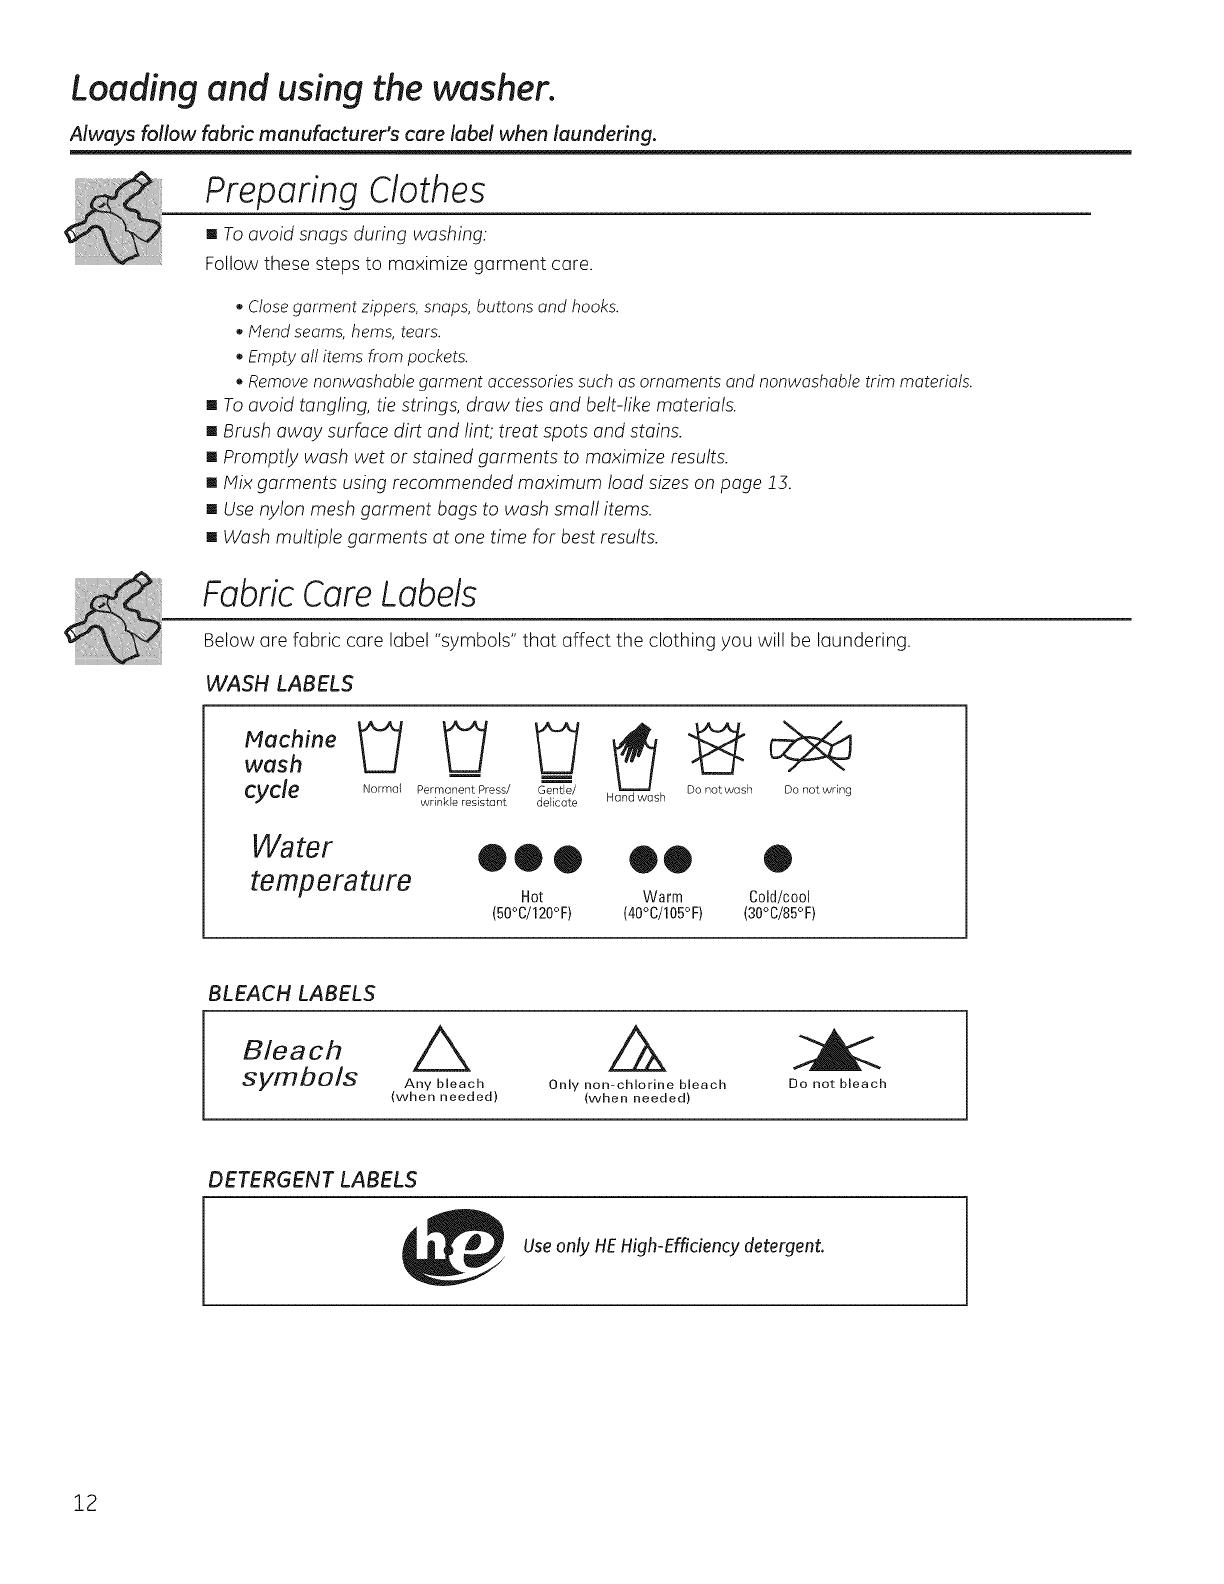
FabricCare Labels
Below are fabric care label "symbols" that affect the clothing you will be laundering.
WASH LABELS
CyCle Normal Permanent Press/ Gentling/ Do notwash Do not wring
wrinkle resistant delicate Hand wash
Water • • • 00 •
temperature Hot Warm Cold/cool
(50°C/120°F) (40°C/105°F) (30°C/85°F)
BLEACH LABELS
Bleach_,. , _ A
symuois Any bleach Only non-chlorine bleach
(when needed) (when needed)
Do not bleach
DETERGENT LABELS
Useonly HEHigh-Efficiency detergent.
12
GEAppliances.com
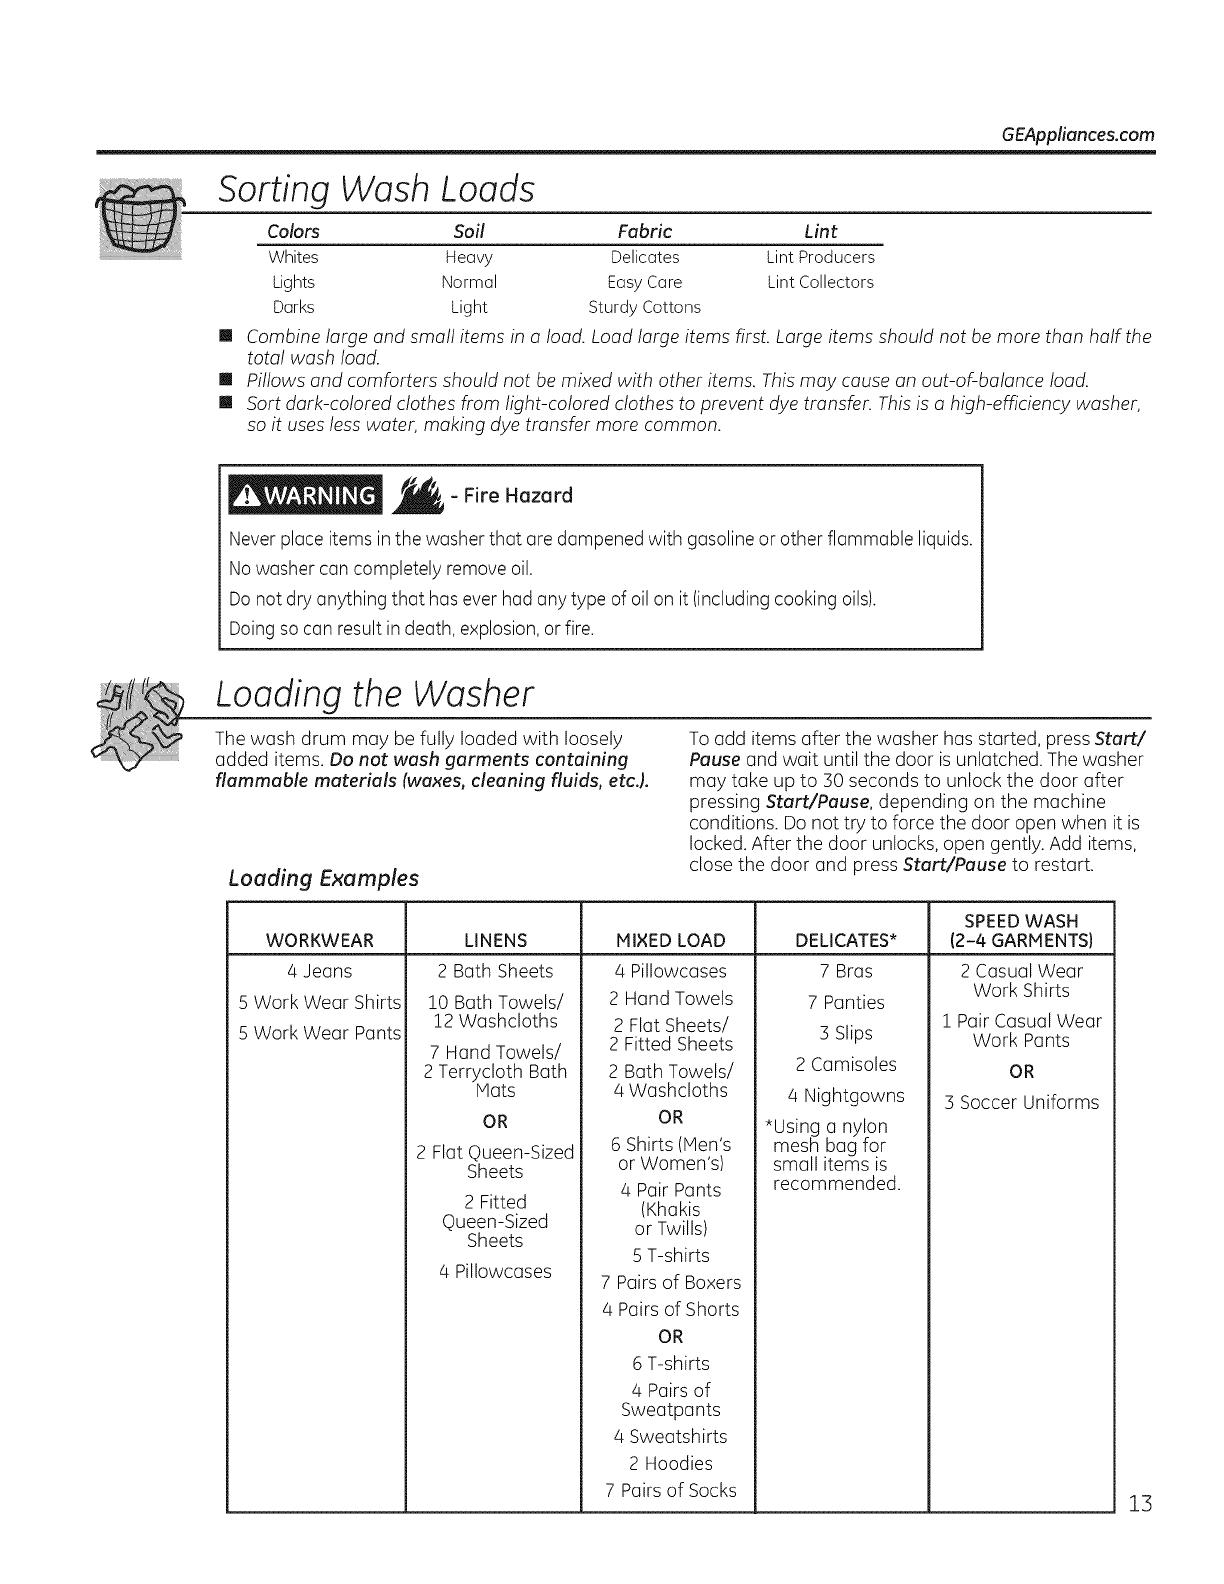
Wash Loads
Sorting
Colors
Whites
Lights
Barks
[]
[]
[]
Soil Fabric Lint
Heavy Delicates LintProducers
Normal EasyCare LintCollectors
Light SturdyCottons
Combine large and small items in a load. Load large items first. Large items should not be more than half the
total wash load.
Pillows and comforters should not be mixed with other items. Thismay cause an out-of-balance load.
Sort dark-colored clothes from light-colored clothes to prevent dye transfer. Thisis ahigh-efficiency washer,
so it usesless water, making dye transfer more common.
- Fire Hazard
Never place items in the washer that are dampened with gasoline or other flammable liquids.
Nowasher can completely remove oil.
Do not dry anything that has ever hadany type of oil on it (including cooking oils).
Doing socan result in death, explosion,or fire.
Loading the Washer
The wash drum may be fully loaded with loosely
added items. Do not wash garments containing
flammable materials (waxes, cleaning fluids, etc.).
Lauding Examples
To add items offer the washer has started, press Start/
Pause and wait until the door is unlatched. The washer
may take up to 30 seconds to unlock the door after
pressing Start/Pause, depending on the machine
conditions. Do not try to force the door open when it is
locked. After the door unlocks, open gently. Add items,
close the door and press Start/Pause to restart.
WORKWEAR
4 Jeans
5 Work Wear Shirts
5 Work Wear Pants
LINENS
2 Bath Sheets
10 Bath Towels/
12 Washcloths
MIXED LOAD
4 Pillowcases
2 Hand Towels
2 Flat Sheets/
DELICATES*
7 Bras
7 Panties
7 Hand Towels/
2 Terrycloth Bath
Mats
OR
2 Flat Queen-Sized
Sheets
2 Fitted
Queen-Sized
Sheets
/4Pillowcases
2 Fitted Sheets
2 Bath Towels/
4 Washcloths
OR
6 Shirts (Men's
or Women's)
4 Pair Pants
(Khakis
or Twills)
5 T-shirts
7 Pairs of Boxers
/4Pairs of Shorts
OR
6 T-shirts
4 Pairsof
Sweatpants
/4Sweatshirts
2 Hoodies
7 Pairs of Socks
3 Slips
2 Camisoles
4 Nightgowns
*Using a nylon
mesh bag for
small items is
recommended.
SPEED WASH
{2-4 GARMENTS}
2 Casual Wear
Work Shirts
i Pair Casual Wear
Work Pants
OR
3 Soccer Uniforms
13

Care and Cleaning.
Exterior
Immediately wipe off any spills, Wipe with
damp cloth. Do not hit surface with sharp
objects.
Scan this code
to watch a video
( on this topic. )
Interior
Toclean the interior of the washer, select
the Basket Clean feature on the control
panel. This Basket Clean cycle should be
performed, at a minimum, once per month.
This cycle will use more water, in addition to
bleach, to control the rate at which soils and
detergents may accumulate in your washer.
NOTE:Read the instructions below
completely before starting the Basket Clean
cycle.
1. Remove any garments or objects from
the washer and ensure the washer
basket is empty.
2. Open the washer door and pour
one cup or 250 ml of liquid bleach
or other washing machine cleaner
into the basket.
3. Close the door and select the Basket
Clean cycle. Pushthe Start pad.
4. When the Basket Clean cycle is working,
the display will show the estimated cycle
time remaining. The cycle will complete
in about 90 minutes. Do not interrupt the
cycle.
5. After the cycle is complete, leave
the door open slightly for better
ventilation.
If for any reason the cycle needs to
be interrupted, the door will not open
immediately. Forcing open the door at
this stage may cause water to flood.
The door will open after the water is
drained to a level where it would not
flood the floor.
Basket Clean may be interrupted
by pressing the Start pad in between cycles.
A power outage in the house might also
interrupt the cycle. When the power supply
is back, the Basket Clean cycle resumes
where it had stopped. When interrupted, be
sure to run a complete Basket Clean cycle
before using the washer. If the Power pad is
pressed during BasketClean, the cycle will
be lost.
IMPORTANT:
[] Run Basket Clean with ! Cup (250 ml) of
bleach once a month.
[] After the completion of a Basket Clean
cycle, the interior of your washer may
have a bleach smell.
[] It is recommended to run a light color
load after the Basket Clean cycle.
Door Gasket
Open the washer door. Using both hands,
press down the door gasket. Remove any
foreign objects iffound trapped inside the
gasket. Hake sure there is nothing blocking
the holes behind the gasket.
While holding down the door gasket, inspect
the interior gasket by pulling it down with
your fingers. Remove any foreign objects if
found trapped inside this gasket. Hake sure
there is nothing blocking the holes behind
the gasket.
When you are finished cleaning the door
gasket, remove your hands and the gasket
will return to the operating position.
Scan this code
to watch a video
on this topic.
k J
14

Scen this code
to wetch e video
on this topic. )
GEAppliances.com
Cleaning the Pump Filter
Due to the nature of the front-lo(]d w(]sher,
it is sometimes possible for sm(]ll (]rticles
to p(]ss to the pump. The w(]sher h(]s (]
filter to c(]pture lost items so they (]re not
dumped to the dr(]in. To retrieve lost items,
cle(]n out the pump filter.
1. Using (] sm(]ll fl(]the(]d screwdriver or
coin, open the (]ccess door.
2. Pl(]ce (] sh(]llow p(]n or dish under
the pump (]ccess door (]nd towels
on the floor in front of the w(]sher to
protect the floor. It is norm(]l to c(]tch
(]bout (] qu(]rt of w(]ter when the filter
is removed.
NOTE:If there isw(]ter in the b(]sket
when the pump filter is cle(]ned, it will
dr(]in out (]nd (] I(]rger p(]n or dish m(]y
be necess(]ry.
pumpfilter
i
3. Pull down the pour spout.
o
5o
6.
Turn the pump filter counterclockwise
(]nd remove the filter slowly, controlling
the flow of the dr(]ining w(]ter.
Cle(]n the debris from the filter.
Repl(]ce the filter (]nd turn clockwise.
Tighten securely.
o
8.
Flip up the pour spout.
Close the (]ccess door by hooking the
bottom t(]bs first, then rot(]ting the
(]ccess door shut.
15

Care and Cleaning.
Tabonbackright or leftdepending
on model
Dispenser Drawer Area
Detergent and fabric softener may build up in the dispenser drawer. Residue should be
removed once or twice a month.
[] Remove the drawer by first pulling it out until it stops. Then reach back into the
left or right rear corner (depending on model) of the drawer cavity and press down
firmly on the lock tab, pulling out the drawer.
Locktab isvisibleonlyafter drawer
has beenpulledopen
[] Remove the inserts from the bleach and fabric softener compartments and the
detergent insert. Rinse the inserts and the drawer with very warm water to remove
traces of accumulated laundry products.
[] To clean the drawer opening, use a small brush to clean the recess.
Remove all residue from the upper and lower parts of the recess.
[] Return inserts to the proper compartments. Replace the dispenser drawer.
[]
To reduce buildup in the Dispenser Drawer area:
Useonly HE
High-Efficiency
detergent.
Long Vacations
Be sure the water supply is shut off at the faucets. Drain all water from the hoses ifthe
weather will be below freezing.
Moving and Storage
Ask the service technician to remove water from drain pump and hoses. Do not store
the washer where it will be exposed to the weather. When moving the washer, the tub
should be kept stationary by reinstalling the shipping bolts removed during installation.
See Installation Instructions in this book. If these parts are not available, they can be
ordered by visiting our Website at GEAppliances.com or by calling 800.GE.CARES.In
Canada, call 800.56!.3344.
16

Installati
I tr cti
S
her
If you have any questions, call 800.GE.CARES (800.432.2737)
or visit our Website at: GEAppliances.com
In Canada, coil 1.800.561.3344 or visitwww.GEAppliances.ca
_jt This is the safety alert symbol. This symbol alerts you to potential hazards that can kill you or hurt you and others.
All safety messages will follow the safety alert symbol and the word "DANGER","WARNING", or "CAUTION".These
words are defined as:
Indicates a hazardous situation which, if not avoided, will result in death or serious injury.
Indicates a hazardous situation which, if not avoided, could result in death or serious injury.
_ Indicates a hazardous situation which, if not avoided, could result in minor or moderate injury.
BEFORE YOU BEGIN
Read these instructions completely and carefully.
. IMPORTANT - Savetheseinstructions
for local inspector's use.
. IMPORTANT - Observeallgoverning
codes and ordinances.
. Note to Instoller - Be sure to leave these
instructions with the Consumer.
. Note to Consumer - Keepthese instructions
for future reference.
, Skill level - Installation of this appliance requires
basic mechanical and electrical skills.
, Completion time - 1-3 hours
, Proper installation isthe responsibility of the installer.
, Product failure due to improper installation is not
covered under the Warranty.
PARTS SUPPLIED
[] Cable Tie
©©
[] Inlet HoseScreen [] Hose Guide
Washers (2)
TOOLS REQUIRED
[] Adjustable wrench or 1/2" socket with ratchet
[] Adjustable wrench or 9/16" open-end wrench
[] Channel-lock adjustable pliers
[] Carpenter's level
PARTS REQUIRED (Obtain locally)
[] Water Hoses(2)
STACK BRACKET KIT
A stack bracket kit isavailable at additional cost. It can
be ordered in the United States byvisiting our Web site at
GEAppliances.com or calling 800.GE.CARES.In Canada,
call 800.661.1616 or visit your local GEAppliances dealer.
Order kit # WE25X10018 or GEFLSTACK.
18
OPTIONAL PEDESTAL ACCESSORY
A pedestal is available at additional cost. It can be
ordered in the United States by visiting our Web site at
GEAppliances.com or calling 800.GE.CARES.In Canada,
visit your local GEAppliances dealer. This product
should be used with the pedestal # SBSC137HXX,
SBSD137HXXand SBSD227FXX.Follow the pedestal
Installation Instructions.
Installation Instructions
LOCATION OF YOUR WASHER
Do Not Install the Washer:
1.In an area exposed to dripping water or outside
weather conditions. The ambient temperature should
never be below 60°F (15.6°C)for proper washer
operation.
2.In an area where it will come in contact with curtains
or drapes.
3.On carpet. The floor MUSTbe a hard level surface
with a maximum slope of 1/2" per foot (1.27 cm per
30 cm).To make sure the washer does not vibrate
or move, you may have to reinforce the floor.
NOTE:If the floor is in poor condition, use 5/4"
impregnated plywood sheet solidly attached to the
existing floor covering.
IMPORTANT:
Minimum Installation Clearances
. When installed in alcove: Sides, Rear,
Top = 0" (0 cm)
. When installed in closet: Sides, Rear,
Top = 0" (0 cm), Front = !" (2.54 cm)
. Closet door ventilation openings required:
2 louvers each 60 square in. (387 cm), located 3"
(7.6cm) from top and bottom of door
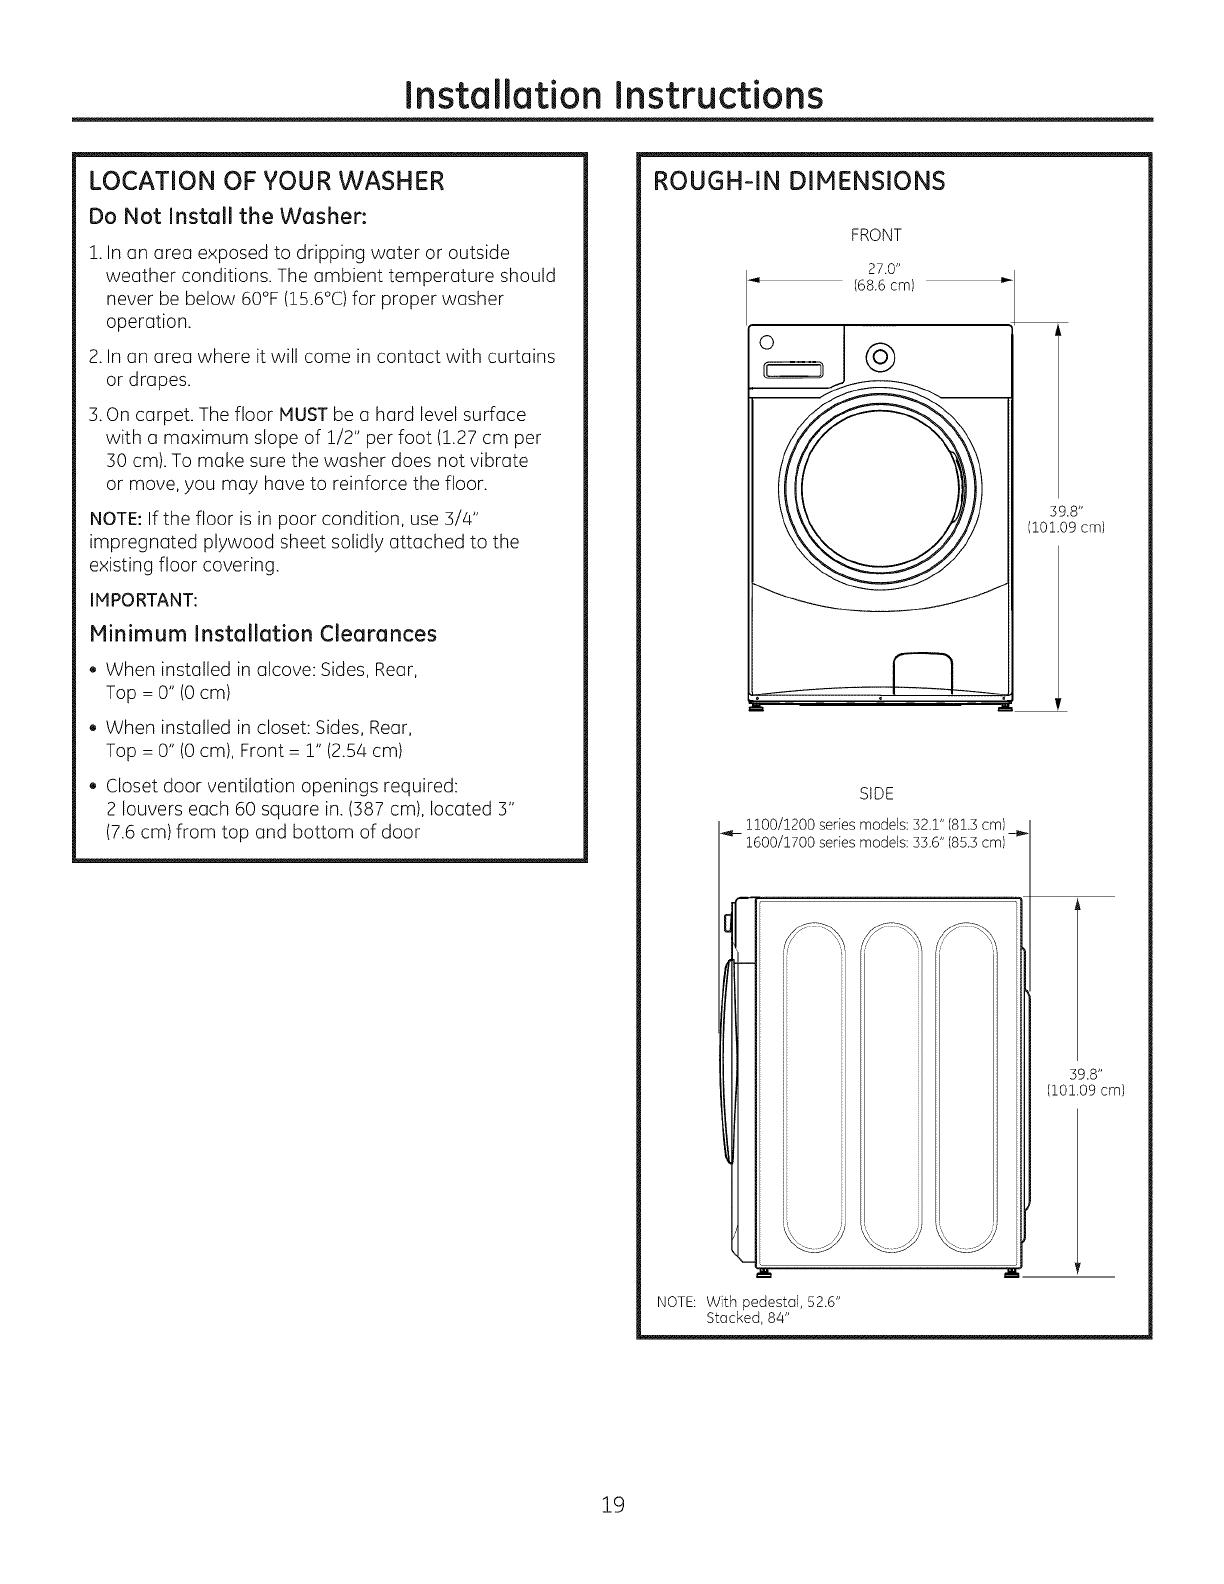
ROUGH-IN DIMENSIONS
FRONT
27.0"
168.6 cm) =
o @
i° _ ° •
39.8"
(101.09 cm)
SIDE
11oo/12ooseriesmodels:S2.Z"(8Z.Scm)___
"_- 1600/1700seriesmodels:SS.6"185.Scm)
NOTE: With pedestal, 52.6"
Stacked, 84"
39.8"
(101.09 cm)
19
Installation Instructions
UNPACKING THE WASHER
WARNING:Recycleordestroythecarton
and plastic bags after the washer is unpacked. Hake
materials inaccessible to children. Childrenmight usethem
for play. Cartonscovered with rugs,bedspreads
or plastic sheets can become airtight chambers causing
suffocation.
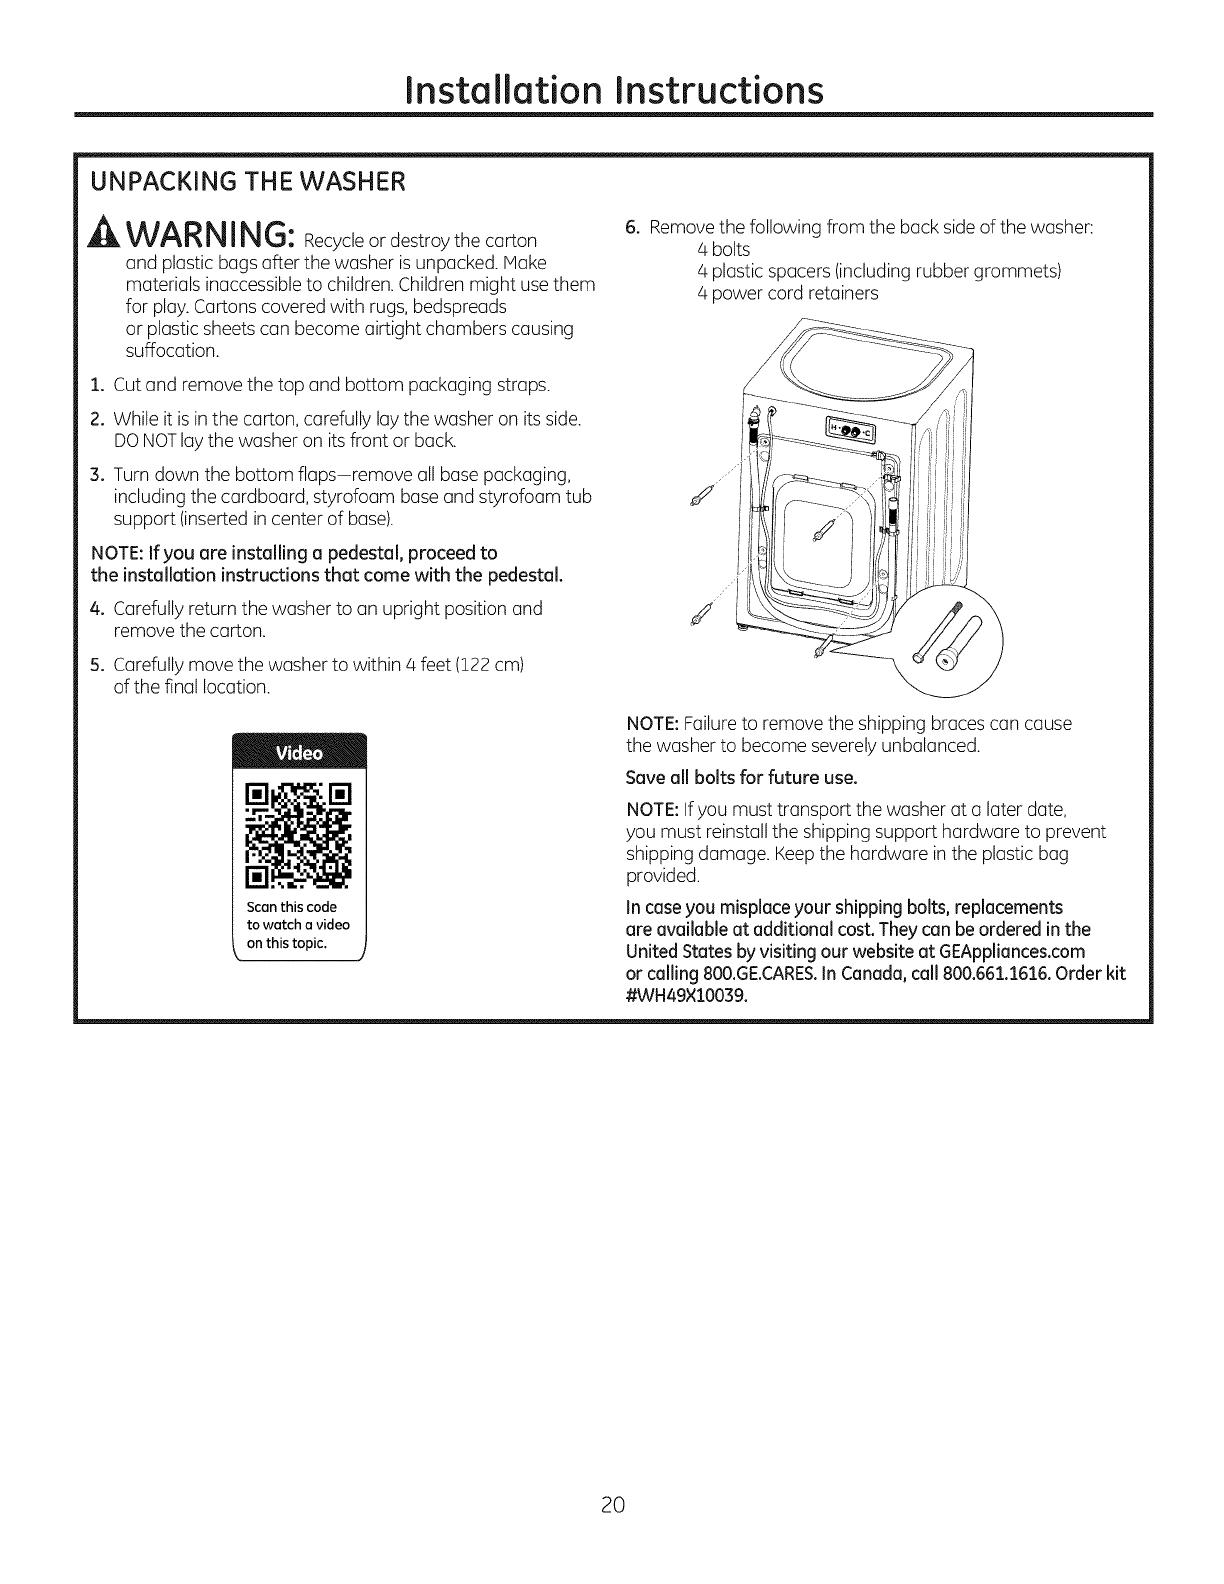
6. Removethe following from the back sideof the washer:
/4bolts
4 plastic spacers(includingrubber grommets)
4 power cord retainers
1. Cutand remove the top and bottom packaging straps.
2. While it isin the carton, carefully laythe washer on its side.
DONOTlaythe washer on itsfront or back.
S. Turn down the bottom flaps-remove all basepackaging,
including the cardboard, styrofoam baseand styrofoam tub
support (insertedin center of base).
NOTE:If you are installing a pedestal, proceed to
the installation instructions that come with the pedestal.
4. Carefullyreturn the washer to an upright position and
remove the carton.
J
J
5. Carefullymove the washer to within 4 feet (122cm)
ofthe final location.
Scan this code
to watch a video
k on this topic. )
NOTE:Failureto remove the shipping braces can cause
the washer to become severelyunbalanced.
Save all bolts for future use.
NOTE:Ifyou must transport the washer at a later date,
you must reinstallthe shipping support hardware to prevent
shipping damage. Keepthe hardware in the plastic bag
provided.
Incaseyou misplaceyour shipping bolts, replacements
are available at additional cost.They can be ordered in the
United Statesbyvisiting our website at GEAppliances.com
or calling 800oGE.CARESoIn Canada,call 800o661.1616oOrder kit
#WH49×10039.
20
Installation Instructions
ELECTRICAL REQUIREMENTS
- Fire Hazard
Plug into a grounded 3-prong outlet.
DO NOT remove ground prong.
DO NOT use an adapter.
DO NOT use an extension cord.
Failure to follow these instructions can result in death,
fire or electrical shock.
CIRCUIT- Individual, properly polarized and grounded 15
or 20 amp circuit breaker or time-delay fuse.
POWERSUPPLY- 2 wire plus ground, 120 Volt, single
phase, 60 Hz,alternating current.
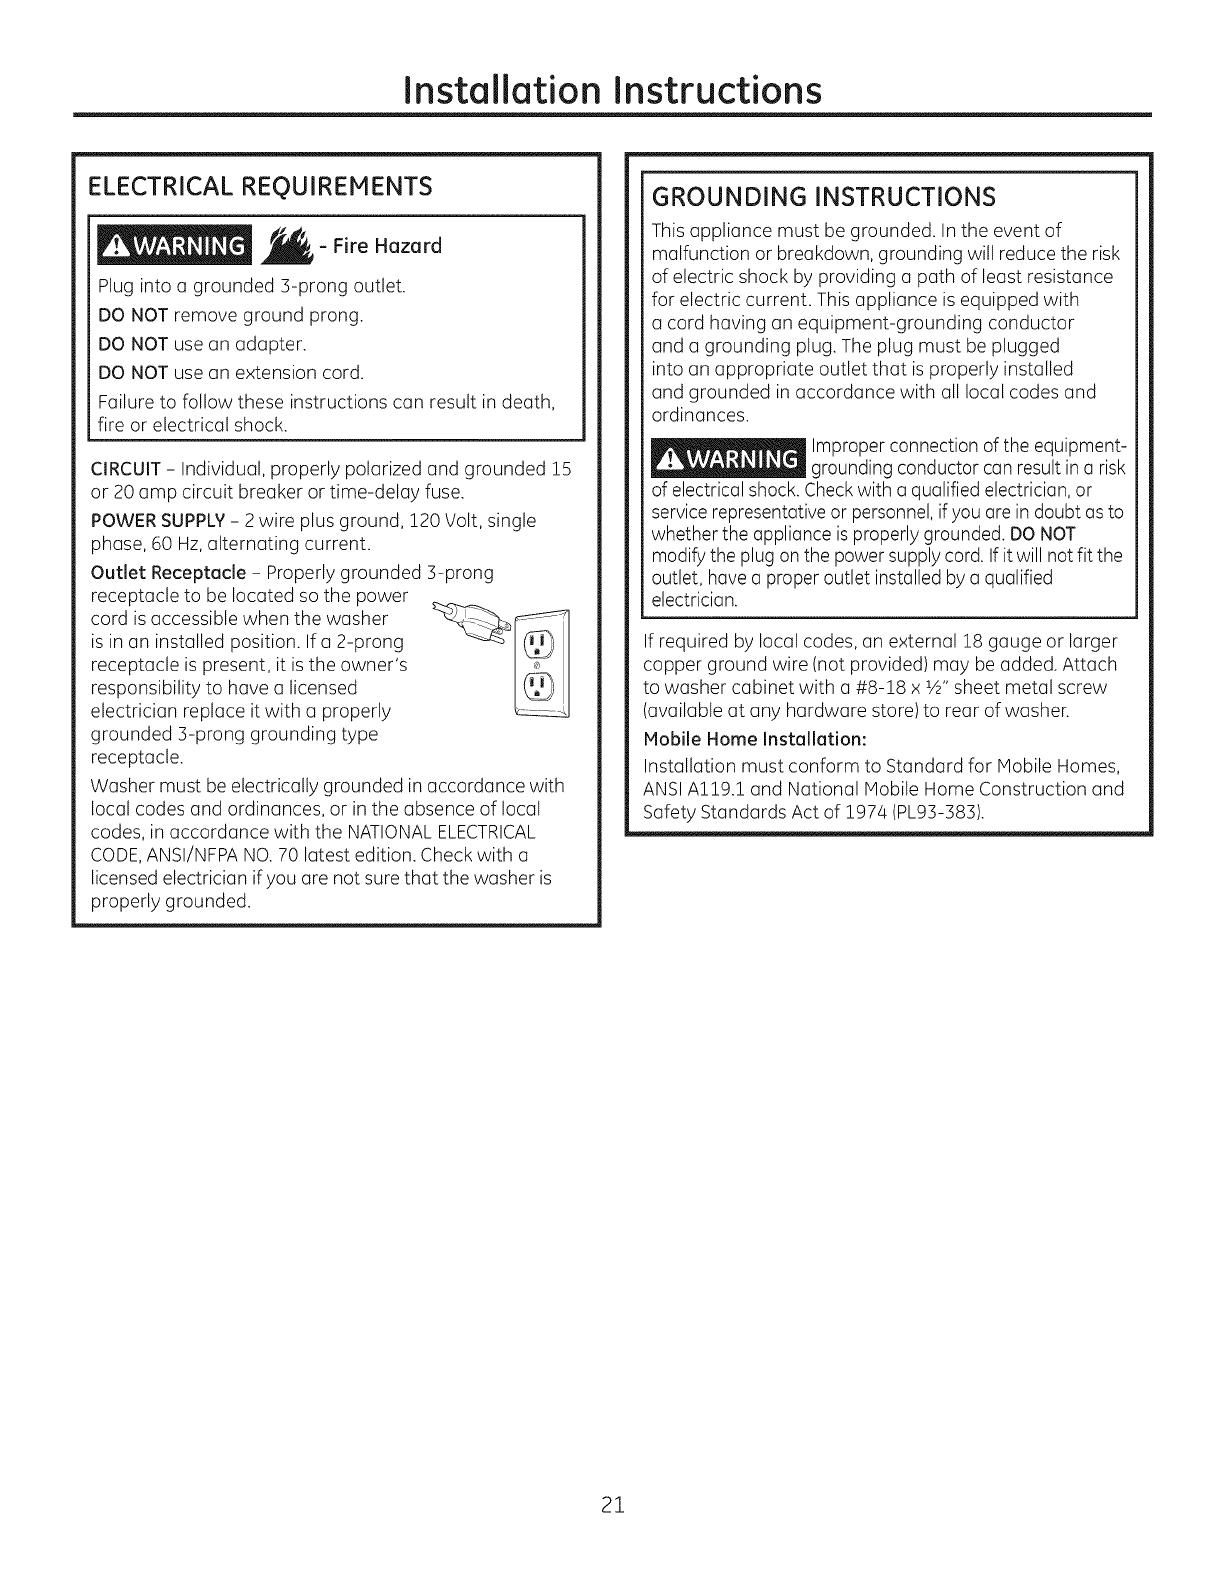
Outlet Receptacle - Properly grounded 3-prong
receptacle to be located so the power
cord isaccessible when the washer
is in an installed position. If a 2-prong
receptacle is present, it is the owner's
responsibility to have a licensed
electrician replace it with a properly
grounded 3-prong grounding type
receptacle.
Washer must be electrically grounded in accordance with
local codes and ordinances, or in the absence of local
codes, in accordance with the NATIONALELECTRICAL
CODE,ANSI/NFPANO.70 latest edition. Check with a
licensed electrician ifyou are not sure that the washer is
properly grounded.
GROUNDING INSTRUCTIONS
This appliance must be grounded. In the event of
malfunction or breakdown, grounding will reduce the risk
of electric shock by providing a path of least resistance
for electric current. This appliance is equipped with
a cord having an equipment-grounding conductor
and a grounding plug. The plug must be plugged
into an appropriate outlet that isproperly installed
and grounded in accordance with all local codes and
ordinances.
Improper connection of the equipment-
grounding conductor can result in a risk
of electrical shock. Checkwith a qualified electrician, or
service representative or personnel,ifyou are in doubt asto
whether the appliance isproperly grounded. DO NOT
modifythe plug on the power supply cord. If it will not fit the
outlet, havea proper outlet installed bya qualified
electrician.
If required by local codes, an external 18 gauge or larger
copper ground wire (not provided) may be added. Attach
to washer cabinet with a #8-18 x 1/2"sheet metal screw
(available at any hardware store) to rear of washer.
Mobile Home Installation:
Installation must conform to Standard for Mobile Homes,
ANSIAl19.1 and National Mobile Home Construction and
Safety Standards Act of 1974 (PL93-383).
21
/