Page is loading ...

fSave This Manual "_
For Future Reference
MODEL NO.
113o179430
8-GALLON
WET/DRY VAC
Serial
Number
Model and serial numbers
may be found on the motor
cover.
You should record both
model and serial number in
a safe place for future use.
CAUTION:
READ ALL
INSTRUCTmONS
CAREFULLY
iNSULATED
VAC
• assembly
® operating
e repair parts
Sold by SEARS, ROEBUCK AND CO., Chicacjo, IL 60684 USA.
Part No. SP5241 Ptin_d i_1 q ":_

FULL ONE YEAR WARRANTY ON CRAFTSMAN WET-DRY VACS
ifwithin one year from the date of purchase, this Craftsman Wet-Dry Vac fails due to a defect
in material or workmanship, Sears will repair it, free of charge.
WARRANTY SERVICE IS AVAILABLE BY SIMPLY CONTACTING THE NEAREST SEARS SERV-
ICE CENTER/DEPARTMENT THROUGHOUT THE UNITED STATES.
This warranty applies only while this product is used in the United States.
This warranty gives you specific legal rights, and you may also have other rights which
vary from state to state.
SEARS, ROEBUCK AND CO., Dept. 698/731A, Sears Tower, Chicago, IL 60684
iMPORTANT SAFETY INSTRUCTIONS
When using your Wet/Dry Vac. follow basic safety pre-
cautions including the following,
WARNING - To reduce the risk of fire,
electric shock, or injury:
Read and understand this owner'smanual and alllabels
on the Wet/Dry Vac before operating. Use only as de-
scribed inthis manual. To avoid personal injury or dam-
age to Wet!Dry Vac, use only Sears Craftsman recom-
mended accessories.
Sparks inside the motor can ignite flammable vapors
or dust. To avoid fire or explosion:
® Do not vacuum, or use thisWet/Dry Vac near,flarnm-
able or combustible liquids,gases, or explosive dusts
like gasoline or other fuels, lighter fluid, cleaners
oil-based paints, natural gas, hydrogen, coal dust.
magnesium dust, grain dust. or gun powder.
• Do not use Wet/Dry Vac as a sprayer for any flamm-
able or combustible liquid.
Do not vacuum anything that is burning or smoking,
such as cigarettes, matches, or hot ashes.
To avoid health hazards from vapors or dusts, do not
vacuum toxic materials.
Do not use or store near hazardous materials.
To avoid electric shock, do not expose to rain. Store
indoors.
Do not allow to be used as a toy. Close attention is
necessary when used by or near children.
Do not use this WeVDry Vac with a torn filter or without
the filter installed except for vacuuming liquids as de-
scribed in the operations section of this manual.
Do not leave Wet/Dry Vac when plugged in. Unplug
from outlet when not in use and before servicing. Turn
off WeVDry Vac before unplugging.
To avoid injury from accidental starting, unplug power
cord before changing or cleaning filter,
Do not unplug by pulling on cord. To unplug, grasp the
plug, not the cord.
Do not use with damaged cord, plug or other parts. If
your WeVDry Vac is not working as it should, has
SAVE THESE
missing parts has been dropped, damaged, left out-
doors, or dropped into water, return itto a Sears Service
Center.
Do not pull or carry by cord, use cord as handle, close
a door on cord, or pull cord around sharp edges or
corners. Do not run Wet!Dry Vac over cord. Keep cord
away from heated surfaces.
Do not handle plug or theWet/DryVac with wet hands.
Do not put any object into ventilation openings. Do not
vacuum with any ventilation openings blocked; keep
free of dust, lint. hair or anything that may reduce air
flow.
Keep hair, loose clothing, fingers, and all parts of body
away from openings and moving parts.
To avoid falls, use extra care when cleaning on stairs.
This Wet/Dry Vac is double-insulated, eliminating the
need for a separate grounding system. Use onty iden-
tical replacement parts. Read the instructions for Servic-
ing Double-Insulated Wet/Dry Vacs before servicing.
Extension cords in poor condition or that are too small
can pose fire and shock hazards. When using an exten-
sion core, be sure it is in good condition. Using any
extension cord will cause some loss of power. To keep
the loss to a minimum, use the table below to choose
the minimum wire size extension cord.
Extension Cord Length Wire Size
e O-50feet No. !4
e 50-100 feet No. 12
Observe the following warnings that appear on the
motor housing of your Wet/Dry Vac.
_] DOUBLE INSULATED. GROUNDING NOT
REQUIRED. WHEN SERVICING USE
ONLY IDENTICAL REPLACEM ENT PARTS
WARNING: TO AVOID ELECTRIC SHOCK--DO NOT
EXPOSE TO RAIN--STORE INDOORS
WARNING: FOR YOUR OWN SAFETY, READ AND
UNDERSTAND OWNER'S MANUAL. DO NOT PICK
UP TOXIC OR FLAMMABLE MATERIALS, HOT
ASHES OR COALS. DO NOT USE AROUND EXPLO-
SiVE LIQUIDS OR VAPORS.
INSTRUCTIONS

The operation of any utility vac can result in foreign
objects being blown into the eyes, which can result in
severe eye damage, Always wear safety goggles com-
plying with ANSI Z87.1 (shown on Package) before com-
mencing operation. Safety Goggles are available at
Sears retail or catalog stores.
WEAR YOUR
mNTRODUCTION
This Wet/Dry Vac is intended for either commercial or
household use.
IMPORTANT NOTE
Please Read CarefulUy
Static Shocks Are Common -- In dry areas or when
the relative humidity of the air is low. To reduce the
frequency of static shocks inyour home the best remedy
is to add moisture to the air with a console or installed
humidifier.
OWNERS MANUAL CONTENTS
Item Page
Warranty information ....................... 2
Safety Instructions ......................... 2
Introduction ............................... 3
Unpacking and Checking Carton Contents ...... 3
Assembly ................................ 4
Operation ................................ 7
Maintenance .............................. 9
Repair Parts ............................. 11
Unpacking and Checking
Carton Contents
Remove entire contents of carton. Check each item
against the Carton Contents List. Notify your Sears
Store immediately ifany parts are damaged or missing.
Carton Contents List
Key Description Qty.
A Vac Assembly ...................... 1
B Hose Assembly ..................... !
C Rectangular Nozzle .................. 1
D Filter .............................. !
E Filter Plate ......................... !
F Filter Nut .......................... 1
G Float .............................. 1
H Cage ............................. 1
I Caster Foot ........................ 4
J Caster ............................ 4
A
float/cage assembly
WARNING: For your own safety never connect plug
to power source outlet untinaH assembly steps are
complete and you have read and understood the
safety and operation instructions. Do not operate
vac with any parts damaged or missing.
Remove top section of the vac from the drum by
lifting lid up out of the carton. Place the top section
of vac upside down into the drum or on a clean
smooth surface.
VACUUM
J
VAC
!J /_- ASSEM BLY

assembly
2. Locate the float. Place the float into the float tunnel
with the words 'q'his Side Towards Lid" laying face
down on the lid.
WARNING: BE SURE TO KEEP HANDS, FINGERS,
OR ANY OTHER FOREIGN OBJECTS OUT OF
FLOAT TUNNEL WHEN ASSEMBLING THE FLOAT
TO AVOID iNJURY OR DAMAGE TO VAC.
LiD
\
3. Line up cage tabs to the slots in the float tunnel of
the lid assembly.
4. Push on the cage until the tabs snap into the slots
for a secure fit.
EZ2Z
TABS (3) -"-'-"-"'-_
SLOTS (3) _
NOTE: If the cage needs to be removed, because the
float isplaced in the wrong way use a slotted screwdriver
and apply the slotted end to one of the cage tabs. Push
in on the tab and Iift the cage up. Tilt the cage slightly
away from the open slot to release the other two tabs.
Pull the cage away from the lid. To replace follow float
cage assembly instructions.

fimter assembmy
1, Carefully put the filter onto the cage by sliding it over
the lip covering the 3 slots until it rests on the shoul-
der.
2. Place the hole of the filter plate over threaded screw
of the cage.
3. Gently push on the filter plate in order for the rubber
ring of the filter to seat inside the circular channel
of the filter plate.
4. Place filter nut onto threaded screw and tighten it
down. Finger tight only.
NOTE: Lever of nut should be away from plate as
shown.
CAUTION: Do not overtighten as this will cause
deformation or cracks in the filter plate or cage.
Nut lever should be away from plate.
q
I
PLATE
CAGE

caster/caster foot assembly
1. Turn the dust drum upside down on the floor.
2. Insert the caster feet into the bottom of drum, as
shown. (4 places)
3. Push on the caster foot until the foot is flush with
bottom of the dust drum.
4. Insert the caster stem into the socket of the caster
foot, as shown. (4 places)
5. Push on the caster until the ball on the caster stem
is inserted all the way into the socket. You will be
able to hear the ball snap into the socket and the
caster will swivel easily when positioning is correct.
6. Turn the drum upright.
NOTE: If your casters are noisy you may put a drop of
oil on the roller shaft to make them quieter.
CASTER STEM
CASTER
SOCKE1
CASTER
FOOT
HOLE
CASTER
PIN
NOTE: If the occasion should arise the hose adaptor
can be removed from the hose. This could be done by
a twisting and pulling action of the adaptor from the
hose.
HOSE
ADAPTER HOSE
vac assembly
1. Line up diverter of top portion of vac with the vacuum
inlet of the dust drum.
2. The handles with flexible latches inside are to be
positioned to the locking tabs on the drum. Press
down on the handles until the flexible latches snap
onto the tabs on the drum.
NOTE: Latches will not snap on if top portion of vac
assembly is on backwards.
3. Push flexible end into vacuum inlet of dust drum.
4. Put retangular nozzle onto end of hose.
FLEXIBLE
LATCHES
TOP
HANDLE
LOCKING
TAB
DIVERTER
DUST DRUM
INLET

parts and features
1. Familiarize yourself with the controls and features
of your vac.
CORD WRAP
AND HANDLE
ON OFF
SWITCH
LOCKING
TABS
FLEXIBLE
LATCHES
DUST DRUM
t
\
\
CORD
VACUUM
PORT
x
\
/
HOSE
CASTERS
RECTANGULAR
NOZZLE
operations
WARNING
To avoid fire or explosion caused by the igniting
of vapors or dust due to the arcing of the motor
brushes, do not operate this vac in areas with
flammable vapors such as lighter fluid, cleaners,
oil-base paints, gasoline, alcohol or explosive dust
such as coal, magnesium, grain or gun powder
in the air. Do not vacuum explosive dust, flamma-
ble or combustible liquids or hot ashes. Do not
use this vac as a sprayer for any flammable or
combustible liquid. To avoid health hazards from
vapors or dusts, do not vacuum toxic materials.
To avoid electrical shock do not expose to rain.
Store vac indoors. Unplug power cord before
changing or cleaning filter or emptying the dust
drum.
VACUUMING DRY MATERIALS
1. The filter must be in correct position at all times to
avoid leaks and possible damage to vac.
2. When using your vac to pick up very fine sawdust
from drywall type material it will be necessary for
you to empty the drum and clean the filter at more
frequent intervals to maintain peak vac performance.
NOTE: A dry filter is necessary to pick up dry material.
If you use your vac to pick up dust when the filter is
wet, the filter will clog quickly and be very difficult to
clean.
3. If your filter is wet but you need to use the vac to
pick up dry material, you can quickly dry the filter
by running the vac without hose attached for 10
minutes. The clean air rushing through the vac will
dry the filter enough for dry pick up.
VACUUMING LiQUiDS
1. When the liquid in the drum reaches apredetermined
level, the vac which is equipped with a float
mechanism which will rise automatically to cut off
airflow. When the float has risen, turn off the vac,
unplug the power cord, and empty the drum.
2. After using the vac to pick up liquids, the filter must
be dried to avoid possible mildew and damage to
the filter.
3. When picking up small amounts of liquid the filter
may be left in place.
4. When picking up large amounts of liquid we recom-
mend that the filter be removed. If the filter is not
removed, it will become saturated and misting may
appear in the exhaust air from the handles.
CAUTION: To avoid damage to the vac do not run
motor with float in up position.
NOTE: You will know that the float has risen because
vac airflow ceases and the motor noise witl become
higher in pitch--due to increase in the motor speed.

EMPTYING THE DRUM
WARNING: TO AVOID INJURY FROM ACCIDENTAL
STARTING, UNPLUG POWER CORD BEFORE EMP-
TYING THE DRUM.
1. Remove top portion of the vac.
2, Dump the drum contents into the proper waste dis-
posal container. Dump drum contents opposite the
vacuum inlet to avoid spillage.
VACUUM
INLET
VACUUM
DRUM
WASTE DISPOSAL __
CONTAINER _'--_f
CORD USE iNSTRUCTIONS
This vac comes with a double-insulated motor which
allows the cord to plug in all receptacles. Be sure to
have cord pulled completely off the cord wrap in order
to vacuum maximurn area. If more cord is needed use
the proper gauge w!reextension cord.
CAUTION: Do not run over cord with vacuum nor
step on cord while vacuuming. This could cause
plug to be pulled from outlet causing electrical or
fire hazard.
CORD WRAP
The cord wrap provided on this vac enables you to
wrap the cord for easy storage when not in use,
MOVING THE MAC
1. To avoid dropping the vac due to latch release or
part breakage, pick the vac up by the lip of the dust
drum,
2, DO NOT pick the vac up by the lid handles. For short
transportation the cord wrap (not cord) can also be
used for carrying the vac when the drum is empty.
CAUTION: Do not use the cord wrap or handles for
carrying when vac contains debris Dr liquid be-
cause the weight may cause a separation of lid and
drum, which could cause part breakage. Instead,
roll the vac on it's casters or pick it up by the drum
lip,
CORD
CORD
WRAP
LID

fi ter maintenance
WARNING: TO AVOID _NJURY FROM ACCIDENTAL
STARTING, UNPLUG POWER CORD BEFORE
CHANGING OR CLEANUNG FILTER.
NOTUCE: This fi_ter is made of high quality paper de-
signed to stop very small particles of dust. The fiiter
can be used for wet or dry pick up. Handle the filter
carefuliy when removing to clean or installing it. Creases
in the filter pleats may occur from insta!tation but
creases will not affect the performance of the fitter.
Re_ova_
To remove tlne old fiite_ for cle_.ning or repiaceme_t:
1. Remove the nut from the threaded screw on the fiker
and, iift the fiiter off the cage.
OAU'TION: To avoid damage to the blower wheel,
aJways reinstall the filter before using the vae for
debris pick up.
Installation
To ensure a proper seal, clean the lid area where the
filter will set. Slide the new filter over the cage. Replace
plate then run nut down threads finger tight only. Do
not overtighten as this wilt cause deformation or cracks
in the filter. (See pg. 5)
WARNING: DO NOT REMOVE THE FILTER CAGE,
IT _S THERE TO HELP PREVENT YOUR FINGERS
FROM GETTING INTO THE BLOWER WHEEL.
Cleaning
Your filter should be cleaned often to maintain peak
vac performance.
NOTE: Be sure to dry the filter before storing or picking
up dry debris.
Dry Filter
1. Some removal of dry debris can be accomplished
without removing the filter from the vac by slapping
your hand on top of the lid while the vac is off.
2. After filter removat from vac. remove the dry debris
by gently tapping the filter against the inside wai! of
your waste container and the debris wili loosen and
fal!,
NOTE: For best resuits of cteaning due to accumu ated
dust, clean the filter in an open area, Cleaning SHOULD
be done outdoors and not in the living quarters
3. For thorough c;eaning of dry filter with fne dust (no
debris) you may run water through it as descr bed
under Wet Fi!ter cleaning,
Wet Filter
After filter is removed a wet filter should be cleaned by
running water through it from a hose or spigot, TaKe
care that water pressure from the hose is not strong
enough to damage [he fiiter.
iMPORTANT: You can quickly dry the filter by runnir_g
the vac without the hose assembly attached for approx-
imately 10 minutes with filter in place to speed up dry ng.
Check the filter for tears or small holes. Even a sina!!
hole can cause a !or of dust to come out of you vac
Do not use a filter with hoies or tears in it. Replace it
_mmediately.
WET/D RY VAC
MAINTENANCE
CLEANING UD ASSEMBLY
To keep your Wet!Dry Vac looking its best, clean the
outside with a cloth dampened with warm water and
miid soap.
CLEANING DRUM
Dry dirty interior
1. Dump debris out.
2. Wash drum thoroughly.
Wet dirty interior
1. Dump debris out.
2. For sanitary reasons, never leave wet debris in vac
drum after use.
3. The drum can be thoroughly washed by scrubbing
when filled with warm soapy water.
_MPORTANT!--To assure product SAFETY and RELIA-
BILITY. repairs and adjustment should be performed
by Sears Service Centers, always using Sears replace-
ment parts.

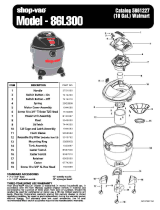
PARTS LiST FOR 8 GALLON WL=T/DRY VAC
MODEL NO. 113.17_,.30
14
!
10

PARTS LIST FOR 8 GALLON WET/DRY VAC
MODEL NO, 113.179430
Always order by Part No. -- Not by Key No.
Key! Part Description
No. No.
73362
9-17816
73317
73316
817466
73324
9-17820 t
9-16922 ±
73164
73137
73348
STD611007 *
1
2
3
4
5
6
7
8
9
10
11
12
Cage, Filter
Filter Assembly
Plate, Filter
Nut, Filter
Drum, Dust
Adapter, Hose
Hose
Nozzle, Rectangular
Foot, Caster
Caster
Deflector
Screw, Pan Cross Type
"AB" No. 10x3/4
Key I Pa_
No. No.
=======_
13 73349
14 73379
15 73352
16 815223-3
17 818079
18 73370
19 814948-1
20 817987-4
21 73353
-- SP5241
Description
Float
Lid Assembly
Nut, Hex Flange 1/4-20
Wheel, Blower
Motor Assembly
(Includes Key Numbers
15&t6)
Switch
Gasket-Motor
Collector Assembly
Cover Assembly, Motor
Manual, Owners
(Not Illustrated)
* Standard Hardware Item--May Be Purchased Locally.
I- Stock Item - May be secured through the hardware Department of most Sears retail stores or catalog order houses.
SERViCiNG OF DOUBLE-INSULATED WET/DRY VAC
In a double-insulated Wet/Dry Vac, two systems of insulation are provided instead of grounding, No grounding
means is provided on a double-insulated appliance, nor should a means for grounding be added. Servicing a
double-insulated Wet/Dry Vac requires extreme care and knowledge of the system, and should be done only by
qualified service personnel. Replacement parts for a double-insulated Wet/Dry Vac must be identical to the parts
they replace. Your double-insulated WettDry Vac is marked with the words "DOUBLE INSULATED" and the symbol
[_ (square within a square) may also be marked on the appliances.
tt

f
SERVICE
MODEL NO.
!13.!79430
8-GALLON
WET/DRY VAC
HOW TO ORDER
REPAIRPARTS
DRY VAC
Now that you have purchased your 8-gallon Wet!Dry Vac,
should a need ever exist for repair parts or service, simply
contact any Sears Service Center and most Sears, Roebuck
and Co, stores. Be sure to provide all pertinent facts when
you call or visit.
Model and serial number may be found on the Motor Cover
of your Wet/Dry Vac.
WHEN ORDERING REPAIRPARTS,ALWAYS GIVE THE FOLLOWING
INFORMATION:
PARTNUMBER
PARTDESCRIPTION
MODEL NUMBER
t13,179430
NAME OF ITEM
WET/DRYVAC
All parts listed may be ordered from any Sears Service Center
and most Sears stores. If the parts you need are not stocked
locally, your order will be electronically transmitted to a Sears
Repair Parts Distribution Center for handling.
Sold by SEARS, ROEBUCK AND CO., Chicago, IL 60684 U.S.A.
Part No. SP524'i Form No. SP5241-'i Printed in U.SA. 12/89
/